


开发前的准备
1. 设置授权回调域名
关于授权的说明,见下面开发文档的截图

重点在
- 设置时不能以http://等协议开头
- 必须是全域名,不可以是二级域名或是某个文件
在这里我使用的微信的测试号

注册后点击修改上面红框,设置域名即可。
同时我们需要授权回调可以回调到我们自己的电脑,这就需要用到内网穿透,本人使用的是NATAPP,这样就能在开发环境下让微信能访问到我们的域名。
第一步:用户同意授权,获取code

其中种的参数具体可以见官方文档,主要来看下redirect_uri。
这个参数所填的是授权后重定向的回调链接地址。我们访问url后会自动转发到这个链接并且将我们需要的code以及拼接url中的state的值作为参数。这个redirect_uri的值就是我们controller的位置。
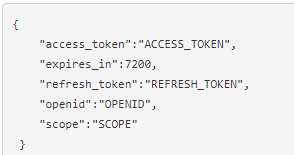
第二步:通过code换取网页授权access_token

该地址会返回一个Json数据包,其中就包含着重要的openid
使用第三方SDK实现获取openid
熟悉了上面的流程,如果已经有轮子了,我们没有必要再自己去实现。这里我使用的是WxJava - 微信开发 Java SDK(开发工具包),它的功能非常全。
- 引入依赖
<dependency>
  <groupId>com.github.binarywang</groupId>
  <artifactId> weixin-java-mp</artifactId>
  <version>3.5.0</version>
</dependency>- 构造网页授权url,然后构造超链接让用户点击
前端调用/wechat/authorize来获取授权后重定向的回调链接地址,下面是代码
1. 定义WechatAccountConfig来获取配置文件种的appId和appSecret
@Data
@Configuration
@ConfigurationProperties(prefix = "wechat")
public class WechatAccountConfig {
    private String mpAppId;

    private String mpAppSecret;
}
2. 使用WechatAccountConfig来创建Bean(WxMpConfigStorage和WxMpService)
WxMpConfigStorage是一个接口,它的子类WxMpDefaultConfigImpl是微信客户端配置存储.
WxMpService也是一个接口,它的子类WxMpServiceImpl就是微信公众号API的Service。构造oauth2授权的url连接的方法就再其中。
@Configuration
public class WechatMpConfig {

    @Autowired
    private WechatAccountConfig accountConfig;

    @Bean
    public WxMpService wxMpService(){
        WxMpService wxMpService = new WxMpServiceImpl();
        wxMpService.setWxMpConfigStorage(wxMpConfigStorage());
        return wxMpService;
    }

    @Bean
    public WxMpConfigStorage wxMpConfigStorage(){
        WxMpDefaultConfigImpl wxMpConfigStorage = new WxMpDefaultConfigImpl();
        wxMpConfigStorage.setAppId(accountConfig.getMpAppId());
        wxMpConfigStorage.setSecret(accountConfig.getMpAppSecret());
        return wxMpConfigStorage;
    }
}
3. 创建Controller并定义方法,调用WxMpService的oauth2buildAuthorizationUrl方法构造oauth2授权的url连接
@Controller
@RequestMapping("/wechat")
@Slf4j
public class WechatController {

    @Autowired
    private WxMpService wxMpService;

    final String url = "http://mysell.nat200.top/sell/weixin/userInfo";
    @RequestMapping("/authorize")
    public String authorize(@RequestParam("returnUrl") String returnUrl){
        //构造oauth2授权的url连接.
        //参数一:用户授权完成后的重定向链接,无需urlencode, 方法内会进行encode
        //参数二:scope
        //参数三:state,重定向后会带上state参数
        String redirectUrl = wxMpService.oauth2buildAuthorizationUrl(url,
                WxConsts.OAuth2Scope.SNSAPI_USERINFO, URLEncoder.encode(returnUrl));
        return "redirect:" + redirectUrl;
    }
}
当用户同意授权后,会回调所设置的url并把authorization code传过来,然后用这个code获得access token,其中也包含用户的openid等信息
4. 编写使用code获取openId的Controller方法
    @RequestMapping("/userInfo")
    public String userInfo(@RequestParam("code") String code,
                        @RequestParam("state") String returnUrl){
        WxMpOAuth2AccessToken wxMpOAuth2AccessToken = new WxMpOAuth2AccessToken();
        try {
            // 用code换取oauth2的access token,openId等信息
            wxMpOAuth2AccessToken = wxMpService.oauth2getAccessToken(code);
        } catch (WxErrorException e) {
            log.error("【微信网页授权】{}",e);
            throw new SellExeception(ResultEnum.WX_MP_ERROR.getCode(),e.getError().getErrorMsg());
        }

        String openId = wxMpOAuth2AccessToken.getOpenId();
        //拼装重定向的地址,也就是你的应用链接+openId
        return "redirect:" + returnUrl + "?openid=" + openId;
    }


 6790
6790


 被折叠的 条评论
为什么被折叠?
被折叠的 条评论
为什么被折叠?
 到【灌水乐园】发言


