


最近上线的项目如上。
本次将会围绕这一大屏应用的部分技术进行分享,其中包含以下内容:
-
路径
-
能量光罩于噪声处理
-
bloom辉光
-
飞线
-
视频材质的应用
1. 路径
路径可以说是我们在可视化开发中较为常用了。
线的显示本身是路径,飞线的方向需要路径,物体按照某轨道移动也需要路径。
1.1 路径移动
路径移动的实现很简单,使用THREE.CurvePath插值工具配合动画工具就可以达到效果。
这里与@tweenjs/tween.js配合使用,编写了一个简单的函数,让某一物体沿着特定路径均匀移动。
/**
 * @param {THREE.CurvePath} curve 曲线工具
 * @param {Object} object 要移动的Object3d对象
 * @param {Number} duration 动画时间
 */
export function pathNavigation(curve, object, duration = 2000) {
  return new Promise((resolve) => {
    const tween = new TWEEN.Tween({ t: 0 });
    tween.to({ t: 1 }, duration);
    tween.onUpdate(({ t }) => {
      object.position.copy(curve.getPoint(t)); // 每帧更新位置
    });
    tween.onComplete(resolve);
    tween.start();
  });
}

// 使用方法:

const curve = new THREE.CurvePath();
curve.push(/* line1 */);
curve.push(/* line2 */);
curve.push(/* line3 */);

const geometry = new THREE.BoxGeometry( 1, 1, 1 );
const material = new THREE.MeshBasicMaterial( {color: 0x00ff00} );
const cube = new THREE.Mesh( geometry, material );
scene.add( cube );

pathNavigation(curve, cube, 5000)
1.2 路径工具
通常我们的路径都是直角拐线,或者就是一个贝塞尔曲线实现的抛物线。
这里我们将二者结合写了一个简单的工具,在两个线段的拐角处会用三维二次贝塞尔曲线实现圆角拐角。
该组件继承自THREE.CurvePath,以支持相应的函数。
分别使用THREE.LineCurve3作为直线、THREE.QuadraticBezierCurve3作为拐角。

路径工具
import * as THREE from 'three';

class CustomCurve extends THREE.CurvePath {
  constructor(nodes = [], radius = 0.8) {
    super();
    radius = 0.5 + radius / 2;
    if (nodes.length < 2) {
      return;
    }
    nodes.forEach((item, index) => {
      if (index) { // filter: first
        const end = new THREE.Vector3(...item);
        const start = new THREE.Vector3(...nodes[index - 1]);
        let left = start.clone();
        let right = end.clone();
        if (index !== 1) {
          left = start.clone().sub(end).multiplyScalar(radius).add(end);
        }
        if (nodes.length !== index + 1) {
          right = end.clone().sub(start).multiplyScalar(radius).add(start);
        }
        this.curves.push(new THREE.LineCurve3(left, right));
      }
      if (index && nodes.length !== index + 1) {  // filter: first and last
        const center = new THREE.Vector3(...item);
        const start = new THREE.Vector3(...nodes[index - 1]);
        const end = new THREE.Vector3(...nodes[index + 1]);
        this.curves.push(
          new THREE.QuadraticBezierCurve3(
            center.clone().sub(start).multiplyScalar(radius).add(start),
            center,
            end.clone().sub(center).multiplyScalar(1 - radius).add(center),
          ),
        );
      }
    });
  }
}

export default CustomCurve;
路径移动
将物体换为THREE.Sprite以实现字体、图标的移动。
2. 能量光罩
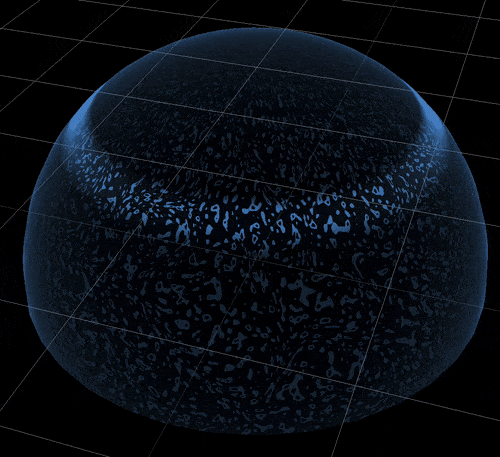
能量光罩
能量光罩,本质是一个半球,并对他的纹理进行加工。
整个模块包含四个部分:
-
SphereGeometry: 半球
-
ShaderMaterial: shader材质
-
texture: 一张贴图,用于实现扫描效果
-
glsl - 边缘发光
-
glsl - 噪声处理
JS代码:
// 首先实现一个半球
const geometry = new THREE.SphereGeometry(
  5,
  36,
  36,
  0,
  Math.PI * 2,
  0,
  (Math.PI / 180) * 90,
);
// 为他增加一个shader材质:
const material = new THREE.ShaderMaterial({
  uniforms: {
    c: { type: 'f', value: 1.5 }, // 系数
    p: { type: 'f', value: 4 },   // 强度
    backgroundTexture: {          // 用于实现扫描效果的贴图
      type: 't',
      value: texture
    },
    offset,                       // 扫描的偏移量
    u_resolution: {               // 用于生成噪声
      value: new THREE.Vector2(500, 500)
    },
    u_time: time,                 // 噪声随时间变化
    glowColor,                    // 光罩的颜色
    viewVector: {                 // 相机位置
      type: 'v3', value: camera.position
    },
  },
  vertexShader: vertex,
  fragmentShader: fragment,
  side: THREE.FrontSide,
  depthWrite: false,
  transparent: true,
});
texture

贴图
这里使用一张黑色的alpha渐变贴图。

渐变
通过这张贴图来映射整个光罩扫描部分的透明度。
顶点着色器
顶点着色器主要为光罩的边缘发光提供计算。
uniform vec3 viewVector;
varying vec2 vUv;
uniform float c;
uniform float p;
varying float intensity;
void main()
{
    vUv = uv;
    vec3 vNormal = normalize(normalMatrix * normal);
    vec3 vNormel = normalize(normalMatrix * viewVector);
    intensity = pow(c - dot(vNormal, vNormel), p);      // 供片源着色器使用

    gl_Position = projectionMatrix * modelViewMatrix * vec4(position, 1.0);
}
片元着色器
片元着色器运行主要的纹理计算代码。其中包含了噪声处理、扫描与内发光的混合计算。
在这里推荐一本在线交互式书籍《The Book of Shaders》,噪声处理的部分来自于其中第十一章Noise 噪声。
噪声处理代码引自:Noise 噪声[1]
#ifdef GL_ES
precision mediump float;
#endif

uniform vec2 u_resolution;
uniform float u_time;
uniform float offset;
uniform vec3 glowColor;
uniform sampler2D backgroundTexture;

varying float intensity;
varying vec2 vUv;

vec3 mod289(vec3 x) { return x - floor(x * (1.0 / 289.0)) * 289.0; }
vec2 mod289(vec2 x) { return x - floor(x * (1.0 / 289.0)) * 289.0; }
vec3 permute(vec3 x) { return mod289(((x*34.0)+1.0)*x); }

float snoise(vec2 v) {
    const vec4 C = vec4(0.211324865405187,  // (3.0-sqrt(3.0))/6.0
                        0.366025403784439,  // 0.5*(sqrt(3.0)-1.0)
                        -0.577350269189626,  // -1.0 + 2.0 * C.x
                        0.024390243902439); // 1.0 / 41.0
    vec2 i  = floor(v + dot(v, C.yy) );
    vec2 x0 = v -   i + dot(i, C.xx);
    vec2 i1;
    i1 = (x0.x > x0.y) ? vec2(1.0, 0.0) : vec2(0.0, 1.0);
    vec4 x12 = x0.xyxy + C.xxzz;
    x12.xy -= i1;
    i = mod289(i); // Avoid truncation effects in permutation
    vec3 p = permute( permute( i.y + vec3(0.0, i1.y, 1.0 ))
        + i.x + vec3(0.0, i1.x, 1.0 ));

    vec3 m = max(0.5 - vec3(dot(x0,x0), dot(x12.xy,x12.xy), dot(x12.zw,x12.zw)), 0.0);
    m = m*m ;
    m = m*m ;
    vec3 x = 2.0 * fract(p * C.www) - 1.0;
    vec3 h = abs(x) - 0.5;
    vec3 ox = floor(x + 0.5);
    vec3 a0 = x - ox;
    m *= 1.79284291400159 - 0.85373472095314 * ( a0*a0 + h*h );
    vec3 g;
    g.x  = a0.x  * x0.x  + h.x  * x0.y;
    g.yz = a0.yz * x12.xz + h.yz * x12.yw;
    return 2500.0 * dot(m, g);  // 这里改变了噪声处理的参数
}

void main() {
    // 使用 vUv 替代 gl_FragCoord, 否则会以摄像机的角度绘制平面纹理
    // vec2 st = gl_FragCoord.xy/u_resolution.xy;
    vec2 st = vUv * 1.0;
    st.x *= u_resolution.x / u_resolution.y;
    vec3 color = vec3(0.0);
    vec2 pos = vec2(st*3.);

    float DF = 0.0;

    // Add a random position
    float a = 0.0;
    vec2 vel = vec2(u_time*.1);
    DF += snoise(pos+vel)*.25+.25;

    // Add a random position
    a = snoise(pos*vec2(cos(u_time*0.15),sin(u_time*0.1))*0.1)*3.1415;
    vel = vec2(cos(a),sin(a));
    DF += snoise(pos+vel)*.25+.25;

    color = vec3( smoothstep(.7,.75,fract(DF)) );

	// offset随着时间在0 - 1之间不断变化
	// 带入到获取alpha贴图的参数中做到贴图不断从上到下扫过
    vec4 background = texture2D(backgroundTexture, vec2(vUv.x, vUv.y + offset));
    background.a = clamp(background.a, 0.3, 0.9); // 因为最后与结果相乘,0.3控制整个光照的最低亮度,0.9控制最高亮度,如果开启辉光需要适当降低最低亮度
    float opacity = max(intensity, color.x) * background.a;
    gl_FragColor = vec4(glowColor, opacity);
}
至此实现了能量光罩,同学们可以对不满意的地方自行定制修改增加参数。
其他
当前的实现因为要使用边缘发光的效果,导致无法开启双面贴图。

这里可以选择将边缘发光去掉。顶点着色器只保留vUv与gl_position的计算即可,片元着色器如下:
// float opacity = max(intensity, color.x) * background.a;
float opacity = max(0.5, color.x)* background.a;

这样看起来更像一个光罩。
3. 辉光
辉光会赋予场景灵魂。
光 是人类看见事物的媒介,同时光也会刺激人类的视觉感官。
与普通的灯光不同。threejs会以后期处理的形式处理辉光效果。
本次开发中未涉及到真实场景的模拟所以选择了Bloom辉光。
UnrealBloomPass 辉光通道
这里将官网的例子套了过来,简单实现了一下
const BLOOM_SCENE = 5; // 辉光所在层数
const renderScene = new RenderPass(scene, camera);

const bloomPass = new UnrealBloomPass(
new THREE.Vector2(window.innerWidth, window.innerHeight),
  1.5,
  0.4,
  0.85,
);
bloomPass.threshold = bloomOptions.threshold;
bloomPass.strength = bloomOptions.strength;
bloomPass.radius = bloomOptions.radius;

const bloom = new EffectComposer(renderer);
bloom.renderToScreen = false;
bloom.addPass(renderScene);
// 眩光通道bloomPass插入到composer
bloom.addPass(bloomPass);

bloomLayer = new THREE.Layers();
bloomLayer.set(BLOOM_SCENE);

const vertexShader = `
  varying vec2 vUv;
  void main() {
    vUv = uv;
    gl_Position = projectionMatrix * modelViewMatrix * vec4( position, 1.0 );
  }`;

const fragmentShader = `
  uniform sampler2D baseTexture;
  uniform sampler2D bloomTexture;
  varying vec2 vUv;
    void main() {
    gl_FragColor = ( texture2D( baseTexture, vUv ) + vec4( 1.0 ) * texture2D( bloomTexture, vUv ) );
  }`;

const finalPass = new ShaderPass(
  new THREE.ShaderMaterial({
    uniforms: {
      baseTexture: { value: null },
      bloomTexture: { value: bloom.renderTarget2.texture },
    },
    vertexShader,
    fragmentShader,
    defines: {},
  }),
  'baseTexture',
);
finalPass.needsSwap = true;

const finalComposer = new EffectComposer(renderer);
finalComposer.addPass(renderScene);
finalComposer.addPass(finalPass);
将原renderer.render(scene, camera)替换为:
scene.traverse(darkenNonBloomed); // 隐藏不需要辉光的物体
bloom.render();
scene.traverse(restoreMaterial); // 还原
finalComposer.render();
其中darkenNonBloomed和restoreMaterial两个函数针对BLOOM_SCENE层进行过滤
const materials = {};
const bloomIgnore = [];
const darkMaterial = new THREE.MeshBasicMaterial({ color: 'black' });
function darkenNonBloomed(obj) {
  if (obj instanceof THREE.Scene) { // 此处忽略Scene,否则场景背景会被影响
    materials.scene = obj.background;
    obj.background = null;
    return;
  }
  if (
    obj instanceof THREE.Sprite || // 此处忽略Sprite
    bloomIgnore.includes(obj.type) ||
    (obj.isMesh && bloomLayer.test(obj.layers) === false) // 判断与辉光是否同层
  ) {
    materials[obj.uuid] = obj.material;
    obj.material = darkMaterial;
  }
}

function restoreMaterial(obj) {
  if (obj instanceof THREE.Scene) {
    obj.background = materials.scene;
    delete materials.scene;
    return;
  }
  if (materials[obj.uuid]) {
    obj.material = materials[obj.uuid];
    delete materials[obj.uuid];
  }
}
当我们在使用时,将需要辉光的物体加入BLOOM_SCENE层即可。
const geometry = new THREE.BoxGeometry(100, 100, 100);
const material = new THREE.MeshPhongMaterial({ color: 0x0033ff });
const cube = new THREE.Mesh(geometry, material);
cube.layers.enable(BLOOM_SCENE);

scene.addMesh(cube);

animation = () => {
    cube.rotation.x += Math.PI / 180 / 5;
    cube.rotation.y += Math.PI / 180 / 5;
    cube.rotation.z += Math.PI / 180 / 5;
};
效果:

盒子
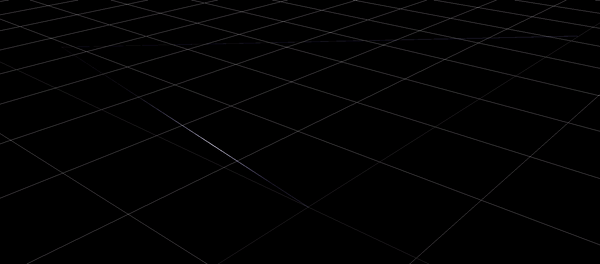
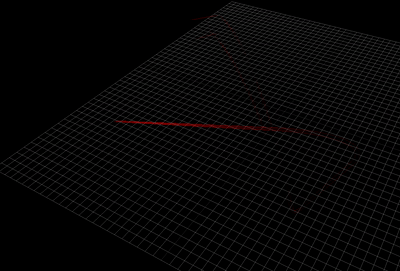
4. 飞线
在之前的文章中分享过使用顶点着色器实现的飞线。但这种飞线有着较为明显的缺陷。

飞线异常
在本次分享中会分享两种弥补这一缺陷的实现方法
-
MeshLine
-
TubeGeometry
4.1 MeshLine
MeshLine[2]是一个扩展库,能让我们绘制出实心有宽度的线条。
使用
import * as THREE from 'three';
import { MeshLine, MeshLineMaterial } from './meshline.js';

const geometry = new THREE.Geometry();
geometry.vertices = [
  // ... THREE.Vector3,
];

// 代码生成材质
const getTexture = (length, lineColor, lightColor, isHalf) => {
  const canvas = document.createElement('canvas');
  canvas.width = 256;
  canvas.height = 1;
  const ctx = canvas.getContext('2d');
  const gradient = ctx.createLinearGradient(0, 0, 256, 1);
  gradient.addColorStop(0, lineColor);
  gradient.addColorStop(isHalf ? length : length / 2, lightColor);
  gradient.addColorStop(length, lineColor);
  gradient.addColorStop(length, lineColor);
  gradient.addColorStop(1, lineColor);
  ctx.fillStyle = gradient;
  ctx.fillRect(0, 0, 256, 1);
  const texture = new THREE.Texture(canvas);
  texture.needsUpdate = true;
  texture.wrapS = THREE.RepeatWrapping;
  texture.wrapT = THREE.RepeatWrapping;
  return texture;
};

const meshLine = new MeshLine();
meshLine.setGeometry(geometry);

const texture = getTexture(length, lineColor, lightColor, isHalf);
texture.anisotropy = 16;
texture.wrapS = THREE.RepeatWrapping;
texture.wrapT = THREE.RepeatWrapping;

const material = new MeshLineMaterial({
  map: texture,             // 材质
  useMap: true,             // 使用材质
  lineWidth: 2,             // 线宽
  sizeAttenuation: false,   // 是否随距离衰减
  transparent: true,        // 开启透明度
});

const { width, height } = getCanvasSize();
material.uniforms.resolution.value.set(width, height);
const mesh = new THREE.Mesh(meshLine.geometry, material);

const tween = new TWEEN.Tween(material.uniforms.offset.value) // 飞线移动动画
  .to({ x: material.uniforms.offset.value.x - 1 }, duration)
  .delay(delay)
  .repeat(repeat)
  .start();
参数:
const defaultOptions = {
  speed: 0.3,
  lineWidth: 2,
  length: 0.3,
  isHalf: false,
  lineColor: 'rgba(171,157,245,0.2)',
  lightColor: 'rgba(239,238,255,1)',
  duration: 1000,
  delay: 0,
  repeat: Infinity,
};
飞线
这一方式的缺陷是无法随着摄像机与线之间的距离变化大小。
4.2 TubeGeometry
管道几何体可以很好的解决Meshline的缺陷。

管道
这个实现方法原本就是用来实现管道的,但在开发时刚好发现他可以用来实现有宽度、距离感的飞线。
先看一下效果:
管道飞线
实现方法只是使用了THREE.TubeGeometry不需要写shader。
const texture = new THREE.TextureLoader().load(
  // 贴图引用本篇第二章能量罩扫光的白色版本
);
texture.wrapS = THREE.RepeatWrapping;
texture.wrapT = THREE.RepeatWrapping;
texture.repeat.x = 1;
texture.repeat.y = 1;
texture.rotation = Math.PI / 90; // 旋转贴图,或者做一张旋转好的贴图。
import * as THREE from 'three';
import PathFactory from './Path'; // 引用本篇第一章的路径工具

const speed = 0.01; // 飞线移动速度
const path = [
  [-110, -50, 0],
  [50, 50, 50],
  [10, -50, 10],
  [50, 100, 100],
  [50, 100, 111],
];
const pathInstence = new PathFactory(path, cornerRadius);
const stripGeo = new THREE.TubeBufferGeometry(  // 定义管道
  pathInstence,
  Math.round(pathInstence.getLength() / 2),
  0.5,
  8,
  false,
);
const stripMat = new THREE.MeshBasicMaterial({
  color,             // 定义颜色,会与白色贴图混合
  map: texture,      // 贴图
  transparent: true, // 开启透明度
  depthWrite: false, // 管道飞线的关键
  side: THREE.DoubleSide,
});
const tube = new THREE.Mesh(stripGeo, stripMat);

this.object3d.add(tube);
this.tube = tube;


function animation() { // render tick
  texture.offset.y += speed;
}
当然,用shader一定可以实现性能更高、效果更好的飞线。
如果想要控制管道飞线的长度,可以采用手动生成贴图的方式。
5. 视频材质的应用
也许你会感叹这么炫的效果是怎么实现的、做这么炫真的这么快做得完吗。也许看到这里你已经知道怎么实现了。但我还是要说一句
不是只有用着色器才能实现特效,还可以用素材来代替
看到这里,你可能已经猜到哪里被视频替代了。
……
没错,就是它!

揭秘
没猜到的同学看见这一幕相信一定比看见特效更加震惊。(O_o)??
炫酷的特效其实只是一段视频素材贴在scene.background上。
使用它很简单
<video id="video" loop autoplay muted style="display: none;">
  <source src="你的视频资源.mp4" type="video/mp4">
</video>
const videoDom = document.getElementById('video');
scene.background = new THREE.VideoTexture(video);
但无法用在移动端。
这一手段的应用范围很广:
-
我们可以给地面贴一个光效扩散的视频来做扫描效果。
-
某个闪烁的标签使用视频来代替。
-
将星光闪烁的视频贴给某个模型来实现换肤。
-
其他种种
当然,这一方法会极大增加静态文件体积。
不过方法提出来就是给人用的,我们要做到不独独依赖某项技术。
多一个实现方法总比只有一个实现方法要好。你一定会做到使用shader来重新替代视频。加油!
参考文档
-
Noise 噪声: https://thebookofshaders.com/11/?lan=ch
-
MeshLine: https://github.com/spite/THREE.MeshLine


 926
926


 被折叠的 条评论
为什么被折叠?
被折叠的 条评论
为什么被折叠?
 到【灌水乐园】发言


