


Activity是通过它的setContentView方法来显示我们传入的布局的。
  Activity#setContentView
  public void setContentView(@LayoutRes int layoutResID) {
        getWindow().setContentView(layoutResID);
        //...
    }
在setContentView方法内部又调用了Window的setContentView,并将布局文件传入。这个Window的实现就是PhoneWindow,在Activity启动过程中会先创建Activity实例,然后调用它的attach方法。
 Activity#attach
final void attach(...) {
         //...
        mWindow = new PhoneWindow(this, window, activityConfigCallback);
        //。。。。
    }
接着来看看PhoneWindow的setContentView又做了啥?
PhoneWindow#setContentView
   public void setContentView(int layoutResID) {
        //1、如果mContentParent为空,就先初始化它。
        if (mContentParent == null) {
            installDecor();
        }
        //。。。。
      //2、将Activity传入的布局文件加载到mContentParent中。
      mLayoutInflater.inflate(layoutResID, mContentParent);

    }
代码很简单,主要做了两件事,先初始化mContentParent ,然后调用inflate方法将布局资源加载成View,并添加到mContentParent中。通过上面几行代码我们知道了,我们的布局文件其实是被添加到mContentParent中的,那mContentParent是什么呢?
更多关于LayoutInflater请看深入理解LayoutInflater
接着分析installDecor()方法,看看它是如何初始化mContentParent的。
PhoneWindow#installDecor
private void installDecor() {
        if (mDecor == null) {
           //1
            mDecor = generateDecor(-1);
            ...
        }
        if (mContentParent == null) {
            //2
            mContentParent = generateLayout(mDecor);
            ....
            }
        //.....省略n行代码
    }
注释1处直接调用了generateDecor方法,生成了一个mDecor实例,mDecor是窗口的顶层视图,它的类型是DecorView继承自FrameLayout。简单的说它就是一个根布局。注释2处判断如果mContentParent 是空的,就调用generateLayout方法,并将窗口的根布局mDecor传入,返回值赋给mContentParent。
接着分析generateDecor方法。
 protected DecorView generateDecor(int featureId) {
        //...
        return new DecorView(context, featureId, this, getAttributes());
    }
很简单,直接new了一个DecorView返回了。
明白了DecorView是如何创建的,接着看看 generateLayout(mDecor)是如何初始化mContentParent的?
protected ViewGroup generateLayout(DecorView decor) {
        // Apply data from current theme.
         //获取窗口的样式
        TypedArray a = getWindowStyle();
        //根据窗口的样式执行大量的setFlags、requestFeature操作
        mIsFloating = a.getBoolean(R.styleable.Window_windowIsFloating, false);
        int flagsToUpdate = (FLAG_LAYOUT_IN_SCREEN|FLAG_LAYOUT_INSET_DECOR)
                & (~getForcedWindowFlags());
        if (mIsFloating) {
            setLayout(WRAP_CONTENT, WRAP_CONTENT);
            setFlags(0, flagsToUpdate);
        } else {
            setFlags(FLAG_LAYOUT_IN_SCREEN|FLAG_LAYOUT_INSET_DECOR, flagsToUpdate);
        }

        if (a.getBoolean(R.styleable.Window_windowNoTitle, false)) {
            requestFeature(FEATURE_NO_TITLE);
        } else if (a.getBoolean(R.styleable.Window_windowActionBar, false)) {
            // Don't allow an action bar if there is no title.
            requestFeature(FEATURE_ACTION_BAR);
        }

        if (a.getBoolean(R.styleable.Window_windowActionBarOverlay, false)) {
            requestFeature(FEATURE_ACTION_BAR_OVERLAY);
        }

        if (a.getBoolean(R.styleable.Window_windowActionModeOverlay, false)) {
            requestFeature(FEATURE_ACTION_MODE_OVERLAY);
        }
         ......省略n行
        //系统的布局资源
        int layoutResource;
        //获取窗口的特征
        int features = getLocalFeatures();
        // System.out.println("Features: 0x" + Integer.toHexString(features));
        if ((features & (1 << FEATURE_SWIPE_TO_DISMISS)) != 0) {
            layoutResource = R.layout.screen_swipe_dismiss;
            setCloseOnSwipeEnabled(true);
        } else if ((features & ((1 << FEATURE_LEFT_ICON) | (1 << FEATURE_RIGHT_ICON))) != 0) {
            if (mIsFloating) {
                TypedValue res = new TypedValue();
                getContext().getTheme().resolveAttribute(
                        R.attr.dialogTitleIconsDecorLayout, res, true);
                layoutResource = res.resourceId;
            } else {
                layoutResource = R.layout.screen_title_icons;
            }
            // XXX Remove this once action bar supports these features.
            removeFeature(FEATURE_ACTION_BAR);
            // System.out.println("Title Icons!");
        } else if ((features & ((1 << FEATURE_PROGRESS) | (1 << FEATURE_INDETERMINATE_PROGRESS))) != 0
                && (features & (1 << FEATURE_ACTION_BAR)) == 0) {
            // Special case for a window with only a progress bar (and title).
            // XXX Need to have a no-title version of embedded windows.
            layoutResource = R.layout.screen_progress;
            // System.out.println("Progress!");
        } else if ((features & (1 << FEATURE_CUSTOM_TITLE)) != 0) {
            // Special case for a window with a custom title.
            // If the window is floating, we need a dialog layout
            if (mIsFloating) {
                TypedValue res = new TypedValue();
                getContext().getTheme().resolveAttribute(
                        R.attr.dialogCustomTitleDecorLayout, res, true);
                layoutResource = res.resourceId;
            } else {
                layoutResource = R.layout.screen_custom_title;
            }
            // XXX Remove this once action bar supports these features.
            removeFeature(FEATURE_ACTION_BAR);
        } else if ((features & (1 << FEATURE_NO_TITLE)) == 0) {
            // If no other features and not embedded, only need a title.
            // If the window is floating, we need a dialog layout
            if (mIsFloating) {
                TypedValue res = new TypedValue();
                getContext().getTheme().resolveAttribute(
                        R.attr.dialogTitleDecorLayout, res, true);
                layoutResource = res.resourceId;
            } else if ((features & (1 << FEATURE_ACTION_BAR)) != 0) {
                layoutResource = a.getResourceId(
                        R.styleable.Window_windowActionBarFullscreenDecorLayout,
                        R.layout.screen_action_bar);
            } else {
                layoutResource = R.layout.screen_title;
            }
            // System.out.println("Title!");
        } else if ((features & (1 << FEATURE_ACTION_MODE_OVERLAY)) != 0) {
            layoutResource = R.layout.screen_simple_overlay_action_mode;
        } else {
            // Embedded, so no decoration is needed.
            layoutResource = R.layout.screen_simple;
            // System.out.println("Simple!");
        }
        //上面的一大段代码就是根据窗口的特征,选择对应的系统布局资源,赋给layoutResource
        //我们经常写的requestWindowFeature(...)代码为什么一定放在setContentView之前
        // 因为系统会根据配置找不同的系统布局文件

        //这个方法内部会将选好的系统layoutResource布局,加载成View,然后添加到根布局mDecor中
        mDecor.onResourcesLoaded(mLayoutInflater, layoutResource);

        //这里的findViewById会调用到根布局mDecor的findViewById(方法的实现在Window中),获取id为
        //android.R.id.content的ViewGroup
        //id为android.R.id.conten的ViewGroup其实是系统layoutResource的一部分。
        ViewGroup contentParent = (ViewGroup)findViewById(ID_ANDROID_CONTENT);
        if (contentParent == null) {
            throw new RuntimeException("Window couldn't find content container view");
        }
        ....
        //然后返回contentParent
        return contentParent;
    }
这样mContentParent 就被初始化了,最终通过Activity的setContentView方法设置的布局会被添加到mContentParent中。这里以系统layoutResource R.layout.screen_simple来说明。
R.layout.screen_simple布局如下:
<LinearLayout xmlns:android="http://schemas.android.com/apk/res/android"
    android:layout_width="match_parent"
    android:layout_height="match_parent"
    android:fitsSystemWindows="true"
    android:orientation="vertical">
    <ViewStub android:id="@+id/action_mode_bar_stub"
              android:inflatedId="@+id/action_mode_bar"
              android:layout="@layout/action_mode_bar"
              android:layout_width="match_parent"
              android:layout_height="wrap_content"
              android:theme="?attr/actionBarTheme" />
    <FrameLayout
         android:id="@android:id/content"
         android:layout_width="match_parent"
         android:layout_height="match_parent"
         android:foregroundInsidePadding="false"
         android:foregroundGravity="fill_horizontal|top"
         android:foreground="?android:attr/windowContentOverlay" />
</LinearLayout>
很简答,就是一个竖直方向的LinearLayout,上面是和标题相关的,下面的FrameLayout它的id就是android.R.id.content,通过Activity的setContentView方法设置的布局就会被添加到这里面。
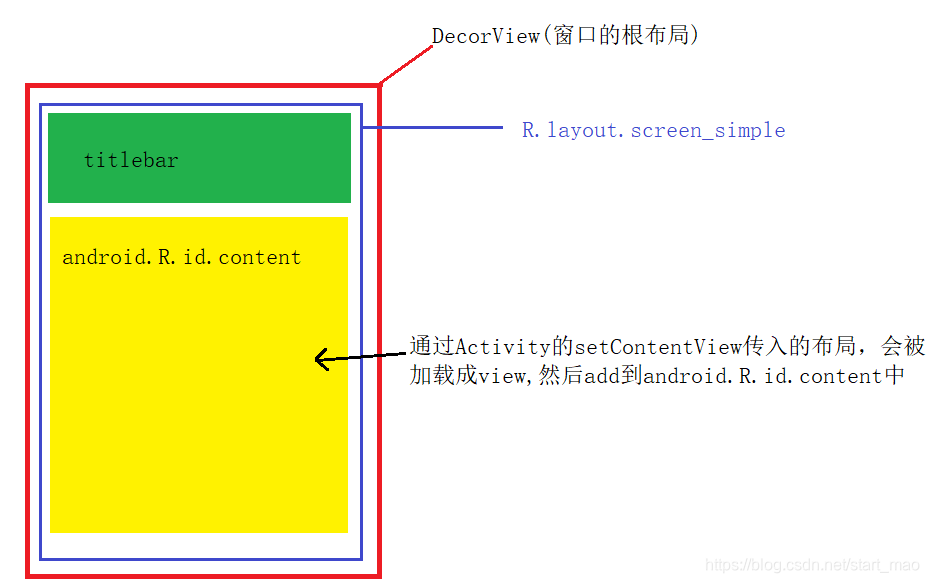
这也是为什么叫setContentView的原因,因为我们的布局确实被add到content中。
总结:
- 当我们调用Activity的setContentView后 内部会调用PhoneWindow的setContentView,然后先根据窗口的主题特征去加载对应的系统布局,并将这个系统布局添加到窗口的根布局DecorView中,然后通过findViewById获取到系统布局中id为content的ViewGroup。最后将我们Activity的布局文件加载添加到id为content的ViewGroup中。
通过上面的源码分析,知道了setContentView的工作原理,不过现在也只是建立了一个View Tree的数据结构而已,并没有显示出来。下面接着分析它是如何绘制显示出来的。
Activity是在onResume生命周期回调执行后才开始显示,因此找到ActivityThread的handleResumeActivity方法。
    final void handleResumeActivity(IBinder token,
            boolean clearHide, boolean isForward, boolean reallyResume, int seq, String reason) {
        //1、这个方法最终会调用Activity的onResume生命周期方法
        r = performResumeActivity(token, clearHide, reason);

        if (r != null) {
            final Activity a = r.activity;
            .....
            if (r.window == null && !a.mFinished && willBeVisible) {
                r.window = r.activity.getWindow();
                View decor = r.window.getDecorView();
                decor.setVisibility(View.INVISIBLE);
                ViewManager wm = a.getWindowManager();
                WindowManager.LayoutParams l = r.window.getAttributes();
                a.mDecor = decor;
                ....
                if (a.mVisibleFromClient) {
                    if (!a.mWindowAdded) {
                        a.mWindowAdded = true;
                        //2、重点,添加窗口
                        wm.addView(decor, l);
                    }
                }
                ......
    }
注释1会导致调用Activity的onResume生命周期方法。然后在注释2调用WindowManagerImpl的addView方法。
    public void addView(@NonNull View view, @NonNull ViewGroup.LayoutParams params) {
        applyDefaultToken(params);
        mGlobal.addView(view, params, mContext.getDisplay(), mParentWindow);
    }
紧接着调用了WindowManagerGlobal类型实例mGlobal的addView方法,将添加工作委托给WindowManagerGlobal,它以工厂的形式对外提供自己的实例。
public final class WindowManagerImpl implements WindowManager {
    private final WindowManagerGlobal mGlobal = WindowManagerGlobal.getInstance();
    ......
    @Override
    public void addView(@NonNull View view, @NonNull ViewGroup.LayoutParams params) {
        applyDefaultToken(params);
        mGlobal.addView(view, params, mContext.getDisplay(), mParentWindow);
    }
    ......
}
WindowManagerGlobal的addView方法如下:
    public void addView(View view, ViewGroup.LayoutParams params,
            Display display, Window parentWindow) {
            //必要的参数检查
        if (view == null) {
            throw new IllegalArgumentException("view must not be null");
        }
        if (display == null) {
            throw new IllegalArgumentException("display must not be null");
        }
        if (!(params instanceof WindowManager.LayoutParams)) {
            throw new IllegalArgumentException("Params must be WindowManager.LayoutParams");
        }
        final WindowManager.LayoutParams wparams = (WindowManager.LayoutParams) params;
        //如果是子Window还要调整布局参数
        if (parentWindow != null) {
            parentWindow.adjustLayoutParamsForSubWindow(wparams);
        }
        ViewRootImpl root;
        View panelParentView = null;
        ....
           //重点、创建ViewRootImpl
            root = new ViewRootImpl(view.getContext(), display);
           //给根布局设置窗口的布局参数
            view.setLayoutParams(wparams);

             //mViews存储所有Window对应的view
            mViews.add(view);
            //mRoots存储所有Window对应的ViewRootImpl
            mRoots.add(root);
            //mParams存储所有Window对应的布局参数
            mParams.add(wparams);

            //root.setView会导致绘制界面,以及Window的添加过程。
            root.setView(view, wparams, panelParentView);
        }
    }
View的绘制其实就是通过ViewRootImpl的setView来完成的,跟进去看看。
public void setView(View view, WindowManager.LayoutParams attrs, View panelParentView) {
        synchronized (this) {
           //一个ViewRootImpl实例对应一个View tree
            if (mView == null) {
                mView = view;
                //1 触发View tree的测量、布局、绘制
                requestLayout();
                .......
				//2 完成Window的添加
               res = mWindowSession.addToDisplay(mWindow,....);
        }
    }
在注释1会调用requestLayout 代码如下:
 @Override
    public void requestLayout() {
        if (!mHandlingLayoutInLayoutRequest) {
           //检查线程
            checkThread();
            //view绘制的入口
            scheduleTraversals();
        }
    }
题外话:我们常说View的绘制不能在子线程中,需要在主线程中,就是在这里检查线程。
void checkThread() {
        if (mThread != Thread.currentThread()) {
            throw new CalledFromWrongThreadException(
                    "Only the original thread that created a view hierarchy can touch its views.");
        }
    }
通过checkThread这段代码,可以看到其实不是必须在主线程,只是需要在创建ViewRootImpl实例时所在的线程。待会就来验证下。
  public ViewRootImpl(Context context, Display display) {
        .....
        mThread = Thread.currentThread();
        ......
继续源码的分析,scheduleTraversals()方法是View绘制的入口。
    void scheduleTraversals() {
        if (!mTraversalScheduled) {
           //往消息队列插入一个同步屏障,来保证mTraversalRunnable任务的优先执行
            mTraversalBarrier = mHandler.getLooper().getQueue().postSyncBarrier();
            mChoreographer.postCallback(
                    Choreographer.CALLBACK_TRAVERSAL, mTraversalRunnable, null);
           ....
        }
    }
更多关于同步屏障请看Handler机制——同步屏障
mTraversalRunnable这个任务会在下一次vsync信号到来时被执行,mTraversalRunnable是TraversalRunnable 的实例。
 final class TraversalRunnable implements Runnable {
        @Override
        public void run() {
          //直接执行了doTraversal方法。
            doTraversal();
        }
    }
doTraversal方法很简单,只有几行代码。
void doTraversal() {
        if (mTraversalScheduled) {
            //移除同步屏障
            mHandler.getLooper().getQueue().removeSyncBarrier(mTraversalBarrier);
            //调用performTraversals
            performTraversals();
        }
    }
接着再来看看performTraversals方法做了什么。performTraversals方法虽然很长,但我们只看其中4行代码。
 private void performTraversals() {
          //1、先向WMS申请Surface,有了Surface之后的绘制才有缓存
          relayoutWindow(params, viewVisibility, insetsPending)
          ...
          //2、触发view tree的测量
          performMeasure(childWidthMeasureSpec, childHeightMeasureSpec);
             ...
          //3、触发view tree的layout (摆放布局)
          performLayout(lp, mWidth, mHeight);
           ...
           //4、触发view tree的绘制过程
         performDraw();
}
这样view tree就完成了 测量、摆放、绘制的过程。前面说过view的绘制其实就是通过ViewRootImpl的setView来完成的如下。
public void setView(View view, WindowManager.LayoutParams attrs, View panelParentView) {
        synchronized (this) {
           //一个ViewRootImpl实例对应一个View tree
            if (mView == null) {
                mView = view;
                //1 触发View tree的测量、布局、绘制
                requestLayout();
                .......
				//2 完成Window的添加
               res = mWindowSession.addToDisplay(mWindow,....);
        }
    }
分析完注释1知道了View tree的测量、布局、绘制。接着来分析注释2看看窗口时如何添加到WMS的。
首先需要明白mWindowSession是WMS的openSession返回的Binder对象,它的真正实现是Session。通过mWindowSession这个Binder对象就和WMS建立了会话,应用端拿到这个Session就可以向WMS发起跨进程的Binder调用。
注意到mWindowSession的addToDisplay方法会跨进程调用到WMS端,它携带的第一个参数也是一个Binder对象,应用端将它注册到WMS中,之后WMS就可以通过这个Binder调用应用端对应方法了,这样就形成了一个双向调用。mWindow的类型是W如下:它持有ViewRootImpl 和mWindowSession,起到一个桥梁的作用。
  static class W extends IWindow.Stub {
        private final WeakReference<ViewRootImpl> mViewAncestor;
        private final IWindowSession mWindowSession;

        W(ViewRootImpl viewAncestor) {
            mViewAncestor = new WeakReference<ViewRootImpl>(viewAncestor);
            mWindowSession = viewAncestor.mWindowSession;
        }
        ......
}
mWindowSession的addToDisplay跨进程调用到Session的addToDisplay实现。
 public int addToDisplay(IWindow window,...) {
        return mService.addWindow(this, window, seq, attrs, viewVisibility, displayId,
                outContentInsets, outStableInsets, outOutsets, outInputChannel);
    }
直接调用了mService的addWindow方法完成了窗口的添加。mService的类型是WindowManagerService(WMS)。
调用到WMS端的addWindow之后,WMS会创建Window相关的对象,WMS负责管理所有Window的层级、绘制和大小。WMS并不关心应用端的Window和View对象。它主要是给应用端分配Surface,以及掌管它们的显示顺序、尺寸位置。
前面分析checkThread时发现View的绘制不是一定需要在主线程,而是需要在创建ViewRootImpl实例时所在的线程,现在就来验证下:
首先定义一个MyTextView 直接继承至AppCompatTextView 里面啥也不做,就是打印一下当前的线程。
public class MyTextView extends AppCompatTextView {
    public MyTextView(Context context) {
        super(context);
    }

    public MyTextView(Context context, @Nullable AttributeSet attrs) {
        super(context, attrs);
    }

    public MyTextView(Context context, @Nullable AttributeSet attrs, int defStyleAttr) {
        super(context, attrs, defStyleAttr);
    }

    @Override
    protected void onMeasure(int widthMeasureSpec, int heightMeasureSpec) {
        super.onMeasure(widthMeasureSpec, heightMeasureSpec);
        //啥也不干,就打印一下线程
        Log.d("TAG","onMeasure current Thread="+Thread.currentThread().getName());
    }

    @Override
    protected void onDraw(Canvas canvas) {
        super.onDraw(canvas);
        //啥也不干,就打印一下线程
        Log.d("TAG","onDraw current Thread="+Thread.currentThread().getName());
    }
}
然后创建一个Activity开一个子线程来显示MyTextView
public class DrawViewInThreadActivity extends AppCompatActivity {

    @Override
    protected void onCreate(Bundle savedInstanceState) {
        super.onCreate(savedInstanceState);
        Log.d("TAG","主线程="+Thread.currentThread().getName());
        new Thread(new Runnable() {
            @Override
            public void run() {
                Looper.prepare();
                Log.d("TAG",Thread.currentThread().getName()+"  start");
                MyTextView tv=new MyTextView(DrawViewInThreadActivity.this);
                tv.setText("我在子线程被绘制的");
                tv.setTextColor(Color.RED);
                WindowManager.LayoutParams layoutParams=new WindowManager.LayoutParams();
                layoutParams.type = WindowManager.LayoutParams.TYPE_APPLICATION_STARTING ;
                layoutParams.height=300;
                layoutParams.width=400;
                getWindowManager().addView(tv,layoutParams);
                Looper.loop();
            }
        }).start();
    }
}
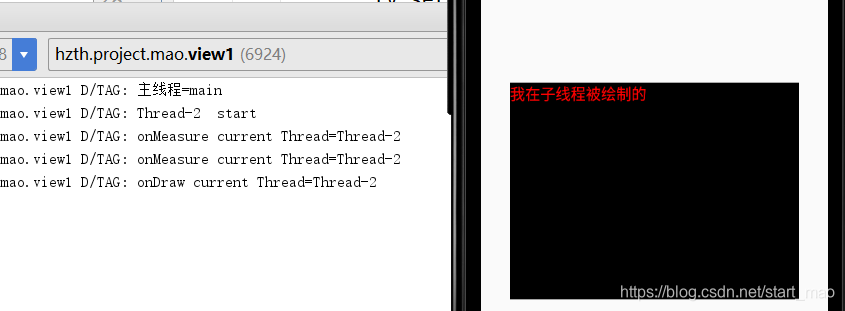
haha,确实是这样。
如果这个时候再无聊一些,可以尝试通过在主线程创建Handler来改变MyTextView的文字,你会发现程序报错了!主线程竟然不能setText更新UI了。
CalledFromWrongThreadException: Only the original thread that created a view hierarchy can touch its views.
enmmm,这就是checkThread抛出的异常啊,这就验证了View的绘制不是一定需要在主线程,而是需要在创建ViewRootImpl实例时所在的线程。


 1012
1012


 被折叠的 条评论
为什么被折叠?
被折叠的 条评论
为什么被折叠?
 到【灌水乐园】发言


