


C++ Read and write Excel files
Number Duck is a commercial C++ library that I've written to simplify reading and writing Excel files. You can download Number Duck here, and check out this page for Windows and Linux instructions on installing, building and linking the library.
Below is an overview of the main components and some quick examples that show how to start accessing Excel files with Number Duck.
Components of a spreadsheet
A Workbook is the general representation of the Excel spreadsheet, the initial object created before reading or writing. It contains all the Styles, Worksheets and any overall functionality such as saving and loading.
Using Styles you can change the appearance of the cells by applying different fonts and colors. Styles can be created once and then applied to many cells across many worksheets.
Worksheets manage all cells and embedded Pictures.
Cell contain values or formulas, and can have previously created styles applied to them.
Writing to an Excel file
You can refer to individual cells by address just like you would in Excel, eg: "A1", or by its X and Y coordinates, eg: (0,0). Note that the coordinates start at 0 while addresses start at "1".
The cells can then be assigned directly with the SetString, SetFloat, SetBoolean or SetFormula functions.
-
#include "Workbook.h"
-
#include "Worksheet.h"
-
#include "Cell.h"
-
-
using
namespace FileScribe
;
-
-
int main
(
int argc,
char
**argv
)
-
{
-
Workbook workbook
(
""
)
;
-
Worksheet
* pWorksheet
= workbook.
GetWorksheetByIndex
(
0
)
;
-
-
for
(
uint16_t y
=
0
; y
<
10
; y
++
)
-
{
-
Cell
* pCell
= pWorksheet
-
>GetCell
(
0,y
)
;
-
pCell
-
>SetFloat
(y
*
3.1417f
)
;
-
}
-
-
pWorksheet
-
>GetCellByAddress
(
"B1"
)
-
>SetString
(
"http://numberduck.com"
)
;
-
pWorksheet
-
>GetCellByAddress
(
"B2"
)
-
>SetBoolean
(
true
)
;
-
pWorksheet
-
>GetCellByAddress
(
"B3"
)
-
>SetFormula
(
"=SUM(A1:A10)"
)
;
-
-
workbook.
Save
(
"Spreadsheet.xls"
)
;
-
-
return
0
;
-
}
Reading an Excel file
Reading an Excel file is as easy as writing, the file is loaded and the cells referenced in the same way. When reading, you should be careful to use the correct type for the cell. EG: If a cell contains a float, you must use GetFloat. Using an incorrect function will return the default value for that type, EG : GetString returns "" if the cell does not contain a string. GetType function allows two that you check the type.
-
Workbook
* pWorkbookIn
=
new Workbook
(
""
)
;
-
if
(pWorkbookIn
-
>Load
(
"Spreadsheet.xls"
)
)
-
{
-
Worksheet
* pWorksheetIn
= pWorkbookIn
-
>GetWorksheetByIndex
(
0
)
;
-
Cell
* pCellIn
= pWorksheetIn
-
>GetCell
(
0,
0
)
;
-
if
(pCellIn
-
>GetType
(
)
== Cell
::
TYPE_FLOAT
)
-
printf
(
"Cell Contents: %f\n", pCellIn
-
>GetFloat
(
)
)
;
-
}
Formatting
Existing Styles can be accessed or new styles created through the workbook object. Note that the default style can also be accessed through the Workbook, which is used by all Cells unless overridden.
-
Workbook workbook
(
""
)
;
-
Worksheet
* pWorksheet
= workbook.
GetWorksheetByIndex
(
0
)
;
-
-
Style
* pDefaultStyle
= workbook.
GetDefaultStyle
(
)
;
-
pDefaultStyle
-
>SetColor
(Color
(
128,
128,
128
)
)
;
-
-
Style
* pStyle
= workbook.
CreateStyle
(
)
;
-
pStyle
-
>SetFont
(
"Comic Sans MS"
)
;
-
pStyle
-
>SetColor
(Color
(
255,
0,
255
)
)
;
-
pStyle
-
>SetBackgroundColor
(Color
(
255,
255,
0
)
)
;
-
pStyle
-
>SetItalic
(
true
)
;
-
pStyle
-
>SetBold
(
true
)
;
-
-
Cell
* pCell
= pWorksheet
-
>GetCellByAddress
(
"A1"
)
;
-
pCell
-
>SetString
(
"Default style"
)
;
-
-
pCell
= pWorksheet
-
>GetCellByAddress
(
"A2"
)
;
-
pCell
-
>SetStyle
(pStyle
)
;
-
pCell
-
>SetString
(
"This looks hideous!"
)
;
-
-
workbook.
Save
(
"Formatting.xls"
)
;
Pictures
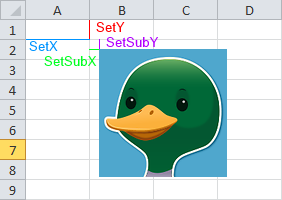
The images are created from a JPEG or PNG image through the Worksheet object. SetX and SetY are used to establish the cell coordinates of the picture while SetSubY and SetSubX position of image within the cell in pixel increments.
-
Workbook workbook
(
""
)
;
-
Worksheet
* pWorksheet
= workbook.
GetWorksheetByIndex
(
0
)
;
-
-
Picture
* pPicture
= pWorksheet
-
>CreatePicture
(
"duck.png"
)
;
-
pPicture
-
>SetX
(
1
)
;
-
pPicture
-
>SetY
(
1
)
;
-
pPicture
-
>SetSubX
(
10
)
;
-
pPicture
-
>SetSubY
(
10
)
;
-
-
workbook.
Save
(
"Picture.xls"
)
;
Conclusion
If you need more information, there is heaps more Number Duck documentation you can look at.
Thanks for reading!
Adam Clifton,
adam@numberduck.com


 3903
3903

 被折叠的 条评论
为什么被折叠?
被折叠的 条评论
为什么被折叠?
 到【灌水乐园】发言


