


概述
此实验申请地址在这里,时间为2小时。
实验帮助在这里。
简介
该动手实验让用户有机会学习如何配置数据库安全功能,以保护和加固从基线到最高安全架构 (MSA) 的数据库。您将学习如何使用 Oracle 数据库安全评估工具 (DBSAT) 功能。
Lab 3: Initialize Environment
此实验用户为oracle,设置了以下的环境变量:
==========================================================================
 ____  ____ ____            _          _                 _  _
|  _ \| __ ) ___|  ___  ___| |    __ _| |__  ___  __   _| || |
| | | |  _ \___ \ / _ \/ __| |   / _` | '_ \/ __| \ \ / / || |_
| |_| | |_) |__) |  __/ (__| |__| (_| | |_) \__ \  \ V /|__   _|
|____/|____/____/ \___|\___|_____\__,_|_.__/|___/   \_/    |_|

==========================================================================
                               ENV VARIABLES
--------------------------------------------------------------------------
 . ORACLE_SID  = cdb1
 . PDB_NAME    = pdb1
 . DBSEC_HOME  = /home/oracle/DBSecLab
 . DBSEC_ADMIN = /home/oracle/DBSecLab/admin
 . DBSEC_LABS  = /home/oracle/DBSecLab/livelabs
 . ORACLE_HOME = /u01/app/oracle/product/19.0.0/dbhome_1
 . DATA_DIR    = /u01/oradata/cdb1
 . PRIVATE_IP  = 10.0.0.150
 . PUBLIC_IP   = 129.153.205.252
--------------------------------------------------------------------------
                      USE THIS SCRIPT TO CHANGE ENV
       source /home/oracle/DBSecLab/admin/setEnv-cdb.sh <CDB> <PDB>
==========================================================================
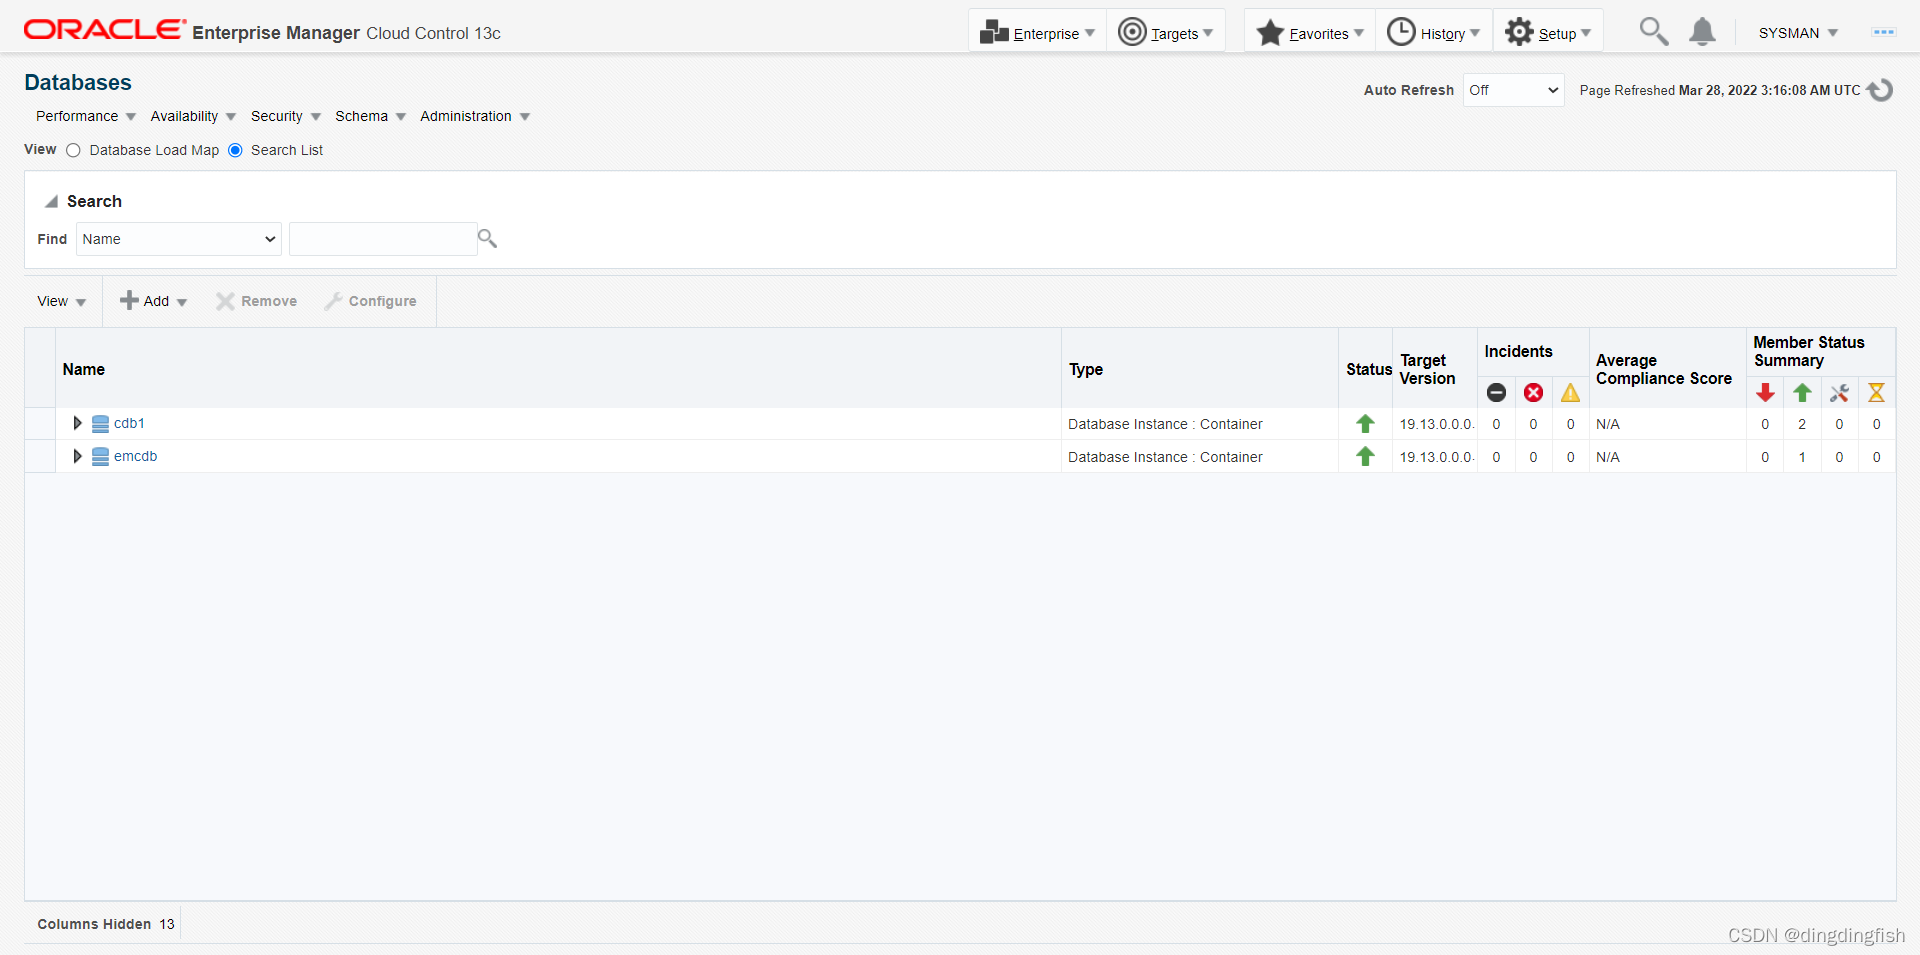
Task 1: Validate That Required Processes are Up and Running.
记录实验虚机的IP地址:129.153.205.252 , 以下用dbsec-lab代替。
确认Enterprise Manager 13c可以访问,网址为https://dbsec-lab:7803/em,注意,是https,而不是原文中的http。用户名sysman,口令Oracle123。
确认以下4个应用地址可以访问:
# PDB1
Prod: http://dbsec-lab:8080/hr_prod_pdb1
Dev: http://dbsec-lab:8080/hr_dev_pdb1

# PDB2
Prod: http://dbsec-lab:8080/hr_prod_pdb2
Dev: http://dbsec-lab:8080/hr_dev_pdb2
确认数据库服务已启动:
$ sudo systemctl status oracle-database
...
Mar 28 02:36:18 dbsec-lab systemd[1]: Starting The Oracle Database Service...
Mar 28 02:37:42 dbsec-lab systemd[1]: Started The Oracle Database Service.
确认数据库安全实验相关服务已启动:
$ sudo systemctl status oracle-database
● oracle-database.service - The Oracle Database Service
   Loaded: loaded (/etc/systemd/system/oracle-database.service; enabled; vendor preset: disabled)
   Active: active (running) since Mon 2022-03-28 02:37:42 UTC; 30min ago
  Process: 2758 ExecStart=/bin/bash -c /home/oracle/DBSecLab/admin/start_all_db.sh >> /home/oracle/DBSecLab/log/all_db_startup_shutdown.log 2>&1 (code=exited, status=0/SUCCESS)
    Tasks: 181
   Memory: 10.0G
   CGroup: /system.slice/oracle-database.service
           ├─ 4879 /u01/app/oracle/product/19.0.0/dbhome_1/bin/tnslsnr LISTENER -inherit
           ├─11282 ora_pmon_cdb1
           ├─11286 ora_clmn_cdb1
           ├─11290 ora_psp0_cdb1
           ├─11302 ora_vktm_cdb1
           ├─11322 ora_gen0_cdb1
           ├─11326 ora_mman_cdb1
           ├─11332 ora_gen1_cdb1
           ├─11335 ora_diag_cdb1
           ├─11337 ora_ofsd_cdb1
           ├─11340 ora_dbrm_cdb1
           ├─11344 ora_vkrm_cdb1
           ├─11346 ora_svcb_cdb1
           ├─11348 ora_pman_cdb1
           ├─11352 ora_dia0_cdb1
           ├─11354 ora_dbw0_cdb1
           ├─11358 ora_lgwr_cdb1
           ├─11362 ora_ckpt_cdb1
           ├─11366 ora_lg00_cdb1
           ├─11368 ora_smon_cdb1
           ├─11372 ora_lg01_cdb1
           ├─11374 ora_smco_cdb1
           ├─11376 ora_reco_cdb1
           ├─11378 ora_w000_cdb1
           ├─11380 ora_lreg_cdb1
           ├─11384 ora_w001_cdb1
           ├─11386 ora_pxmn_cdb1
           ├─11392 ora_mmon_cdb1
           ├─11394 ora_mmnl_cdb1
           ├─11396 ora_d000_cdb1
           ├─11398 ora_s000_cdb1
           ├─11400 ora_tmon_cdb1
           ├─11432 ora_m000_cdb1
           ├─11439 ora_tt00_cdb1
           ├─11441 ora_tt01_cdb1
           ├─11443 ora_tt02_cdb1
           ├─11457 ora_w002_cdb1
           ├─11461 ora_aqpc_cdb1
           ├─11465 ora_p000_cdb1
           ├─11467 ora_p001_cdb1
           ├─11470 ora_p002_cdb1
           ├─11472 ora_p003_cdb1
           ├─11572 ora_cjq0_cdb1
           ├─11618 ora_w003_cdb1
           ├─11792 oraclecdb1 (LOCAL=NO)
           ├─11884 ora_pmon_emcdb
           ├─11889 ora_clmn_emcdb
           ├─11893 ora_psp0_emcdb
           ├─11908 ora_w004_cdb1
           ├─11913 ora_vktm_emcdb
           ├─11919 ora_gen0_emcdb
           ├─11923 ora_mman_emcdb
           ├─11929 ora_gen1_emcdb
           ├─11932 ora_diag_emcdb
           ├─11934 ora_ofsd_emcdb
           ├─11937 ora_dbrm_emcdb
           ├─11941 ora_vkrm_emcdb
           ├─11943 ora_svcb_emcdb
           ├─11945 ora_pman_emcdb
           ├─11949 ora_dia0_emcdb
           ├─11951 ora_dbw0_emcdb
           ├─11955 ora_lgwr_emcdb
           ├─11959 ora_ckpt_emcdb
           ├─11963 ora_lg00_emcdb
           ├─11965 ora_smon_emcdb
           ├─11969 ora_lg01_emcdb
           ├─11971 ora_smco_emcdb
           ├─11973 ora_reco_emcdb
           ├─11975 ora_w000_emcdb
           ├─11977 ora_lreg_emcdb
           ├─11981 ora_w001_emcdb
           ├─11983 ora_pxmn_emcdb
           ├─11989 ora_mmon_emcdb
           ├─11991 ora_mmnl_emcdb
           ├─11993 ora_d000_emcdb
           ├─11995 ora_s000_emcdb
           ├─11997 ora_tmon_emcdb
           ├─12017 ora_m000_emcdb
           ├─12023 ora_qm02_cdb1
           ├─12029 ora_q003_cdb1
           ├─12046 ora_tt00_emcdb
           ├─12049 ora_tt01_emcdb
           ├─12051 ora_tt02_emcdb
           ├─12138 ora_m001_cdb1
           ├─12140 ora_m002_cdb1
           ├─12143 ora_m003_cdb1
           ├─12258 oraclecdb1 (LOCAL=NO)
           ├─12654 ora_w002_emcdb
           ├─12958 ora_w003_emcdb
           ├─12960 ora_aqpc_emcdb
           ├─12972 ora_cjq0_emcdb
           ├─13230 oracleemcdb (LOCAL=NO)
           ├─13314 ora_w004_emcdb
           ├─13317 oracleemcdb (LOCAL=NO)
           ├─13356 ora_q00e_cdb1
           ├─13362 ora_m001_emcdb
           ├─13364 ora_m002_emcdb
           ├─13388 ora_m003_emcdb
           ├─13391 ora_qm02_emcdb
           ├─13399 ora_q004_emcdb
           ├─13418 ora_q009_emcdb
           ├─13781 ora_cl00_cdb1
           ├─13785 ora_cl01_cdb1
           ├─14188 ora_w005_emcdb
           ├─14277 ora_cl00_emcdb
           ├─14280 ora_cl01_emcdb
           ├─14477 oracleemcdb (LOCAL=NO)
           ├─14479 oracleemcdb (LOCAL=NO)
           ├─14481 oracleemcdb (LOCAL=NO)
           ├─14554 oracleemcdb (LOCAL=NO)
           ├─14556 oracleemcdb (LOCAL=NO)
           ├─14558 oracleemcdb (LOCAL=NO)
           ├─14560 oracleemcdb (LOCAL=NO)
           ├─14693 oracleemcdb (LOCAL=NO)
           ├─14899 ora_w006_emcdb
           ├─14962 oracleemcdb (LOCAL=NO)
           ├─14971 oracleemcdb (LOCAL=NO)
           ├─14977 oracleemcdb (LOCAL=NO)
           ├─14980 oracleemcdb (LOCAL=NO)
           ├─14984 oracleemcdb (LOCAL=NO)
           ├─14986 oracleemcdb (LOCAL=NO)
           ├─14990 oracleemcdb (LOCAL=NO)
           ├─14992 oracleemcdb (LOCAL=NO)
           ├─14998 oracleemcdb (LOCAL=NO)
           ├─15000 oracleemcdb (LOCAL=NO)
           ├─15004 oracleemcdb (LOCAL=NO)
           ├─15009 oracleemcdb (LOCAL=NO)
           ├─15012 oracleemcdb (LOCAL=NO)
           ├─15025 oracleemcdb (LOCAL=NO)
           ├─15045 oracleemcdb (LOCAL=NO)
           ├─15113 oracleemcdb (LOCAL=NO)
           ├─15136 oracleemcdb (LOCAL=NO)
           ├─15151 oracleemcdb (LOCAL=NO)
           ├─15177 oracleemcdb (LOCAL=NO)
           ├─15179 oracleemcdb (LOCAL=NO)
           ├─15181 oracleemcdb (LOCAL=NO)
           ├─15183 oracleemcdb (LOCAL=NO)
           ├─15185 oracleemcdb (LOCAL=NO)
           ├─15243 ora_w007_emcdb
           ├─15580 oracleemcdb (LOCAL=NO)
           ├─17375 oracleemcdb (LOCAL=NO)
           ├─17436 ora_w008_emcdb
           ├─17457 ora_w009_emcdb
           ├─18340 ora_w00a_emcdb
           ├─19523 oracleemcdb (LOCAL=NO)
           ├─20718 ora_m004_cdb1
           ├─20752 ora_w005_cdb1
           ├─20787 ora_w006_cdb1
           ├─20881 ora_w007_cdb1
           ├─20926 ora_w008_cdb1
           ├─20929 ora_w00b_emcdb
           ├─20946 ora_w009_cdb1
           ├─20949 ora_w00c_emcdb
           ├─20969 ora_w00a_cdb1
           ├─21005 ora_w00b_cdb1
           ├─21032 ora_w00d_emcdb
           ├─21068 ora_w00e_emcdb
           ├─21090 ora_w00c_cdb1
           ├─21101 ora_w00f_emcdb
           ├─21126 ora_w00d_cdb1
           ├─21154 ora_w00e_cdb1
           ├─21173 ora_w00f_cdb1
           ├─23209 ora_m004_emcdb
           ├─23378 oracleemcdb (LOCAL=NO)
           ├─25588 oracleemcdb (LOCAL=NO)
           ├─26265 oracleemcdb (LOCAL=NO)
           ├─28088 oraclecdb1 (LOCAL=NO)
           ├─28090 oraclecdb1 (LOCAL=NO)
           ├─28092 oraclecdb1 (LOCAL=NO)
           ├─28094 oraclecdb1 (LOCAL=NO)
           ├─28099 oraclecdb1 (LOCAL=NO)
           ├─28108 oraclecdb1 (LOCAL=NO)
           ├─28223 ora_p000_emcdb
           ├─28225 ora_p001_emcdb
           ├─28227 ora_p002_emcdb
           └─28229 ora_p003_emcdb

Mar 28 02:36:18 dbsec-lab systemd[1]: Starting The Oracle Database Service...
Mar 28 02:37:42 dbsec-lab systemd[1]: Started The Oracle Database Service.
Lab 4: Database Security Assessment Tool (DBSAT)
Introduction
本研讨会介绍 Oracle 数据库安全评估工具 (DBSAT) 的功能。 它使用户学习如何使用此功能来评估数据库的所有安全组件。
Task 1: Installing DBSAT
软件从Oracle Support Document 2138254.1 中下载,本实验已下载。安装即解压,安装目录为$DBSEC_LABS/dbsat/dbsat222。2.2.2是最新版本。
sudo su - oracle
cd $DBSEC_LABS/dbsat
mkdir dbsat222
unzip /u01/app/sources/dbsat-2.2.2.zip -d dbsat222
软件大小为6M:
$ cd $DBSEC_LABS/dbsat
$ du -sh .
6.0M    .
Task 2: Collect data
先来看一下帮助:
$ ./dbsat --help

Database Security Assessment Tool version 2.2.2 (June 2021)

    Usage: dbsat collect [ -n ] <database_connect_string> <output_file>
           dbsat report [ -a ] [ -n ] [ -g ] [ -x <section> ] <input_file>
           dbsat discover [ -n ] -c <config_file> <output_file>

    Options:
       -a  Report with all user accounts, including locked and schema-only,
           Oracle-supplied users
       -n  No encryption for output
       -g  Show all grants including Common Grants in a Pluggable Database
       -x  Specify sections to exclude from report (may be repeated for
           multiple sections)
       -c  Configuration file for discoverer
运行DBSAT,从pdb1中搜集数据(pdbhol是输出文件):
cd $DBSEC_LABS/dbsat/dbsat222
./dbsat
./dbsat collect dbsat_admin/Oracle123@pdb1 pdbhol
DBSAT只对数据库执行查询,不会在数据库中创建对象。
输出如下(请忽略其中的tfactl警告),注意最后需要指定需要加密文件的口令:
Setup complete.
SQL queries complete.
/bin/ls: cannot access /u01/app/oracle/product/19.0.0/dbhome_1/bin/tfactl: No such file or directory
Warning: Exit status 256 from OS rule: executable_permission
Warning: Exit status 256 from OS rule: dbcs_status
OS commands complete.
Disconnected from Oracle Database 19c Enterprise Edition Release 19.0.0.0.0 - Production
Version 19.13.0.0.0
DBSAT Collector completed successfully.

Calling /u01/app/oracle/product/19.0.0/dbhome_1/bin/zip to encrypt pdbhol.json...

Enter password:
Verify password:
  adding: pdbhol.json (deflated 89%)
zip completed successfully.
输出文件如下:
$ ls -l *zip
-rw-------. 1 oracle oinstall 106926 Mar 28 03:48 pdbhol.zip
注意2个要求:
- 为了收集完整的数据,当它执行操作系统命令来收集进程和文件系统信息时,DBSAT 收集器必须在包含数据库的服务器上运行
- 此外,DBSAT 收集器必须以对 ORACLE_HOME 下的文件和目录具有读取权限的 OS 用户身份运行,包括 TNS_ADMIN(如果设置了)
Task 3: Generate the report
和数据库的交互就结束了,运行report分析collect的数据:
$ cd $DBSEC_LABS/dbsat/dbsat222
$ ./dbsat report pdbhol

Database Security Assessment Tool version 2.2.2 (June 2021)

This tool is intended to assist you in securing your Oracle database
system. You are solely responsible for your system and the effect and
results of the execution of this tool (including, without limitation,
any damage or data loss). Further, the output generated by this tool may
include potentially sensitive system configuration data and information
that could be used by a skilled attacker to penetrate your system. You
are solely responsible for ensuring that the output of this tool,
including any generated reports, is handled in accordance with your
company's policies.

Archive:  pdbhol.zip
[pdbhol.zip] pdbhol.json password:
  inflating: pdbhol.json
DBSAT Reporter ran successfully.

Calling /usr/bin/zip to encrypt the generated reports...

Enter password:
Verify password:
        zip warning: pdbhol_report.zip not found or empty
  adding: pdbhol_report.txt (deflated 85%)
  adding: pdbhol_report.html (deflated 86%)
  adding: pdbhol_report.xlsx (deflated 3%)
  adding: pdbhol_report.json (deflated 86%)
zip completed successfully.
注意:
- 输出不需要指定 .zip 扩展名
- DBSAT 报告器将收集器生成的文件(json 或 zip 文件)作为输入,并将生成一个 zip 文件,其中包含四种不同格式的报告:HTML、电子表格、JSON 和文本
- 如果选择不加密数据,则在指定目录生成四个报告文件
$ ls -l *zip
-rw-------. 1 oracle oinstall 182661 Mar 28 05:45 pdbhol_report.zip
-rw-------. 1 oracle oinstall 106926 Mar 28 03:48 pdbhol.zip
然后就可以解压看报告了:
$ unzip pdbhol_report.zip
Archive:  pdbhol_report.zip
[pdbhol_report.zip] pdbhol_report.txt password:
  inflating: pdbhol_report.txt
  inflating: pdbhol_report.html
  inflating: pdbhol_report.xlsx
  inflating: pdbhol_report.json
可以下载报告pdbhol_report.html到本地查看。或者利用实验提供的glassfish webserver查看:
. ../dbsat_use_glassfish_webserver.sh
http://129.153.205.252:8080/hr_prod_pdb1/dbsat/pdbhol_report.html
Task 4: Analyze the Report - Summary
Database Identity中包含评估主机的信息。
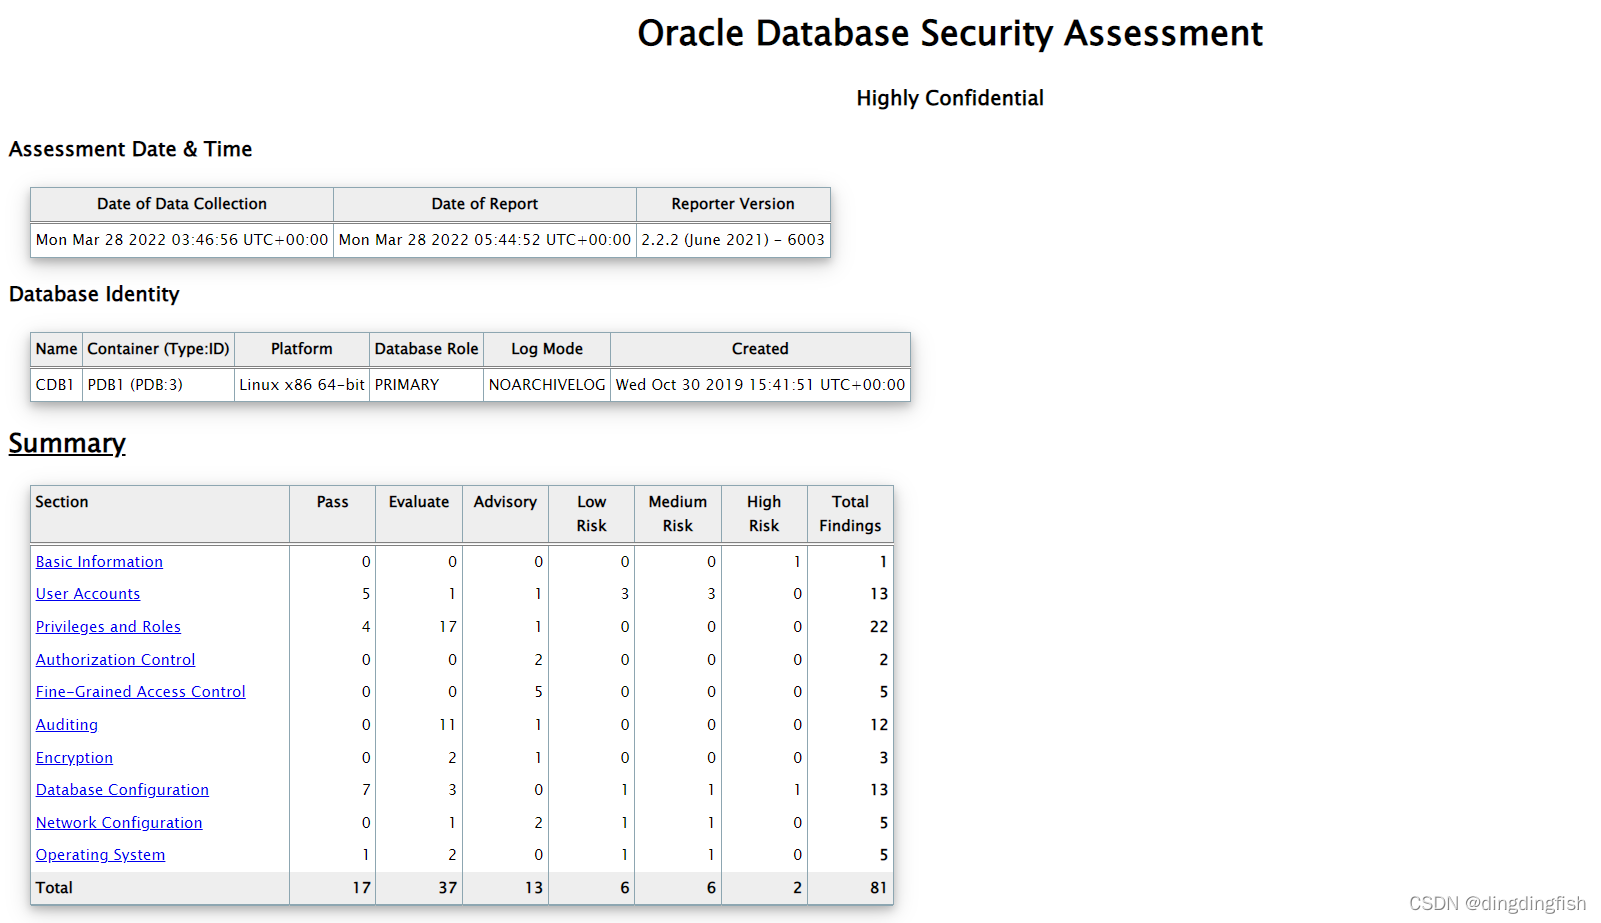
注:
- “Total Findnigs”少于 70 个结果可能表明收集数据存在一些问题
- 您将在 HTML 报告的底部找到有关原因的更多详细信息
- 收集器生成的 JSON 文件也可用于进一步的故障排除
- 如果您针对 ADW/ATP 运行 DBSAT 或远程运行收集器,您将获得少于 80 个结果
- 这样做的主要原因是我们跳过了与操作系统相关的发现和依赖于从操作系统读取文件的发现的集合
Task 5: Analyze the Report - Findings
DBSAT Reporter 结果分析以称为Finding的单位报告,在您看到的每个“Finding”中:
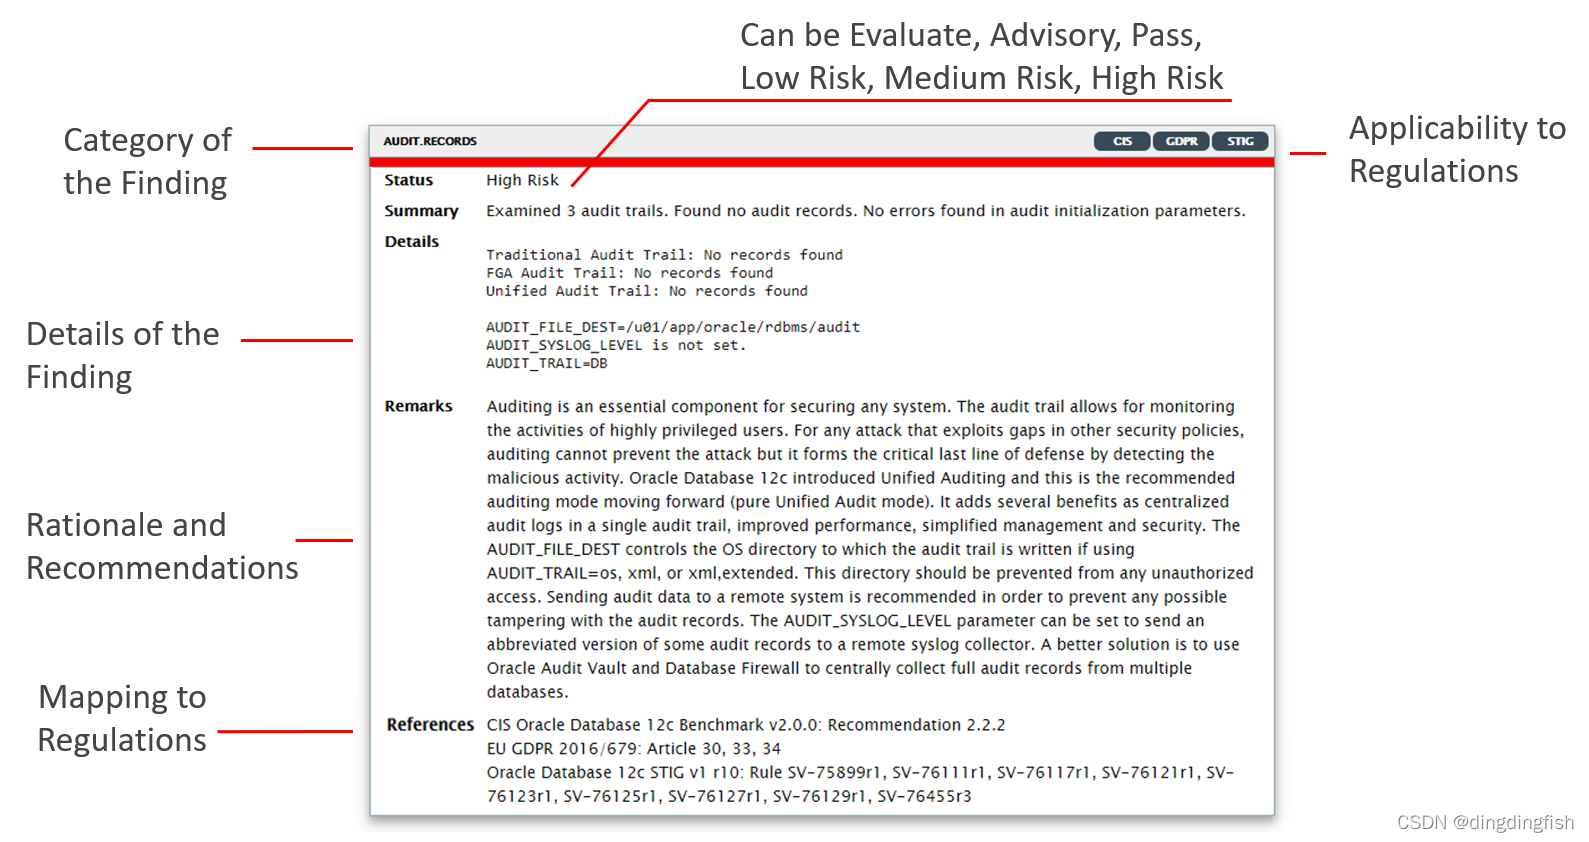
各部分的说明如下。
-
规则的唯一 ID: ID 有两部分:前缀标识报告部分,后缀标识特定规则
-
Status 您可以将状态值用作实施 DBSAT 建议的指导方针,它们可用于根据风险级别以及对您的组织可能意味着什么来确定优先级和安排更改 - 例如,高风险可能需要立即采取补救措施,而其他风险可能会在计划的停机时间内得到修复,或者与其他维护活动捆绑在一起:
- Pass (未发现错误)
- Evaluate(需要人工分析)
- Low Risk
- Medium Risk
- High Risk
- Advisory(通过启用额外的安全功能和技术来改善安全状况。姿势和改进机会)
-
Summary 提供结果的简短摘要。当发现具有信息性时,摘要通常仅报告已检查的数据元素的数量。
-
Details 提供详细信息以解释调查结果摘要,通常是评估数据库的结果,然后是任何更改建议。
-
Remarks 解释规则的原因和建议的补救措施。
-
References 如果发现与 CIS Oracle Database Benchmark 12c v2.0.0 建议、Oracle Database 12c STIG v1 r10 或 GDPR 文章/Recitals 相关,将在此处提及
Task 6: Analyze the Report - Details
看一个实际报告中的例子:
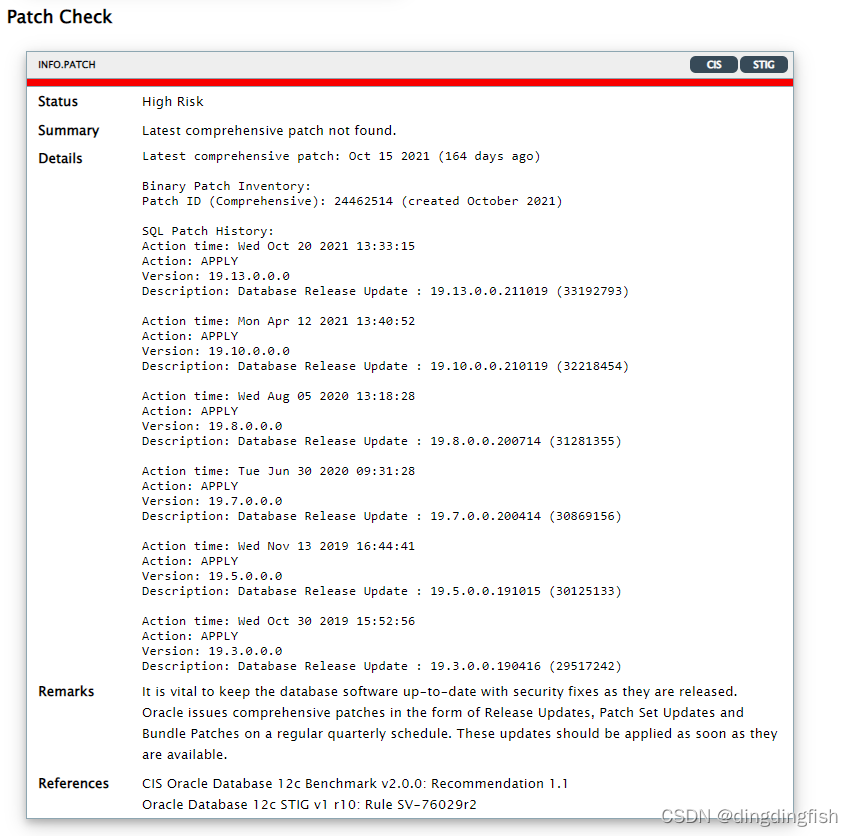
- 唯一ID:INFO.PATCH
- Status:High Risk
- Summary:Latest comprehensive patch not found.
- Details:具体的补丁,略。
- Remarks:在数据库软件发布时使用安全修复程序使它们保持最新是至关重要的。 Oracle 按季度定期以发行更新、补丁集更新和捆绑补丁的形式发布综合补丁。 这些更新应在可用时立即应用。
- References:CIS和STIG
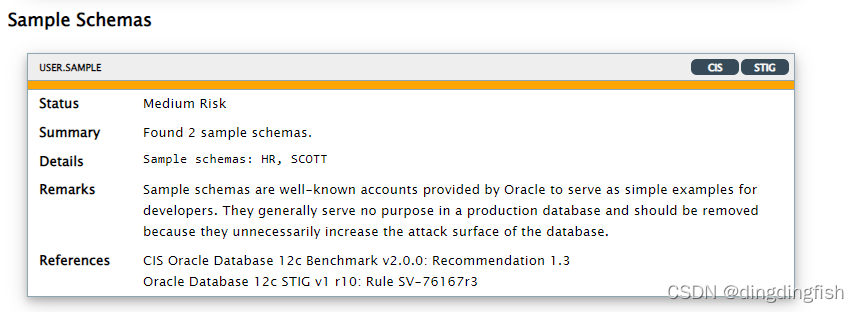
原文中给出可另一个中风险的例子,说明为:示例Schema是 Oracle 提供的众所周知的帐户,可作为开发人员的简单示例。 它们通常在生产数据库中没有用,应该被删除,因为它们不必要地增加了数据库的攻击面。
再来看一个低风险的例子,说明为:如果用户帐户不再使用,它会不必要地增加系统的攻击面,同时不会提供相应的好处。 此外,当没有人经常使用该帐户时,未经授权的使用不太可能被注意到。 应调查超过 30 天未使用的帐户以确定它们是否应保持活动状态。 一种解决方案是在分配给用户的配置文件中设置 INACTIVE_ACCOUNT_TIME 以自动锁定在指定天数内未登录到数据库实例的帐户。 还建议对不经常使用的帐户进行未经授权的活动进行审计。
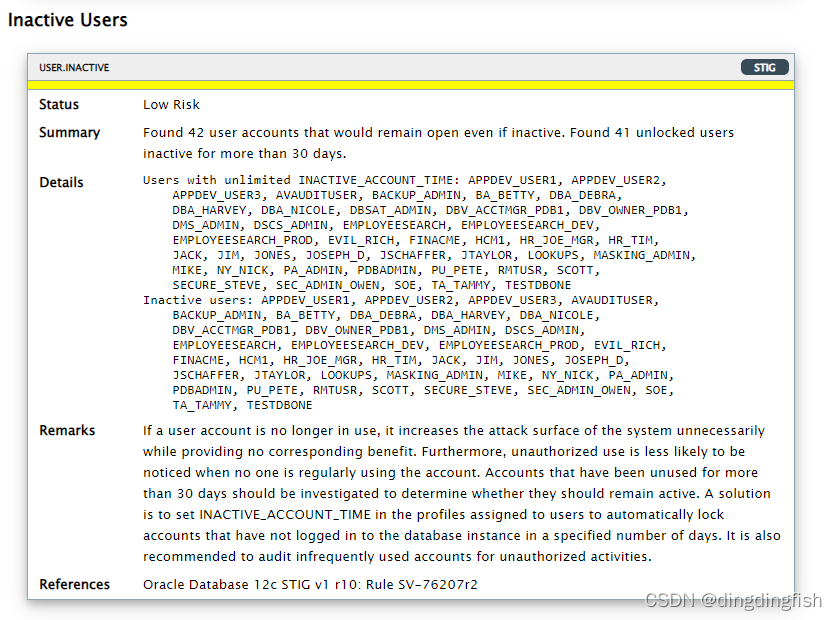
其中列出了无限INACTIVE_ACCOUNT_TIME的用户。但我们需要继续查看是否用户的user profile中指定了无限的INACTIVE_ACCOUNT_TIME。往上滑动到User Accounts中部分可以查看用户的Profile,例如DEFAULT即表示设置了默认的INACTIVE_ACCOUNT_TIME。
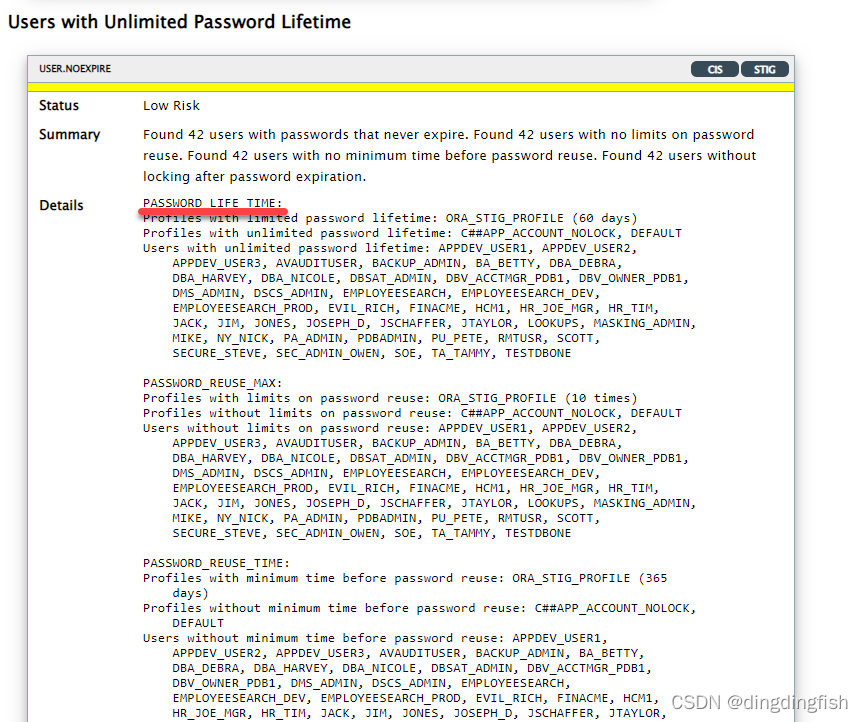
再来看一个口令过期设置的例子:
我们可以进一步在Privileges and Roles部分,查看用户所具有的权限。
在PRIV.SYSTEM(用户具有的系统权限)部分,注意以下标识:

D:表示用户通过直接授予获得该特权*:granted with admin optionC:commonly granted(D)(*):组合
在 PRIV.ACCT部分显示直接或间接授予帐户管理权限。在PRIV.DBA部分,显示用户具有的DBA角色。
再来看一下Authorization Control部分。AUTH.DV和Database Vault相关,蓝色表示有改进可能。AUTH.PRIV和权限分析相关。
Privilege Analysis was first introduced with Oracle Database 12c and licensed as part of the Oracle Database Vault option。但是现在已经包含在企业版之中了。This change applies to all supported versions of the Oracle Database。
权限分析允许:
- 报告数据库中使用的实际权限和角色,例如 捕获一段时间内的特权和角色使用情况并报告使用情况
- 按用户和应用程序识别未使用的权限和角色,例如 DBA 使用的特权
- 通过帮助为用户和应用程序强制执行最小权限来降低风险
ACCESS.REDACT部分表示细粒度访问控制。相关Oracle技术包括:Data Redaction, VPD, RAS Policies, Label Security and Transparent Sensitive Data Protection (TSDP) policies。
Auditing部分与审计相关。Transparent Data Encryption与数据加密相关。例如,GDPR(第 32 条)将加密视为核心技术之一,使任何无权访问个人数据的人无法理解数据。
Database Configuration部分显示和安全相关的初始化参数。
CONF.DIR和Directory对象有关。不应允许访问由数据库内核本身使用的文件。 具有写入和执行的目录将被标记。确保所有 DIRECTORY 对象都是必需的,对于需要的对象,将它们指向$ORACLE_HOME、$ORACLE_BASE之外的目录。
CONF.BKUP和备份相关,在过去90天都没有做过备份。
OS.FILES部分指示错误设置的操作系统权限。
Task 7: Discover Sensitive Data
前面已经运行了dbsat的collect和report。本节介绍dbsat的discover。
cd $DBSEC_LABS/dbsat/dbsat222/Discover/conf
修改配置文件:
cp sample_dbsat.config dbsat.config
chmod +w dbsat.config
vi dbsat.config
配置文件如下,唯一修改的地方是将DB_SERVICE_NAME赋值为pdb1:
$ cat dbsat.config|grep -v "^#"|grep -v "^[[:space:]]*$"
[Database]
        TNS_ADMIN =
        NET_SERVICE_NAME =
        WALLET_LOCATION =
        DB_HOSTNAME = localhost
        DB_PORT = 1521
        DB_SERVICE_NAME = pdb1
         SSL_ENABLED = FALSE
        SSL_TRUSTSTORE =
        SSL_TRUSTSTORE_TYPE =
        SSL_KEYSTORE =
        SSL_KEYSTORE_TYPE =
        SSL_DN =
        SSL_VERSION =
        SSL_CIPHER_SUITES =
[Discovery Parameters]
        SENSITIVE_PATTERN_FILES = sensitive_en.ini
        SCHEMA_SCOPE = ALL
        MINROWS = 1
        EXCLUSION_LIST_FILE =
[Sensitive Categories]
    Identification Info - National IDs = High Risk
    Identification Info - Personal IDs = High Risk
    Identification Info - Public IDs = High Risk
    Biographic Info - Address = High Risk
    Biographic Info - Family Data = High Risk
    Biographic Info - Extended PII  = High Risk
    Biographic Info - Restricted Data = High Risk
    IT Info - User Data = High Risk
    IT Info - Device Data = Medium Risk
    Financial Info - Card Data = High Risk
    Financial Info - Bank Data = High Risk
    Health Info - Insurance Data  = High Risk
    Health Info - Provider Data = Medium Risk
    Health Info - Medical Data = Medium Risk
    Job Info - Employee Data = High Risk
    Job Info - Org Data = Low Risk
    Job Info - Compensation Data = High Risk
    Academic Info - Student Data = High Risk
    Academic Info - Institution Data = Medium Risk
    Academic Info - Performance Data = Low Risk
还有一个关联的模式文件定义了什么是敏感数据,模式文件和配置文件需在同一目录:
$ wc -l sensitive_en.ini
827 sensitive_en.ini
模式文件没有找到中文的,但你可以模仿然后自己制作一个。
配置文件可以设置:
- 数据库连接详细信息
- SSL 参数
- Discover参数
- 敏感类别和相关风险级别
有了配置文件,就可以开始发现了,用户名口令分别输入DBSAT_ADMIN和Oracle123:
cd ../..
./dbsat discover -c Discover/conf/dbsat.config pdb1_dbsat


Database Security Assessment Tool version 2.2.2 (June 2021)

This tool is intended to assist you in securing your Oracle database
system. You are solely responsible for your system and the effect and
results of the execution of this tool (including, without limitation,
any damage or data loss). Further, the output generated by this tool may
include potentially sensitive system configuration data and information
that could be used by a skilled attacker to penetrate your system. You
are solely responsible for ensuring that the output of this tool,
including any generated reports, is handled in accordance with your
company's policies.

Enter username: DBSAT_ADMIN
Enter password:
DBSAT Discover ran successfully.
Calling /usr/bin/zip to encrypt the generated reports...

Enter password:
Verify password:
        zip warning: pdb1_dbsat_report.zip not found or empty
  adding: pdb1_dbsat_discover.html (deflated 86%)
  adding: pdb1_dbsat_discover.csv (deflated 86%)
Zip completed successfully.

$ ls -l *zip
-rw-------. 1 oracle oinstall  12484 Mar 28 08:24 pdb1_dbsat_report.zip
-rw-------. 1 oracle oinstall 182661 Mar 28 05:45 pdbhol_report.zip
-rw-------. 1 oracle oinstall 106926 Mar 28 03:48 pdbhol.zip
显然,discover的过程是需要连数据库的。
解压报告:
unzip pdb1_dbsat_report.zip
下载并查看pdb1_dbsat_discover.html,或者用以下方式:
$ . ../dbsat_use_glassfish_webserver.sh
...
. Use your local browser to view it on your PUBLIC_IP at:
http://129.153.205.252:8080/hr_prod_pdb1/dbsat/pdb1_dbsat_discover.html
http://129.153.205.252:8080/hr_prod_pdb1/dbsat/pdbhol_report.html
Task 8: Analyze the Discoverer Report - Summary
在报告的初始部分给出了Discover对象的概要信息。
关键是Discovery Parameters部分。
- Schemas Scope=ALL :扫描的Schema,即使是ALL也排除了SYS, SYSTEM 和其它Oracle maintained schemas
- Exclusion List File = NONE :排除表列表,分号分割,形式为schemaA.tableA
- Minimum Rows Count = [1 (default)] :小于指定行数的表不会被扫描
- Pattern File(s) = [sensitive.ini (default), other.ini, …] :模式文件,默认为英文
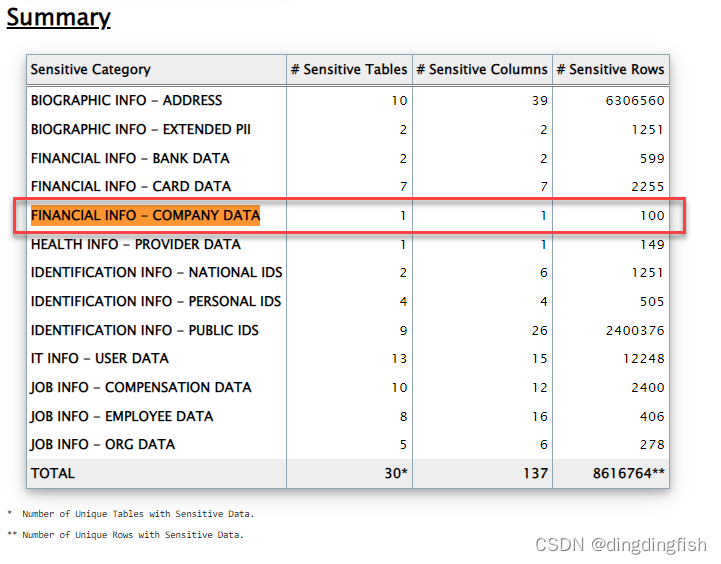
发现的概要如下:
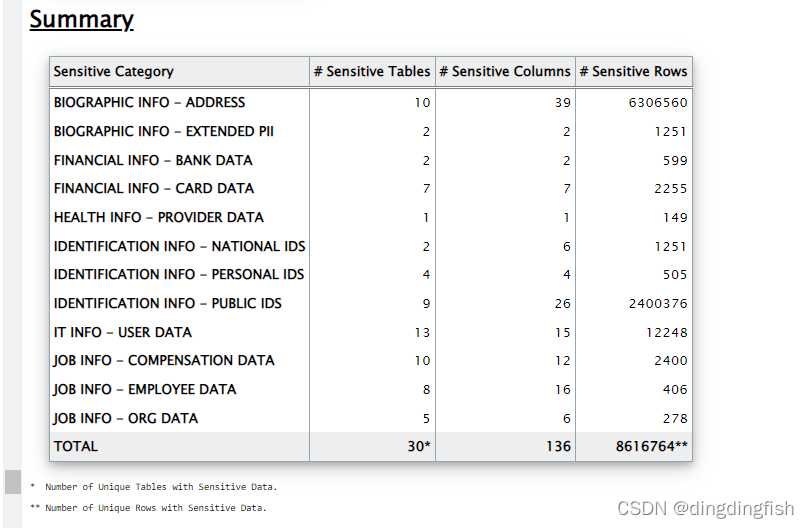
注意:
- 一个表可能包含匹配多个Category的列/或列注释,这使得#Sensitive Tables 和#Sensitive Rows 的总数不会相加
- 在 Total 行中,DBSAT 显示唯一数量的表和唯一的行数
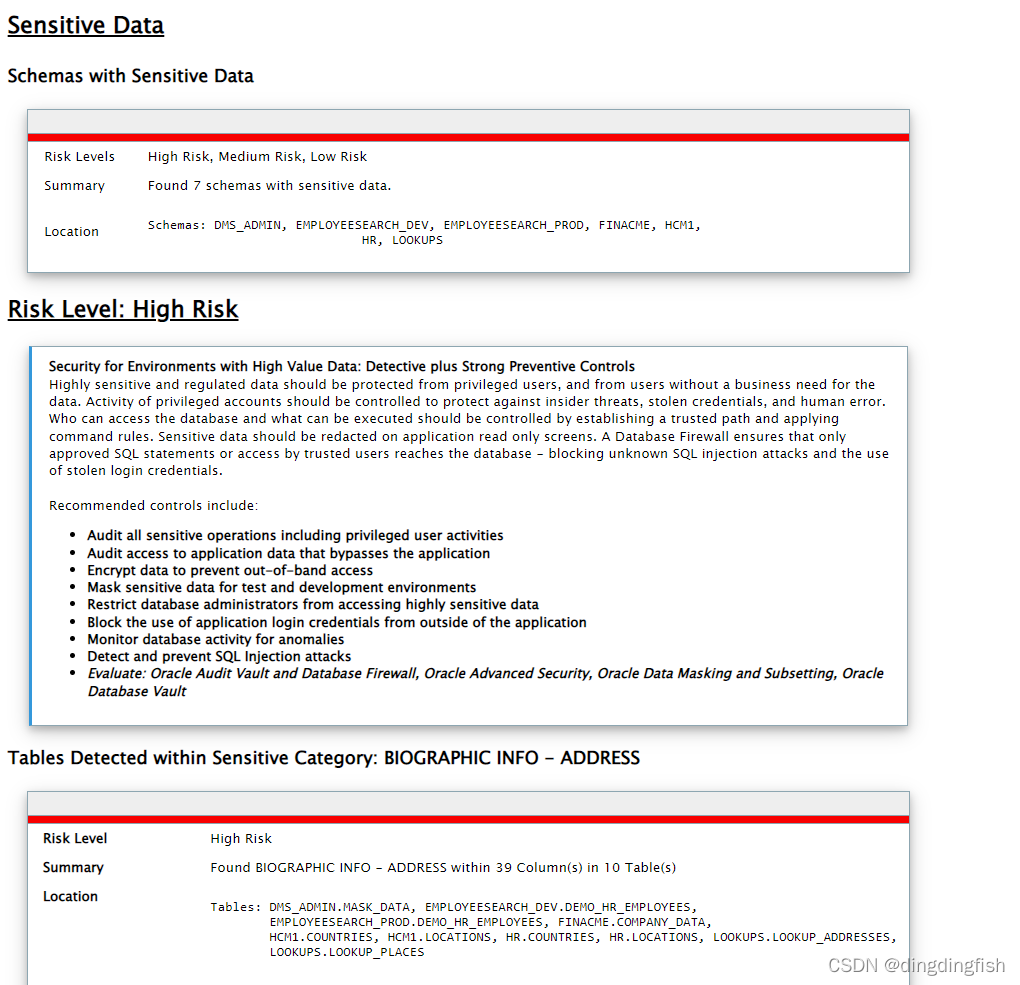
上图显示了有敏感数据的Schema,然后是Risk Level及建议。最后是Tables Detected within Sensitive Category。Schema View中有表的详细信息和Sensitive Column Details。
DBSAT Discover的 csv 输出文件可用于帮助 Oracle Audit Vault 和 Database Firewall 了解您拥有哪些敏感数据,并为您提供有关谁在访问敏感数据的报告 – 隐私报告
Task 9: Advanced Discoverer - Getting into dbsat.config Discovery parameters
本节学习DBSAT配置文件dbsat.config如何影响DBSAT Discoverer的行为。我们将:
- 使用 EXCLUDE_LIST_FILE 参数从报告中排除列
- 使用 SCHEMA_SCOPE 参数指定或排除模式
- 使用 MINROWS 参数排除少于 5 行的表(这对于根据行数排除表很有用)
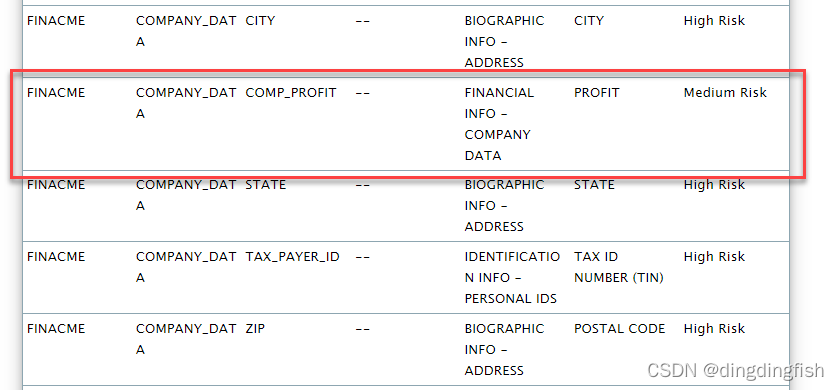
在Sensitive Column Details部分,红框部分表示,表 HCM1.SUPPLEMENTAL_DATA 中的 LAST_INS_CLAIM 列包含HEALTHCARE PROVIDE数据。
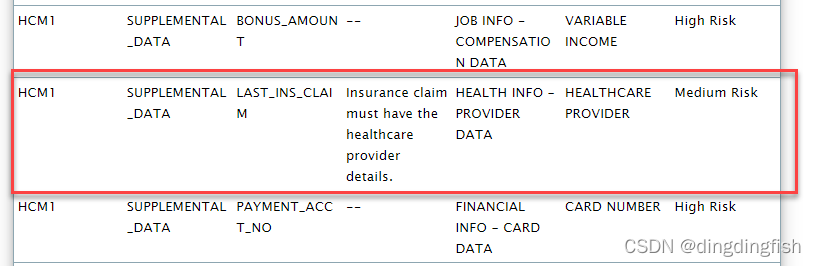
我们假定数据中并不包含HEALTHCARE PROVIDE数据,这个误判是由于Column Comment Insurance claim must have the healthcare provider details.导致的。因此我们需要排除掉此列。
接下来我们需要获取此列的FQCN(Fully Qualified Column Name)。当然你可以从Excel中查看,本例使用命令行,得到其FQCN为HCM1.SUPPLEMENTAL_DATA.LAST_INS_CLAIM:
$ column -s, -t < pdb1_dbsat_discover.csv |grep LAST_INS_CLAIM
"HCM1"                                                                    "SUPPLEMENTAL_DATA"          "LAST_INS_CLAIM"       "VARCHAR2"          "HEALTH INFO - PROVIDER DATA"         "HEALTHCARE PROVIDER"                   "HCM1.SUPPLEMENTAL_DATA.LAST_INS_CLAIM"                          149       "Insurance claim must have the healthcare provider details."
创建以下排除文件exclude.ini:
$ cat Discover/conf/exclude.ini
HCM1.SUPPLEMENTAL_DATA.LAST_INS_CLAIM
然后在配置文件中指定此排除文件:
$ grep EXCLUSION_LIST_FILE Discover/conf/dbsat.config
#EXCLUSION_LIST_FILE contains schemas, tables and columns to be excluded from the scan
        EXCLUSION_LIST_FILE = exclude.ini
再次运行DBSAT discover,指定新的文件名pdb1_dbsat_v2,用户名口令分别为DBSAT_ADMIN和Oracle123:
$ ./dbsat discover -c Discover/conf/dbsat.config pdb1_dbsat_v2
Database Security Assessment Tool version 2.2.2 (June 2021)

This tool is intended to assist you in securing your Oracle database
system. You are solely responsible for your system and the effect and
results of the execution of this tool (including, without limitation,
any damage or data loss). Further, the output generated by this tool may
include potentially sensitive system configuration data and information
that could be used by a skilled attacker to penetrate your system. You
are solely responsible for ensuring that the output of this tool,
including any generated reports, is handled in accordance with your
company's policies.

Enter username: DBSAT_ADMIN
Enter password:
DBSAT Discover ran successfully.
Calling /usr/bin/zip to encrypt the generated reports...

Enter password:
Verify password:
        zip warning: pdb1_dbsat_v2_report.zip not found or empty
  adding: pdb1_dbsat_v2_discover.html (deflated 86%)
  adding: pdb1_dbsat_v2_discover.csv (deflated 86%)
Zip completed successfully.
解压:
$ unzip pdb1_dbsat_v2_report.zip
下载pdb1_dbsat_v2_discover.html并查看,或使用以下的方法:
$ . ../dbsat_use_glassfish_webserver.sh

==============================================================================
 Set Glassfish to use DBSAT...
==============================================================================

. Start Glassfish

==============================================================================
 Start Glassfish App...
==============================================================================

. It appears glassfish is already started!


. Make a directory in the Glassfish HR app for the DBSAT HTML file

. Copy the .html files to our new Glassfish DBSAT directory

. Use your local browser to view it on your PUBLIC_IP at:
http://129.153.205.252:8080/hr_prod_pdb1/dbsat/pdb1_dbsat_discover.html
http://129.153.205.252:8080/hr_prod_pdb1/dbsat/pdb1_dbsat_v2_discover.html
http://129.153.205.252:8080/hr_prod_pdb1/dbsat/pdbhol_report.html
这一回,在Sensitive Column Details中已搜索不到LAST_INS_CLAIM。
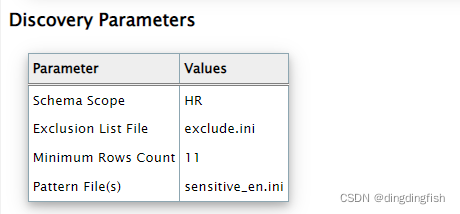
接下来,指定schema为HR,指定小于11行的表均不扫描:
$ egrep -e "SCHEMA_SCOPE|MINROWS" Discover/conf/dbsat.config
#SCHEMA_SCOPE defines comma separated schemas to be scanned.
        SCHEMA_SCOPE = HR
#MINROWS is the minimum number of rows in a table for it to be scanned.
        MINROWS = 11
重新运行DBSAT discover,指定新的文件名pdb1_dbsat_v3,用户名口令分别为DBSAT_ADMIN和Oracle123:
$ ./dbsat discover -c Discover/conf/dbsat.config pdb1_dbsat_v3
解压:
$ unzip pdb1_dbsat_v3_report.zip
Archive:  pdb1_dbsat_v3_report.zip
[pdb1_dbsat_v3_report.zip] pdb1_dbsat_v3_discover.html password:
  inflating: pdb1_dbsat_v3_discover.html
  inflating: pdb1_dbsat_v3_discover.csv
下载pdb1_dbsat_v3_discover.html并查看,或使用以下的方法:
$ . ../dbsat_use_glassfish_webserver.sh
...
. Use your local browser to view it on your PUBLIC_IP at:
http://129.153.205.252:8080/hr_prod_pdb1/dbsat/pdb1_dbsat_discover.html
http://129.153.205.252:8080/hr_prod_pdb1/dbsat/pdb1_dbsat_v2_discover.html
http://129.153.205.252:8080/hr_prod_pdb1/dbsat/pdb1_dbsat_v3_discover.html
http://129.153.205.252:8080/hr_prod_pdb1/dbsat/pdbhol_report.html
在报告中可以看到配置已生效:
Task 10: Advanced Discoverer - Getting into Pattern files, Sensitive Types, and Categories
创建测试Schema,测试表:
$ sqlplus system/Oracle123@pdb1
drop user finacme cascade;
create user finacme identified by oracle temporary tablespace temp default tablespace users;
grant connect, create session to finacme;
grant create table to finacme;
alter user finacme quota 100M on USERS;

create table finacme.company_data (
   company_id number not null constraint company_data_company_id_pk primary key,
   name varchar2(20),
   stadr varchar2(20),
   city varchar2(20),
   state varchar2(20),
   zip varchar2(20),
   tax_payer_id number(12),
   comp_profit number(20),
   fy_end_date date );
插入100条测试数据:
begin
  for i in 1..100 loop
      insert into finacme.company_data values (i, 'Company '||initcap(dbms_random.string('A', 10)) , 'California', 'San Francisco','CA','90000'+i,'19442350012'+i, i+23440003, sysdate-i);
  end loop;
end;
/
commit;
更新统计信息:
exec dbms_stats.gather_table_stats('FINACME','COMPANY_DATA');
大致看下数据:
set pages 120
set lines 150

select * from finacme.company_data;
...
        99 Company Ogbbrumspq   California           San Francisco        CA                   90099                  1.9442E+10    23440102 19-DEC-21
       100 Company Obromyjdvv   California           San Francisco        CA                   90100                  1.9442E+10    23440103 18-DEC-21

100 rows selected.
Task 11: Advanced Discoverer - Pattern Files
DBSAT 使用pattern file和定义的正则表达式来查找敏感数据。
pattern file就是之前使用的sensitive_en.ini。
chmod +w Discover/conf/sensitive_en.ini
vi Discover/conf/sensitive_en.ini
以文件中的一部分为例:
[NATIONAL IDENTIFIER]
COL_NAME_PATTERN = (^|[_-])(NATIONAL.*(ID|IDENTIFICATION)|SSN#?|SIN#?|SOCIAL.?(INSURANCE|SECURITY).?(ID|NUMBERS?|NUM|NO|NBR|#))($|[_-])
COL_COMMENT_PATTERN = NATIONAL.?(ID|IDENTIFICATION)|\bSSN#?\b|\bSIN#?\b|SOCIAL.?(INSURANCE|SECURITY).?(ID|NUM|NBR|#)
SENSITIVE_CATEGORY = Identification Info - National IDs
- NATIONAL IDENTIFIER表示SENSITIVE_TYPE_NAME。
- COL_NAME_PATTERN表示用于搜索列名的 Java 正则表达式
- COL_COMMENT_PATTERN表示用于搜索列注释的 Java 正则表达式
- SENSITIVE_TYPE_NAME所属的Sensitive Category
在配置文件中,指定了需要扫描的Sensitive Categories:
$ cat Discover/conf/dbsat.config
...
[Sensitive Categories]
    Identification Info - National IDs = High Risk
    Identification Info - Personal IDs = High Risk
    Identification Info - Public IDs = High Risk
    Biographic Info - Address = High Risk
    Biographic Info - Family Data = High Risk
    Biographic Info - Extended PII  = High Risk
    Biographic Info - Restricted Data = High Risk
    IT Info - User Data = High Risk
    IT Info - Device Data = Medium Risk
    Financial Info - Card Data = High Risk
    Financial Info - Bank Data = High Risk
    Health Info - Insurance Data  = High Risk
    Health Info - Provider Data = Medium Risk
    Health Info - Medical Data = Medium Risk
    Job Info - Employee Data = High Risk
    Job Info - Org Data = Low Risk
    Job Info - Compensation Data = High Risk
    Academic Info - Student Data = High Risk
    Academic Info - Institution Data = Medium Risk
    Academic Info - Performance Data = Low Risk
以下演示增加1个Sensitive Categories。
首先,还原dbsat.config文件,按以下设置:
# vi Discover/conf/dbsat.config
SCHEMA_SCOPE = ALL
MINROWS = 1
EXCLUSION_LIST_FILE =
然后在文件末添加以下:
Financial Info - Company Data = Medium Risk
在Discover/conf/sensitive_en.ini文件末尾添加具体的定义:
# Financial Info - Company Data
[PROFIT]
COL_NAME_PATTERN = ^(?!.*(NON)).*PROFIT
COL_COMMENT_PATTERN = ^(?!.*(NON)).*PROFIT
SENSITIVE_CATEGORY = Financial Info - Company Data
重新执行DBSAT discover,用户名口令分别为DBSAT_ADMIN和Oracle123:
$ ./dbsat discover -c Discover/conf/dbsat.config pdb1_dbsat_v4
解压:
$ unzip pdb1_dbsat_v4_report.zip
Archive:  pdb1_dbsat_v4_report.zip
[pdb1_dbsat_v4_report.zip] pdb1_dbsat_v4_discover.html password:
  inflating: pdb1_dbsat_v4_discover.html
  inflating: pdb1_dbsat_v4_discover.csv
查看报告pdb1_dbsat_v4_discover.html:
此表有5个列都是敏感列,但因为新建规则的只有1列,原因是列名与PROFIT匹配。
Task 12: Processing DBSAT report JSON output
在本练习中,您将接触到 DBSAT 实用程序(“dbsat_diff”和“dbsat_extract”)、JSON 输出报告以及如何从中获取关系视图。 JSON 报告的主要目的是打开 DBSAT 报告器以与第三方工具集成。 另一个用例可能是构建一个模型以从多个数据库加载数据并能够比较/生成并排报告。
这些示例实用程序可以从Doc ID 2138254.1 中下载。
cd $DBSEC_LABS/dbsat
unzip dbsat_util.zip -d dbsat222
使用:
cd dbsat222
python dbsat_extract -i CRYPT.TDE -i CONF.PWDFILE -v pdbhol_report.json
输出为:
=== pdbhol_report.json: CDB1 PDB1 (PDB:3) Mon Mar 28 2022 03:46:56 UTC+00:00

CRYPT.TDE: Transparent Data Encryption
| Status: Advisory
| Summary:
|     Found 9 unencrypted tablespaces. No encrypted columns found. Examined 1
|         initialization parameter.
| Details:
|     Unencrypted tablespaces: DBSEC_TBS_DMS, EMPDATA_DEV, EMPDATA_PROD,
|         LOOKUPS, SYSAUX, SYSTEM, TEMP, UNDOTBS1, USERS
|     Encrypted tablespaces: (none)
|
|     ENCRYPT_NEW_TABLESPACES = CLOUD_ONLY. Recommended value is ALWAYS.

CONF.PWDFILE: Access to Password File
| Status: Pass
| Summary:
|     The password file is configured correctly.
| Details:
|     REMOTE_LOGIN_PASSWORDFILE = EXCLUSIVE
此脚本从先前生成的 hol_report.json 文件中提取 CRYPT.TDE 和 CONF.PWDFILE 调查结果(Finding)。
使用“dbsat_diff”,比较两个报告并找出差异:
python dbsat_diff pdbhol_report.json pdbhol2_report.json
将JSON报告导入数据库中:
$ sqlplus dba_debra/Oracle123@pdb1
create or replace directory DBSAT_DIR as '/home/oracle/DBSecLab/livelabs/dbsat/dbsat222';
create table DBSAT_FOO(docname varchar2(32), doc CLOB check (DOC IS JSON));
insert into DBSAT_FOO values ('pdbhol_report.json', bfilename('DBSAT_DIR','pdbhol_report.json'));

commit;
查看JSON表中的数据:
col docname format a17
col title format a50
col remarks format a60
set lines 400
set pages 100

select docname, severity, title, remarks
  from DBSAT_FOO, JSON_TABLE(
       doc,
       '$[*].items[*]' columns TYPE VARCHAR2(32) PATH '$.type',
       severity NUMBER PATH '$.severity',
       title VARCHAR2(128) PATH '$.title',
       remarks VARCHAR2(4000) PATH '$.remarks' )
 where TYPE = 'finding'
 order by docname, severity
/
输出为:
...
pdbhol_report.jso          5 Database Backup                                    The database should be backed up regularly. This will help y
n                                                                               ou to prevent loss of data in the event of a system failure
                                                                                and may help to quickly recover from a ransomware attack. Or
                                                                                acle Recovery Manager (RMAN) allows performing backup and re
                                                                                covery tasks on your databases. Unencrypted backup data shou
                                                                                ld not be transported on tape or disk to offsite storage for
                                                                                  safekeeping. Oracle Secure Backup (OSB) may also be used f
                                                                                or tape data protection in a distributed environment.

pdbhol_report.jso          5 Patch Check                                        It is vital to keep the database software up-to-date with se
n                                                                               curity fixes as they are released. Oracle issues comprehensi
                                                                                ve patches in the form of Release Updates, Patch Set Updates
                                                                                 and Bundle Patches on a regular quarterly schedule. These u
                                                                                pdates should be applied as soon as they are available.


159 rows selected.
Task 13: (Optional) Uninstalling DBSAT
实际为清理程序,因为卸载只需删除目录:
cd $DBSEC_LABS/dbsat
./dbsat_uninstall.sh
Appendix: About the Product
概述
Oracle 数据库安全评估工具 (DBSAT) 有助于识别敏感数据、分析数据库配置、用户、他们的权利和安全策略,以发现安全风险并改善组织内 Oracle 数据库的安全状况。
您可以使用 DBSAT 在您的组织中实施和实施安全最佳实践,并加快遵守欧盟 GDPR 等法规。
DBSAT 的组成部分与数据流
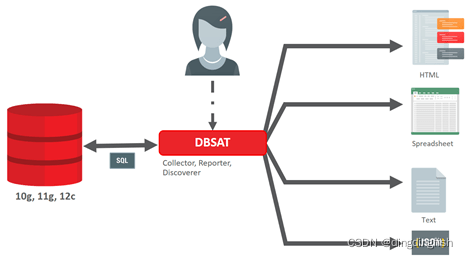
DBSAT由DBSAT Collector、DBSAT Reporter和DBSAT Discoverer三个组件组成,分别对应数据收集、数据分析和敏感数据发现的功能:
- DBSAT Collector :执行 SQL 查询并运行操作系统命令以从要评估的系统中收集数据。 它主要通过查询数据库字典视图来做到这一点。 收集的数据写入文件中,后续会被 DBSAT Reporter 在分析阶段使用。
- DBSAT Reporter :分析收集的数据并以多种格式报告其发现和建议:HTML、Excel、JSON 和文本。 Reporter 可以在任何机器上运行:PC、笔记本电脑或服务器。 您不限于在与收集器相同的服务器上运行它。
- DBSAT Discoverer:根据配置文件中指定的设置,执行 SQL 查询并从要评估的系统中收集数据。 它主要通过查询数据库字典视图来做到这一点。 然后使用收集的数据生成 HTML 和 CSV 格式的数据库敏感数据评估报告。 CSV 报告可以加载到 Oracle Audit Vault and Database Firewall 中,以将敏感数据上下文添加到新的数据隐私报告中。 有关此功能的更多信息,请参阅 Oracle Audit Vault and Database Firewall Auditor’s Guide 中的 Importing Sensitive Data Into AVDF Repository。
DBSAT 生成两种类型的报告
- 数据库安全风险评估报告
- 数据库敏感数据评估报告
您可以使用报告结果来:
- 修复眼前的短期风险
- 实施全面的安全策略
使用 DBSAT 的好处
您可以使用 DBSAT 来:
- 快速识别数据库中的敏感数据和安全配置错误
- 提升安全最佳实践
- 改善 Oracle 数据库的安全状况(Posture)
- 减少攻击面和风险暴露
- 向审计者提供输入
在我们的客户群中执行了 1000 次数据库安全评估后,我们确定了 10 大最常见的安全调查结果已被证明是:
1 . 没有数据库安全策略/策略
2 . 没有补丁/补丁管理
3 . 未加密敏感/受监管数据
4 . 没有监控/审计
5 . 特权过度的帐户; 没有个性化账户; 无 SoD(Separation of Duty)
6 . 弱/不存在的密码策略; 弱密码管理
7 . 以明文形式发送给第三方的数据
8 . 没有操作系统加固
9 . 生产中对 DEV/TEST/Training/etc 没有敏感数据匿名化(数据脱敏)。
10. 生产环境中仍有一些示例模式


 1395
1395

 被折叠的 条评论
为什么被折叠?
被折叠的 条评论
为什么被折叠?
 到【灌水乐园】发言


