


 本文详细介绍了Android开发中Bundle的使用方法,通过创建简单的demo,展示如何在两个界面间传递数据。包括界面布局设计、代码实现及配置文件调整,确保读者能够清晰掌握Bundle在实际开发中的应用。
Android开发–UI之Bundle的使用
最近,把之前学过的东西大体的整理了以下,并且想把学过的心得分享给大家。我自己做了一个小小的demo,以便说明具体的应用。
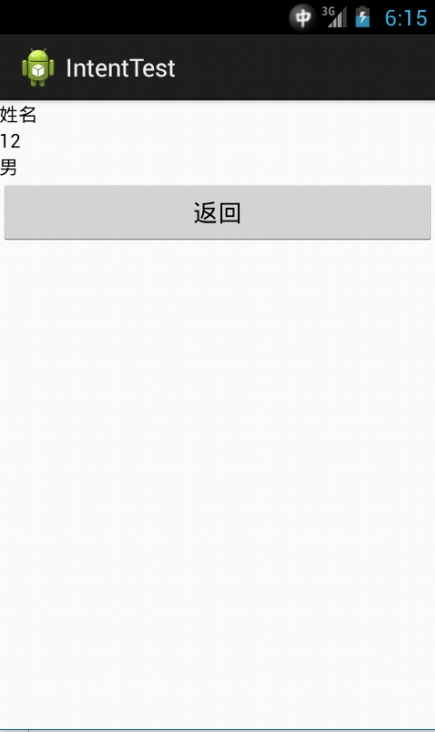
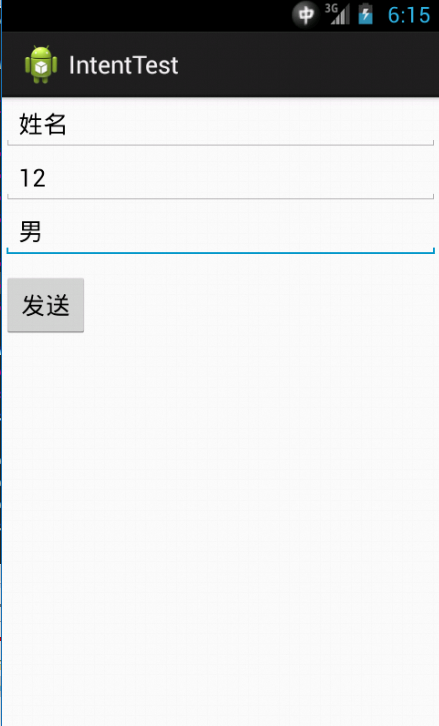
这里的两个界面是通过第一个界面输入,然后,第二个界面输出结果的。
废话少说,直接进入正题。
第一个界面的代码:
package com.example.intenttest;

import android.app.Activity;
import android.content.Intent;
import android.os.Bundle;
import android.view.View;
import android.view.View.OnClickListener;
import android.widget.Button;
import android.widget.EditText;

public class MainActivity extends Activity {

    private EditText edtname;
    private EditText edtage;
    private EditText edtsex;
    private Button send;

    private String name;
    private String age;
    private String sex;

    @Override
    protected void onCreate(Bundle savedInstanceState) {
        super.onCreate(savedInstanceState);
        setContentView(R.layout.activity_main);

        edtname = (EditText)findViewById(R.id.edt1);
        edtage = (EditText)findViewById(R.id.edt2);
        edtsex = (EditText)findViewById(R.id.edt3);
        send = (Button)findViewById(R.id.btn);


        send.setOnClickListener(new OnClickListener() {

            @Override
            public void onClick(View v) {
                startTransmitData();
            }
        });

    }

    private void startTransmitData(){
        name = edtname.getText().toString(); //将edtname强制转换为String类型
        age = edtage.getText().toString();
        sex = edtsex.getText().toString();  //将edtsex强制转换为String类型
        Intent mIntent = new Intent();
        mIntent.setClass(getApplicationContext(),ShowActivity.class);
        Bundle mBundle = new Bundle();
        //通过key--valuse进行记录
        mBundle.putString("name", name);
        mBundle.putString("age", age);
        mBundle.putString("sex", sex);
        //将整个的数据进行封装到intent中,等待传递
        mIntent.putExtras(mBundle);
        startActivity(mIntent);

    }

}
第一个界面的xml代码:
<LinearLayout xmlns:android="http://schemas.android.com/apk/res/android"
    xmlns:tools="http://schemas.android.com/tools"
    android:id="@+id/LinearLayout1"
    android:layout_width="match_parent"
    android:layout_height="match_parent"
    android:orientation="vertical"
    tools:context=".MainActivity" >

    <EditText
        android:id="@+id/edt1"
        android:layout_width="match_parent"
        android:layout_height="wrap_content"
        android:ems="10" >

    </EditText>

      <EditText
        android:id="@+id/edt2"
        android:layout_width="match_parent"
        android:layout_height="wrap_content"
        android:ems="10" >

    </EditText>

      <EditText
        android:id="@+id/edt3"
        android:layout_width="match_parent"
        android:layout_height="wrap_content"
        android:ems="10" >

    </EditText>

      <Button
          android:id="@+id/btn"
          android:layout_width="wrap_content"
          android:layout_height="wrap_content"
          android:layout_marginTop="10dp"
          android:text="发送" />

</LinearLayout>
第二个界面的代码:
package com.example.intenttest;

import android.app.Activity;
import android.content.Intent;
import android.os.Bundle;
import android.view.View;
import android.view.View.OnClickListener;
import android.widget.Button;
import android.widget.TextView;

public class ShowActivity extends Activity{

    private TextView txtname;
    private TextView txtage;
    private TextView txtsex;
    private Button cal;

    private String name;
    private String age;
    private String sex;

    @Override
    protected void onCreate(Bundle savedInstanceState) {
        // TODO Auto-generated method stub
        super.onCreate(savedInstanceState);
        setContentView(R.layout.showactivity);

        txtname = (TextView)findViewById(R.id.txt1);
        txtage = (TextView)findViewById(R.id.txt2);
        txtsex = (TextView)findViewById(R.id.txt3);

        Intent inten = getIntent();
        Bundle bundle = inten.getExtras();
        //通过key值进行获取所对应的valuse值
        name = bundle.getString("name");
        age = bundle.getString("age");
        sex = bundle.getString("sex");
        //将内容显示在控件中
        txtname.setText(name);
        txtage.setText(age);
        txtsex.setText(sex);

        cal = (Button)findViewById(R.id.cal);

        cal.setOnClickListener(new OnClickListener() {

            @Override
            public void onClick(View v) {
                finish();
            }
        });


    }

}
第二个界面的xml代码:
<?xml version="1.0" encoding="utf-8"?>
<LinearLayout xmlns:android="http://schemas.android.com/apk/res/android"
    android:layout_width="match_parent"
    android:layout_height="match_parent"
    android:orientation="vertical" >

    <TextView
        android:id="@+id/txt1"
        android:layout_width="fill_parent"
        android:layout_height="wrap_content"
        android:textColor="#000"
        android:text="测试1" />

    <TextView
        android:id="@+id/txt2"
        android:layout_width="fill_parent"
        android:layout_height="wrap_content"
        android:textColor="#000"
        android:text="测试2" />

    <TextView
        android:id="@+id/txt3"
        android:layout_width="fill_parent"
        android:layout_height="wrap_content"
        android:textColor="#000"
        android:text="测试3" />

    <Button
        android:id="@+id/cal"
        android:layout_width="match_parent"
        android:layout_height="wrap_content"
        android:text="返回" />

</LinearLayout>
代码到这里已经完成了大部分的功能,只是需要在配置文件中进行以下配置就可以了。
上面的解释很简单也很明了,我相信,你看过之后一定会有很大帮助吧。
你学会了吗??


 650
650

 被折叠的 条评论
为什么被折叠?
被折叠的 条评论
为什么被折叠?
 到【灌水乐园】发言


