


原文:https://my.oschina.net/u/2474041/blog/783313
我们使用了spring boot简化了一系列配置,但是每个应用都有一个application.propertities。这样在分布式环境或是应用包比较多时就变得很难管理,所以这里的解决方案是使用spring cloud实现配置中心化。
首先在这里有一个client和server的概念。client是上面我们说的一个个应用包,server实际上也是一个spring boot项目,用来管理我们的配置。
首先,我搭建一个server工程,名叫propertity
pom.xml
<?xml version="1.0" encoding="UTF-8"?>
<project xmlns="http://maven.apache.org/POM/4.0.0"
         xmlns:xsi="http://www.w3.org/2001/XMLSchema-instance"
         xsi:schemaLocation="http://maven.apache.org/POM/4.0.0 http://maven.apache.org/xsd/maven-4.0.0.xsd">
    <modelVersion>4.0.0</modelVersion>

    <groupId>propertity</groupId>
    <artifactId>propertity</artifactId>
    <version>1.0-SNAPSHOT</version>

    <parent>
        <groupId>org.springframework.cloud</groupId>
        <artifactId>spring-cloud-starter-parent</artifactId>
        <version>Brixton.BUILD-SNAPSHOT</version>
        <relativePath /> <!-- lookup parent from repository -->
    </parent>

    <dependencies>

        <dependency>
            <groupId>org.springframework.cloud</groupId>
            <artifactId>spring-cloud-config-server</artifactId>
        </dependency>
        <dependency>
            <groupId>org.springframework.cloud</groupId>
            <artifactId>spring-cloud-starter-eureka</artifactId>
        </dependency>
        <dependency>
            <groupId>org.springframework.boot</groupId>
            <artifactId>spring-boot-starter-test</artifactId>
            <scope>test</scope>
        </dependency>
    </dependencies>

    <build>
        <plugins>
            <plugin>
                <groupId>org.springframework.boot</groupId>
                <artifactId>spring-boot-maven-plugin</artifactId>
                <version>1.3.3.RELEASE</version>
            </plugin>
        </plugins>
    </build>

    <!-- repositories also needed for snapshots and milestones -->

    <repositories>
        <repository>
            <id>spring-snapshots</id>
            <name>Spring Snapshots</name>
            <url>http://repo.spring.io/libs-snapshot-local</url>
            <snapshots>
                <enabled>true</enabled>
            </snapshots>
        </repository>
        <repository>
            <id>spring-milestones</id>
            <name>Spring Milestones</name>
            <url>http://repo.spring.io/libs-milestone-local</url>
            <snapshots>
                <enabled>false</enabled>
            </snapshots>
        </repository>
        <repository>
            <id>spring-releases</id>
            <name>Spring Releases</name>
            <url>http://repo.spring.io/libs-release-local</url>
            <snapshots>
                <enabled>false</enabled>
            </snapshots>
        </repository>
    </repositories>
    <pluginRepositories>
        <pluginRepository>
            <id>spring-snapshots</id>
            <name>Spring Snapshots</name>
            <url>http://repo.spring.io/libs-snapshot-local</url>
            <snapshots>
                <enabled>true</enabled>
            </snapshots>
        </pluginRepository>
        <pluginRepository>
            <id>spring-milestones</id>
            <name>Spring Milestones</name>
            <url>http://repo.spring.io/libs-milestone-local</url>
            <snapshots>
                <enabled>false</enabled>
            </snapshots>
        </pluginRepository>
    </pluginRepositories>
</project>
启动器
package com.sunsharing.idream;

import org.springframework.boot.SpringApplication;
import org.springframework.boot.autoconfigure.SpringBootApplication;
import org.springframework.boot.builder.SpringApplicationBuilder;
import org.springframework.cloud.config.server.EnableConfigServer;

@SpringBootApplication
@EnableConfigServer
public class PropertityApplication {
    public static void main(String[] args) {
        new SpringApplicationBuilder(PropertityApplication.class).web(true).run(args);
    }
}
配置文件
server.port=8888
spring.cloud.config.uri=http://localhost:8888
#应用名称
spring.cloud.config.name=cloud-config
#从本地获取配置文件
spring.profiles.active=native
#文件路径
spring.cloud.config.server.native.searchLocations=file:D:/config/
默认是从github上获取配置文件,也可以从svn获取配置文件,我这里读的是本地。

可打开浏览器验证一下是否成功
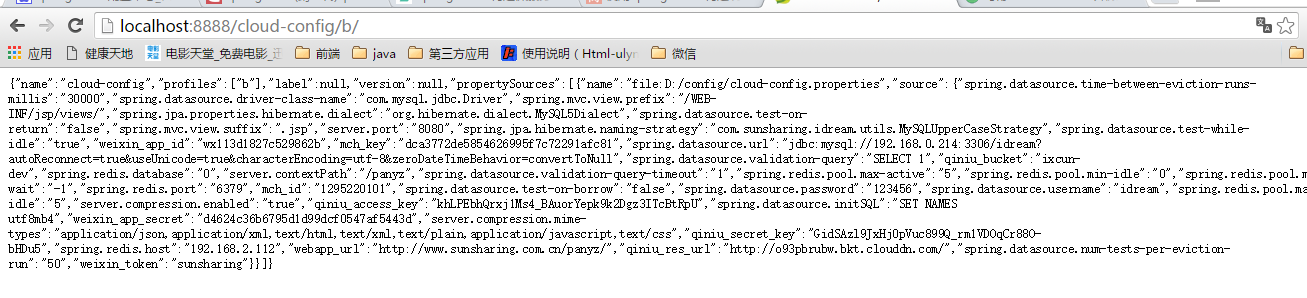
这里有一点需要注意:
以cloud-config-a.properties为例子,它的application是cloud-config,profile是a,client会根据填写的参数来选择读取对应的配置
在client端的pom中加入
<dependency>
    <groupId>org.springframework.cloud</groupId>
    <artifactId>spring-cloud-starter-config</artifactId>
    <version>1.2.0.RELEASE</version>
</dependency>
bootstrap.properties 的加载也是先于 application.properties 。在resource下新建一个bootstrap.properties,配置如下
# 配置中心服务的地址
spring.cloud.config.uri=http://192.168.2.112:8888
# 要读取的配置文件application属性
spring.cloud.config.name=cloud-config
# 要读取的配置文件profile属性
spring.cloud.config.profile=a
这里有一个坑,spring.cloud.config.uri=http://192.168.2.112:8888这里的uri配置必须带上http://,否则会报错,报错的内容是

超级坑,居然是beanUtil拷贝password属性出错,搞得我一脸懵b。
配置完成后,就可以从远程server中获取配置文件,和在本地配置application.properties并无差别。
如果需要在更改配置后刷新client端的配置需要在client端加上
<dependency>
    <groupId>org.springframework.boot</groupId>
    <artifactId>spring-boot-starter-actuator</artifactId>
</dependency>
往client发送一个请求即可


 1809
1809

 被折叠的 条评论
为什么被折叠?
被折叠的 条评论
为什么被折叠?
 到【灌水乐园】发言


