转载请标明出处:
http://blog.csdn.net/lmj623565791/article/details/49990941;
本文出自:【张鸿洋的博客】
一、概述
相信Android的开发者对于设配问题都比较苦恼,Google官方虽然给出了一系列的建议,但是想要单纯使用这些建议将设备很轻松的做好,还是相当困难的。个人也比较关注适配的问题,之前也发了几篇关于适配的文章,大致有:
ok,我大致说一下,没看过的先看完这篇,再考虑看不看以上几篇,本篇的灵感是来自以上几篇,但是适配的方便程度、以及效果远比上面几篇效果要好。
既然灵感来源于上述几篇,就大体介绍下:
-
第一篇:主要是根据设计图的尺寸,然后将设计图上标识的px尺寸,转化为百分比,为所有的主流屏幕去生成对应百分比的值,每个尺寸都会有一个values文件夹。存在一些问题:产生大量的文件夹,适配不了特殊的尺寸(必须建立默认的文件夹)
-
第二篇和第三篇:这两篇属于一样的了,主要是基于Google推出的百分比布局,已经很大程度解决了适配的问题。存在一些问题:使用起来比较反人类,因为设计图上标识的都是px,所以需要去计算百分比,然后这个百分比还是依赖父容器的,设计图可能并不会将每个父容器的尺寸都标识出来,所有很难使用(当然,有人已经采用自动化的工具去计算了)。还有个问题就是,因为依赖于父容器,导致ScrollView,ListView等容器内高度无法使用百分比。
可以看到都存在一些问题,或多或少都需要进行一些额外的工作,然而我希望适配是这样的:
- 拿到设计图,meta信息中填入设计图的尺寸,然后不需要额外计算,布局直接抄设计图上的尺寸,不产生任何多余的资源文件,完成各种分辨率的适配!
二、直观的体验
假设我们拿到一张设计图:
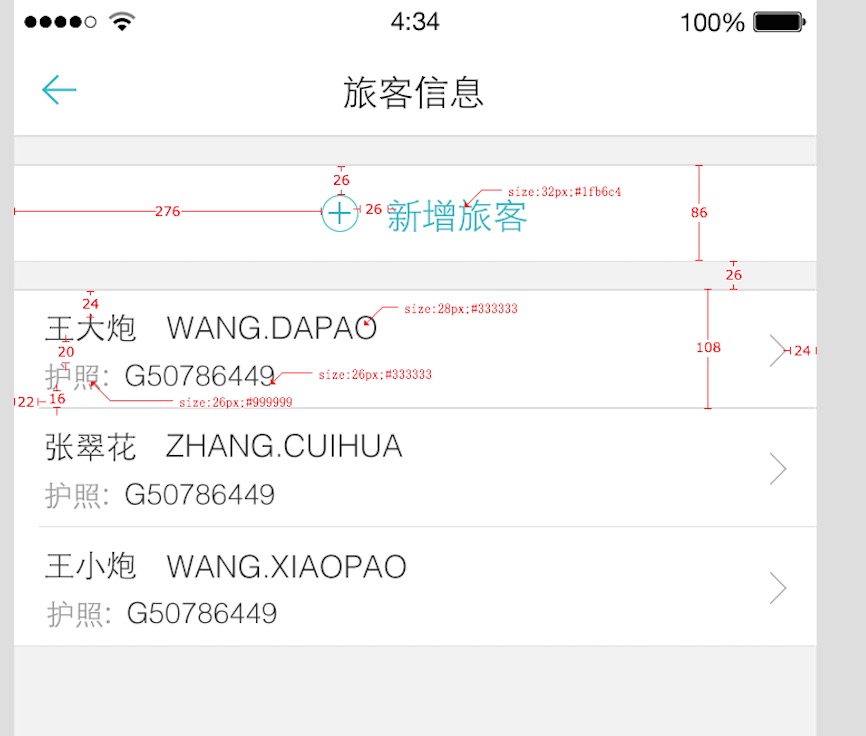
这样的设计图开发中很常见吧,有些公司可能需要自己去测量。
按照我们的思想:
布局直接抄设计图上的尺寸
对于,新增旅客我们的布局文库应该这么写:
<code class="language-xml hljs  has-numbering" style="display: block; padding: 0px; background-color: transparent; color: inherit; box-sizing: border-box; font-family: 'Source Code Pro', monospace;font-size:undefined; white-space: pre; border-top-left-radius: 0px; border-top-right-radius: 0px; border-bottom-right-radius: 0px; border-bottom-left-radius: 0px; word-wrap: normal; background-position: initial initial; background-repeat: initial initial;"><span class="hljs-tag" style="color: rgb(0, 102, 102); box-sizing: border-box;"><<span class="hljs-title" style="box-sizing: border-box; color: rgb(0, 0, 136);">RelativeLayout
android:layout_width="match_parent"
android:layout_height="86px"
android:layout_marginTop="26px"
android:background="#ffffffff"</span>></span>

<span class="hljs-tag" style="color: rgb(0, 102, 102); box-sizing: border-box;"><<span class="hljs-title" style="box-sizing: border-box; color: rgb(0, 0, 136);">ImageView
</span>    <span class="hljs-attribute" style="box-sizing: border-box; color: rgb(102, 0, 102);">android:id</span>=<span class="hljs-value" style="box-sizing: border-box; color: rgb(0, 136, 0);">"@+id/id_tv_add"</span>
    <span class="hljs-attribute" style="box-sizing: border-box; color: rgb(102, 0, 102);">android:layout_width</span>=<span class="hljs-value" style="box-sizing: border-box; color: rgb(0, 136, 0);">"34px"</span>
    <span class="hljs-attribute" style="box-sizing: border-box; color: rgb(102, 0, 102);">android:layout_height</span>=<span class="hljs-value" style="box-sizing: border-box; color: rgb(0, 136, 0);">"34px"</span>
    <span class="hljs-attribute" style="box-sizing: border-box; color: rgb(102, 0, 102);">android:layout_gravity</span>=<span class="hljs-value" style="box-sizing: border-box; color: rgb(0, 136, 0);">"center_vertical"</span>
    <span class="hljs-attribute" style="box-sizing: border-box; color: rgb(102, 0, 102);">android:layout_marginLeft</span>=<span class="hljs-value" style="box-sizing: border-box; color: rgb(0, 136, 0);">"276px"</span>
    <span class="hljs-attribute" style="box-sizing: border-box; color: rgb(102, 0, 102);">android:layout_marginTop</span>=<span class="hljs-value" style="box-sizing: border-box; color: rgb(0, 136, 0);">"26px"</span>
    <span class="hljs-attribute" style="box-sizing: border-box; color: rgb(102, 0, 102);">android:src</span>=<span class="hljs-value" style="box-sizing: border-box; color: rgb(0, 136, 0);">"@mipmap/add"</span>
    /></span>

<span class="hljs-tag" style="color: rgb(0, 102, 102); box-sizing: border-box;"><<span class="hljs-title" style="box-sizing: border-box; color: rgb(0, 0, 136);">TextView
</span>    <span class="hljs-attribute" style="box-sizing: border-box; color: rgb(102, 0, 102);">android:layout_width</span>=<span class="hljs-value" style="box-sizing: border-box; color: rgb(0, 136, 0);">"wrap_content"</span>
    <span class="hljs-attribute" style="box-sizing: border-box; color: rgb(102, 0, 102);">android:layout_height</span>=<span class="hljs-value" style="box-sizing: border-box; color: rgb(0, 136, 0);">"wrap_content"</span>
    <span class="hljs-attribute" style="box-sizing: border-box; color: rgb(102, 0, 102);">android:layout_centerVertical</span>=<span class="hljs-value" style="box-sizing: border-box; color: rgb(0, 136, 0);">"true"</span>
    <span class="hljs-attribute" style="box-sizing: border-box; color: rgb(102, 0, 102);">android:layout_marginLeft</span>=<span class="hljs-value" style="box-sizing: border-box; color: rgb(0, 136, 0);">"26px"</span>
    <span class="hljs-attribute" style="box-sizing: border-box; color: rgb(102, 0, 102);">android:layout_toRightOf</span>=<span class="hljs-value" style="box-sizing: border-box; color: rgb(0, 136, 0);">"@id/id_tv_add"</span>
    <span class="hljs-attribute" style="box-sizing: border-box; color: rgb(102, 0, 102);">android:text</span>=<span class="hljs-value" style="box-sizing: border-box; color: rgb(0, 136, 0);">"新增旅客"</span>
    <span class="hljs-attribute" style="box-sizing: border-box; color: rgb(102, 0, 102);">android:textColor</span>=<span class="hljs-value" style="box-sizing: border-box; color: rgb(0, 136, 0);">"#1fb6c4"</span>
    <span class="hljs-attribute" style="box-sizing: border-box; color: rgb(102, 0, 102);">android:textSize</span>=<span class="hljs-value" style="box-sizing: border-box; color: rgb(0, 136, 0);">"32px"</span>
    /></span>
<span class="hljs-tag" style="color: rgb(0, 102, 102); box-sizing: border-box;"></<span class="hljs-title" style="box-sizing: border-box; color: rgb(0, 0, 136);">RelativeLayout</span>></span></code><ul class="pre-numbering" style="box-sizing: border-box; position: absolute; width: 50px; background-color: rgb(238, 238, 238); top: 0px; left: 0px; margin: 0px; padding: 6px 0px 40px; border-right-width: 1px; border-right-style: solid; border-right-color: rgb(221, 221, 221); list-style: none; text-align: right;"><li style="box-sizing: border-box; padding: 0px 5px;">1</li><li style="box-sizing: border-box; padding: 0px 5px;">2</li><li style="box-sizing: border-box; padding: 0px 5px;">3</li><li style="box-sizing: border-box; padding: 0px 5px;">4</li><li style="box-sizing: border-box; padding: 0px 5px;">5</li><li style="box-sizing: border-box; padding: 0px 5px;">6</li><li style="box-sizing: border-box; padding: 0px 5px;">7</li><li style="box-sizing: border-box; padding: 0px 5px;">8</li><li style="box-sizing: border-box; padding: 0px 5px;">9</li><li style="box-sizing: border-box; padding: 0px 5px;">10</li><li style="box-sizing: border-box; padding: 0px 5px;">11</li><li style="box-sizing: border-box; padding: 0px 5px;">12</li><li style="box-sizing: border-box; padding: 0px 5px;">13</li><li style="box-sizing: border-box; padding: 0px 5px;">14</li><li style="box-sizing: border-box; padding: 0px 5px;">15</li><li style="box-sizing: border-box; padding: 0px 5px;">16</li><li style="box-sizing: border-box; padding: 0px 5px;">17</li><li style="box-sizing: border-box; padding: 0px 5px;">18</li><li style="box-sizing: border-box; padding: 0px 5px;">19</li><li style="box-sizing: border-box; padding: 0px 5px;">20</li><li style="box-sizing: border-box; padding: 0px 5px;">21</li><li style="box-sizing: border-box; padding: 0px 5px;">22</li><li style="box-sizing: border-box; padding: 0px 5px;">23</li><li style="box-sizing: border-box; padding: 0px 5px;">24</li><li style="box-sizing: border-box; padding: 0px 5px;">25</li><li style="box-sizing: border-box; padding: 0px 5px;">26</li><li style="box-sizing: border-box; padding: 0px 5px;">27</li></ul>
来张组合图,感受一下:
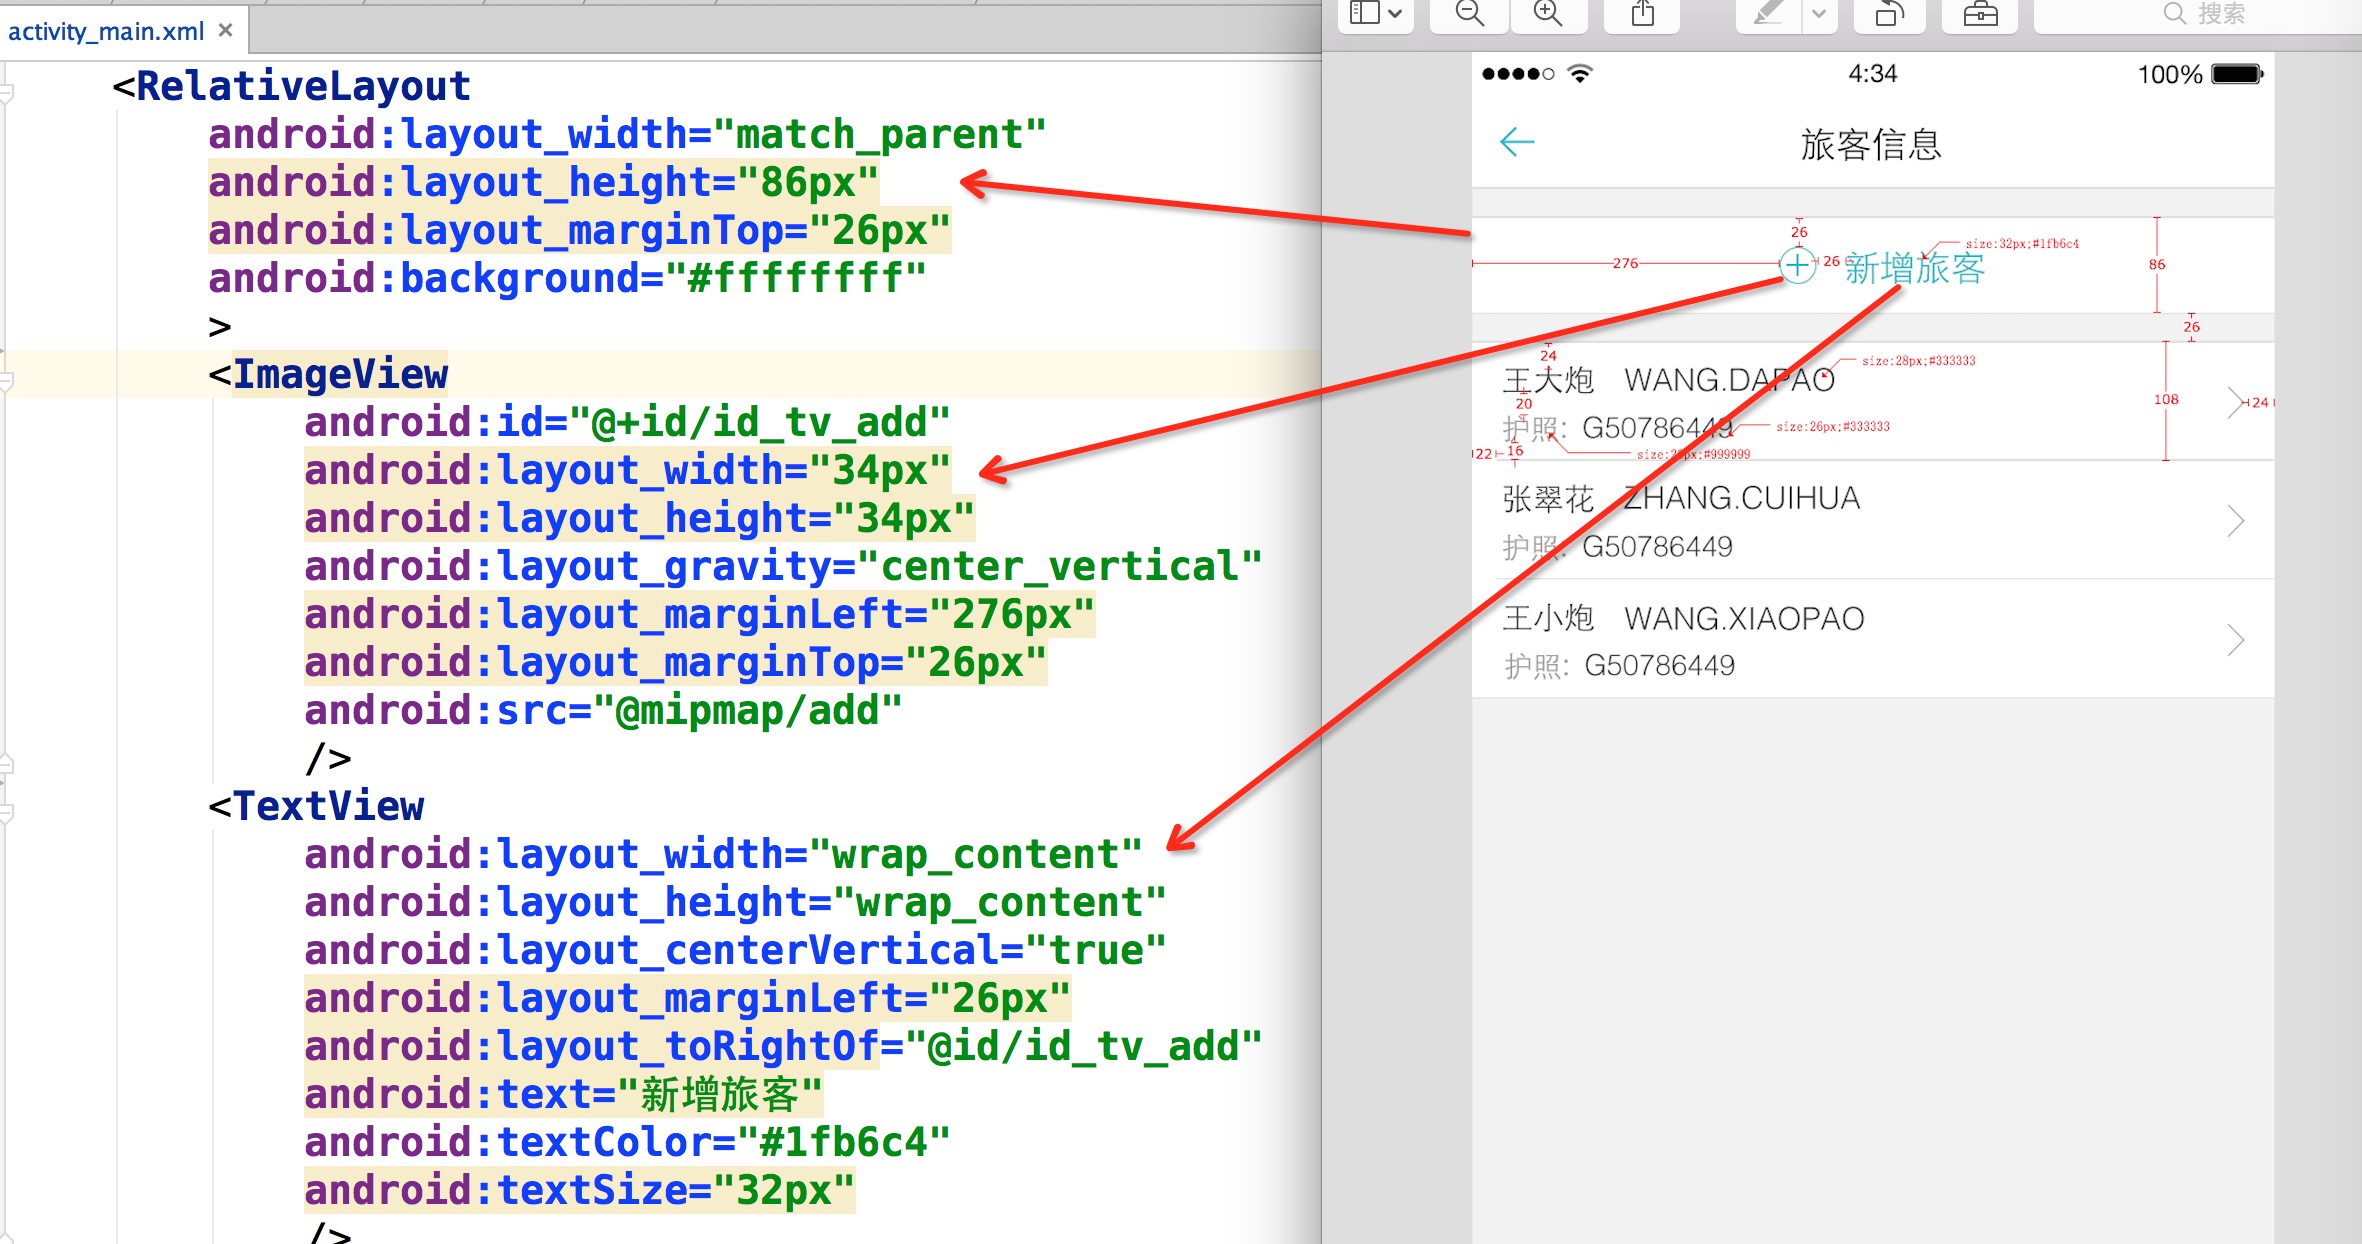
感受完了,想一想,按照这种方式去写布局你说爽不爽。
ok,那么对于Item的布局文件,就是这么写:
<code class="language-xml hljs  has-numbering" style="display: block; padding: 0px; background-color: transparent; color: inherit; box-sizing: border-box; font-family: 'Source Code Pro', monospace;font-size:undefined; white-space: pre; border-top-left-radius: 0px; border-top-right-radius: 0px; border-bottom-right-radius: 0px; border-bottom-left-radius: 0px; word-wrap: normal; background-position: initial initial; background-repeat: initial initial;"><span class="hljs-tag" style="color: rgb(0, 102, 102); box-sizing: border-box;"><<span class="hljs-title" style="box-sizing: border-box; color: rgb(0, 0, 136);">RelativeLayout
</span>    <span class="hljs-attribute" style="box-sizing: border-box; color: rgb(102, 0, 102);">android:layout_width</span>=<span class="hljs-value" style="box-sizing: border-box; color: rgb(0, 136, 0);">"match_parent"</span>
    <span class="hljs-attribute" style="box-sizing: border-box; color: rgb(102, 0, 102);">android:layout_height</span>=<span class="hljs-value" style="box-sizing: border-box; color: rgb(0, 136, 0);">"108px"</span>
    <span class="hljs-attribute" style="box-sizing: border-box; color: rgb(102, 0, 102);">android:layout_marginTop</span>=<span class="hljs-value" style="box-sizing: border-box; color: rgb(0, 136, 0);">"26px"</span>
    <span class="hljs-attribute" style="box-sizing: border-box; color: rgb(102, 0, 102);">android:background</span>=<span class="hljs-value" style="box-sizing: border-box; color: rgb(0, 136, 0);">"#ffffffff"</span>
    ></span>

    <span class="hljs-tag" style="color: rgb(0, 102, 102); box-sizing: border-box;"><<span class="hljs-title" style="box-sizing: border-box; color: rgb(0, 0, 136);">TextView
</span>        <span class="hljs-attribute" style="box-sizing: border-box; color: rgb(102, 0, 102);">android:layout_width</span>=<span class="hljs-value" style="box-sizing: border-box; color: rgb(0, 136, 0);">"wrap_content"</span>
        <span class="hljs-attribute" style="box-sizing: border-box; color: rgb(102, 0, 102);">android:layout_height</span>=<span class="hljs-value" style="box-sizing: border-box; color: rgb(0, 136, 0);">"wrap_content"</span>
        <span class="hljs-attribute" style="box-sizing: border-box; color: rgb(102, 0, 102);">android:layout_marginLeft</span>=<span class="hljs-value" style="box-sizing: border-box; color: rgb(0, 136, 0);">"22px"</span>
        <span class="hljs-attribute" style="box-sizing: border-box; color: rgb(102, 0, 102);">android:layout_marginTop</span>=<span class="hljs-value" style="box-sizing: border-box; color: rgb(0, 136, 0);">"16px"</span>
        <span class="hljs-attribute" style="box-sizing: border-box; color: rgb(102, 0, 102);">android:text</span>=<span class="hljs-value" style="box-sizing: border-box; color: rgb(0, 136, 0);">"王大炮 WANG.DAPAO"</span>
        <span class="hljs-attribute" style="box-sizing: border-box; color: rgb(102, 0, 102);">android:textColor</span>=<span class="hljs-value" style="box-sizing: border-box; color: rgb(0, 136, 0);">"#333"</span>
        <span class="hljs-attribute" style="box-sizing: border-box; color: rgb(102, 0, 102);">android:textSize</span>=<span class="hljs-value" style="box-sizing: border-box; color: rgb(0, 136, 0);">"28px"</span>
        /></span>
    <span class="hljs-tag" style="color: rgb(0, 102, 102); box-sizing: border-box;"><<span class="hljs-title" style="box-sizing: border-box; color: rgb(0, 0, 136);">TextView
</span>        <span class="hljs-attribute" style="box-sizing: border-box; color: rgb(102, 0, 102);">android:layout_width</span>=<span class="hljs-value" style="box-sizing: border-box; color: rgb(0, 136, 0);">"wrap_content"</span>
        <span class="hljs-attribute" style="box-sizing: border-box; color: rgb(102, 0, 102);">android:layout_height</span>=<span class="hljs-value" style="box-sizing: border-box; color: rgb(0, 136, 0);">"wrap_content"</span>
        <span class="hljs-attribute" style="box-sizing: border-box; color: rgb(102, 0, 102);">android:layout_alignParentBottom</span>=<span class="hljs-value" style="box-sizing: border-box; color: rgb(0, 136, 0);">"true"</span>
        <span class="hljs-attribute" style="box-sizing: border-box; color: rgb(102, 0, 102);">android:layout_marginBottom</span>=<span class="hljs-value" style="box-sizing: border-box; color: rgb(0, 136, 0);">"16px"</span>
        <span class="hljs-attribute" style="box-sizing: border-box; color: rgb(102, 0, 102);">android:layout_marginLeft</span>=<span class="hljs-value" style="box-sizing: border-box; color: rgb(0, 136, 0);">"22px"</span>
        <span class="hljs-attribute" style="box-sizing: border-box; color: rgb(102, 0, 102);">android:text</span>=<span class="hljs-value" style="box-sizing: border-box; color: rgb(0, 136, 0);">"护照:G50786449"</span>
        <span class="hljs-attribute" style="box-sizing: border-box; color: rgb(102, 0, 102);">android:textColor</span>=<span class="hljs-value" style="box-sizing: border-box; color: rgb(0, 136, 0);">"#999"</span>
        <span class="hljs-attribute" style="box-sizing: border-box; color: rgb(102, 0, 102);">android:textSize</span>=<span class="hljs-value" style="box-sizing: border-box; color: rgb(0, 136, 0);">"26px"</span>
        /></span>

<span class="hljs-tag" style="color: rgb(0, 102, 102); box-sizing: border-box;"></<span class="hljs-title" style="box-sizing: border-box; color: rgb(0, 0, 136);">RelativeLayout</span>></span></code><ul class="pre-numbering" style="box-sizing: border-box; position: absolute; width: 50px; background-color: rgb(238, 238, 238); top: 0px; left: 0px; margin: 0px; padding: 6px 0px 40px; border-right-width: 1px; border-right-style: solid; border-right-color: rgb(221, 221, 221); list-style: none; text-align: right;"><li style="box-sizing: border-box; padding: 0px 5px;">1</li><li style="box-sizing: border-box; padding: 0px 5px;">2</li><li style="box-sizing: border-box; padding: 0px 5px;">3</li><li style="box-sizing: border-box; padding: 0px 5px;">4</li><li style="box-sizing: border-box; padding: 0px 5px;">5</li><li style="box-sizing: border-box; padding: 0px 5px;">6</li><li style="box-sizing: border-box; padding: 0px 5px;">7</li><li style="box-sizing: border-box; padding: 0px 5px;">8</li><li style="box-sizing: border-box; padding: 0px 5px;">9</li><li style="box-sizing: border-box; padding: 0px 5px;">10</li><li style="box-sizing: border-box; padding: 0px 5px;">11</li><li style="box-sizing: border-box; padding: 0px 5px;">12</li><li style="box-sizing: border-box; padding: 0px 5px;">13</li><li style="box-sizing: border-box; padding: 0px 5px;">14</li><li style="box-sizing: border-box; padding: 0px 5px;">15</li><li style="box-sizing: border-box; padding: 0px 5px;">16</li><li style="box-sizing: border-box; padding: 0px 5px;">17</li><li style="box-sizing: border-box; padding: 0px 5px;">18</li><li style="box-sizing: border-box; padding: 0px 5px;">19</li><li style="box-sizing: border-box; padding: 0px 5px;">20</li><li style="box-sizing: border-box; padding: 0px 5px;">21</li><li style="box-sizing: border-box; padding: 0px 5px;">22</li><li style="box-sizing: border-box; padding: 0px 5px;">23</li><li style="box-sizing: border-box; padding: 0px 5px;">24</li><li style="box-sizing: border-box; padding: 0px 5px;">25</li><li style="box-sizing: border-box; padding: 0px 5px;">26</li><li style="box-sizing: border-box; padding: 0px 5px;">27</li><li style="box-sizing: border-box; padding: 0px 5px;">28</li></ul>
看到这,我相信,你现在最大的疑问就是:你用的px,px能完成适配?搞笑吧?
那么首先说一下:这个px并不代表1像素,我在内部会进行百分比化处理,也就是说:720px高度的屏幕,你这里填写72px,占据10%;当这个布局文件运行在任何分辨率的手机上,这个72px都代表10%的高度,这就是本库适配的原理。
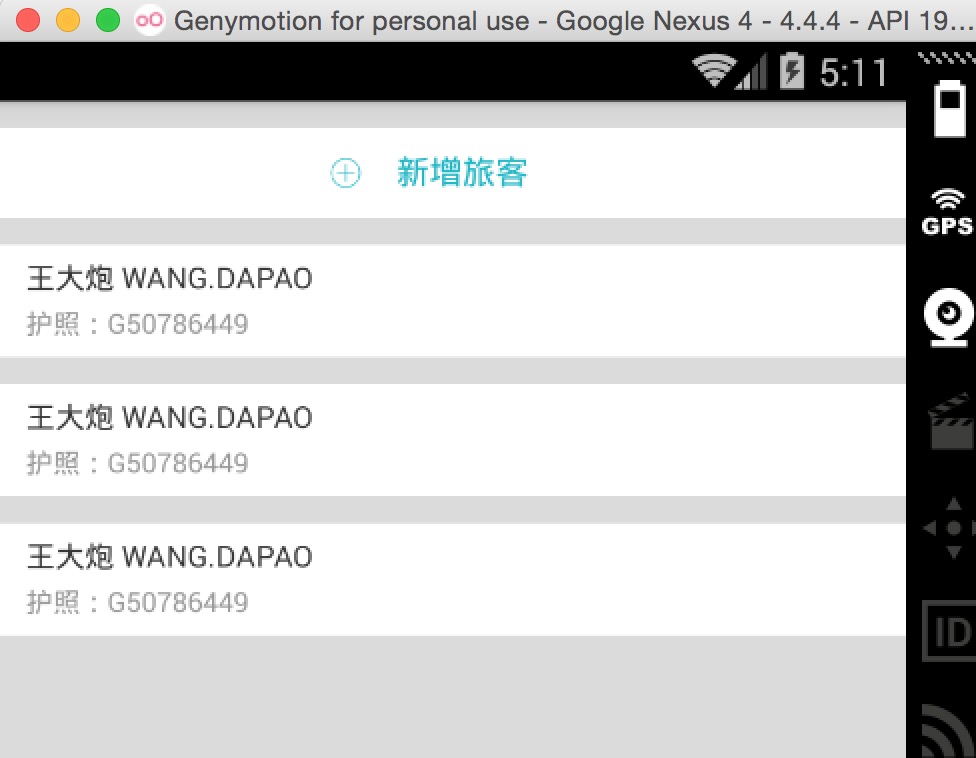
接下来:看下不同分辨率下的效果:
768*1280,Andriod 4.4.4
480*800,Android 2.3.7
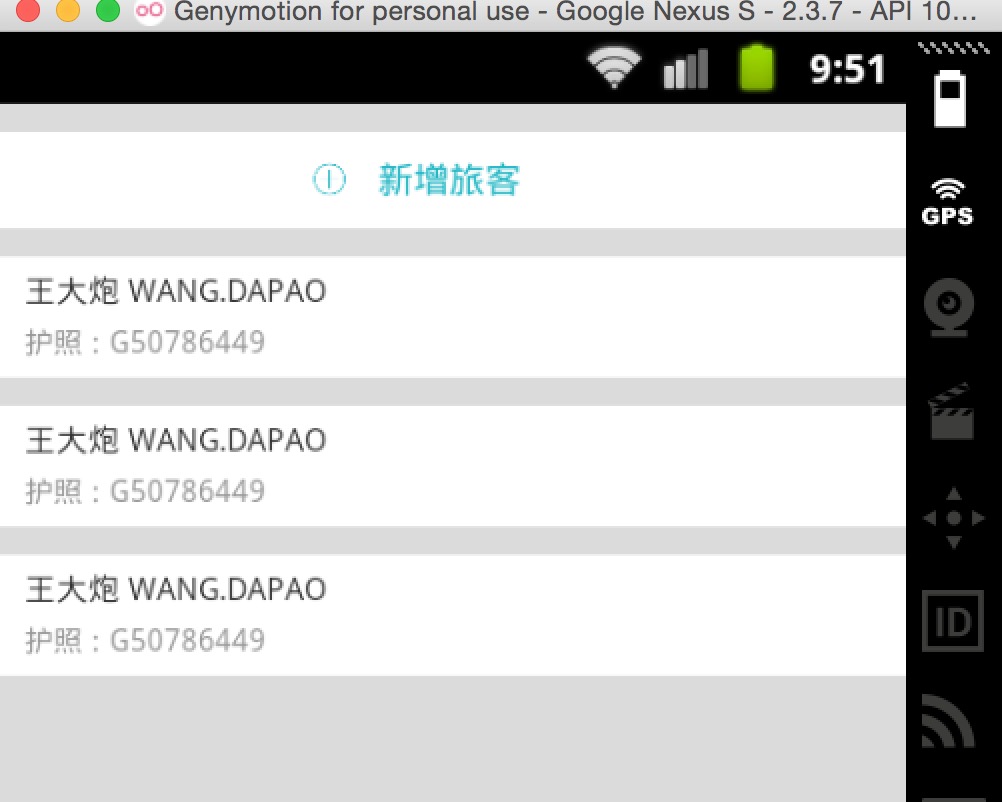
上述两个机器的分辨率差距相当大了,按照百分比的规则,完美实现了适配,最为重要的是:
- 再也不用拿着设计稿去想这控件的宽高到底取多少dp
- 再也不用去为多个屏幕去写多个dimens
- 再也不用去计算百分比了(如果使用百分比控件完成适配)
- 再也不用去跟UI MM去解释什么是dp了
接下来说下用法。
本库的地址:https://github.com/hongyangAndroid/AndroidAutoLayout
三、用法
用法
(1)注册设计图尺寸
将autolayout引入
<code class="language-xml hljs  has-numbering" style="display: block; padding: 0px; background-color: transparent; color: inherit; box-sizing: border-box; font-family: 'Source Code Pro', monospace;font-size:undefined; white-space: pre; border-top-left-radius: 0px; border-top-right-radius: 0px; border-bottom-right-radius: 0px; border-bottom-left-radius: 0px; word-wrap: normal; background-position: initial initial; background-repeat: initial initial;">dependencies {
    compile project(':autolayout')
}</code><ul class="pre-numbering" style="box-sizing: border-box; position: absolute; width: 50px; background-color: rgb(238, 238, 238); top: 0px; left: 0px; margin: 0px; padding: 6px 0px 40px; border-right-width: 1px; border-right-style: solid; border-right-color: rgb(221, 221, 221); list-style: none; text-align: right;"><li style="box-sizing: border-box; padding: 0px 5px;">1</li><li style="box-sizing: border-box; padding: 0px 5px;">2</li><li style="box-sizing: border-box; padding: 0px 5px;">3</li></ul>
对于eclipse的伙伴,只有去copy源码了~~
在你的项目的AndroidManifest中注明你的设计稿的尺寸。
<code class="language-xml hljs  has-numbering" style="display: block; padding: 0px; background-color: transparent; color: inherit; box-sizing: border-box; font-family: 'Source Code Pro', monospace;font-size:undefined; white-space: pre; border-top-left-radius: 0px; border-top-right-radius: 0px; border-bottom-right-radius: 0px; border-bottom-left-radius: 0px; word-wrap: normal; background-position: initial initial; background-repeat: initial initial;"><span class="hljs-tag" style="color: rgb(0, 102, 102); box-sizing: border-box;"><<span class="hljs-title" style="box-sizing: border-box; color: rgb(0, 0, 136);">meta-data</span> <span class="hljs-attribute" style="box-sizing: border-box; color: rgb(102, 0, 102);">android:name</span>=<span class="hljs-value" style="box-sizing: border-box; color: rgb(0, 136, 0);">"design_width"</span> <span class="hljs-attribute" style="box-sizing: border-box; color: rgb(102, 0, 102);">android:value</span>=<span class="hljs-value" style="box-sizing: border-box; color: rgb(0, 136, 0);">"768"</span>></span><span class="hljs-tag" style="color: rgb(0, 102, 102); box-sizing: border-box;"></<span class="hljs-title" style="box-sizing: border-box; color: rgb(0, 0, 136);">meta-data</span>></span>
<span class="hljs-tag" style="color: rgb(0, 102, 102); box-sizing: border-box;"><<span class="hljs-title" style="box-sizing: border-box; color: rgb(0, 0, 136);">meta-data</span> <span class="hljs-attribute" style="box-sizing: border-box; color: rgb(102, 0, 102);">android:name</span>=<span class="hljs-value" style="box-sizing: border-box; color: rgb(0, 136, 0);">"design_height"</span> <span class="hljs-attribute" style="box-sizing: border-box; color: rgb(102, 0, 102);">android:value</span>=<span class="hljs-value" style="box-sizing: border-box; color: rgb(0, 136, 0);">"1280"</span>></span><span class="hljs-tag" style="color: rgb(0, 102, 102); box-sizing: border-box;"></<span class="hljs-title" style="box-sizing: border-box; color: rgb(0, 0, 136);">meta-data</span>></span>
</code><ul class="pre-numbering" style="box-sizing: border-box; position: absolute; width: 50px; background-color: rgb(238, 238, 238); top: 0px; left: 0px; margin: 0px; padding: 6px 0px 40px; border-right-width: 1px; border-right-style: solid; border-right-color: rgb(221, 221, 221); list-style: none; text-align: right;"><li style="box-sizing: border-box; padding: 0px 5px;">1</li><li style="box-sizing: border-box; padding: 0px 5px;">2</li><li style="box-sizing: border-box; padding: 0px 5px;">3</li></ul>
(2)Activity中开启设配
- 让你的Activity去继承
AutoLayoutActivity - 在你的Activity的onCreate里面写入:
AutoLayout.getInstance().auto(this, true);,例如:
<code class="language-xml hljs  has-numbering" style="display: block; padding: 0px; background-color: transparent; color: inherit; box-sizing: border-box; font-family: 'Source Code Pro', monospace;font-size:undefined; white-space: pre; border-top-left-radius: 0px; border-top-right-radius: 0px; border-bottom-right-radius: 0px; border-bottom-left-radius: 0px; word-wrap: normal; background-position: initial initial; background-repeat: initial initial;">@Override
protected void onCreate(Bundle savedInstanceState)
{
    super.onCreate(savedInstanceState);
    setContentView(R.layout.activity_main);

    AutoLayout.getInstance().auto(this);
}</code><ul class="pre-numbering" style="box-sizing: border-box; position: absolute; width: 50px; background-color: rgb(238, 238, 238); top: 0px; left: 0px; margin: 0px; padding: 6px 0px 40px; border-right-width: 1px; border-right-style: solid; border-right-color: rgb(221, 221, 221); list-style: none; text-align: right;"><li style="box-sizing: border-box; padding: 0px 5px;">1</li><li style="box-sizing: border-box; padding: 0px 5px;">2</li><li style="box-sizing: border-box; padding: 0px 5px;">3</li><li style="box-sizing: border-box; padding: 0px 5px;">4</li><li style="box-sizing: border-box; padding: 0px 5px;">5</li><li style="box-sizing: border-box; padding: 0px 5px;">6</li><li style="box-sizing: border-box; padding: 0px 5px;">7</li><li style="box-sizing: border-box; padding: 0px 5px;">8</li></ul>
ok,非常简单的两部即可引入项目,然后,然后干嘛?
然后就按照上个章节的编写方式开始玩耍吧~
ok,上面是最简单的用法,当然你也可以不去继承AutoLayoutActivity来使用。
AutoLayoutActivity的用法实际上是完成了一件事:
- LinearLayout -> AutoLinearLayout
- RelativeLayout -> AutoRelativeLayout
- FrameLayout -> AutoFrameLayout
如果你不想继承AutoLayoutActivity,那么你就得像Google的百分比库一样,去用AutoXXXLayout代替系统原有的XXXLayout。当然,你可以放心的是,所有的系统属性原有的属性都会支持,不过根布局上就不支持px的自动百分比化了,但是一般根布局都是MATCH_PARENT,而上述的方式,根布局也是可以直接px的百分比化的。
四、注意事项
(1)如何开启PreView
大家都知道,写布局文件的时候,不能实时的去预览效果,那么体验真的是非常的不好,也在很大程度上降低开发效率,所以下面教大家如何用好,用对PreView(针对该库)。
首先,你要记得你设计稿的尺寸,比如 768 * 1280
然后在你的PreView面板,选择分辨率一致的设备:
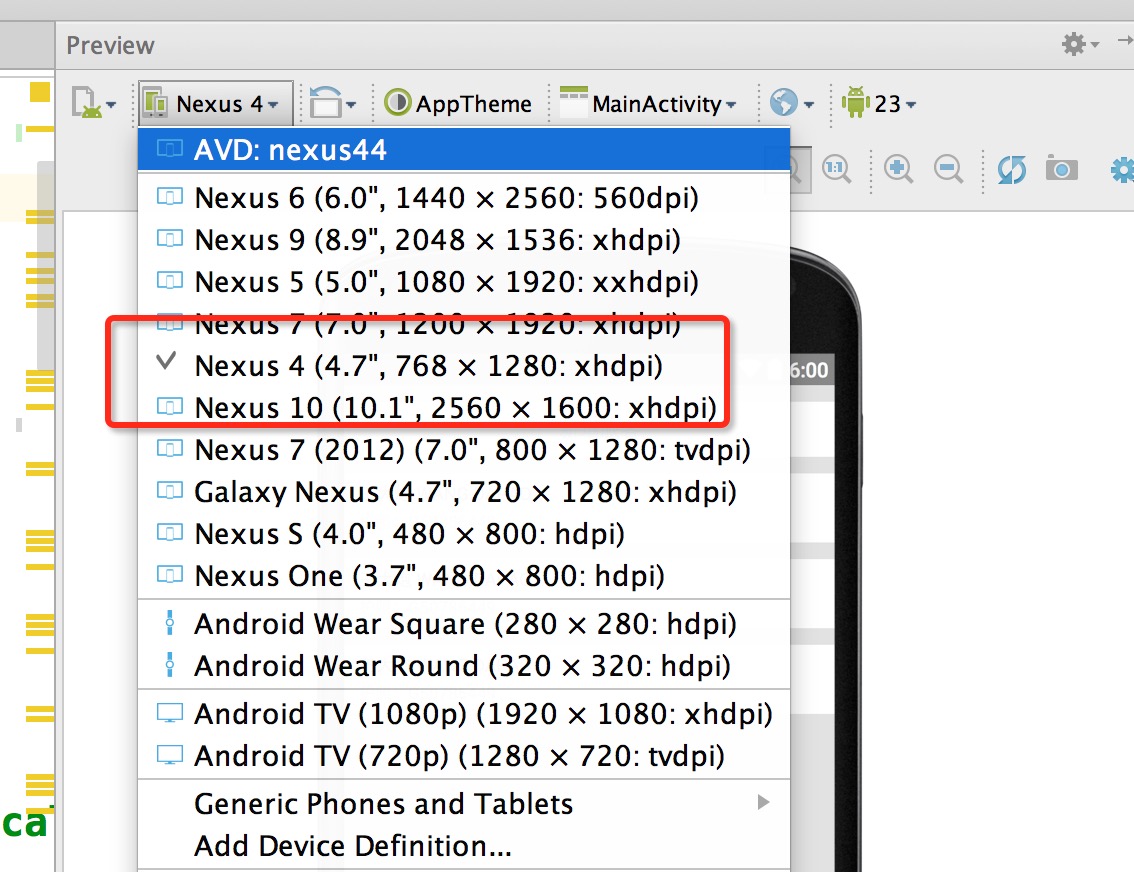
然后你就可以看到最为精确的预览了:
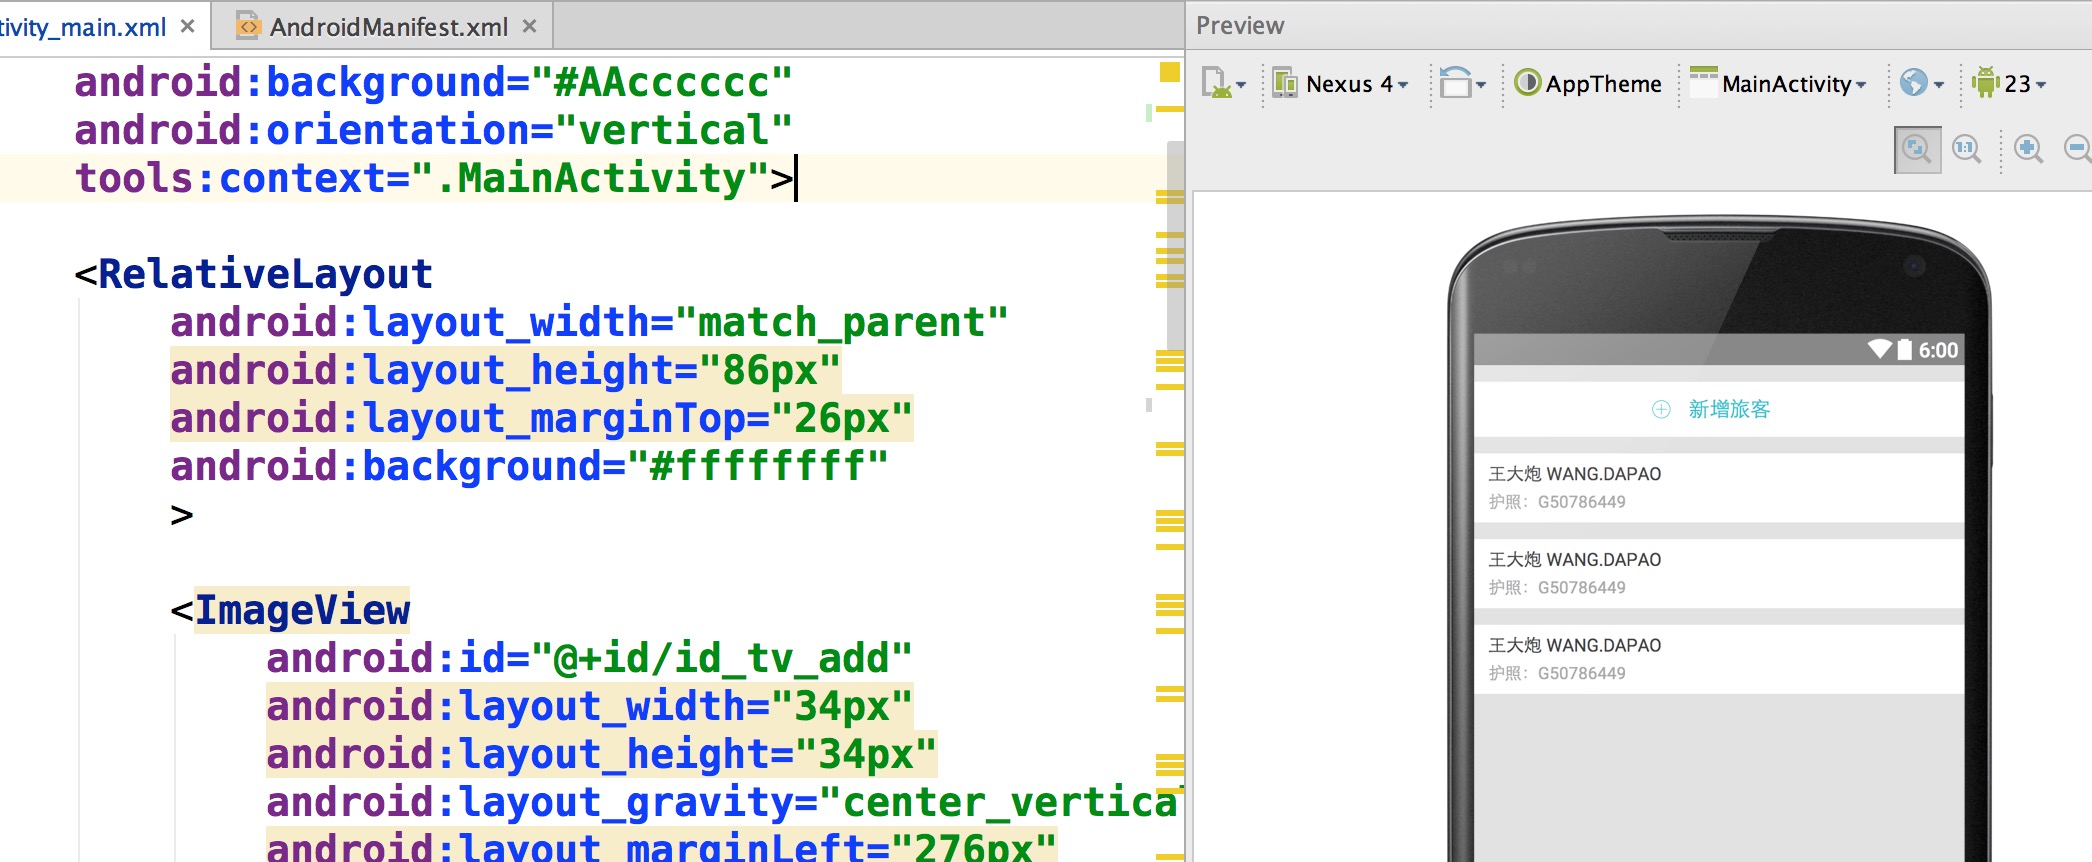
两个注意事项:
- 你们UI给的设计图的尺寸并非是主流的设计图,该尺寸没找到,你可以
拿显示器砸他自己去新建一个设备。 - 不要在PreView中去查看所有分辨率下的显示,是看不出来适配效果的,因为有些计算是动态的。
(2)关于TextView
TextView这个控件呢,可能和设计稿上会有一些出入,并非是此库的原因,而是与生俱来的特性。
比如:
<code class="hljs xml has-numbering" style="display: block; padding: 0px; background-color: transparent; color: inherit; box-sizing: border-box; font-family: 'Source Code Pro', monospace;font-size:undefined; white-space: pre; border-top-left-radius: 0px; border-top-right-radius: 0px; border-bottom-right-radius: 0px; border-bottom-left-radius: 0px; word-wrap: normal; background-position: initial initial; background-repeat: initial initial;"><span class="hljs-tag" style="color: rgb(0, 102, 102); box-sizing: border-box;"><<span class="hljs-title" style="box-sizing: border-box; color: rgb(0, 0, 136);">TextView
</span> <span class="hljs-attribute" style="box-sizing: border-box; color: rgb(102, 0, 102);">textSize</span>=<span class="hljs-value" style="box-sizing: border-box; color: rgb(0, 136, 0);">"32px"</span>
 <span class="hljs-attribute" style="box-sizing: border-box; color: rgb(102, 0, 102);">layout_height</span>=<span class="hljs-value" style="box-sizing: border-box; color: rgb(0, 136, 0);">"wrap_contnt"</span>
 /></span></code><ul class="pre-numbering" style="box-sizing: border-box; position: absolute; width: 50px; background-color: rgb(238, 238, 238); top: 0px; left: 0px; margin: 0px; padding: 6px 0px 40px; border-right-width: 1px; border-right-style: solid; border-right-color: rgb(221, 221, 221); list-style: none; text-align: right;"><li style="box-sizing: border-box; padding: 0px 5px;">1</li><li style="box-sizing: border-box; padding: 0px 5px;">2</li><li style="box-sizing: border-box; padding: 0px 5px;">3</li><li style="box-sizing: border-box; padding: 0px 5px;">4</li></ul>
你去运行肯定不是32px的高度,文字的上下方都会有一定的空隙。如何你将高度写死,也会发现文字显示不全。
恩,所以呢,灵活应对这个问题,对于存在字体标识很精确的值,你可以选择:对于TextView与其他控件的上下边距呢,尽可能的稍微写小一点。
其实我上面的例子,几乎都是TextView,所有我在编写Item里面的时候,也有意缩小了一下marginTop值等。不过,对于其他控件是不存在这样的问题的。
ps:因为TextView的上述问题:所以对于居中,虽然可以使用本库通过编写margin_left,margin_top等很轻松的完成居中。但是为了精确起见,还是建议使用gravity,centerInXXX等属性完成。
五、其他
目前支持属性
- layout_width
- layout_height
- layout_margin(left,top,right,bottom)
- pading(left,top,right,bottom)
- textSize
- 不会影响系统所有的其他属性,以及不会影响dp,sp的使用
性能的提升
通过本库的方式去编写代码,可以在很大程序上使用margin,也就是说,对于View的位置非常好控制,从而能够减少非常多的嵌套,甚至任何一个复杂的界面做到无嵌套。
以及,几乎不需要去使用RelativeLayout的规则了,比如rightOf,完全可以由marginLeft完成,其他的rule同理。
对于LinearLayout的weight,几乎也不需要使用了,比如屏幕宽度720px,想要四个控件横向均分,完全可以写layout_width="180px"
我相信通过上述的介绍,你已经了解的本库适配的做法,而且可以说是我见过的最方便的适配方案,最大化的减轻了适配的负担,甚至比你不适配时编写UI都方便。目前本库,已经尝试用于项目中,尽可能去发现一些潜在的问题。
本库的地址:https://github.com/hongyangAndroid/AndroidAutoLayout,欢迎各位一起完善,让适配问题消失在我们的痛苦中。
ok,最后,只有去体验了,才能发现优点和缺点~~


 2283
2283

 被折叠的 条评论
为什么被折叠?


