


Web Components
前言
Web Components 可以将标记结构、样式和行为隐藏起来,并与页面上的其他代码相隔离,保证不同的部分不会混在一起,可使代码更加干净、整洁。
Shadow DOM(影子DOM)
Web components 的一个重要属性是封装,Shadow DOM 接口是关键所在,它可以将隐藏的、独立的 DOM 附加到一个元素上。Shadow DOM 允许将隐藏的 DOM 树附加到常规的 DOM 树中——以 shadow root 节点为起始根节点,在这个根节点的下方,可以是任意元素,和普通的 DOM 元素一样。和操作常规 DOM 一样——例如添加子节点、设置属性,以及为节点添加自己的样式。或者为整个 Shadow DOM 添加样式。不同的是,Shadow DOM 内部的元素始终不会影响到它外部的元素(除了 :focus-within)。它是一个document-fragment(是一个保存多个element的容器对象(保存在内存)当更新其中的一个或者多个element时,页面不会更新。只有当documentFragment容器中保存的所有element更新后再将其插入到页面中才能更新页面)。
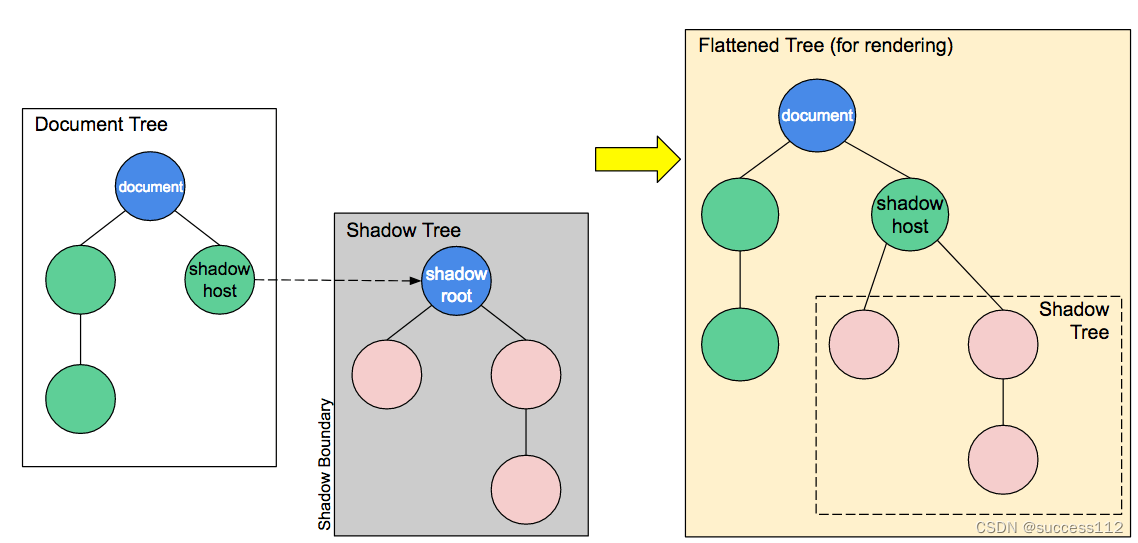
- Shadow host:一个常规 DOM节点,Shadow DOM 会被附加到这个节点。
- Shadow tree:Shadow DOM内部的DOM树。
- Shadow boundary:Shadow DOM结束的地方,也是常规 DOM开始的地方。
- Shadow root: Shadow tree的根节点
用法
Element.attachShadow() 方法来将一个 shadow root 附加到任何(img、video、textarea等除外)一个元素上。它接受一个配置对象作为参数,该对象有一个mode属性,值可以是open或者closed。除了自定义元素外,已有的下列元素可以附加shadow dom。
| article | aside | blockquote |
| body | div | footer |
| h1 | h2 | h3 |
| h4 | h5 | h6 |
| header | main | nav |
| p | section | span |
<div>Light dom节点</div>
<div id="container">shadow host</div>
<script>
 const container = document.querySelector('#container'); // shadow host
 const shadowRoot = container.attachShadow({ mode: 'open' })

    // mode 为 open 时, 可以使用shadowRoot获取到影子节点
    // mode 为 closed 时, 不可以获取到影子节点
    for (let index = 0; index < 3; index++) {
        const p = document.createElement('p');
		p.id="p"+index;
		if(index%2===0){
			p.style='color:red;font-size:20px';
		}
        p.innerHTML = `shadow dom 中第${index}个p标签`
        shadowRoot.appendChild(p)
    }
 </script>
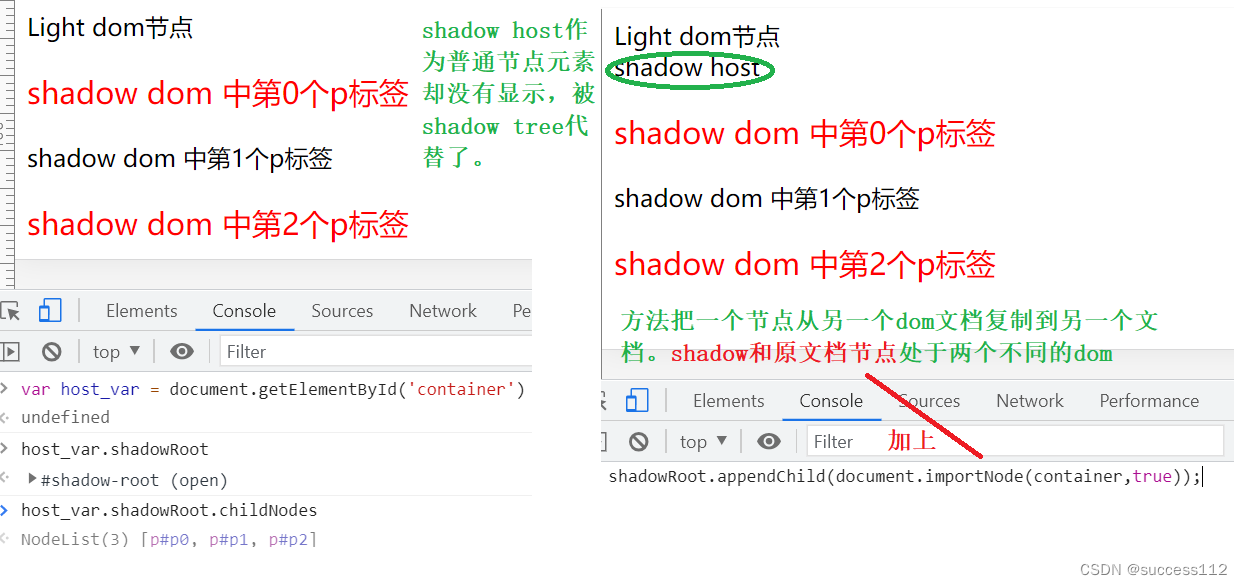
图中小改动不提倡,它有专门解决的slot槽位。
slot
当shadow host内存在影子DOM,浏览器默认只会渲染该影子DOM的影子树,而不渲染影子主体的内容。注意是content(子元素、文字等等都是内容)不渲染。但是shadow host的样式还是会渲染。不用slot,改变shadow dom中的内容。但像下面这样,加一个足球图标
<my-card >
		<img style='width=20px;height:20px;' src='./image/football.png'></img>
</my-card>
显然仅靠上述代码不可能完成,又加一个image属性传入src,在生成shadow tree标签时加一个img,然后赋值路径,可以的。但是我们还是用slot吧,更灵活。在shadow tree中<slot></slot>占位,它会把host下所有的内容(Light dom)都展示在tree中第一次出现<slot></slot>的位置。
<my-card >
<img style='width=20px;height:20px;' src='./image/football.png'></img>
</my-card>
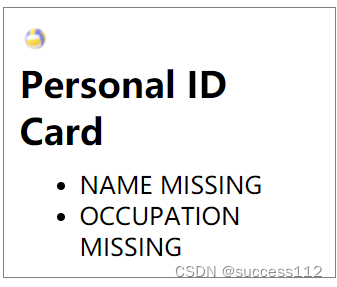
class MyCard extends HTMLElement {
constructor() {
super();
//设置两个属性的默认值
this.setAttribute('personName',this.getAttribute('personName')?this.getAttribute('personName'):'NAME MISSING');
this.setAttribute('occupation',this.getAttribute('occupation')?this.getAttribute('occupation'):'OCCUPATION MISSING');
const shadowRoot = this.attachShadow({mode: 'open'});
shadowRoot.innerHTML ='<style>'+':host {padding: 10px; border: 1px solid gray; width: 200px; margin: 10px;display:block;}'+
'h2 { margin: 0 0 10px; }'+
'ul { margin: 0; }'+
'p { margin: 10px 0; }'+
'</style>'+
'<slot></slot>'+
'<h2>Personal ID Card</h2>'+
'<ul>'+
'<li>'+this.getAttribute('personName')+'</li>'+
'<li>'+this.getAttribute('occupation')+'</li>'+
'</ul>';
}
}
window.customElements.define('my-card',MyCard);
</script>
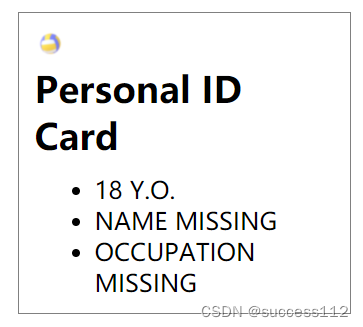
tree的不同位置插入不同内容,我们就要对slot分组,就有了name属性。拥有name属性的槽位来替换对应slot属性值相同的影子子树中的位置,而剩下的内容默认替换空名槽位,若不存在空名槽位,则剩余内容将被抛弃。
<my-card >
		<img slot='x1' style='width=20px;height:20px;' src='./image/football.png'></img>
		<li slot='x2'>18 Y.O.</li>
</my-card>
class MyCard extends HTMLElement {
		constructor() {
			super();
			//设置两个属性的默认值
			this.setAttribute('personName',this.getAttribute('personName')?this.getAttribute('personName'):'NAME MISSING');
			this.setAttribute('occupation',this.getAttribute('occupation')?this.getAttribute('occupation'):'OCCUPATION MISSING');
		const shadowRoot = this.attachShadow({mode: 'open'});
			shadowRoot.innerHTML ='<style>'+':host {padding: 10px; border: 1px solid gray; width: 200px; margin: 10px;display:block;}'+
									'h2 { margin: 0 0 10px; }'+
									'ul { margin: 0; }'+
									'p { margin: 10px 0; }'+
									'</style>'+
									'<slot name=x1></slot>'+
									'<h2>Personal ID Card</h2>'+
									'<ul>'+
									'<slot name=x2></slot>'+
									'<li>'+this.getAttribute('personName')+'</li>'+
									'<li>'+this.getAttribute('occupation')+'</li>'+
									'</ul>';

		}
  }
  window.customElements.define('my-card',MyCard);
::slotted()
::slotted()选定那些被放在 HTML 模板中的元素,这个伪类选择器仅仅适用于 影子节点树 (Shadow Dom)。并且只会选择实际的元素节点, 而不包括文本节点。
语法::slotted( <compound-selector> )。<compound-selector> =[ <type-selector>? <subclass-selector>* [ <pseudo-element-selector> <pseudo-class-selector>* ]* ]
自定义组件
有了前面的铺垫,自定义组件自身是一个Shadow host,在它下面挂在shadow tree来具体实现组件外观功能。大体应该分这两步。
简单示例
简单示例,我们就把shadow dom构建放在自定义组件内。:host为shadow host定义样式,如果在shadow的:host和文档中都给一个属性设置样式,那么文档样式优先(!important提升了优先级就不适应了),有利于设置默认值。颜色我们使用了自定义css,自定义CSS属性存在于所有层次。
<my-ele style='width:200px;margin-left:450px'>haha</my-ele>
<script>
   class MyEle extends HTMLElement {
		constructor() {
			super();
		const shadowRoot = this.attachShadow({mode: 'open'});
			shadowRoot.innerHTML ='<style>'+':host {display: block; }'+
									'.card {display: block;height:40px;text-align: center;border:1px solid #5e72e4;border-radius:.25rem;background-color: var(--card-bg, #5e72e4);font-size: .875rem;position: relative;letter-spacing: .025em;text-transform: uppercase;will-change: transform;}'+
									'</style>'+
									'<div class="card">'+
									'<div style='+'margin-top:10px'+'>Card title</div></div>';

		}
  }
  window.customElements.define('my-ele',MyEle);
	</script>
伪类选择器
host顾名思义,就是选择shadow dom的host。无论带参数与否都是首先要确定host,然后根据host是寻找shadow tree中的元素还是,host父类元素
:host
上面已经出现的:host就是伪类选择器,它可以在shadow tree的构建过程中对shadow host(Light dom)设置样式。这就成为自定义元素的通用样式,只要用到该元素,就会使用该设定样式,除非外部样式覆盖。
//<my-ele>进行设置为块
:host {display: block;}
//带子类选择器,对shadow tree元素设置样式,这里是<div class="card">设置边框
:host .card{border:1px solid green;}
:host()
也是选择shadow host,必须有参数。参数必须是自定义元素的class属性。例如
空样式markclass在host只作为标记,我们可以在shadow dom中定义它的属性,一样可以反应到Light dom中。乍一看和:host一样,但它可以优选择的给定样式,只给
class='markclass’的host样式。也同样可以带子类选择器给shadow tree元素赋样式
<my-ele class='markclass' style='width:200px;margin-left:450px'></my-ele>
:host(.markclass) {border:8px solid green;}
:host(.markclass) .card{font-size:20px;}
:host-context()
选择host的特定祖先元素,也可以接子类选择器,对host的兄弟元素进行渲染。
<div class='parent'>
		<my-ele class='markclass' style='width:200px;margin-left:450px'></my-ele>
</div>
:host-context(.parent){background-color:red;}
属性选择器
如下是配置系统配色方案的样式,:root(代表<html>)是伪类.后面的都是属性选择器。包含data-color-mode="light"和data-light-theme*="light"属性及值为light的元素显示亮色。具备data-color-mode属性的元素直接显示亮色。
:root,[data-color-mode=light][data-light-theme*=light],[data-color-mode]{
    color-scheme: light
}
template
HTML 内容[模板](<template>)元素是一种用于保存客户端内容机制,该内容在加载页面时不会呈现,在运行时使用 JavaScript 实例化。虽然解析器在加载页面时确实会处理<template>元素的内容,但这样做只是为了确保这些内容有效;但元素内容不会被渲染。它也是一种document-fragment,简单的例子链接过去可以看。
真正的模板结合shadow dom才是它的最好用武之地示例:
<!--自定义标签-->
<person-details>
		<p slot="person-name">Dr. Shazaam</p>
		<span slot="person-age">Immortal</span>
		<span slot="person-occupation">Superhero</span>
</person-details>
	<!-->模板把shadown dom的innerHtml搬出来了,更好用html来书写<-->
	<template id="person-template">
		<div>
			<h2>Personal ID Card</h2>
			<slot name="person-name">NAME MISSING</slot>
			<ul>
				<li><slot name="person-age">AGE MISSING</slot></li>
				<li><slot name="person-occupation">OCCUPATION MISSING</slot></li>
			</ul>
		</div>
	</template>
class PersonDetails extends HTMLElement {
		constructor() {
		super();
		var template = document.getElementById('person-template');
		var templateContent = template.content;

		const shadowRoot = this.attachShadow({mode: 'open'});

		var style = document.createElement('style');
		style.textContent = 'div { padding: 10px; border: 1px solid gray; width: 200px; margin: 10px; }' +
							'h2 { margin: 0 0 10px; }' +
							'ul { margin: 0; }' +
							'p { margin: 10px 0; }' +
							'::slotted(*) { color: gray; font-family: sans-serif; } ';

		shadowRoot.appendChild(style);
		shadowRoot.appendChild(templateContent.cloneNode(true));
	}
  }
  window.customElements.define('person-details',PersonDetails)
::slotted()选择的是Light dom中含有slot"属性"的元素,本例中<person-details>下级中带有槽位的元素。::slotted(span)、::slotted(.class)、::slotted(#id)可以给对应选择出来的槽位元素赋予样式。
总结
自定义组件主要就是使用shadow dom隔离的作用,让组件和整体环境不相互干扰。template 的出现让我们不必在shadow dom中拼接元素,而是在Light dom中写好模板,shadow dom定义过程中把它拼接到shadow tree上替换slot。template只在js操作之后才会渲染,这才是选择template的主要原因。否则任何其他元素也可以替换,但它原本位置也会渲染这些元素。


 317
317


 被折叠的 条评论
为什么被折叠?
被折叠的 条评论
为什么被折叠?
 到【灌水乐园】发言


