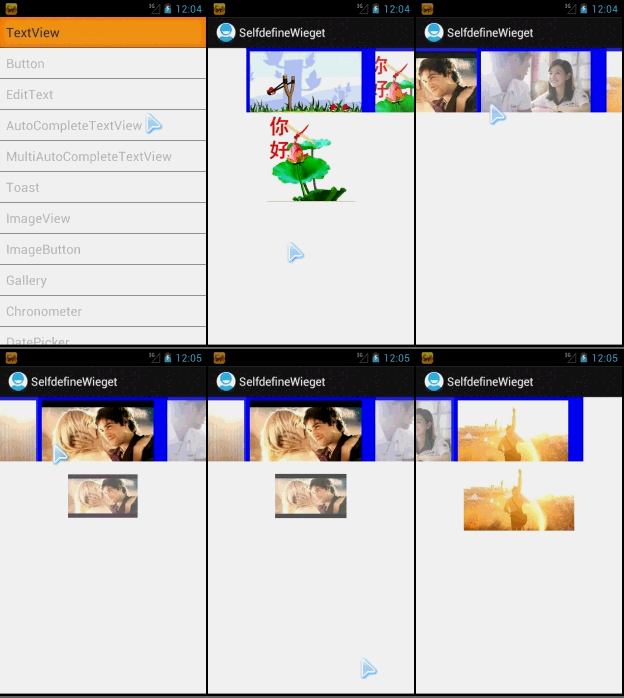
ImageSwitcher 和TextSwitcher使用方法类似,这里主要通过介绍ImageSwitcher来学习这两个控件。
ImageSwitcher管理着两个ImageView(同理:TextSwitcher管理两个TextView),但是同一时刻值显示一个ImageView。
在使用时需要注意,一定要实现ViewSwitcher.ViewFactory接口。
在添加资源的地方使用mImgSwitcher.setImageDrawable(XXX)或相关方法。
下面看看一个简单示例:
1、widget_switcher_layout.xml
<?xml version="1.0" encoding="utf-8"?>
<LinearLayout xmlns:android="http://schemas.android.com/apk/res/android"
    android:layout_width="match_parent"
    android:layout_height="match_parent"
    android:orientation="vertical" >

    <Gallery
        android:id="@+id/images_horizontal_scroll"
        android:layout_width="match_parent"
        android:layout_height="100dp" />

    <ImageSwitcher
        android:id="@+id/img_switch_view"
        android:layout_width="match_parent"
        android:layout_height="wrap_content" >
    </ImageSwitcher>

</LinearLayout>fade_in.xml
<?xml version="1.0" encoding="utf-8"?>
<set xmlns:android="http://schemas.android.com/apk/res/android"
    android:duration="2000" >

    <alpha
        android:fromAlpha="0"
        android:toAlpha="1" />

    <scale
        android:fromXScale="0.0"
        android:fromYScale="0.0"
        android:pivotX="50%"
        android:pivotY="50%"
        android:toXScale="1"
        android:toYScale="1" />

</set><?xml version="1.0" encoding="utf-8"?>
<set xmlns:android="http://schemas.android.com/apk/res/android"
android:duration="200" >
<alpha
android:fromAlpha="1"
android:toAlpha="0" />
<scale
android:fromXScale="1"
android:fromYScale="1"
android:pivotX="50%"
android:pivotY="50%"
android:toXScale="0"
android:toYScale="0" />
</set>3、activity——WidgetImageSwitcherActivity.java
import android.app.Activity;
import android.os.Bundle;
import android.view.View;
import android.view.ViewGroup.LayoutParams;
import android.view.animation.Animation;
import android.view.animation.AnimationUtils;
import android.widget.AdapterView;
import android.widget.AdapterView.OnItemSelectedListener;
import android.widget.Gallery;
import android.widget.ImageSwitcher;
import android.widget.ImageView;
import android.widget.ViewSwitcher.ViewFactory;

import com.xy.zt.selfdefinewieget.WidgetGalleryActivity.ImageAdapter;

public class WidgetImageSwitcherActivity extends Activity implements OnItemSelectedListener,
        ViewFactory {

    private int[] imgs = {
            R.drawable.angry_bird,
            R.drawable.hello_image_view, R.drawable.image_aver,
            R.drawable.image_run, R.drawable.love, R.drawable.loveing_gire,
            R.drawable.qianjing
    };

    private ImageSwitcher mImgSwitcher;
    private Gallery mScrollView;
    private ImageAdapter mAdapter;
    private Animation mFadeIn;
    private Animation mFadeOut;

    @Override
    public void onCreate(Bundle savedInstanceState) {
        super.onCreate(savedInstanceState);
        setContentView(R.layout.widget_switcher_layout);
        init();

    }

    private void init() {
        mImgSwitcher = (ImageSwitcher) findViewById(R.id.img_switch_view);
        mFadeIn = AnimationUtils.loadAnimation(this, R.anim.fade_in);
        mFadeOut = AnimationUtils.loadAnimation(this, R.anim.fade_out);
        mImgSwitcher.setInAnimation(mFadeIn);
        mImgSwitcher.setOutAnimation(mFadeOut);
        mImgSwitcher.setFactory(this);

        mScrollView = (Gallery) findViewById(R.id.images_horizontal_scroll);
        mAdapter = new ImageAdapter(this);
        mScrollView.setAdapter(mAdapter);
        mScrollView.setOnItemSelectedListener(this);
    }

    public void onItemSelected(AdapterView<?> listView, View v, int position, long id) {
        ImageView imgView = ((ImageView) v.findViewById(R.id.gallery_adapter_img));
        if (imgView == null) {
            System.out.println("image view is null!...");
            return;
        }
         mImgSwitcher.setImageDrawable(imgView.getDrawable());
    }

    public void onNothingSelected(AdapterView<?> arg0) {

    }

    public View makeView() {
        ImageView iv = new ImageView(this);
        iv.setLayoutParams(new ImageSwitcher.LayoutParams(
                LayoutParams.MATCH_PARENT, LayoutParams.MATCH_PARENT));
        iv.setScaleType(ImageView.ScaleType.CENTER_INSIDE);
        iv.setImageResource(R.drawable.hello_image_view);
        return iv;
    }
}
LayoutParams.MATCH_PARENT, LayoutParams.MATCH_PARENT));一定要使用ImageSwitcher的LayoutParams或者省去这句代码。
代码中使用到了一些图片资源和ImageAdapter类,对这部分内容不清楚的童鞋请参见一步一步学android控件(之十) —— Gallery 。
4、在ViewData.java中添加如下内容(此部分内容可选)
public static final int IMAGE_SWITCHER_ID = TOGGLE_SWITCH_ID + 1;
    public static final String IMAGE_SWITCHER_NAME = "ImageSwitcher";
private static final ViewData mImgSwitcher = new ViewData(IMAGE_SWITCHER_NAME,
            IMAGE_SWITCHER_ID);
View_Datas.add(mImgSwitcher);case ViewData.IMAGE_SWITCHER_ID:
intent.setClass(mContext, WidgetImageSwitcherActivity.class);
mContext.startActivity(intent);
break;5、效果展示
TextSwitcher的原理和ImageSwitcher一样,使用可参照ImageSwitcher的使用方法。下一篇文章ScrollView & HorizontalScrollView 。


 618
618

 被折叠的 条评论
为什么被折叠?


