


一、从官网下载MySQL Community Server
http://dev.mysql.com/downloads/mysql/选择相应的系统,通常linux选择Linux-Generic下载即可
二、创建用户
创建用户之前可以查看系统有哪些用户:grep bash /etc/passwd首先创建mysql用户,组mysql,根目录/opt/mysql
或者命令 groupadd mysql
useradd -g mysql -d /opt/mysql mysql
三、将安装包ftp传至/opt/mysql/install下解压
把root用户切换到mysql用户下:su - mysql
因为会解压出来很多包,我们可以在/opt/mysql下先建一个install目录:mkdir install
MySQL-5.5.29-1.linux2.6.x86_64.tar传至/opt/mysql/install
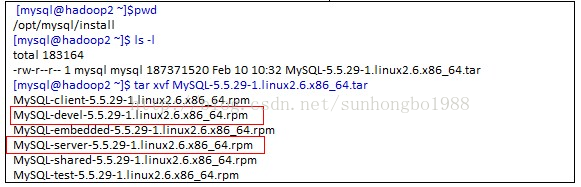
红色部分为需要安装的客户端和服务端
如果是在f5上则需要通过scp命令来传文件
scp urp@134.64.110.80:/home/urp/mysql_anzhuang/MySQL-server-5.5.29-1.rhel5.x86_64.rpm /opt/mysql/install
四、安装
1、先查看原主机上又没有mysql(root用户操作)
[root@hadoop2 install]$ rpm -qa|grep mysql
mysql-5.0.77-4.el5_5.4
如果有继续安装,会如下安装失败:
[root@hadoop2 install]$ rpm -ivh MySQL-server-5.5.29-1.linux2.6.x86_64.rpm
error: Failed dependencies:
MySQL conflicts with mysql-5.0.77-4.el5_5.4.x86_64
所以要先卸载或升级,但是我升级和卸载都报了一个依赖的错,因为有个dovecot依赖如下,最后加了个--nodeps参数解决,
rpm -qa | grep -i mysql //这里加 "i" 参数的含义是不区分大小写。查看一下是否安装并且安装的版本叫什么名字
找到有某些版本的mysql名字之后对其执行卸载。如
:mysql-libs-5.0.45-6.fc7
执行:rpm -e mysql-libs-5.0.45-6.fc7
[root@hadoop2 install]$ rpm -Uvh MySQL-server-5.5.29-1.linux2.6.x86_64.rpm
error: Failed dependencies:
libmysqlclient.so.15()(64bit) is needed by (installed) dovecot-1.0.7-7.el5.x86_64
libmysqlclient.so.15(libmysqlclient_15)(64bit) is needed by (installed) dovecot-1.0.7-7.el5.x86_64
[root@hadoop2 install]$ rpm -e mysql-5.0.77-4.el5_5.4
error: Failed dependencies:
libmysqlclient.so.15()(64bit) is needed by (installed) dovecot-1.0.7-7.el5.x86_64
libmysqlclient.so.15(libmysqlclient_15)(64bit) is needed by (installed) dovecot-1.0.7-7.el5.x86_64
[root@hadoop2 install]rpm -e mysql-5.0.77-4.el5_5.4 --nodeps
[root@hadoop2 home]# rpm -qa|grep mysql
[root@hadoop2 home]#
卸载Mysql数据库可参考:
http://www.cnblogs.com/xd502djj/archive/2011/03/29/1999171.html
2、安装server和client
[root@hadoop2 install]# rpm -ivh MySQL-server-5.5.29-1.linux2.6.x86_64.rpm
Preparing... ########################################### [100%]
1:MySQL-server ########################################### [100%]
PLEASE REMEMBER TO SET A PASSWORD FOR THE MySQL root USER !
To do so, start the server, then issue the following commands:
/usr/bin/mysqladmin -u root password 'new-password'
/usr/bin/mysqladmin -u root -h hadoop2 password 'new-password'
Alternatively you can run:
/usr/bin/mysql_secure_installation
which will also give you the option of removing the test
databases and anonymous user created by default. This is
strongly recommended for production servers.
See the manual for more instructions.
Please report any problems with the /usr/bin/mysqlbug script!
Notes regarding SELinux on this platform:
=========================================
The default policy might cause server startup to fail because it is
not allowed to access critical files. In this case, please update
your installation.
The default policy might also cause inavailability of SSL related
features because the server is not allowed to access /dev/random
and /dev/urandom. If this is a problem, please do the following:
1) install selinux-policy-targeted-sources from your OS vendor
2) add the following two lines to /etc/selinux/targeted/src/policy/domains/program/mysqld.te:
allow mysqld_t random_device_t:chr_file read;
allow mysqld_t urandom_device_t:chr_file read;
3) cd to /etc/selinux/targeted/src/policy and issue the following command:
make load
[root@hadoop2 install]rpm -ivh MySQL-client-5.5.29-1.linux2.6.x86_64.rpm
Preparing... ########################################### [100%]
1:MySQL-client ########################################### [100%]
[root@hadoop2 install]#chown -R mysql:mysql /usr/share/mysql
三、安装完修改数据文件路径
修改数据文件目录cp -R /var/lib/mysql /data/mysql
vi /etc/my.cnf
把socket = /var/lib/mysql/mysql.sock
都改成
#socket = /var/lib/mysql/mysql.sock
socket = /data/mysql/mysql.sock
4、启动
方式一、[mysql@hadoop2 mysql]$pwd
/usr/share/mysql
[mysql@hadoop2 mysql]$ /usr/share/mysql/mysql.server start
Starting MySQL..[ OK ]
重启:/usr/share/mysql/mysql.server restart
./mysql.server脚本是调用/usr/bin/mysqld_safe来启动mysql的
方式二、
启动:service mysql start
停止:service mysql stop
重启:service mysql restart
启动报错可以查看启动日志,启动日志位于/data/mysql下
五、查看mysql是否启动,看进程+3306端口
[mysql@hadoop2 mysql]$ netstat -an|grep 3306tcp 0 0 :::3306 :::* LISTEN
[mysql@hadoop2 mysql]$ ps -ef|grep mysqld_safe
mysql 4637 1 0 11:54 pts/0 00:00:00 /bin/sh /usr/bin/mysqld_safe --datadir=/var/lib/mysql --pid-file=/var/lib/mysql/hadoop2.pid
mysql 5001 4606 0 13:50 pts/0 00:00:00 grep mysqld_safe
六、设定root用户密码
[root@hadoop2 mysql]# mysqladmin -u root password '123456'这是第一次设定,如果修改就是
mysqladmin -u root -p 旧密码password 新密码
七、尝试连接
[mysql@hadoop2 ~]$ mysql -u root -pEnter password:
Welcome to the MySQL monitor. Commands end with ; or \g.
Your MySQL connection id is 5
Server version: 5.5.29 MySQL Community Server (GPL)
Copyright (c) 2000, 2011, Oracle and/or its affiliates. All rights reserved.
Oracle is a registered trademark of Oracle Corporation and/or its
affiliates. Other names may be trademarks of their respective
owners.
Type 'help;' or '\h' for help. Type '\c' to clear the current input statement.
mysql>
八、修改可以远程登录(通过mysql客户端连接数据库)
mysql>use mysqlReading table information for completion of table and column names
You can turn off this feature to get a quicker startup with -A
Database changed
mysql> select host,user, Password ,Select_priv from user;
mysql> grant all on *.* to root@'%' identified by '6543210';
Query OK, 0 rows affected (0.00 sec)
mysql> GRANT USAGE ON *.* TO 'root'@'%' WITH GRANT OPTION;
Query OK, 0 rows affected (0.00 sec)
mysql> select host,user from user where user='root';
mysql> flush privileges;
Query OK, 0 rows affected (0.00 sec)
修改用户密码
mysql>use mysql;
mysql>update user set password=password('新密码') WHERE User='root' and host='%';
mysql>flush privileges;
这样远程登录就可以成功了。□√
九、修改字符集
查看原字符集:mysql>use mysql
Reading table information for completion of table and column names
You can turn off this feature to get a quicker startup with -A
Database changed
mysql> show variables like 'character_set%' ;
mysql> show variables like 'collation_%';
需要将/usr/share/mysql/my-huge.cnf
my-innodb-heavy-4G.cnf
my-large.cnf
my-medium.cnf
my-small.cnf
任意一个(根据数据库的需求,本例用large)copy至/etc下,修改为my.cnf
[root@hadoop2] cp /usr/share/mysql/my-large.cnf /etc/my.cnf
[root@hadoop2] vi /etc/my.cnf
在[client]下添加default-character-set=utf8
在[mysqld]下添加character_set_server=utf8
在[mysql] 下添加default-character-set=utf8
[mysql @hadoop2] /usr/share/mysql/mysql.server restart
进行查看
十、修改SQL不区分大小写
在/etc/my.cnf 中的[mysqld]后添加lower_case_table_names=1,重启MYSQL服务11、支持procedure或者function编译及执行
在mysql中编译或者执行procedure或者function时,可能会报如下错误
This function has none of DETERMINISTIC, NO SQL, or READS SQL DATA in its declaration and binary logging is enabled (you *might* want to use the less safe log_bin_trust_function_creators variable)
两种方法
在/etc/my.cnf 中的[mysqld]后添加添加log_bin_trust_function_creators = 1,重启MYSQL服务
在控制台执行SQL> set global log_bin_trust_function_creators = 1;
不过重启后会失效
五、启动停止
1、启动
[mysql@hadoop2 mysql]$pwd
/usr/share/mysql
[mysql@hadoop2 ~]$ /usr/share/mysql/mysql.server start
Starting MySQL..[ OK ]
2、停止
[mysql@hadoop2 ~]$ /usr/bin/mysqladmin –u root –p shutdown
Enter password:
或者
[mysql@hadoop2 ~]$ /usr/share/mysql/mysql.server stop
3、重启
[mysql@hadoop2 ~]$ /usr/share/mysql/mysql.server restart
4、通过chkconfig设置开机自动启动
[root@hadoop2 mysql]# chkconfig mysql on
[root@hadoop2 mysql]# chkconfig --list mysql
mysql 0:off 1:off 2:on 3:on 4:on 5:on 6:off
六、基本使用
mysql> show databases; //查看数据库
mysql> use test //选择数据库
Database changed
mysql> show tables; //查看表
Empty set (0.00 sec)
mysql> create table gl(id int(3) auto_increment not null primary key, name char(10) not null);
//创建表
Query OK, 0 rows affected (0.01 sec)
mysql> select * from gl;
Empty set (0.00 sec)
mysql> show tables; //再次查看表
mysql> insert into gl values("",'Guolei'); //插入数据
Query OK, 1 row affected, 1 warning (0.00 sec)
mysql> select * from gl; //查询数据
mysql> exit
Bye
七、备份数据库
使用mysqldump命令备份
[mysql@hadoop2 ~]$ /usr/bin/mysqldump -u root -p654321 --opt test>>test.bbb //单库备份
[mysql@hadoop2 ~]$ls –l
total 8
drwxrwxr-x 2 mysql mysql 4096 Feb 10 11:19 install
-rw-rw-r-- 1 mysql mysql 3690 Feb 10 14:54 test.bbb
[mysql@hadoop2 ~]$ mysqldump -u root –p654321 --opt --all-databases --lock-tables=false >dump.sql//全量备份
备份出来的test.bbb是个文本文件,可以使用more或者cat打开
使用mysqldump命令导入备份
[mysql@hadoop2 ~]$ mysql -u root -p test< test.bbb
Enter password:
备份注意:
mysqldump: Got error: 1066: Not unique table/alias: 'pmamap' when using LOCK TABLES
需要加上--lock-tables=false 参数
八、两台数据库设置主从
1、场景描述
主数据库服务器:134.64.114.198,MySQL已经安装,并且无应用数据。
从数据库服务器:134.64.114.199,MySQL已经安装,并且无应用数据。
2、操作步骤
修改从数据库server-id
修改从服务器的配置文件/etc/my.cnf
将 server-id = 1修改为 server-id = 10(也可以修改为别的值),并确保这个ID没有被别的MySQL服务所使用。
重启mysql服务
$service mysql restart
在从数据库建立复制用户
mysql> create user rep;
在主数据库赋予权限给复制用户
mysql>GRANT REPLICATION SLAVE ON *.* to 'rep'@'134.64.114.199' identified by 'rep!@#';
在主数据库查询FILE 及 Position
Mysql> show master status;
+------------------+----------+--------------+------------------+
| File | Position | Binlog_Do_DB | Binlog_Ignore_DB |
+------------------+----------+--------------+------------------+
| mysql-bin.000005 | 261 | | |
+------------------+----------+--------------+------------------+
记录下 FILE 及 Position 的值,在后面进行从服务器操作的时候需要用到。
在从数据库执行同步SQL语句
mysql> change master to
master_host='134.64.114.198',
master_user='rep',
master_password='rep!@#',
master_log_file='mysql-bin.000017',
master_log_pos=107;
在从数据库启动主从同步进程
mysql> start slave;
主从同步检查
mysql> show slave status\G
==============================================
**************** 1. row *******************
Slave_IO_State:
Master_Host: 134.64.114.198
Master_User: rep
Master_Port: 3306
Connect_Retry: 60
Master_Log_File: mysql-bin.000005
Read_Master_Log_Pos: 415
Relay_Log_File: localhost-relay-bin.000008
Relay_Log_Pos: 561
Relay_Master_Log_File: mysql-bin.000005
Slave_IO_Running: YES
Slave_SQL_Running: YES
Replicate_Do_DB:
……………省略若干……………
Master_Server_Id: 1
1 row in set (0.01 sec)
==============================================
其中Slave_IO_Running 与 Slave_SQL_Running 的值都必须为YES,才表明状态正常。


 377
377

 被折叠的 条评论
为什么被折叠?
被折叠的 条评论
为什么被折叠?
 到【灌水乐园】发言


