


一、前言
应用RN技术栈实现APP上线后,业务部门领导会上反馈未实现ipad横屏全屏展示,用户体验较差。由此,一场pad横屏全屏展示的APP调优工作由此开展。
实操环境:
- Xcode: 14.2
- react-native-cli: 2.0.1
- react-native: 0.60.3
- iOS: 16.1.2 (iPhone X)
二、实现思路
时间紧任务重,技术实现上,考虑到存量功能代码改造工作量,RN层面对于横屏改造工作量较大,故RN层面整体实现横屏展示时间上不允许,RN侧改造方案放弃。
由于业务方只关注APP某一功能模块,故将改造范围缩减,当业务方点击APP功能模块入口时,允许APP解除屏幕方向锁定,让屏幕方向根据设备的物理方向自动调整。当应用退出当前关注功能模块时,APP屏幕方向锁定,不允许屏幕方向根据设备的物理方向自动调整。
APP默认仅支持竖屏。
2.1 Android端
操作如下:
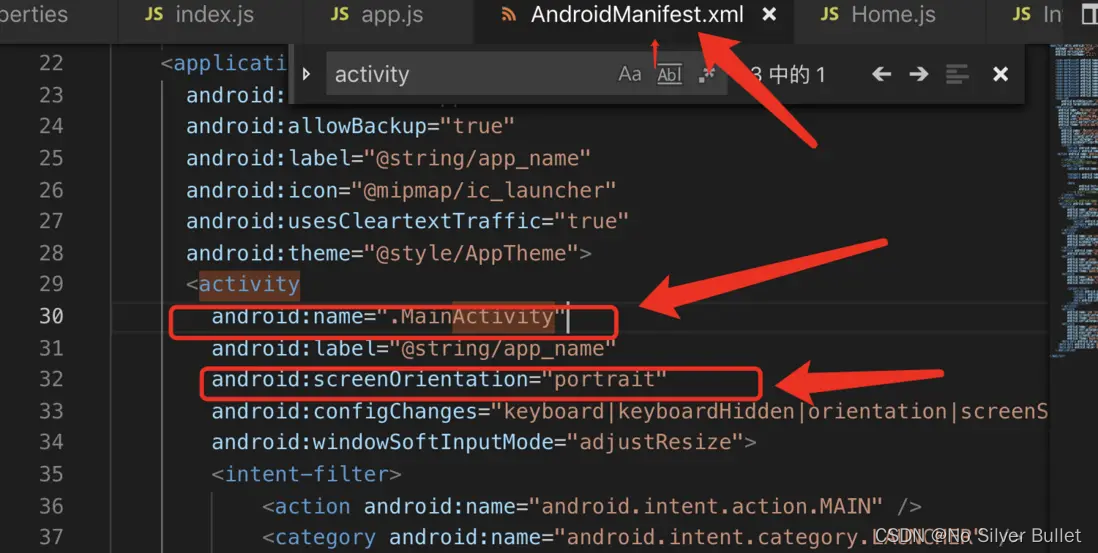
app/src/main/AndroidManifest.xml配置文件中添加android:screenOrientation="portrait"。
值得注意的是:需要在activity中添加并且是在属性为android:name=".MainActivity"下添加以上配置,如图:
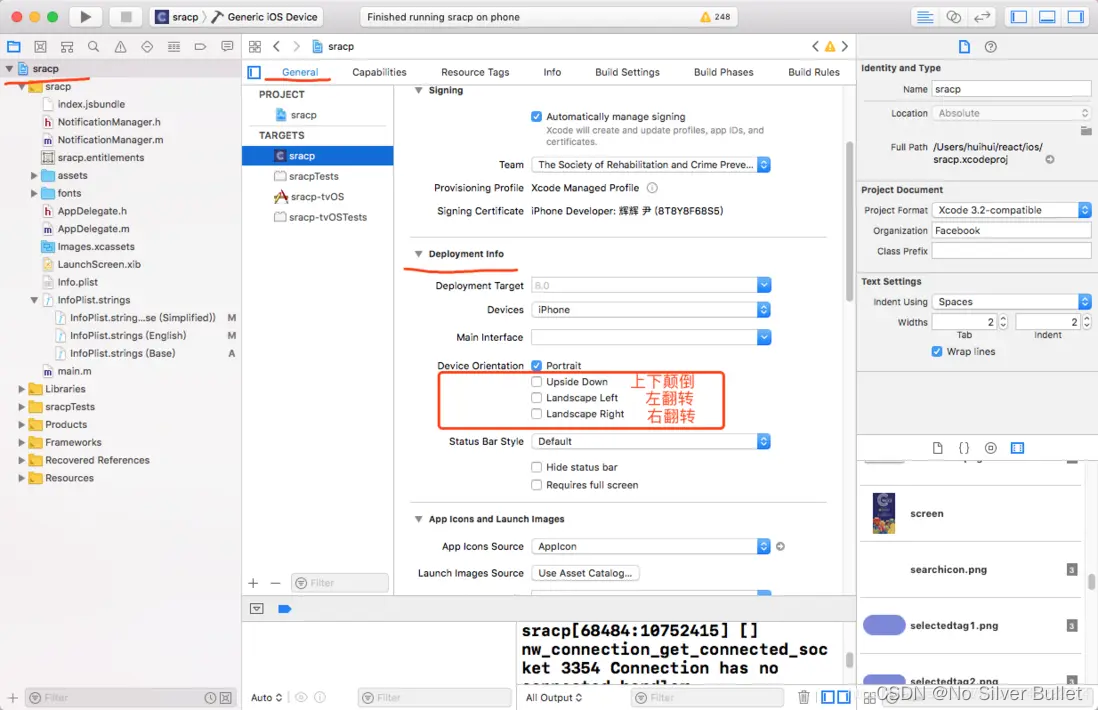
2.2 iOS端
为实现iPad适配,首先需要将Targeted Device Families更改为iPhone, iPad:
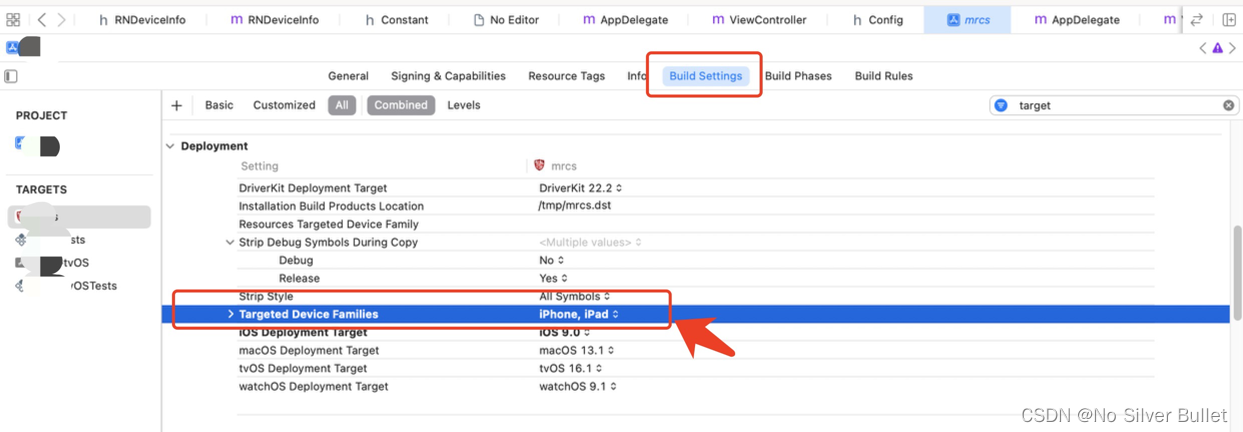
在Xcode项目中把相对应的勾去掉即可。
基于项目为react-native技术栈实现,不涉及原生代码,可借助react-native第三方组件:react-native-orientation实现。
安装步骤:
npm i --save react-native-orientation
react-native link react-native-orientation (自动link不成功,建议手动link)
进入功能模块时,
import Orientation from 'react-native-orientation';

onPress={() => {
  // 解除屏幕方向锁定,让屏幕方向根据设备的物理方向自动调整
  console.log('----------解除屏幕方向锁定,让屏幕方向根据设备的物理方向自动调整---------');
  Orientation.unlockAllOrientations();
  ....
}}
退出功能模块时,
import Orientation from 'react-native-orientation';

initData = () => {
  // 锁定屏幕竖屏锁定
  console.log('----------锁定屏幕竖屏锁定---------');
  Orientation.lockToPortrait();
};
按照以上实现思路实施后,发现android系统下的pad表现较好,能够按照预期设想自动实现APP横竖屏切换,且内容适配。
但是,iOS系统下的iPhone、iPad表现不尽如人意,虽然可以实现屏幕横竖屏自动切换,但是当APP处于横屏状态下时,页面展示效果存在未完全铺展开的适配问题。
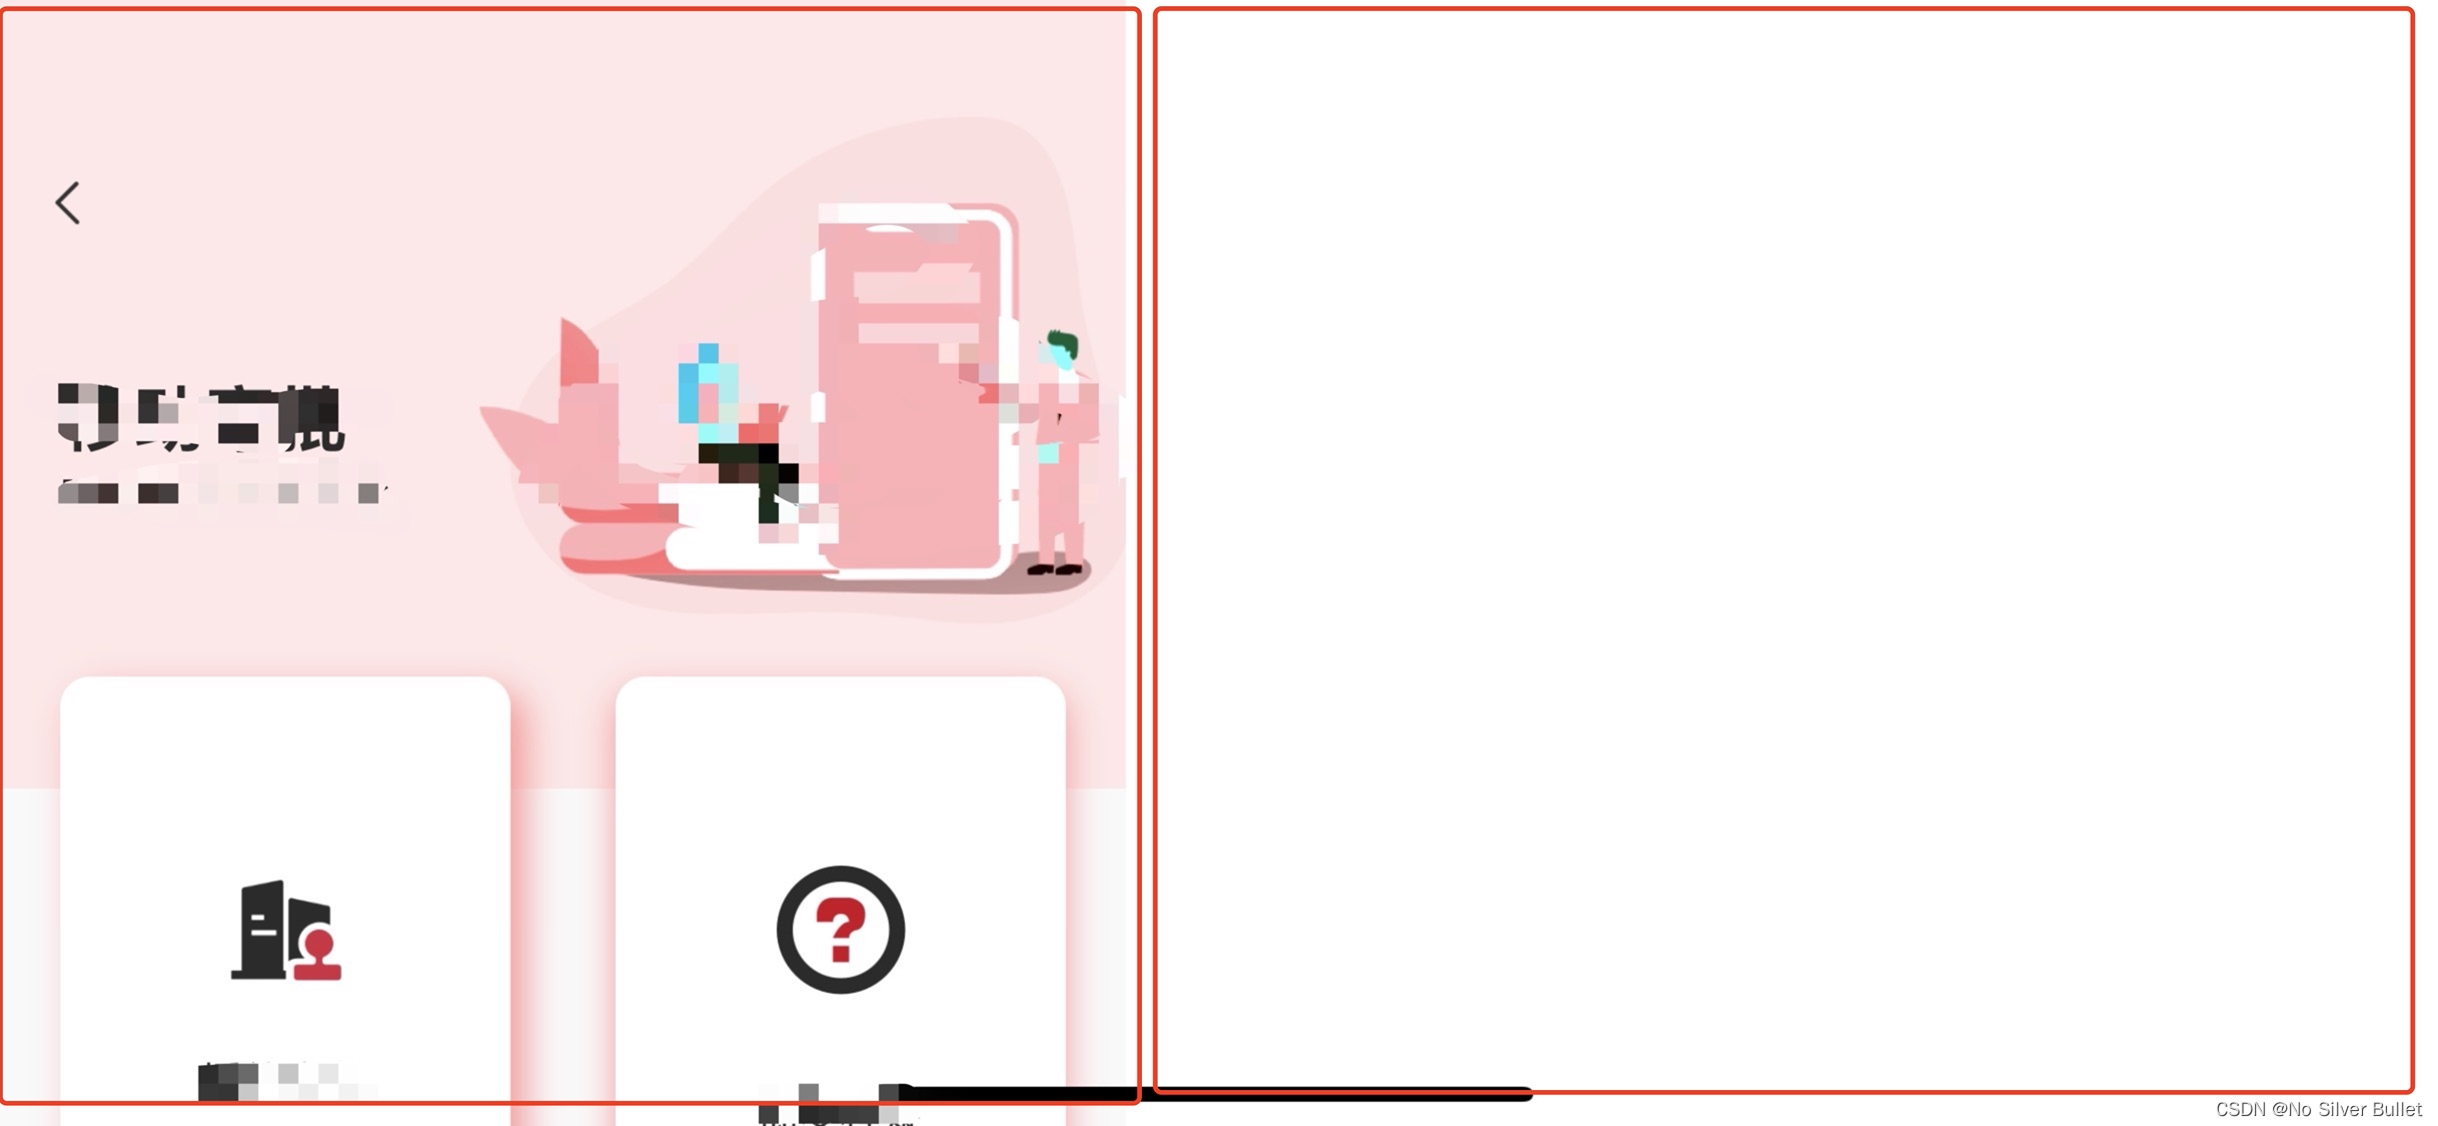
显而易见,iOS系统中当旋转物理设备至横屏时,仍然沿用的设备竖屏状态下的宽高进行页面绘制。关键问题就出在这里。
且发现在RN页面及webview中均存在横屏状态下沿用竖屏状态宽高问题。
按照网上给出的解决方案:
对于iOS,在ios/Info.plist文件中包括以下行就可以了:
<key>UISupportedInterfaceOrientations</key>
<array>
    <string>UIInterfaceOrientationPortrait</string>
</array>

<key>UISupportedInterfaceOrientations~ipad</key>
<array>
    <string>UIInterfaceOrientationLandscapeRight</string>
    <string>UIInterfaceOrientationLandscapeLeft</string>
    <string>UIInterfaceOrientationPortrait</string>
    <string>UIInterfaceOrientationPortraitUpsideDown</string>
</array>
经实践发现问题依旧存在。且存在整个APP应用横竖屏切换时,样式错乱(竖屏状态应用横屏样式,遮挡)问题。
经过控制台日志分析发现如下兼容性提示信息:
> [Orientation] BUG IN CLIENT OF UIKIT: Setting UIDevice.orientation is not supported. Please use UIWindowScene.requestGeometryUpdate(_:)
在 iOS 16 中,通过设置 UIDevice.orientation 来强制旋转屏幕的方向已不再被支持。
根据错误提示,需要使用 UIWindowScene.requestGeometryUpdate(_:) 方法来实现。
转为 iOS 15.2.1测试机后,发现以上兼容性提示信息在控制台不再展示。
但是竖屏转横屏后,依旧存在样式错乱(竖屏状态应用横屏样式,遮挡)问题。
经过项目实践,发现组件react-native-orientation对于iOS系统横竖屏转换支持并不友好,也有可能自己遗漏了xcode配置。
三、延伸阅读
3.1 iOS 原生实现横竖屏切换
3.1.1 iOS16 之前实现横竖屏切换
在 AppDelegate.h 文件中添加一个变量来记录是否需要进行横竖屏切换。
@property (nonatomic, assign, getter=isLaunchScreen) BOOL launchScreen; /**< 是否是横屏 */
在 AppDelegate.m 文件中重写 launchScreen 的 setter 方法:
- (void)setLaunchScreen:(BOOL)launchScreen {

    _launchScreen = launchScreen;
    [self application:[UIApplication sharedApplication] supportedInterfaceOrientationsForWindow:nil];
}
并且实现 UIApplicationDelegate 的 application:supportedInterfaceOrientationsForWindow: 方法
- (UIInterfaceOrientationMask)application:(UIApplication *)application supportedInterfaceOrientationsForWindow:(UIWindow *)window {

    if (self.isLaunchScreen) {
        // 只支持横屏,并且 Home 按键在右边
        return UIInterfaceOrientationMaskLandscapeRight;
    }

    // 只支持竖屏
    return UIInterfaceOrientationMaskPortrait;
}
接下来在需要切换横竖屏的 View 中增加以下方法,就能在 iOS16 之前实现该功能。
/// 切换设备方向
/// - Parameter isLaunchScreen: 是否是全屏
- (void)p_switchOrientationWithLaunchScreen:(BOOL)isLaunchScreen {
    AppDelegate *appdelegate = (AppDelegate *)[UIApplication sharedApplication].delegate;
    if (isLaunchScreen) {
        // 全屏操作
        appdelegate.launchScreen = YES;
    } else {
        // 退出全屏操作
        appdelegate.launchScreen = NO;
    }
    // 设置设备的方向
    [self p_swichToNewOrientation:isLaunchScreen ? UIInterfaceOrientationLandscapeRight : UIInterfaceOrientationPortrait];
}

/// iOS16 之前进行横竖屏切换方式
/// - Parameter interfaceOrientation: 需要切换的方向
- (void)p_swichToNewOrientation:(UIInterfaceOrientation)interfaceOrientation {
    NSNumber *orientationTarget = [NSNumber numberWithInteger:interfaceOrientation];
    [[UIDevice currentDevice] setValue:orientationTarget forKey:@"orientation"];
}
经过以上代码,就能实现在 iOS16 之前的设备上进行横竖屏切换,下面开始适配 iOS16 的横竖屏切换。
3.1.2 iOS16 之后实现横竖屏切换
跟 iOS16 之前方式一样,需要设置 launchScreen 标志变量,重写 launchScreen 的 setter 方法,实现 UIApplicationDelegate 的 application:supportedInterfaceOrientationsForWindow: 方法。
在Xcode 14下,需要实现横竖屏切换的 View p_switchOrientationWithLaunchScreen: 方法中增加 iOS16 适配。
/// 切换设备方向
/// - Parameter isLaunchScreen: 是否是全屏
- (void)p_switchOrientationWithLaunchScreen:(BOOL)isLaunchScreen {

    AppDelegate *appdelegate = (AppDelegate *)[UIApplication sharedApplication].delegate;
    if (isLaunchScreen) {
        // 全屏操作
        appdelegate.launchScreen = YES;
    } else {
        // 退出全屏操作
        appdelegate.launchScreen = NO;
    }

    if (@available(iOS 16.0, *)) {
        // setNeedsUpdateOfSupportedInterfaceOrientations 方法是 UIViewController 的方法,所以这个操作最好是放在控制器中去操作
        [self setNeedsUpdateOfSupportedInterfaceOrientations];
        NSArray *array = [[[UIApplication sharedApplication] connectedScenes] allObjects];
        UIWindowScene *scene = [array firstObject];
        // 屏幕方向
        UIInterfaceOrientationMask orientation = isLaunchScreen ? UIInterfaceOrientationMaskLandscapeRight : UIInterfaceOrientationMaskPortrait;
        UIWindowSceneGeometryPreferencesIOS *geometryPreferencesIOS = [[UIWindowSceneGeometryPreferencesIOS alloc] initWithInterfaceOrientations:orientation];
        // 开始切换
        [scene requestGeometryUpdateWithPreferences:geometryPreferencesIOS errorHandler:^(NSError * _Nonnull error) {
            NSLog(@"强制%@错误:%@", isLaunchScreen ? @"横屏" : @"竖屏", error);
        }];
    } else {
        [self p_swichToNewOrientation:isLaunchScreen ? UIInterfaceOrientationLandscapeRight : UIInterfaceOrientationPortrait];
    }
}
3.2 react-native-orientation 可用函数
react-native-orientation 组件可用函数如下:
lockToPortrait()lockToLandscape()lockToLandscapeLeft()lockToLandscapeRight()unlockAllOrientations()getOrientation(function(err, orientation)返回的结果有LANDSCAPE、PORTRAIT、UNKNOWN、PORTRAITUPSIDEDOWN;getSpecificOrientation(function(err, specificOrientation)返回的结果有LANDSCAPE-LEFT、LANDSCAPE-RIGHT、PORTRAIT、UNKNOWN、PORTRAITUPSIDEDOWN;
官方文档中,还有一些事件的介绍,详细可以到官方文档上了解学习。
3.3 从模拟器中删除以前的应用程序
- 删除
...../Library/Developer/Xcode/DerivedData中的所有文件; - 然后从Xcode(Product->Clean Build Folder)中清除构建文件夹。
然后运行应用程序,
3.4 Xcode Crash报错提示Message from debugger: Terminated due to signal 9
原因:
-
内存使用过高
-
CPU使用过高
当内存或者CPU使用过高时,系统会杀死进程。需要启动任务管理器,杀掉无用进程。
3.5 react-native-full-screen (仅支持Android)
react-native-full-screen 是一个用于 React Native 库,它提供了一种简单的方式来实现Android全屏显示。通过使用这个库,可以轻松地将React Native应用程序设置为全屏模式,以提供更好的用户体验。
该库提供了一些方法和组件,可以实现全屏显示。其中包括:
-
FullScreen.enableFullScreen(): 这个方法可以将应用程序设置为全屏模式。调用这个方法后,应用程序将占据整个屏幕,并隐藏系统的状态栏和导航栏。 -
FullScreen.disableFullScreen(): 这个方法可以将应用程序从全屏模式切换回正常模式。调用这个方法后,应用程序将恢复到原来的显示状态,显示系统的状态栏和导航栏。 -
FullScreen.FullScreenView: 这个组件可以用作容器,将其包裹在需要全屏显示的内容周围。当这个组件被渲染时,它会自动将其子组件设置为全屏模式。
使用react-native-full-screen库,可以轻松地实现全屏显示,并根据需要在全屏和正常模式之间进行切换。
应用时,首先安装依赖包:
npm install react-native-full-screen --save
然后,链接库。
react-native link react-native-full-screen
使用时,首先导入依赖,
import FullScreen from 'react-native-full-screen';
在需要横屏的代码点,做如下逻辑处理:
FullScreen.onFullScreen();
若自动link不成功,建议手动link,可参照react-native-orientation。
安装时,注意RN 0.60 及以上不需要执行 link 操作(不可信!!亲自实践发现RN 0.60.3自动link不成功,需手动link!))。
(RN 0.60 and and above)
npm install @hortau/react-native-orientation-locker
(RN 0.59 and and below)
npm install @hortau/react-native-orientation-locker

react-native link @hortau/react-native-orientation-locker
3.6 react-native-orientation-locker
react-native-orientation-locker 为react-native-orientation的升级版,使用方式与 react-native-orientation 相同。
3.6.1 问题分析
经过实践发现,react-native-orientation-locker demo可正常实现横竖屏转换,且横屏为全屏,通过对比项目发现,RN版本不同,demo中RN版本号为0.63.2,实际项目中RN版本为0.60.3。初步怀疑是RN版本兼容性问题。为此计划将实际项目RN版本升级至0.63.2,通过借助Upgrade Helper升级手动升级过程中,由于存在 SDK不同版本,依赖的组件、pod依赖有所不同,包括依赖哪些组件、组件名(存在重命名的组件)、组件的描述文件路径等等问题导致RN版本升级失败。
考虑到存量项目体量较大,正确做法应该是将demo中RN高版本降级至0.60.3,以此验证横屏遮挡是否由RN版本兼容性导致。经过demo RN降级发现,ios设备中可正常实现横竖屏切换,且横屏无遮挡。
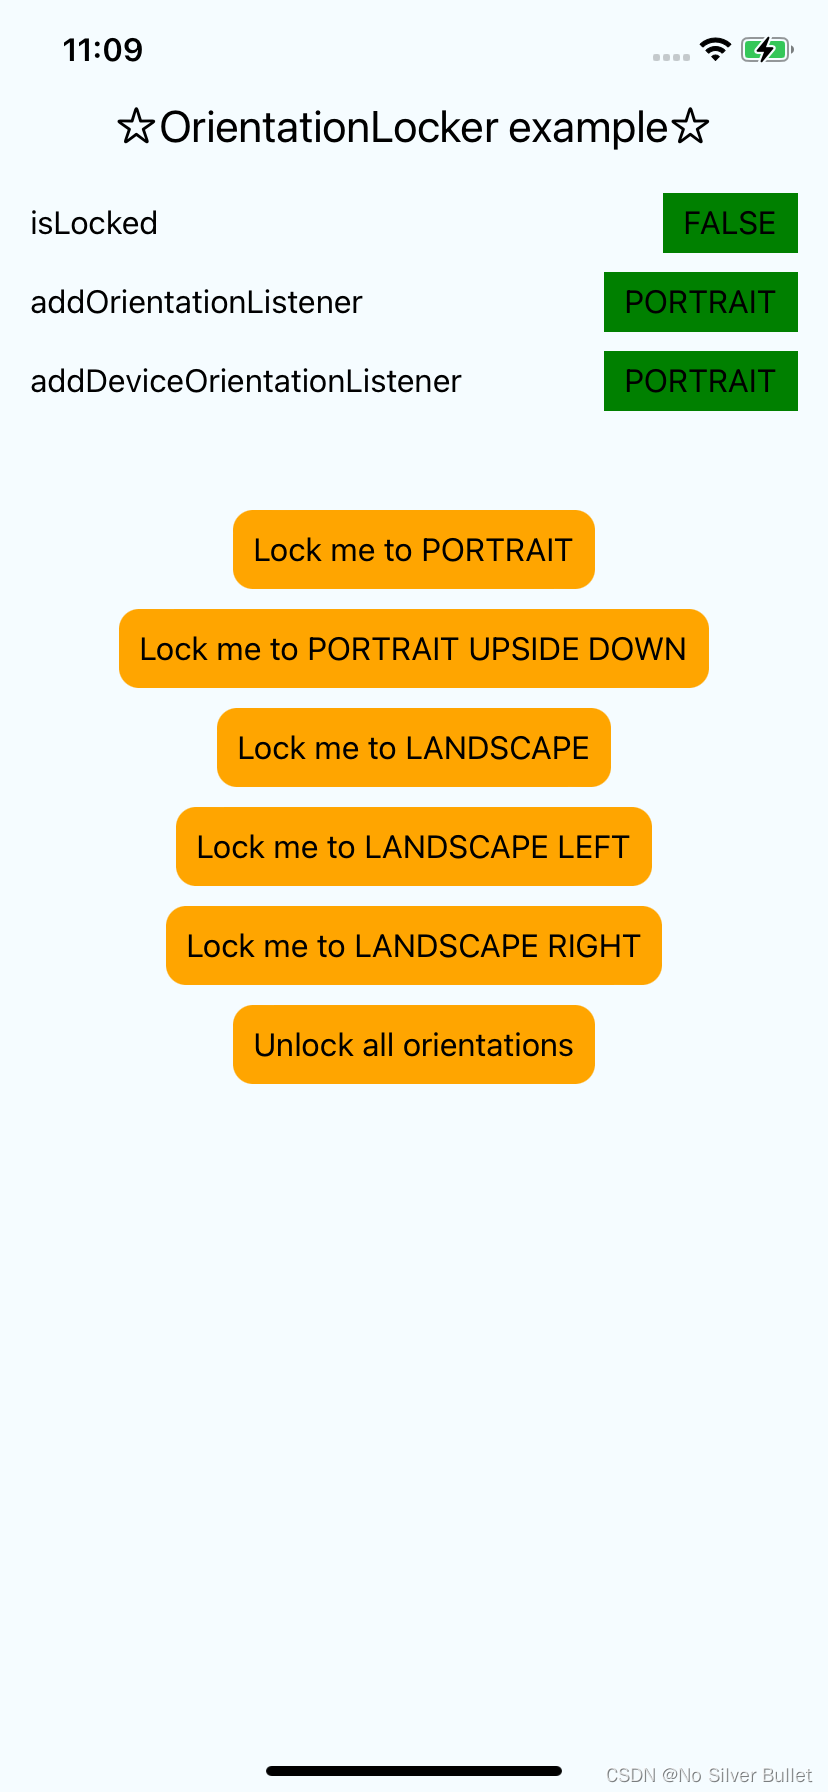
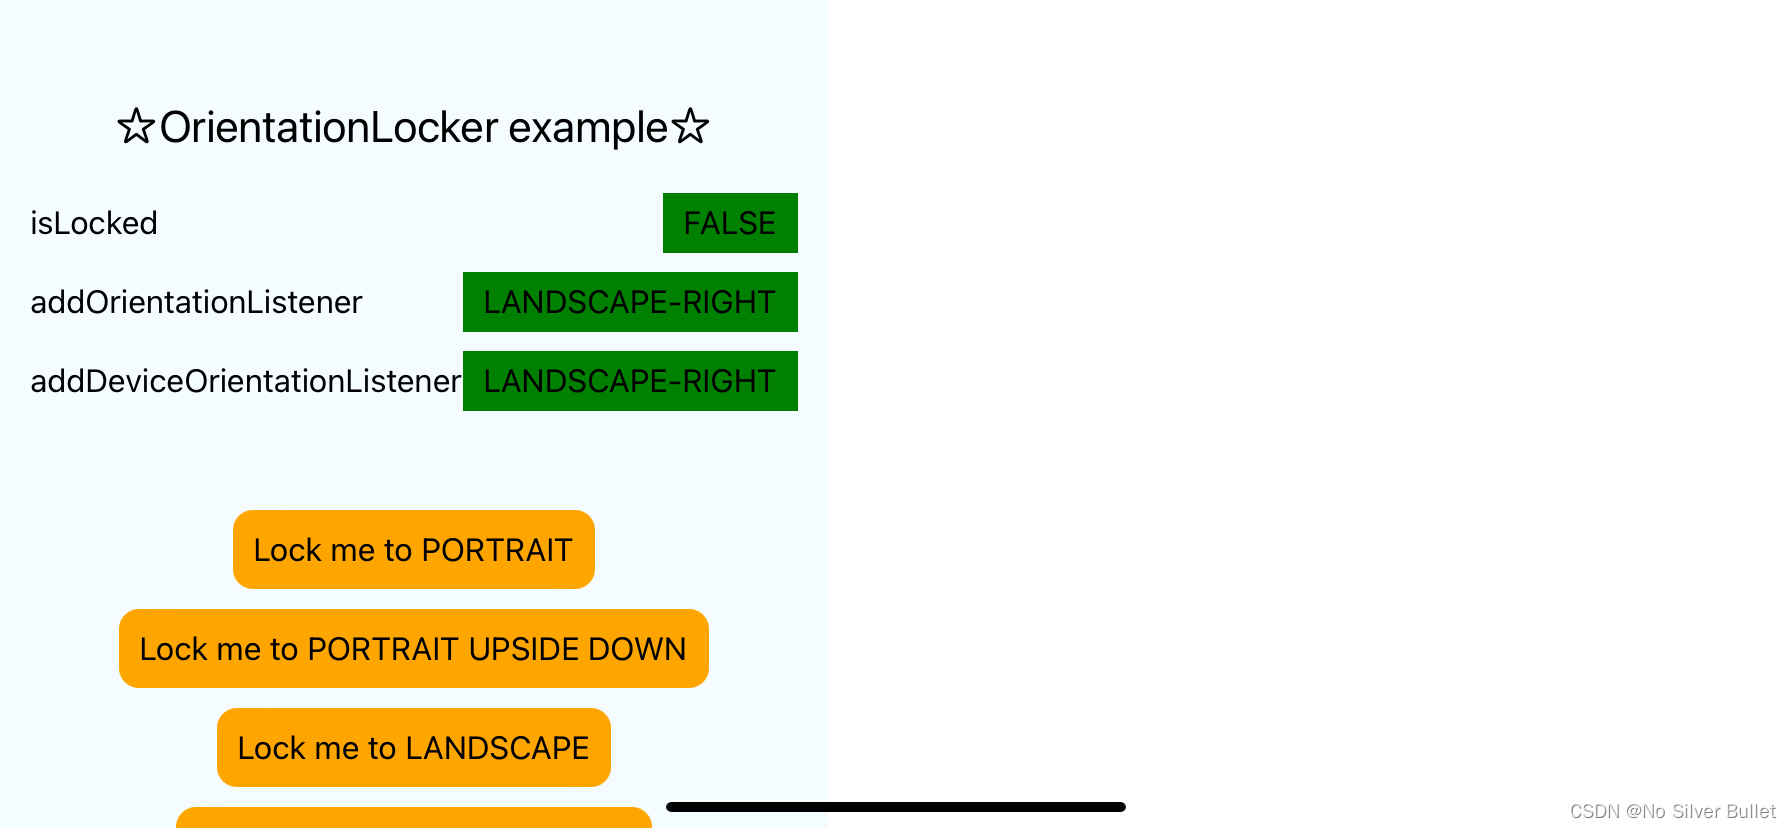
通过观察发现,demo 横竖屏状态下addOrientationListener、addDeviceOrientationListener方法均能正确识别出用户界面、物理设备选择方向,实际项目引入后,横竖屏状态下addOrientationListener、addDeviceOrientationListener方法均无法正确识别出用户界面、物理设备选择方向。为此,问题症结明确。
demo 竖屏未锁定用户界面状态下:
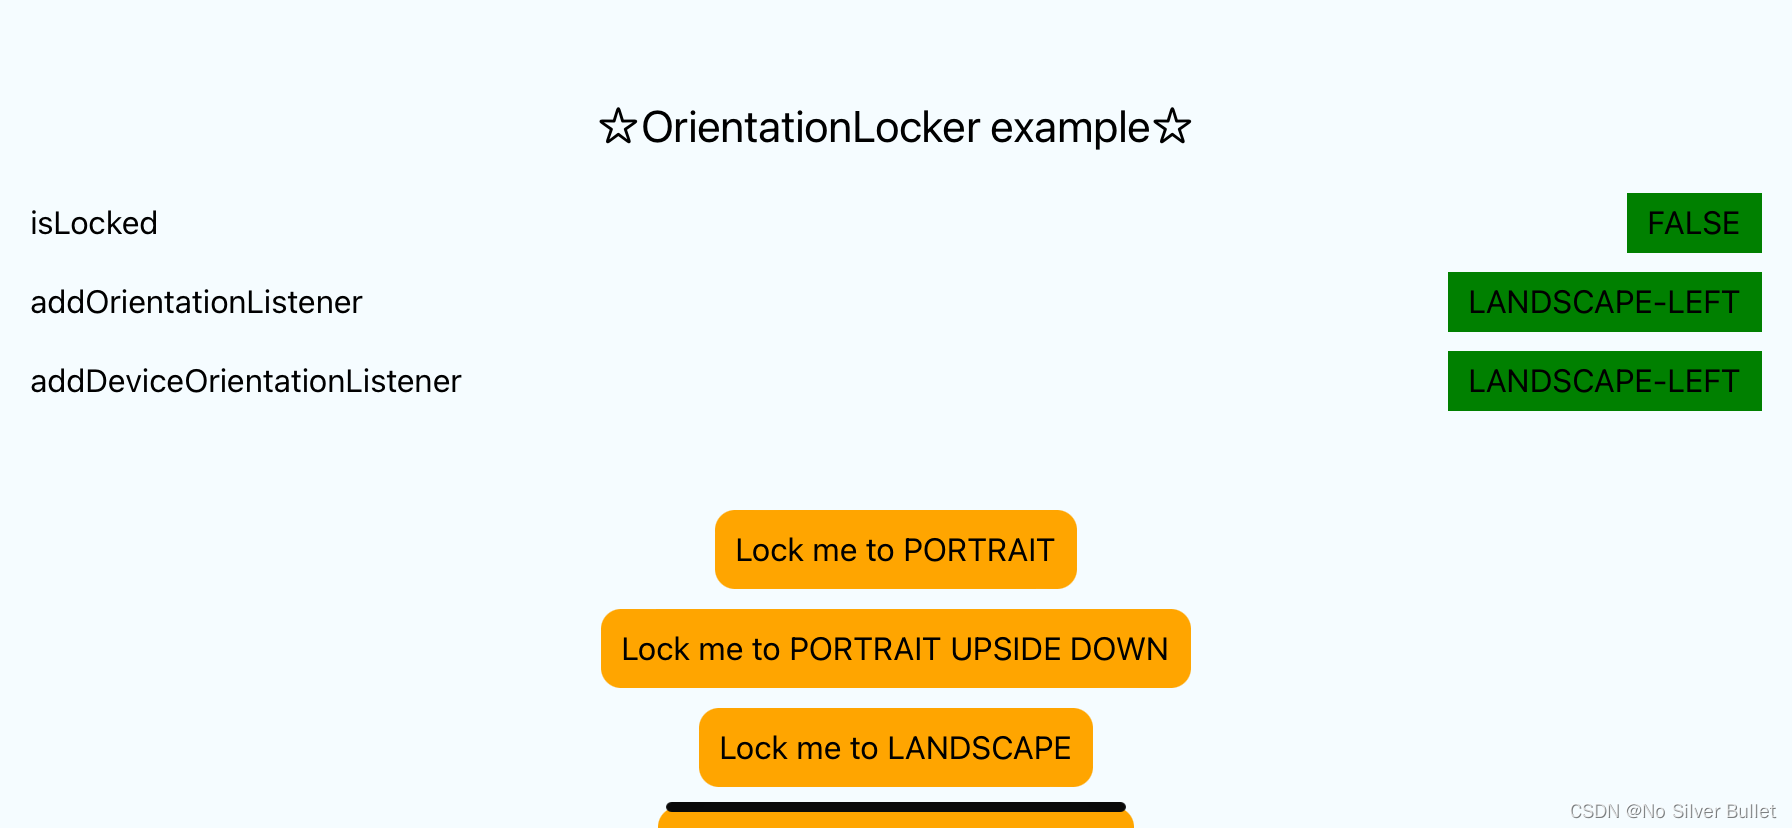
demo 横屏未锁定用户界面左旋转状态下:
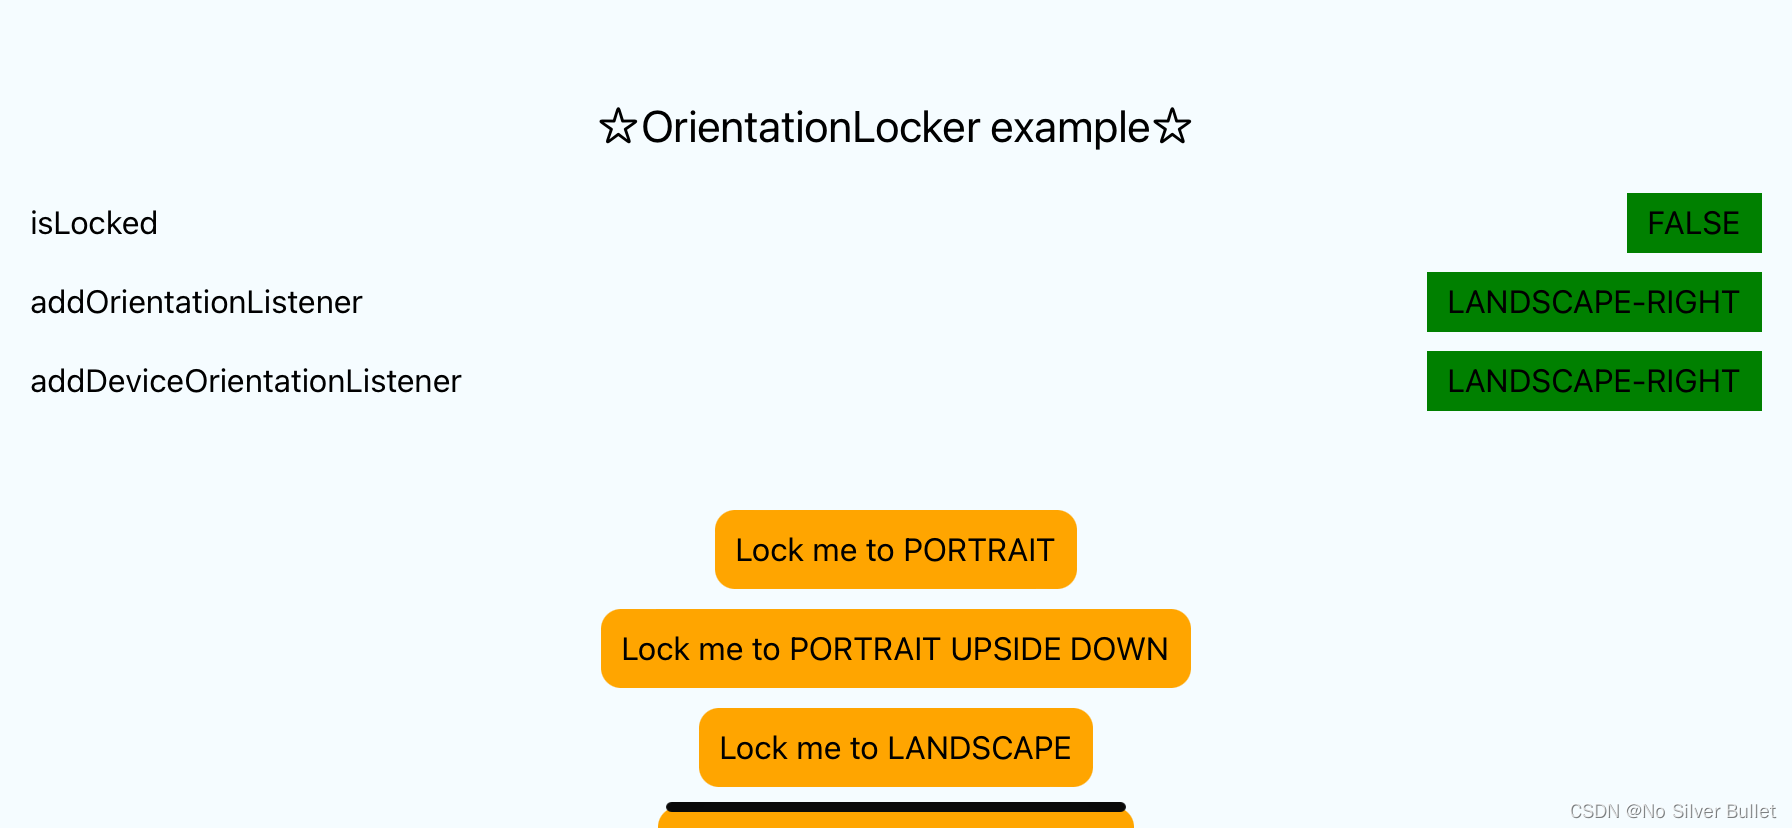
demo 横屏未锁定用户界面右旋转状态下:
addOrientationListener(function(orientation))
当用户界面方向改变时,回调函数会被调用。但若已执行lockToXXX,则只有在调用unlockAllOrientations时回调才会触发。它可能返回PORTRAIT、LANDSCAPE-LEFT、LANDSCAPE-RIGHT、PORTRAIT-UPSIDEDOWN或UNKNOWN。在lockToXXX/unlockAllOrientations时,会强制发送UI方向改变事件。
对应的移除方法为:removeOrientationListener(function(orientation))
addDeviceOrientationListener(function(deviceOrientation))
当物理设备方向改变时,回调函数会被调用。即使调用了lockToXXX,该回调仍可被调用。它可以返回PORTRAIT、LANDSCAPE-LEFT、LANDSCAPE-RIGHT、PORTRAIT-UPSIDEDOWN或UNKNOWN。
实际项目竖屏未锁定用户界面状态下:
实际项目横屏未锁定用户界面左旋转状态下:

实际项目横屏未锁定用户界面右旋转状态下:

3.6.2 HOOK 未调用问题解决
通过前面分析,需首先明确项目中横竖屏状态下addOrientationListener、addDeviceOrientationListener方法为何不能正确识别出用户界面、物理设备选择方向。
demo中APP.js文件源码如下:
/**
 * Sample React Native App
 *
 * adapted from App.js generated by the following command:
 *
 * react-native init example
 *
 * https://github.com/facebook/react-native
 */

import React, {Component, useEffect, useState} from 'react';
import {
  Platform,
  Pressable,
  ScrollView,
  StyleSheet,
  Text,
  TouchableOpacity,
  View,
} from 'react-native';
import Orientation, {
  useOrientationChange,
  useDeviceOrientationChange,
  useLockListener,
} from 'react-native-orientation-locker';

export default function App() {
  const [isLocked, setLocked] = useState();
  const [orientation, setOrientation] = useState();
  const [deviceOrientation, setDeviceOrientation] = useState();
  const [lock, setLock] = useState();

  // eslint-disable-next-line react-hooks/exhaustive-deps
  useEffect(() => {
    checkLocked();
  });

  useOrientationChange((o) => {
    console.log('----------------useOrientationChange----------------', o);
    setOrientation(o);
  });

  useDeviceOrientationChange((o) => {
    console.log('----------------useDeviceOrientationChange----------------', o);
    setDeviceOrientation(o);
  });

  useLockListener((o) => {
    console.log('----------------useLockListener----------------', o);
    setLocked(o);
  });

  function checkLocked() {
    const locked = Orientation.isLocked();
    if (locked !== isLocked) {
      setLocked(locked);
    }
  }

  return (
    <View style={styles.container}>
      <Text style={styles.welcome}>☆OrientationLocker example☆</Text>
      <View style={styles.row}>
        <Text style={{flex: 1}}>isLocked</Text>
        <Text style={styles.value}>{isLocked ? 'TRUE' : 'FALSE'}</Text>
      </View>
      <View style={styles.row}>
        <Text style={{flex: 1}}>addOrientationListener</Text>
        <Text style={styles.value}>{orientation}</Text>
      </View>
      <View style={styles.row}>
        <Text style={{flex: 1}}>addDeviceOrientationListener</Text>
        <Text style={styles.value}>{deviceOrientation}</Text>
      </View>
      <ScrollView
        contentContainerStyle={{
          alignItems: 'center',
          marginTop: 20,
          paddingVertical: 20,
        }}>
        <TouchableOpacity
          activeOpacity={0.9}
          onPress={() => {
            Orientation.lockToPortrait();
            checkLocked();
          }}
          style={styles.button}>
          <Text>Lock me to PORTRAIT</Text>
        </TouchableOpacity>
        <TouchableOpacity
          activeOpacity={0.9}
          onPress={() => {
            Orientation.lockToPortraitUpsideDown();
            checkLocked();
          }}
          style={styles.button}>
          <Text>Lock me to PORTRAIT UPSIDE DOWN</Text>
        </TouchableOpacity>
        <TouchableOpacity
          activeOpacity={0.9}
          onPress={() => {
            Orientation.lockToLandscape();
            checkLocked();
          }}
          style={styles.button}>
          <Text>Lock me to LANDSCAPE</Text>
        </TouchableOpacity>
        <TouchableOpacity
          activeOpacity={0.9}
          onPress={() => {
            Orientation.lockToLandscapeLeft();
            checkLocked();
          }}
          style={styles.button}>
          <Text>Lock me to LANDSCAPE LEFT</Text>
        </TouchableOpacity>
        <TouchableOpacity
          activeOpacity={0.9}
          onPress={() => {
            Orientation.lockToLandscapeRight();
            checkLocked();
          }}
          style={styles.button}>
          <Text>Lock me to LANDSCAPE RIGHT</Text>
        </TouchableOpacity>

        <TouchableOpacity
          activeOpacity={0.9}
          onPress={() => {
            Orientation.unlockAllOrientations();
            checkLocked();
          }}
          style={styles.button}>
          <Text>Unlock all orientations</Text>
        </TouchableOpacity>
      </ScrollView>
    </View>
  );
}

const styles = StyleSheet.create({
  container: {
    flex: 1,
    backgroundColor: '#F5FCFF',
  },
  welcome: {
    fontSize: 20,
    textAlign: 'center',
    margin: 10,
    marginTop: 50,
  },
  row: {
    flexDirection: 'row',
    marginTop: 10,
    paddingHorizontal: 15,
    alignItems: 'center',
  },
  value: {
    backgroundColor: 'green',
    color: 'black',
    paddingHorizontal: 10,
    paddingVertical: 5,
  },
  button: {
    backgroundColor: 'orange',
    padding: 10,
    borderRadius: 10,
    marginTop: 10,
  },
});
上述代码中,应用useOrientationChange、useDeviceOrientationChange Hooks方法实现addOrientationListener、addDeviceOrientationListener监听函数执行。
useOrientationChange: hook foraddOrientationListenereventuseDeviceOrientationChange: hook foraddDeviceOrientationListenerevent
useDeviceOrientationChange.js 文件内容如下:
import { useRef, useEffect } from 'react';
import Orientation from '../orientation'

export function useDeviceOrientationChange(callback) {
  const savedCallback = useRef();

  useEffect(() => {
    savedCallback.current = callback;
  }, [callback]);

  useEffect(() => {
    function listener(ori) {
      savedCallback.current(ori);
    }
    const initial = Orientation.getInitialOrientation();
    listener(initial);
    Orientation.addDeviceOrientationListener(listener);

    return () => {
      Orientation.removeDeviceOrientationListener(listener);
    };
  }, []);
}
useOrientationChange.js文件内容如下:
import { useRef, useEffect } from 'react';
import Orientation from '../orientation'

export function useOrientationChange(callback) {
    const savedCallback = useRef();

    useEffect(() => {
      savedCallback.current = callback;
    }, [callback]);

    useEffect(() => {
      function listener(ori) {
        savedCallback.current(ori);
      }
      const initial = Orientation.getInitialOrientation();
      listener(initial);
      Orientation.addOrientationListener(listener);

      return () => {
        Orientation.removeOrientationListener(listener);
      };
    }, []);
  }
通过控制台打印useOrientationChange、useDeviceOrientationChange回调函数可知,正常情况下监听函数会根据用户界面、设备旋转输出相应信息,
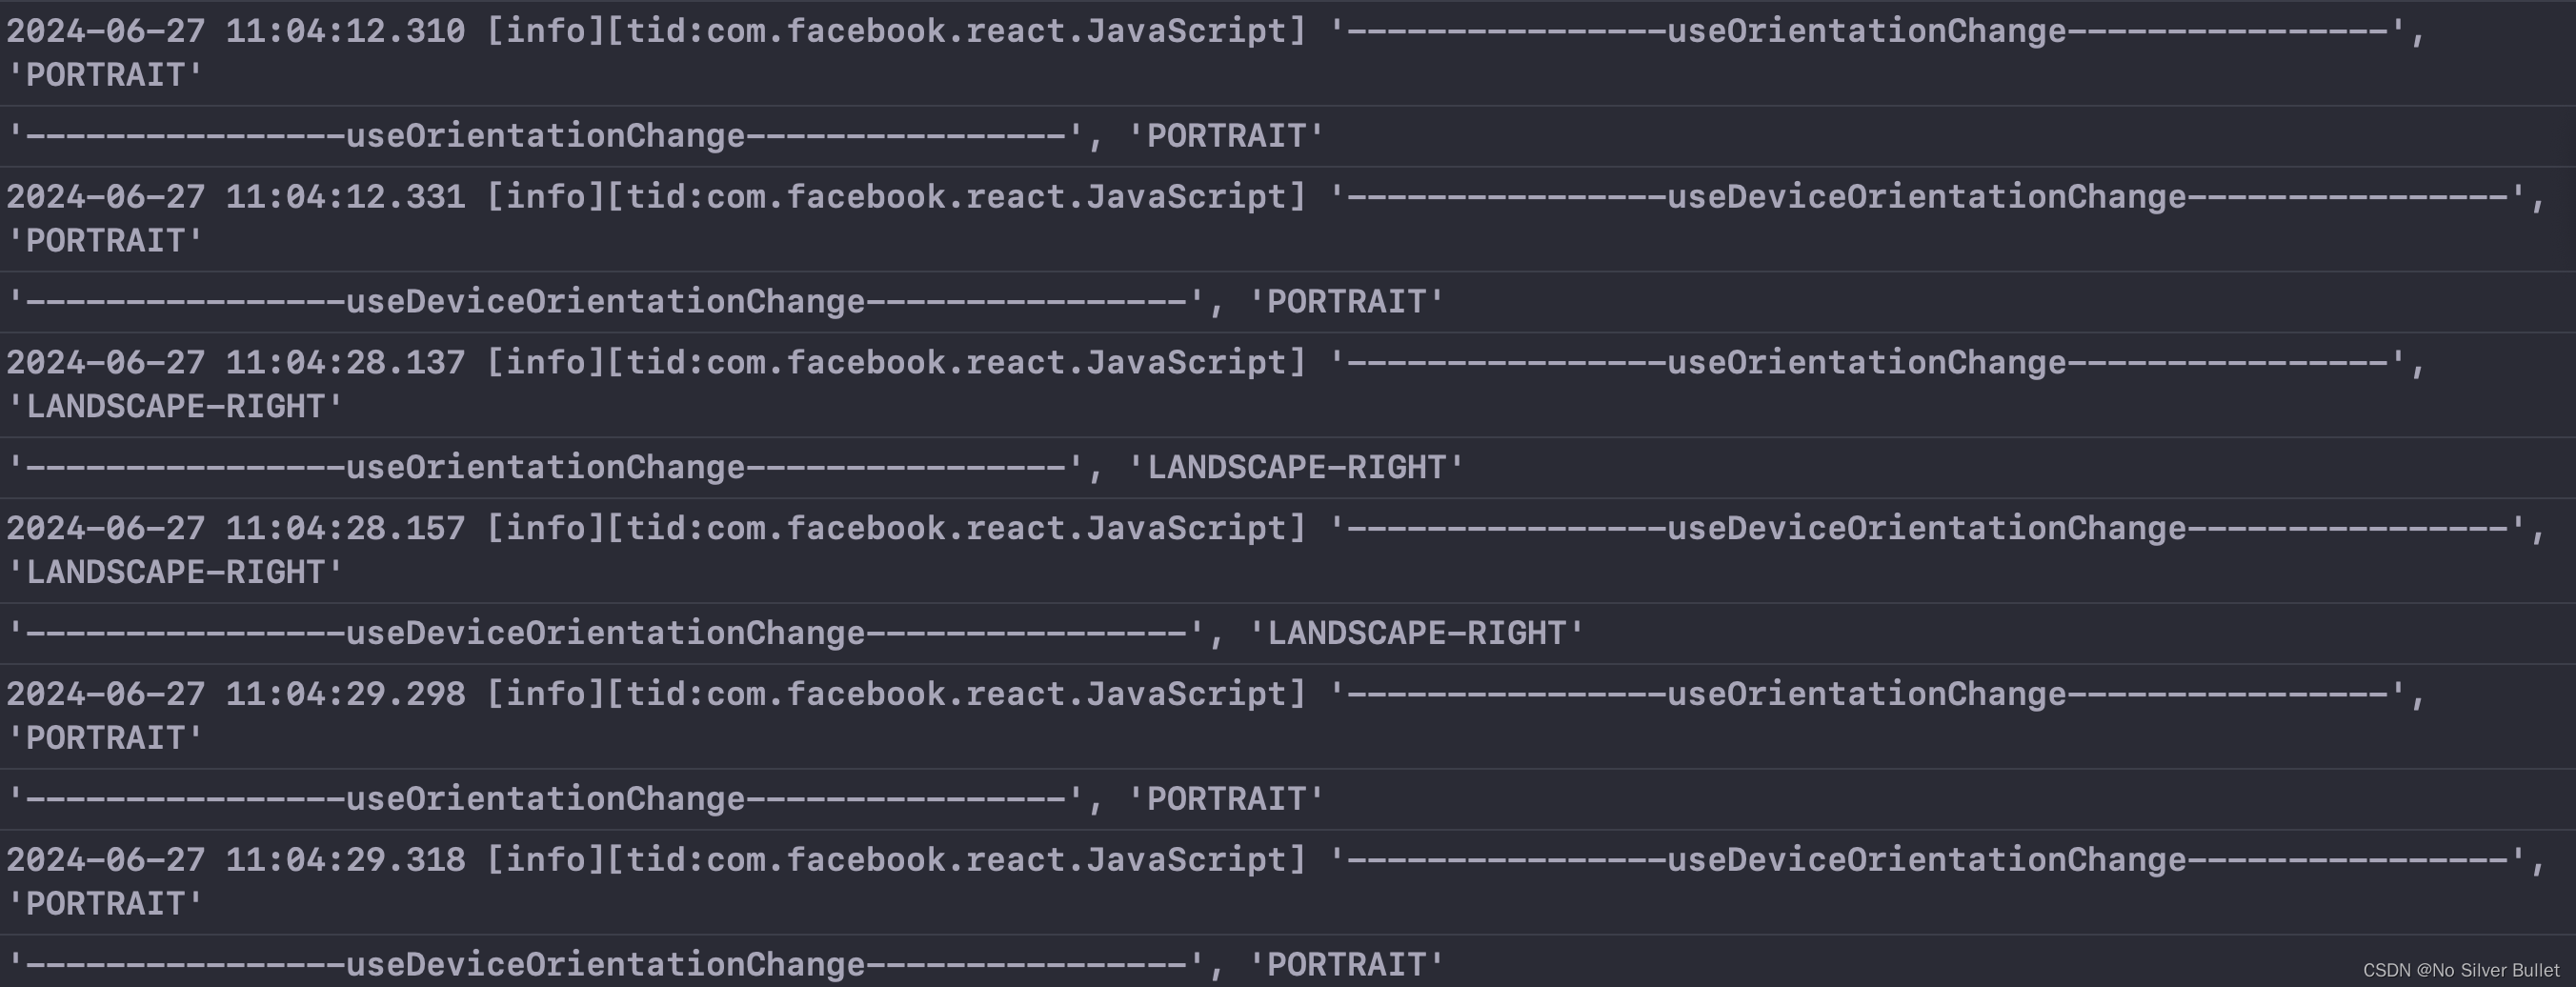
但是开发项目中,当旋转设备时发现回调函数useOrientationChange、useDeviceOrientationChange并未执行,

经过一系列文档查阅,发现react-native 0.60.3安装react-native-orientation-locker依赖包后并未自动 link 成功,需通过执行react-native link react-native-orientation-locker 手动 link。
手动link后,改变物理设备后,发现回调函数useOrientationChange、useDeviceOrientationChange执行,但是依旧是半屏,并未全屏展示。
实际项目竖屏锁定用户界面右旋转状态下:

实际项目横屏未锁定用户界面左旋转状态下:

实际项目横屏未锁定用户界面右旋转状态下:
二次部署后,在实施项目中,当旋转设备时发现回调函数useOrientationChange、useDeviceOrientationChange又变为未执行😌!
重新通过执行react-native link react-native-orientation-locker 手动 link后,改变物理设备,回调函数useOrientationChange、useDeviceOrientationChange依旧未执行。
初步怀疑项目集成的react、react-native版本过低导致,通过对比demo、实际项目引入的react版本发现,均为16.8.6。
Hook 是 React 16.8.0 的新增特性,React Native 0.59 及以上版本支持 Hook。它可以让你在不编写 class 的情况下使用 state 以及其他的 React 特性。
⚠️请注意⚠️,要启用 Hook,所有 React 相关的 package 都必须升级到 16.8.0 或更高版本。如果你忘记更新诸如 React DOM 之类的 package,Hook 将无法运行。
Hook 是一些可以让你在函数组件里“钩入” React state 及生命周期等特性的函数。Hook 不能在 class 组件中使用 —— 这使得你不使用 class 也能使用 React。
通过将demo项目中的依赖包替换实施项目中的依赖包,然后手动link后,发现现回调函数useOrientationChange、useDeviceOrientationChange可执行,应用可正确旋转,但是旋转后依旧为半屏!
3.6.3 问题定位
通过反复对比项目配置,发现iOS项目启动阶段加载的配置文件出现问题。Demo中AppDelegate.m配置文件如下:
#import "AppDelegate.h"

#import <React/RCTBridge.h>
#import <React/RCTBundleURLProvider.h>
#import <React/RCTRootView.h>
#import "Orientation.h"

@implementation AppDelegate

- (BOOL)application:(UIApplication *)application didFinishLaunchingWithOptions:(NSDictionary *)launchOptions
{

  RCTBridge *bridge = [[RCTBridge alloc] initWithDelegate:self launchOptions:launchOptions];
  RCTRootView *rootView = [[RCTRootView alloc] initWithBridge:bridge
                                                   moduleName:@"mrcs"
                                            initialProperties:nil];

  rootView.backgroundColor = [[UIColor alloc] initWithRed:1.0f green:1.0f blue:1.0f alpha:1];

  self.window = [[UIWindow alloc] initWithFrame:[UIScreen mainScreen].bounds];
  UIViewController *rootViewController = [UIViewController new];
  rootViewController.view = rootView;
  self.window.rootViewController = rootViewController;
  [self.window makeKeyAndVisible];
  return YES;
}

- (NSURL *)sourceURLForBridge:(RCTBridge *)bridge
{
#if DEBUG
  return [[RCTBundleURLProvider sharedSettings] jsBundleURLForBundleRoot:@"index" fallbackResource:nil];
#else
  return [[NSBundle mainBundle] URLForResource:@"main" withExtension:@"jsbundle"];
#endif
}

- (UIInterfaceOrientationMask)application:(UIApplication *)application supportedInterfaceOrientationsForWindow:(UIWindow *)window {
  return [Orientation getOrientation];
}
@end
开发项目中,AppDelegate.m配置文件如下:
/**
 * Copyright (c) Facebook, Inc. and its affiliates.
 *
 * This source code is licensed under the MIT license found in the
 * LICENSE file in the root directory of this source tree.
 */
#import <React/RCTBridge.h>
#import <React/RCTBundleURLProvider.h>
#import <React/RCTRootView.h>

#import "AppDelegate.h"
#import "ViewController.h"
#import "Constant.h"
#import "Orientation.h"

@implementation AppDelegate

- (BOOL)application:(UIApplication *)application didFinishLaunchingWithOptions:(NSDictionary *)launchOptions
{
  // 初始化界面
  [self initialViewController];

  return YES;
}

# pragma mark - View Controller 初始化
- (void)initialViewController
{
  self.window = [[UIWindow alloc] initWithFrame:[UIScreen mainScreen].bounds];
  self.window.backgroundColor = [UIColor whiteColor];
  ViewController *viewController = [ViewController new];
  UIViewController *rootViewController = viewController;
  self.window.rootViewController = rootViewController;
  [self.window makeKeyAndVisible];

}

- (UIInterfaceOrientationMask)application:(UIApplication *)application supportedInterfaceOrientationsForWindow:(UIWindow *)window {
  return [Orientation getOrientation];
}

@end
其中,demo中实例化了一个RCTRootView对象,然后作为一个VC的view展示出来,当然可以把rootView当做一个普普通通的view,用addSubview的方式作为子视图展现在任何需要的地方。
接下来,看下RCTRootView这个类,就像上面看到的,RCTRootView可以将React Native视图嵌入到原生组件,它是一个UIView容器,承载着React Native应用,也提供了原生端与被托管端的接口。官方提供了两个初始化方法:
- (instancetype)initWithBridge:(RCTBridge *)bridge
                    moduleName:(NSString *)moduleName
             initialProperties:(NSDictionary *)initialProperties NS_DESIGNATED_INITIALIZER;

- (instancetype)initWithBundleURL:(NSURL *)bundleURL
                       moduleName:(NSString *)moduleName
                initialProperties:(NSDictionary *)initialProperties
                    launchOptions:(NSDictionary *)launchOptions;
这两个方法没什么大差别,对于项目中只有一个RCTRootView的时候建议使用下面的方法,这个方法内部创建了一个RCTBridge,而上面的方法用于有多个RCTRootView的情况,开发者直接创建RCTBridge,多个RCTRootView可共用一个RCTBridge。
通过RCTRootView的初始化函数可以将任意属性传递给React Native应用。参数initialProperties必须是NSDictionary的一个实例。这一字典参数会在内部被转化为一个可供JS组件调用的JSON对象。
初始化RCTRootView的时候,也会创建一个RCTBridge对象,继续看下RCTBridge.m的源码,初始化时,首先触发+ (void)initialize方法,这个方法做了那些事儿呢?通过源码看到,它首先判断所有实现RCTBridgeModule协议的类是否已经加入RCTModuleClasses数组中,没有在这个数组的类,就把它加进去,这样就保证了RCTModuleClasses包含了所有实现RCTBridgeModule协议的类。
/**
 * Copyright (c) Facebook, Inc. and its affiliates.
 *
 * This source code is licensed under the MIT license found in the
 * LICENSE file in the root directory of this source tree.
 */

#import "RCTBridge.h"
#import "RCTBridge+Private.h"

#import <objc/runtime.h>

#import "RCTConvert.h"
#import "RCTEventDispatcher.h"
#if RCT_ENABLE_INSPECTOR
#import "RCTInspectorDevServerHelper.h"
#endif
#import "RCTLog.h"
#import "RCTModuleData.h"
#import "RCTPerformanceLogger.h"
#import "RCTProfile.h"
#import "RCTReloadCommand.h"
#import "RCTUtils.h"

NSString *const RCTJavaScriptWillStartLoadingNotification = @"RCTJavaScriptWillStartLoadingNotification";
NSString *const RCTJavaScriptWillStartExecutingNotification = @"RCTJavaScriptWillStartExecutingNotification";
NSString *const RCTJavaScriptDidLoadNotification = @"RCTJavaScriptDidLoadNotification";
NSString *const RCTJavaScriptDidFailToLoadNotification = @"RCTJavaScriptDidFailToLoadNotification";
NSString *const RCTDidInitializeModuleNotification = @"RCTDidInitializeModuleNotification";
NSString *const RCTDidSetupModuleNotification = @"RCTDidSetupModuleNotification";
NSString *const RCTDidSetupModuleNotificationModuleNameKey = @"moduleName";
NSString *const RCTDidSetupModuleNotificationSetupTimeKey = @"setupTime";
NSString *const RCTBridgeWillReloadNotification = @"RCTBridgeWillReloadNotification";
NSString *const RCTBridgeWillDownloadScriptNotification = @"RCTBridgeWillDownloadScriptNotification";
NSString *const RCTBridgeDidDownloadScriptNotification = @"RCTBridgeDidDownloadScriptNotification";
NSString *const RCTBridgeDidInvalidateModulesNotification = @"RCTBridgeDidInvalidateModulesNotification";
NSString *const RCTBridgeDidDownloadScriptNotificationSourceKey = @"source";
NSString *const RCTBridgeDidDownloadScriptNotificationBridgeDescriptionKey = @"bridgeDescription";

static NSMutableArray<Class> *RCTModuleClasses;
static dispatch_queue_t RCTModuleClassesSyncQueue;
NSArray<Class> *RCTGetModuleClasses(void)
{
  __block NSArray<Class> *result;
  dispatch_sync(RCTModuleClassesSyncQueue, ^{
    result = [RCTModuleClasses copy];
  });
  return result;
}

/**
 * Register the given class as a bridge module. All modules must be registered
 * prior to the first bridge initialization.
 */
void RCTRegisterModule(Class);
void RCTRegisterModule(Class moduleClass)
{
  static dispatch_once_t onceToken;
  dispatch_once(&onceToken, ^{
    RCTModuleClasses = [NSMutableArray new];
    RCTModuleClassesSyncQueue = dispatch_queue_create("com.facebook.react.ModuleClassesSyncQueue", DISPATCH_QUEUE_CONCURRENT);
  });

  RCTAssert([moduleClass conformsToProtocol:@protocol(RCTBridgeModule)],
            @"%@ does not conform to the RCTBridgeModule protocol",
            moduleClass);

  // Register module
  dispatch_barrier_async(RCTModuleClassesSyncQueue, ^{
    [RCTModuleClasses addObject:moduleClass];
  });
}

/**
 * This function returns the module name for a given class.
 */
NSString *RCTBridgeModuleNameForClass(Class cls)
{
#if RCT_DEBUG
  RCTAssert([cls conformsToProtocol:@protocol(RCTBridgeModule)],
            @"Bridge module `%@` does not conform to RCTBridgeModule", cls);
#endif

  NSString *name = [cls moduleName];
  if (name.length == 0) {
    name = NSStringFromClass(cls);
  }

  return RCTDropReactPrefixes(name);
}

static BOOL turboModuleEnabled = NO;
BOOL RCTTurboModuleEnabled(void)
{
  return turboModuleEnabled;
}

void RCTEnableTurboModule(BOOL enabled) {
  turboModuleEnabled = enabled;
}

#if RCT_DEBUG
void RCTVerifyAllModulesExported(NSArray *extraModules)
{
  // Check for unexported modules
  unsigned int classCount;
  Class *classes = objc_copyClassList(&classCount);

  NSMutableSet *moduleClasses = [NSMutableSet new];
  [moduleClasses addObjectsFromArray:RCTGetModuleClasses()];
  [moduleClasses addObjectsFromArray:[extraModules valueForKeyPath:@"class"]];

  for (unsigned int i = 0; i < classCount; i++) {
    Class cls = classes[i];
    if (strncmp(class_getName(cls), "RCTCxxModule", strlen("RCTCxxModule")) == 0) {
      continue;
    }
    Class superclass = cls;
    while (superclass) {
      if (class_conformsToProtocol(superclass, @protocol(RCTBridgeModule))) {
        if ([moduleClasses containsObject:cls]) {
          break;
        }

        // Verify it's not a super-class of one of our moduleClasses
        BOOL isModuleSuperClass = NO;
        for (Class moduleClass in moduleClasses) {
          if ([moduleClass isSubclassOfClass:cls]) {
            isModuleSuperClass = YES;
            break;
          }
        }
        if (isModuleSuperClass) {
          break;
        }

        // Note: Some modules may be lazily loaded and not exported up front, so this message is no longer a warning.
        RCTLogInfo(@"Class %@ was not exported. Did you forget to use RCT_EXPORT_MODULE()?", cls);
        break;
      }
      superclass = class_getSuperclass(superclass);
    }
  }

  free(classes);
}
#endif

@interface RCTBridge () <RCTReloadListener>
@end

@implementation RCTBridge
{
  NSURL *_delegateBundleURL;
}

dispatch_queue_t RCTJSThread;

+ (void)initialize
{
  static dispatch_once_t onceToken;
  dispatch_once(&onceToken, ^{

    // Set up JS thread
    RCTJSThread = (id)kCFNull;
  });
}

static RCTBridge *RCTCurrentBridgeInstance = nil;

/**
 * The last current active bridge instance. This is set automatically whenever
 * the bridge is accessed. It can be useful for static functions or singletons
 * that need to access the bridge for purposes such as logging, but should not
 * be relied upon to return any particular instance, due to race conditions.
 */
+ (instancetype)currentBridge
{
  return RCTCurrentBridgeInstance;
}

+ (void)setCurrentBridge:(RCTBridge *)currentBridge
{
  RCTCurrentBridgeInstance = currentBridge;
}

- (instancetype)initWithDelegate:(id<RCTBridgeDelegate>)delegate
                   launchOptions:(NSDictionary *)launchOptions
{
  return [self initWithDelegate:delegate
                      bundleURL:nil
                 moduleProvider:nil
                  launchOptions:launchOptions];
}

- (instancetype)initWithBundleURL:(NSURL *)bundleURL
                   moduleProvider:(RCTBridgeModuleListProvider)block
                    launchOptions:(NSDictionary *)launchOptions
{
  return [self initWithDelegate:nil
                      bundleURL:bundleURL
                 moduleProvider:block
                  launchOptions:launchOptions];
}

- (instancetype)initWithDelegate:(id<RCTBridgeDelegate>)delegate
                       bundleURL:(NSURL *)bundleURL
                  moduleProvider:(RCTBridgeModuleListProvider)block
                   launchOptions:(NSDictionary *)launchOptions
{
  if (self = [super init]) {
    _delegate = delegate;
    _bundleURL = bundleURL;
    _moduleProvider = block;
    _launchOptions = [launchOptions copy];

    [self setUp];
  }
  return self;
}

RCT_NOT_IMPLEMENTED(- (instancetype)init)

- (void)dealloc
{
  /**
   * This runs only on the main thread, but crashes the subclass
   * RCTAssertMainQueue();
   */
  [self invalidate];
}

- (void)setRCTTurboModuleLookupDelegate:(id<RCTTurboModuleLookupDelegate>)turboModuleLookupDelegate
{
  [self.batchedBridge setRCTTurboModuleLookupDelegate:turboModuleLookupDelegate];
}

- (void)didReceiveReloadCommand
{
  [self reload];
}

- (NSArray<Class> *)moduleClasses
{
  return self.batchedBridge.moduleClasses;
}

- (id)moduleForName:(NSString *)moduleName
{
  return [self.batchedBridge moduleForName:moduleName];
}

- (id)moduleForName:(NSString *)moduleName lazilyLoadIfNecessary:(BOOL)lazilyLoad
{
  return [self.batchedBridge moduleForName:moduleName lazilyLoadIfNecessary:lazilyLoad];
}

- (id)moduleForClass:(Class)moduleClass
{
  id module = [self.batchedBridge moduleForClass:moduleClass];
  if (!module) {
    module = [self moduleForName:RCTBridgeModuleNameForClass(moduleClass)];
  }
  return module;
}

- (NSArray *)modulesConformingToProtocol:(Protocol *)protocol
{
  NSMutableArray *modules = [NSMutableArray new];
  for (Class moduleClass in [self.moduleClasses copy]) {
    if ([moduleClass conformsToProtocol:protocol]) {
      id module = [self moduleForClass:moduleClass];
      if (module) {
        [modules addObject:module];
      }
    }
  }
  return [modules copy];
}

- (BOOL)moduleIsInitialized:(Class)moduleClass
{
  return [self.batchedBridge moduleIsInitialized:moduleClass];
}

- (void)reload
{
  #if RCT_ENABLE_INSPECTOR
  // Disable debugger to resume the JsVM & avoid thread locks while reloading
  [RCTInspectorDevServerHelper disableDebugger];
  #endif

  [[NSNotificationCenter defaultCenter] postNotificationName:RCTBridgeWillReloadNotification object:self];

  /**
   * Any thread
   */
  dispatch_async(dispatch_get_main_queue(), ^{
    // WARNING: Invalidation is async, so it may not finish before re-setting up the bridge,
    // causing some issues. TODO: revisit this post-Fabric/TurboModule.
    [self invalidate];
    // Reload is a special case, do not preserve launchOptions and treat reload as a fresh start
    self->_launchOptions = nil;
    [self setUp];
  });
}

- (void)requestReload
{
  [self reload];
}

- (Class)bridgeClass
{
  return [RCTCxxBridge class];
}

- (void)setUp
{
  RCT_PROFILE_BEGIN_EVENT(0, @"-[RCTBridge setUp]", nil);

  _performanceLogger = [RCTPerformanceLogger new];
  [_performanceLogger markStartForTag:RCTPLBridgeStartup];
  [_performanceLogger markStartForTag:RCTPLTTI];

  Class bridgeClass = self.bridgeClass;

  #if RCT_DEV
  RCTExecuteOnMainQueue(^{
    RCTRegisterReloadCommandListener(self);
  });
  #endif

  // Only update bundleURL from delegate if delegate bundleURL has changed
  NSURL *previousDelegateURL = _delegateBundleURL;
  _delegateBundleURL = [self.delegate sourceURLForBridge:self];
  if (_delegateBundleURL && ![_delegateBundleURL isEqual:previousDelegateURL]) {
    _bundleURL = _delegateBundleURL;
  }

  // Sanitize the bundle URL
  _bundleURL = [RCTConvert NSURL:_bundleURL.absoluteString];

  self.batchedBridge = [[bridgeClass alloc] initWithParentBridge:self];
  [self.batchedBridge start];

  RCT_PROFILE_END_EVENT(RCTProfileTagAlways, @"");
}

- (BOOL)isLoading
{
  return self.batchedBridge.loading;
}

- (BOOL)isValid
{
  return self.batchedBridge.valid;
}

- (BOOL)isBatchActive
{
  return [_batchedBridge isBatchActive];
}

- (void)invalidate
{
  RCTBridge *batchedBridge = self.batchedBridge;
  self.batchedBridge = nil;

  if (batchedBridge) {
    RCTExecuteOnMainQueue(^{
      [batchedBridge invalidate];
    });
  }
}

- (void)updateModuleWithInstance:(id<RCTBridgeModule>)instance
{
  [self.batchedBridge updateModuleWithInstance:instance];
}

- (void)registerAdditionalModuleClasses:(NSArray<Class> *)modules
{
  [self.batchedBridge registerAdditionalModuleClasses:modules];
}

- (void)enqueueJSCall:(NSString *)moduleDotMethod args:(NSArray *)args
{
  NSArray<NSString *> *ids = [moduleDotMethod componentsSeparatedByString:@"."];
  NSString *module = ids[0];
  NSString *method = ids[1];
  [self enqueueJSCall:module method:method args:args completion:NULL];
}

- (void)enqueueJSCall:(NSString *)module method:(NSString *)method args:(NSArray *)args completion:(dispatch_block_t)completion
{
  [self.batchedBridge enqueueJSCall:module method:method args:args completion:completion];
}

- (void)enqueueCallback:(NSNumber *)cbID args:(NSArray *)args
{
  [self.batchedBridge enqueueCallback:cbID args:args];
}

- (void)registerSegmentWithId:(NSUInteger)segmentId path:(NSString *)path
{
  [self.batchedBridge registerSegmentWithId:segmentId path:path];
}

@end
RCTBridgeModule协议是干啥的呢?它提供注册桥模块所需的接口,比如:
#define RCT_EXPORT_MODULE(js_name) \
RCT_EXTERN void RCTRegisterModule(Class); \
+ (NSString *)moduleName { return @#js_name; } \
+ (void)load { RCTRegisterModule(self); }
从RCT_EXPORT_MODULE这个宏方法可以看到,继承RCTBridgeModule协议的类文件被引用时就会调用RCTRegisterModule方法,这个方法的作用就是将所有实现RCTBridgeModule协议的类加到RCTModuleClasses数组中,而moduleName方法则返回一个js模块名字,如果省略js_name的时候,js模块名会直接使用OC类的名字。
接着看协议中的其他接口:
#define RCT_EXPORT_METHOD(method) \
  RCT_REMAP_METHOD(, method)

#define RCT_REMAP_METHOD(js_name, method) \
  RCT_EXTERN_REMAP_METHOD(js_name, method) \
  - (void)method
第一个宏可以看做是第二个宏缺省js_name的特殊写法。这两个宏是把原生方法暴露给js,缺省js_name的时候,JS直接取OC的方法名作为导出到js的方法名,如果oc方法带有多个参数时,导出到JS的方法名是Objective-C方法名的第一个部分,比如:
 RCT_EXPORT_METHOD(doSomething:(NSString  *)aString
                         withA:(NSInteger)a
                          andB:(NSInteger)b)
暴露给JS的方法名为doSomeThing,可通过NativeModules.ModuleName.doSomething方式调用。
如果使用RCT_EXPORT_METHOD方法时,不慎出现许多方法的第一部分相同的时候,后导出的优先级会高一些,也可以说是后导出的方法会覆盖掉之前的方法,导致不必要的错误,因此当许多方法的第一部分相同的时候用RCT_REMAP_METHOD()宏来避免在JS端的名字冲突。
#define RCT_EXTERN_MODULE(objc_name, objc_supername) \
    RCT_EXTERN_REMAP_MODULE(, objc_name, objc_supername)

#define RCT_EXTERN_REMAP_MODULE(js_name, objc_name, objc_supername) \
  objc_name : objc_supername \
  @end \
  @interface objc_name (RCTExternModule) <RCTBridgeModule> \
  @end \
  @implementation objc_name (RCTExternModule) \
  RCT_EXPORT_MODULE(js_name)
这两个宏用在OC的implementation文件中,可以添加一个参数用来指定在Javascript中访问这个模块的名字。如果你不指定,默认就会使用这个Objective-C类的名字。
- (NSDictionary<NSString *, id> *)constantsToExport;
调用上面这个方法可以导出一些常量给JS,这些常量在JS端可以随时访问,通常用这种方法来传递一些静态数据,可以避免通过bridge进行一次来回交互。需要注意的是这个常量仅仅在初始化的时候导出了一次,所以即使在运行期间改变constantToExport返回的值,也不会影响到JS端所得到的结果。
大概了解了RCTBridgeModule协议以后,继续来看RCTRootView的初始化函数,initWithBridge一步步执行可以看到在runApplication方法里对原生端传递的信息组合了一下,再由bridge把Module、Method、initialProperties信息丢到RCTJavaScriptExecutor的JS执行队里。
ViewController.m 文件修改如下:
# pragma mark - React Native 初始化
- (void)initialReactNative:(NSDictionary *)launchOptions
{
  RCTBridge *bridge = [[RCTBridge alloc] initWithDelegate:self launchOptions:launchOptions];
  RCTRootView *rootView = [[RCTRootView alloc] initWithBridge:bridge
                                                   moduleName:kModuleName
                                            initialProperties:nil];
  rootView.backgroundColor = [[UIColor alloc] initWithRed:1.0f green:1.0f blue:1.0f alpha:1];
  [self.view addSubview:rootView];
  rootView.translatesAutoresizingMaskIntoConstraints = false;
  [rootView.leftAnchor constraintEqualToAnchor:self.view.leftAnchor].active = YES;
  [rootView.bottomAnchor constraintEqualToAnchor:self.view.bottomAnchor].active = YES;
  [rootView.rightAnchor constraintEqualToAnchor:self.view.rightAnchor].active = YES;
  [rootView.topAnchor constraintEqualToAnchor:self.view.topAnchor].active = YES;
}
总结⚠️:经历以上曲折问题分析解决历程,源自自己对于iOS开发自身技能缺失,其实问题的正确解决思路应该是:
- 保证demo正常可用;
- 保证与demo ios端配置保持一致;
- 考虑到版本差异性,保证开发项目中
react、react-native、react-native-orientation-locker与demo保持一致; - 定位到项目初始化加载阶段出现问题。


 770
770

 被折叠的 条评论
为什么被折叠?
被折叠的 条评论
为什么被折叠?
 到【灌水乐园】发言


