


部分同学可能无法访问https://developer.android.com,将里面的文档贴出来供更多人学习,原链接https://developer.android.com/guide/components/services.html
服务
Service 是一个可以在后台执行长时间运行操作而不提供用户界面的应用组件。服务可由其他应用组件启动,而且即使用户切换到其他应用,服务仍将在后台继续运行。 此外,组件可以绑定到服务,以与之进行交互,甚至是执行进程间通信 (IPC)。 例如,服务可以处理网络事务、播放音乐,执行文件 I/O 或与内容提供程序交互,而所有这一切均可在后台进行。
服务基本上分为两种形式:
-
启动
-
当应用组件(如 Activity)通过调用
startService()启动服务时,服务即处于“启动”状态。一旦启动,服务即可在后台无限期运行,即使启动服务的组件已被销毁也不受影响。 已启动的服务通常是执行单一操作,而且不会将结果返回给调用方。例如,它可能通过网络下载或上传文件。 操作完成后,服务会自行停止运行。
绑定
-
当应用组件通过调用
bindService()绑定到服务时,服务即处于“绑定”状态。绑定服务提供了一个客户端-服务器接口,允许组件与服务进行交互、发送请求、获取结果,甚至是利用进程间通信 (IPC) 跨进程执行这些操作。 仅当与另一个应用组件绑定时,绑定服务才会运行。 多个组件可以同时绑定到该服务,但全部取消绑定后,该服务即会被销毁。
虽然本文档是分开概括讨论这两种服务,但是您的服务可以同时以这两种方式运行,也就是说,它既可以是启动服务(以无限期运行),也允许绑定。问题只是在于您是否实现了一组回调方法:onStartCommand()(允许组件启动服务)和 onBind()(允许绑定服务)。
无论应用是处于启动状态还是绑定状态,抑或处于启动并且绑定状态,任何应用组件均可像使用 Activity 那样通过调用 Intent 来使用服务(即使此服务来自另一应用)。 不过,您可以通过清单文件将服务声明为私有服务,并阻止其他应用访问。 使用清单文件声明服务部分将对此做更详尽的阐述。
注意:服务在其托管进程的主线程中运行,它既不创建自己的线程,也不在单独的进程中运行(除非另行指定)。 这意味着,如果服务将执行任何 CPU 密集型工作或阻止性操作(例如 MP3 播放或联网),则应在服务内创建新线程来完成这项工作。通过使用单独的线程,可以降低发生“应用无响应”(ANR) 错误的风险,而应用的主线程仍可继续专注于运行用户与 Activity 之间的交互。
基础知识
您应使用服务还是线程?
简单地说,服务是一种即使用户未与应用交互也可在后台运行的组件。 因此,您应仅在必要时才创建服务。
如需在主线程外部执行工作,不过只是在用户正在与应用交互时才有此需要,则应创建新线程而非服务。 例如,如果您只是想在 Activity 运行的同时播放一些音乐,则可在 onCreate() 中创建线程,在 onStart() 中启动线程,然后在 onStop() 中停止线程。您还可以考虑使用 AsyncTask 或 HandlerThread,而非传统的 Thread 类。如需了解有关线程的详细信息,请参阅进程和线程文档。
请记住,如果您确实要使用服务,则默认情况下,它仍会在应用的主线程中运行,因此,如果服务执行的是密集型或阻止性操作,则您仍应在服务内创建新线程。
要创建服务,您必须创建 Service 的子类(或使用它的一个现有子类)。在实现中,您需要重写一些回调方法,以处理服务生命周期的某些关键方面并提供一种机制将组件绑定到服务(如适用)。 应重写的最重要的回调方法包括:
-
当另一个组件(如 Activity)通过调用
startService()请求启动服务时,系统将调用此方法。一旦执行此方法,服务即会启动并可在后台无限期运行。 如果您实现此方法,则在服务工作完成后,需要由您通过调用stopSelf()或stopService()来停止服务。(如果您只想提供绑定,则无需实现此方法。) -
当另一个组件想通过调用
bindService()与服务绑定(例如执行 RPC)时,系统将调用此方法。在此方法的实现中,您必须通过返回IBinder提供一个接口,供客户端用来与服务进行通信。请务必实现此方法,但如果您并不希望允许绑定,则应返回 null。 -
首次创建服务时,系统将调用此方法来执行一次性设置程序(在调用
onStartCommand()或onBind()之前)。如果服务已在运行,则不会调用此方法。 - 当服务不再使用且将被销毁时,系统将调用此方法。服务应该实现此方法来清理所有资源,如线程、注册的侦听器、接收器等。 这是服务接收的最后一个调用。
onStartCommand()
onBind()
onCreate()
onDestroy()
如果组件通过调用 startService() 启动服务(这会导致对 onStartCommand() 的调用),则服务将一直运行,直到服务使用 stopSelf() 自行停止运行,或由其他组件通过调用 stopService() 停止它为止。
如果组件是通过调用 bindService() 来创建服务(且未调用 onStartCommand(),则服务只会在该组件与其绑定时运行。一旦该服务与所有客户端之间的绑定全部取消,系统便会销毁它。
仅当内存过低且必须回收系统资源以供具有用户焦点的 Activity 使用时,Android 系统才会强制停止服务。如果将服务绑定到具有用户焦点的 Activity,则它不太可能会终止;如果将服务声明为在前台运行(稍后讨论),则它几乎永远不会终止。或者,如果服务已启动并要长时间运行,则系统会随着时间的推移降低服务在后台任务列表中的位置,而服务也将随之变得非常容易被终止;如果服务是启动服务,则您必须将其设计为能够妥善处理系统对它的重启。 如果系统终止服务,那么一旦资源变得再次可用,系统便会重启服务(不过这还取决于从 onStartCommand() 返回的值,本文稍后会对此加以讨论)。如需了解有关系统会在何时销毁服务的详细信息,请参阅进程和线程文档。
在下文中,您将了解如何创建各类服务以及如何从其他应用组件使用服务。
使用清单文件声明服务
如同 Activity(以及其他组件)一样,您必须在应用的清单文件中声明所有服务。
要声明服务,请添加 <service> 元素作为 <application> 元素的子元素。例如:
<manifest ... >
  ...
  <application ... >
      <service android:name=".ExampleService" />
      ...
  </application>
</manifest>
如需了解有关使用清单文件声明服务的详细信息,请参阅 <service> 元素参考文档。
您还可将其他属性包括在 <service> 元素中,以定义一些特性,如启动服务及其运行所在进程所需的权限。android:name 属性是唯一必需的属性,用于指定服务的类名。应用一旦发布,即不应更改此类名,如若不然,可能会存在因依赖显式 Intent 启动或绑定服务而破坏代码的风险(请阅读博客文章Things That Cannot Change[不能更改的内容])。
为了确保应用的安全性,请始终使用显式 Intent 启动或绑定 Service,且不要为服务声明 Intent 过滤器。 启动哪个服务存在一定的不确定性,而如果对这种不确定性的考量非常有必要,则可为服务提供 Intent 过滤器并从 Intent 中排除相应的组件名称,但随后必须使用 setPackage() 方法设置 Intent 的软件包,这样可以充分消除目标服务的不确定性。
此外,还可以通过添加 android:exported 属性并将其设置为 "false",确保服务仅适用于您的应用。这可以有效阻止其他应用启动您的服务,即便在使用显式 Intent 时也如此。
创建启动服务
启动服务由另一个组件通过调用 startService() 启动,这会导致调用服务的 onStartCommand() 方法。
服务启动之后,其生命周期即独立于启动它的组件,并且可以在后台无限期地运行,即使启动服务的组件已被销毁也不受影响。 因此,服务应通过调用stopSelf() 结束工作来自行停止运行,或者由另一个组件通过调用 stopService() 来停止它。
应用组件(如 Activity)可以通过调用 startService() 方法并传递 Intent 对象(指定服务并包含待使用服务的所有数据)来启动服务。服务通过onStartCommand() 方法接收此 Intent。
例如,假设某 Activity 需要将一些数据保存到在线数据库中。该 Activity 可以启动一个协同服务,并通过向 startService() 传递一个 Intent,为该服务提供要保存的数据。服务通过 onStartCommand() 接收 Intent,连接到互联网并执行数据库事务。事务完成之后,服务会自行停止运行并随即被销毁。
注意:默认情况下,服务与服务声明所在的应用运行于同一进程,而且运行于该应用的主线程中。 因此,如果服务在用户与来自同一应用的 Activity 进行交互时执行密集型或阻止性操作,则会降低 Activity 性能。 为了避免影响应用性能,您应在服务内启动新线程。
从传统上讲,您可以扩展两个类来创建启动服务:
- 这是适用于所有服务的基类。扩展此类时,必须创建一个用于执行所有服务工作的新线程,因为默认情况下,服务将使用应用的主线程,这会降低应用正在运行的所有 Activity 的性能。
-
这是
Service的子类,它使用工作线程逐一处理所有启动请求。如果您不要求服务同时处理多个请求,这是最好的选择。 您只需实现onHandleIntent()方法即可,该方法会接收每个启动请求的 Intent,使您能够执行后台工作。
Service
IntentService
下文介绍如何使用其中任一个类来实现服务。
扩展 IntentService 类
由于大多数启动服务都不必同时处理多个请求(实际上,这种多线程情况可能很危险),因此使用 IntentService 类实现服务也许是最好的选择。
IntentService 执行以下操作:
- 创建默认的工作线程,用于在应用的主线程外执行传递给
onStartCommand()的所有 Intent。 - 创建工作队列,用于将 Intent 逐一传递给
onHandleIntent()实现,这样您就永远不必担心多线程问题。 - 在处理完所有启动请求后停止服务,因此您永远不必调用
stopSelf()。 - 提供
onBind()的默认实现(返回 null)。 - 提供
onStartCommand()的默认实现,可将 Intent 依次发送到工作队列和onHandleIntent()实现。
综上所述,您只需实现 onHandleIntent() 来完成客户端提供的工作即可。(不过,您还需要为服务提供小型构造函数。)
以下是 IntentService 的实现示例:
public class HelloIntentService extends IntentService {

  /**
   * A constructor is required, and must call the super IntentService(String)
   * constructor with a name for the worker thread.
   */
  public HelloIntentService() {
      super("HelloIntentService");
  }

  /**
   * The IntentService calls this method from the default worker thread with
   * the intent that started the service. When this method returns, IntentService
   * stops the service, as appropriate.
   */
  @Override
  protected void onHandleIntent(Intent intent) {
      // Normally we would do some work here, like download a file.
      // For our sample, we just sleep for 5 seconds.
      try {
          Thread.sleep(5000);
      } catch (InterruptedException e) {
          // Restore interrupt status.
          Thread.currentThread().interrupt();
      }
  }
}
您只需要一个构造函数和一个 onHandleIntent() 实现即可。
如果您决定还重写其他回调方法(如 onCreate()、onStartCommand() 或 onDestroy()),请确保调用超类实现,以便 IntentService 能够妥善处理工作线程的生命周期。
例如,onStartCommand() 必须返回默认实现(即,如何将 Intent 传递给 onHandleIntent()):
@Override
public int onStartCommand(Intent intent, int flags, int startId) {
    Toast.makeText(this, "service starting", Toast.LENGTH_SHORT).show();
    return super.onStartCommand(intent,flags,startId);
}
除 onHandleIntent() 之外,您无需从中调用超类的唯一方法就是 onBind()(仅当服务允许绑定时,才需要实现该方法)。
在下一部分中,您将了解如何在扩展 Service 基类时实现同类服务。该基类包含更多代码,但如需同时处理多个启动请求,则更适合使用该基类。
扩展服务类
正如上一部分中所述,使用 IntentService 显著简化了启动服务的实现。但是,若要求服务执行多线程(而不是通过工作队列处理启动请求),则可扩展Service 类来处理每个 Intent。
为了便于比较,以下提供了 Service 类实现的代码示例,该类执行的工作与上述使用 IntentService 的示例完全相同。也就是说,对于每个启动请求,它均使用工作线程执行作业,且每次仅处理一个请求。
public class HelloService extends Service {
  private Looper mServiceLooper;
  private ServiceHandler mServiceHandler;

  // Handler that receives messages from the thread
  private final class ServiceHandler extends Handler {
      public ServiceHandler(Looper looper) {
          super(looper);
      }
      @Override
      public void handleMessage(Message msg) {
          // Normally we would do some work here, like download a file.
          // For our sample, we just sleep for 5 seconds.
          try {
              Thread.sleep(5000);
          } catch (InterruptedException e) {
              // Restore interrupt status.
              Thread.currentThread().interrupt();
          }
          // Stop the service using the startId, so that we don't stop
          // the service in the middle of handling another job
          stopSelf(msg.arg1);
      }
  }

  @Override
  public void onCreate() {
    // Start up the thread running the service.  Note that we create a
    // separate thread because the service normally runs in the process's
    // main thread, which we don't want to block.  We also make it
    // background priority so CPU-intensive work will not disrupt our UI.
    HandlerThread thread = new HandlerThread("ServiceStartArguments",
            Process.THREAD_PRIORITY_BACKGROUND);
    thread.start();

    // Get the HandlerThread's Looper and use it for our Handler
    mServiceLooper = thread.getLooper();
    mServiceHandler = new ServiceHandler(mServiceLooper);
  }

  @Override
  public int onStartCommand(Intent intent, int flags, int startId) {
      Toast.makeText(this, "service starting", Toast.LENGTH_SHORT).show();

      // For each start request, send a message to start a job and deliver the
      // start ID so we know which request we're stopping when we finish the job
      Message msg = mServiceHandler.obtainMessage();
      msg.arg1 = startId;
      mServiceHandler.sendMessage(msg);

      // If we get killed, after returning from here, restart
      return START_STICKY;
  }

  @Override
  public IBinder onBind(Intent intent) {
      // We don't provide binding, so return null
      return null;
  }

  @Override
  public void onDestroy() {
    Toast.makeText(this, "service done", Toast.LENGTH_SHORT).show();
  }
}
正如您所见,与使用 IntentService 相比,这需要执行更多工作。
但是,因为是由您自己处理对 onStartCommand() 的每个调用,因此可以同时执行多个请求。此示例并未这样做,但如果您希望如此,则可为每个请求创建一个新线程,然后立即运行这些线程(而不是等待上一个请求完成)。
请注意,onStartCommand() 方法必须返回整型数。整型数是一个值,用于描述系统应该如何在服务终止的情况下继续运行服务(如上所述,IntentService 的默认实现将为您处理这种情况,不过您可以对其进行修改)。从 onStartCommand() 返回的值必须是以下常量之一:
-
如果系统在
onStartCommand()返回后终止服务,则除非有挂起 Intent 要传递,否则系统 不会重建服务。这是最安全的选项,可以避免在不必要时以及应用能够轻松重启所有未完成的作业时运行服务。 -
如果系统在
onStartCommand()返回后终止服务,则会重建服务并调用onStartCommand(),但 不会重新传递最后一个 Intent。相反,除非有挂起 Intent 要启动服务(在这种情况下,将传递这些 Intent ),否则系统会通过空 Intent 调用onStartCommand()。这适用于不执行命令、但无限期运行并等待作业的媒体播放器(或类似服务)。 -
如果系统在
onStartCommand()返回后终止服务,则会重建服务,并通过传递给服务的最后一个 Intent 调用onStartCommand()。任何挂起 Intent 均依次传递。这适用于主动执行应该立即恢复的作业(例如下载文件)的服务。
START_NOT_STICKY
START_STICKY
START_REDELIVER_INTENT
有关这些返回值的更多详细信息,请查阅每个常量链接的参考文档。
启动服务
您可以通过将 Intent(指定要启动的服务)传递给 startService(),从 Activity 或其他应用组件启动服务。Android 系统调用服务的 onStartCommand()方法,并向其传递 Intent。(切勿直接调用 onStartCommand()。)
例如,Activity 可以结合使用显式 Intent 与 startService(),启动上文中的示例服务 (HelloService):
Intent intent = new Intent(this, HelloService.class);
startService(intent);
startService() 方法将立即返回,且 Android 系统调用服务的 onStartCommand() 方法。如果服务尚未运行,则系统会先调用 onCreate(),然后再调用 onStartCommand()。
如果服务亦未提供绑定,则使用 startService() 传递的 Intent 是应用组件与服务之间唯一的通信模式。但是,如果您希望服务返回结果,则启动服务的客户端可以为广播创建一个 PendingIntent (使用 getBroadcast()),并通过启动服务的 Intent 传递给服务。然后,服务就可以使用广播传递结果。
多个服务启动请求会导致多次对服务的 onStartCommand() 进行相应的调用。但是,要停止服务,只需一个服务停止请求(使用 stopSelf() 或 stopService())即可。
停止服务
启动服务必须管理自己的生命周期。也就是说,除非系统必须回收内存资源,否则系统不会停止或销毁服务,而且服务在 onStartCommand() 返回后会继续运行。因此,服务必须通过调用 stopSelf() 自行停止运行,或者由另一个组件通过调用 stopService() 来停止它。
一旦请求使用 stopSelf() 或 stopService() 停止服务,系统就会尽快销毁服务。
但是,如果服务同时处理多个 onStartCommand() 请求,则您不应在处理完一个启动请求之后停止服务,因为您可能已经收到了新的启动请求(在第一个请求结束时停止服务会终止第二个请求)。为了避免这一问题,您可以使用 stopSelf(int) 确保服务停止请求始终基于最近的启动请求。也就说,在调用stopSelf(int) 时,传递与停止请求的 ID 对应的启动请求的 ID(传递给 onStartCommand() 的 startId)。然后,如果在您能够调用 stopSelf(int) 之前服务收到了新的启动请求,ID 就不匹配,服务也就不会停止。
注意:为了避免浪费系统资源和消耗电池电量,应用必须在工作完成之后停止其服务。 如有必要,其他组件可以通过调用 stopService() 来停止服务。即使为服务启用了绑定,一旦服务收到对 onStartCommand() 的调用,您始终仍须亲自停止服务。
如需了解有关服务生命周期的详细信息,请参阅下面有关管理服务生命周期的部分。
创建绑定服务
绑定服务允许应用组件通过调用 bindService() 与其绑定,以便创建长期连接(通常不允许组件通过调用 startService() 来启动它)。
如需与 Activity 和其他应用组件中的服务进行交互,或者需要通过进程间通信 (IPC) 向其他应用公开某些应用功能,则应创建绑定服务。
要创建绑定服务,必须实现 onBind() 回调方法以返回 IBinder,用于定义与服务通信的接口。然后,其他应用组件可以调用 bindService() 来检索该接口,并开始对服务调用方法。服务只用于与其绑定的应用组件,因此如果没有组件绑定到服务,则系统会销毁服务(您不必按通过 onStartCommand() 启动的服务那样来停止绑定服务)。
要创建绑定服务,首先必须定义指定客户端如何与服务通信的接口。 服务与客户端之间的这个接口必须是 IBinder 的实现,并且服务必须从 onBind() 回调方法返回它。一旦客户端收到 IBinder,即可开始通过该接口与服务进行交互。
多个客户端可以同时绑定到服务。客户端完成与服务的交互后,会调用 unbindService() 取消绑定。一旦没有客户端绑定到该服务,系统就会销毁它。
有多种方法实现绑定服务,其实现比启动服务更为复杂,因此绑定服务将在有关绑定服务的单独文档中专门讨论。
向用户发送通知
一旦运行起来,服务即可使用 Toast 通知或状态栏通知来通知用户所发生的事件。
Toast 通知是指出现在当前窗口的表面、片刻随即消失不见的消息,而状态栏通知则在状态栏中随消息一起提供图标,用户可以选择该图标来采取操作(例如启动 Activity)。
通常,当某些后台工作已经完成(例如文件下载完成)且用户现在可以对其进行操作时,状态栏通知是最佳方法。 当用户从展开视图中选定通知时,通知即可启动 Activity(例如查看已下载的文件)。
如需了解详细信息,请参阅 Toast 通知或状态栏通知开发者指南。
在前台运行服务
前台服务被认为是用户主动意识到的一种服务,因此在内存不足时,系统也不会考虑将其终止。 前台服务必须为状态栏提供通知,放在“正在进行”标题下方,这意味着除非服务停止或从前台移除,否则不能清除通知。
例如,应该将通过服务播放音乐的音乐播放器设置为在前台运行,这是因为用户明确意识到其操作。 状态栏中的通知可能表示正在播放的歌曲,并允许用户启动 Activity 来与音乐播放器进行交互。
要请求让服务运行于前台,请调用 startForeground()。此方法采用两个参数:唯一标识通知的整型数和状态栏的 Notification。例如:
Notification notification = new Notification(R.drawable.icon, getText(R.string.ticker_text),
        System.currentTimeMillis());
Intent notificationIntent = new Intent(this, ExampleActivity.class);
PendingIntent pendingIntent = PendingIntent.getActivity(this, 0, notificationIntent, 0);
notification.setLatestEventInfo(this, getText(R.string.notification_title),
        getText(R.string.notification_message), pendingIntent);
startForeground(ONGOING_NOTIFICATION_ID, notification);
注意:提供给 startForeground() 的整型 ID 不得为 0。
要从前台移除服务,请调用 stopForeground()。此方法采用一个布尔值,指示是否也移除状态栏通知。 此方法不会停止服务。 但是,如果您在服务正在前台运行时将其停止,则通知也会被移除。
如需了解有关通知的详细信息,请参阅创建状态栏通知。
管理服务生命周期
服务的生命周期比 Activity 的生命周期要简单得多。但是,密切关注如何创建和销毁服务反而更加重要,因为服务可以在用户没有意识到的情况下运行于后台。
服务生命周期(从创建到销毁)可以遵循两条不同的路径:
- 启动服务
该服务在其他组件调用
startService()时创建,然后无限期运行,且必须通过调用stopSelf()来自行停止运行。此外,其他组件也可以通过调用stopService()来停止服务。服务停止后,系统会将其销毁。 - 绑定服务
该服务在另一个组件(客户端)调用
bindService()时创建。然后,客户端通过IBinder接口与服务进行通信。客户端可以通过调用unbindService()关闭连接。多个客户端可以绑定到相同服务,而且当所有绑定全部取消后,系统即会销毁该服务。 (服务不必自行停止运行。)
这两条路径并非完全独立。也就是说,您可以绑定到已经使用 startService() 启动的服务。例如,可以通过使用 Intent(标识要播放的音乐)调用 startService() 来启动后台音乐服务。随后,可能在用户需要稍加控制播放器或获取有关当前播放歌曲的信息时,Activity 可以通过调用 bindService()绑定到服务。在这种情况下,除非所有客户端均取消绑定,否则 stopService() 或 stopSelf() 不会实际停止服务。
实现生命周期回调
与 Activity 类似,服务也拥有生命周期回调方法,您可以实现这些方法来监控服务状态的变化并适时执行工作。 以下框架服务展示了每种生命周期方法:
public class ExampleService extends Service { int mStartMode; // indicates how to behave if the service is killed IBinder mBinder; // interface for clients that bind boolean mAllowRebind; // indicates whether onRebind should be used @Override public voidonCreate() { // The service is being created } @Override public intonStartCommand(Intent intent, int flags, int startId) { // The service is starting, due to a call tostartService()return mStartMode; } @Override public IBinderonBind(Intent intent) { // A client is binding to the service withbindService()return mBinder; } @Override public booleanonUnbind(Intent intent) { // All clients have unbound withunbindService()return mAllowRebind; } @Override public voidonRebind(Intent intent) { // A client is binding to the service withbindService(), // after onUnbind() has already been called } @Override public voidonDestroy() { // The service is no longer used and is being destroyed } }
注:与 Activity 生命周期回调方法不同,您不需要调用这些回调方法的超类实现。
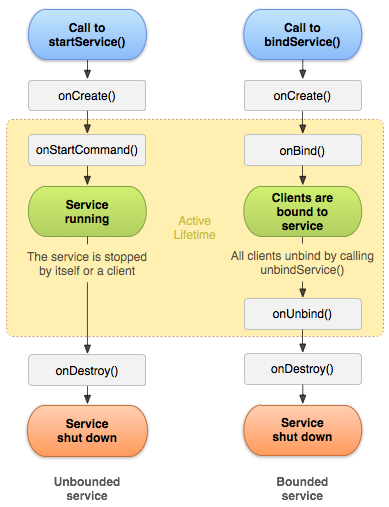
图 2. 服务生命周期。左图显示了使用 startService() 所创建的服务的生命周期,右图显示了使用 bindService() 所创建的服务的生命周期。
通过实现这些方法,您可以监控服务生命周期的两个嵌套循环:
- 服务的整个生命周期从调用
onCreate()开始起,到onDestroy()返回时结束。与 Activity 类似,服务也在onCreate()中完成初始设置,并在onDestroy()中释放所有剩余资源。例如,音乐播放服务可以在onCreate()中创建用于播放音乐的线程,然后在onDestroy()中停止该线程。无论服务是通过
startService()还是bindService()创建,都会为所有服务调用onCreate()和onDestroy()方法。 - 服务的有效生命周期从调用
onStartCommand()或onBind()方法开始。每种方法均有 {Intent对象,该对象分别传递到startService()或bindService()。对于启动服务,有效生命周期与整个生命周期同时结束(即便是在
onStartCommand()返回之后,服务仍然处于活动状态)。对于绑定服务,有效生命周期在onUnbind()返回时结束。
注:尽管启动服务是通过调用 stopSelf() 或 stopService() 来停止,但是该服务并无相应的回调(没有 onStop() 回调)。因此,除非服务绑定到客户端,否则在服务停止时,系统会将其销毁 — onDestroy() 是接收到的唯一回调。
图 2 说明了服务的典型回调方法。尽管该图分开介绍通过 startService() 创建的服务和通过 bindService() 创建的服务,但是请记住,不管启动方式如何,任何服务均有可能允许客户端与其绑定。因此,最初使用 onStartCommand()(通过客户端调用 startService())启动的服务仍可接收对 onBind()的调用(当客户端调用 bindService() 时)。
如需了解有关创建提供绑定的服务的详细信息,请参阅绑定服务文档,该文档的管理绑定服务的生命周期部分提供了有关 onRebind() 回调方法的更多信息。
绑定服务
绑定服务是客户端-服务器接口中的服务器。绑定服务可让组件(例如 Activity)绑定到服务、发送请求、接收响应,甚至执行进程间通信 (IPC)。 绑定服务通常只在为其他应用组件服务时处于活动状态,不会无限期在后台运行。
本文向您介绍如何创建绑定服务,包括如何绑定到来自其他应用组件的服务。 不过,您还应参阅服务文档,了解有关一般服务的更多信息,例如:如何利用服务传送通知、如何将服务设置为在前台运行等等。
基础知识
绑定服务是 Service 类的实现,可让其他应用与其绑定和交互。要提供服务绑定,您必须实现 onBind()回调方法。该方法返回的 IBinder 对象定义了客户端用来与服务进行交互的编程接口。
绑定到已启动服务
正如服务文档中所述,您可以创建同时具有已启动和绑定两种状态的服务。 也就是说,可通过调用 startService()启动该服务,让服务无限期运行;此外,还可通过调用 bindService() 使客户端绑定到服务。
如果您确实允许服务同时具有已启动和绑定状态,则服务启动后,系统“不会”在所有客户端都取消绑定时销毁服务。 为此,您必须通过调用stopSelf() 或 stopService() 显式停止服务。
尽管您通常应该实现 onBind() 或onStartCommand(),但有时需要同时实现这两者。例如,音乐播放器可能发现让其服务无限期运行并同时提供绑定很有用处。 这样一来,Activity 便可启动服务进行音乐播放,即使用户离开应用,音乐播放也不会停止。 然后,当用户返回应用时,Activity 可绑定到服务,重新获得回放控制权。
请务必阅读管理绑定服务的生命周期部分,详细了解有关为已启动服务添加绑定时该服务的生命周期信息。
客户端可通过调用 bindService() 绑定到服务。调用时,它必须提供 ServiceConnection 的实现,后者会监控与服务的连接。bindService() 方法会立即无值返回,但当 Android 系统创建客户端与服务之间的连接时,会对 ServiceConnection 调用 onServiceConnected(),向客户端传递用来与服务通信的IBinder。
多个客户端可同时连接到一个服务。不过,只有在第一个客户端绑定时,系统才会调用服务的 onBind()方法来检索 IBinder。系统随后无需再次调用 onBind(),便可将同一 IBinder 传递至任何其他绑定的客户端。
当最后一个客户端取消与服务的绑定时,系统会将服务销毁(除非 startService() 也启动了该服务)。
当您实现绑定服务时,最重要的环节是定义您的 onBind() 回调方法返回的接口。您可以通过几种不同的方法定义服务的 IBinder 接口,下文对这些方法逐一做了阐述。
创建绑定服务
创建提供绑定的服务时,您必须提供 IBinder,用以提供客户端用来与服务进行交互的编程接口。 您可以通过三种方法定义接口:
-
扩展 Binder 类
-
如果服务是供您的自有应用专用,并且在与客户端相同的进程中运行(常见情况),则应通过扩展
Binder类并从onBind()返回它的一个实例来创建接口。客户端收到Binder后,可利用它直接访问Binder实现中乃至Service中可用的公共方法。如果服务只是您的自有应用的后台工作线程,则优先采用这种方法。 不以这种方式创建接口的唯一原因是,您的服务被其他应用或不同的进程占用。
使用 Messenger
-
如需让接口跨不同的进程工作,则可使用
Messenger为服务创建接口。服务可以这种方式定义对应于不同类型Message对象的Handler。此Handler是Messenger的基础,后者随后可与客户端分享一个IBinder,从而让客户端能利用Message对象向服务发送命令。此外,客户端还可定义自有Messenger,以便服务回传消息。这是执行进程间通信 (IPC) 的最简单方法,因为
Messenger会在单一线程中创建包含所有请求的队列,这样您就不必对服务进行线程安全设计。
使用 AIDL
-
AIDL(Android 接口定义语言)执行所有将对象分解成原语的工作,操作系统可以识别这些原语并将它们编组到各进程中,以执行 IPC。 之前采用
Messenger的方法实际上是以 AIDL 作为其底层结构。 如上所述,Messenger会在单一线程中创建包含所有客户端请求的队列,以便服务一次接收一个请求。 不过,如果您想让服务同时处理多个请求,则可直接使用 AIDL。 在此情况下,您的服务必须具备多线程处理能力,并采用线程安全式设计。如需直接使用 AIDL,您必须创建一个定义编程接口的
.aidl文件。Android SDK 工具利用该文件生成一个实现接口并处理 IPC 的抽象类,您随后可在服务内对其进行扩展。
注:大多数应用“都不会”使用 AIDL 来创建绑定服务,因为它可能要求具备多线程处理能力,并可能导致实现的复杂性增加。因此,AIDL 并不适合大多数应用,本文也不会阐述如何将其用于您的服务。如果您确定自己需要直接使用 AIDL,请参阅 AIDL 文档。
扩展 Binder 类
如果您的服务仅供本地应用使用,不需要跨进程工作,则可以实现自有 Binder 类,让您的客户端通过该类直接访问服务中的公共方法。
注:此方法只有在客户端和服务位于同一应用和进程内这一最常见的情况下方才有效。 例如,对于需要将 Activity 绑定到在后台播放音乐的自有服务的音乐应用,此方法非常有效。
以下是具体的设置方法:
- 在您的服务中,创建一个可满足下列任一要求的
Binder实例:- 包含客户端可调用的公共方法
- 返回当前
Service实例,其中包含客户端可调用的公共方法 - 或返回由服务承载的其他类的实例,其中包含客户端可调用的公共方法
- 从
onBind()回调方法返回此Binder实例。 - 在客户端中,从
onServiceConnected()回调方法接收Binder,并使用提供的方法调用绑定服务。
注:之所以要求服务和客户端必须在同一应用内,是为了便于客户端转换返回的对象和正确调用其 API。服务和客户端还必须在同一进程内,因为此方法不执行任何跨进程编组。
例如,以下这个服务可让客户端通过 Binder 实现访问服务中的方法:
public class LocalService extends Service {
    // Binder given to clients
    private final IBinder mBinder = new LocalBinder();
    // Random number generator
    private final Random mGenerator = new Random();

    /**
     * Class used for the client Binder.  Because we know this service always
     * runs in the same process as its clients, we don't need to deal with IPC.
     */
    public class LocalBinder extends Binder {
        LocalService getService() {
            // Return this instance of LocalService so clients can call public methods
            return LocalService.this;
        }
    }

    @Override
    public IBinder onBind(Intent intent) {
        return mBinder;
    }

    /** method for clients */
    public int getRandomNumber() {
      return mGenerator.nextInt(100);
    }
}
LocalBinder 为客户端提供 getService() 方法,以检索 LocalService 的当前实例。这样,客户端便可调用服务中的公共方法。 例如,客户端可调用服务中的 getRandomNumber()。
点击按钮时,以下这个 Activity 会绑定到 LocalService 并调用 getRandomNumber() :
public class BindingActivity extends Activity {
    LocalService mService;
    boolean mBound = false;

    @Override
    protected void onCreate(Bundle savedInstanceState) {
        super.onCreate(savedInstanceState);
        setContentView(R.layout.main);
    }

    @Override
    protected void onStart() {
        super.onStart();
        // Bind to LocalService
        Intent intent = new Intent(this, LocalService.class);
        bindService(intent, mConnection, Context.BIND_AUTO_CREATE);
    }

    @Override
    protected void onStop() {
        super.onStop();
        // Unbind from the service
        if (mBound) {
            unbindService(mConnection);
            mBound = false;
        }
    }

    /** Called when a button is clicked (the button in the layout file attaches to
      * this method with the android:onClick attribute) */
    public void onButtonClick(View v) {
        if (mBound) {
            // Call a method from the LocalService.
            // However, if this call were something that might hang, then this request should
            // occur in a separate thread to avoid slowing down the activity performance.
            int num = mService.getRandomNumber();
            Toast.makeText(this, "number: " + num, Toast.LENGTH_SHORT).show();
        }
    }

    /** Defines callbacks for service binding, passed to bindService() */
    private ServiceConnection mConnection = new ServiceConnection() {

        @Override
        public void onServiceConnected(ComponentName className,
                IBinder service) {
            // We've bound to LocalService, cast the IBinder and get LocalService instance
            LocalBinder binder = (LocalBinder) service;
            mService = binder.getService();
            mBound = true;
        }

        @Override
        public void onServiceDisconnected(ComponentName arg0) {
            mBound = false;
        }
    };
}
上例说明了客户端如何使用 ServiceConnection 的实现和 onServiceConnected() 回调绑定到服务。下文更详细介绍了绑定到服务的过程。
注:在上例中,onStop() 方法将客户端与服务取消绑定。 客户端应在适当时机与服务取消绑定,如附加说明中所述。
如需查看更多示例代码,请参见 ApiDemos 中的 LocalService.java 类和 LocalServiceActivities.java 类。
使用 Messenger
如需让服务与远程进程通信,则可使用 Messenger 为您的服务提供接口。利用此方法,您无需使用 AIDL 便可执行进程间通信 (IPC)。
以下是 Messenger 的使用方法摘要:
- 服务实现一个
Handler,由其接收来自客户端的每个调用的回调 Handler用于创建Messenger对象(对Handler的引用)Messenger创建一个IBinder,服务通过onBind()使其返回客户端- 客户端使用
IBinder将Messenger(引用服务的Handler)实例化,然后使用后者将Message对象发送给服务 - 服务在其
Handler中(具体地讲,是在handleMessage()方法中)接收每个Message。
这样,客户端并没有调用服务的“方法”。而客户端传递的“消息”(Message 对象)是服务在其 Handler 中接收的。
以下是一个使用 Messenger 接口的简单服务示例:
public class MessengerService extends Service {
    /** Command to the service to display a message */
    static final int MSG_SAY_HELLO = 1;

    /**
     * Handler of incoming messages from clients.
     */
    class IncomingHandler extends Handler {
        @Override
        public void handleMessage(Message msg) {
            switch (msg.what) {
                case MSG_SAY_HELLO:
                    Toast.makeText(getApplicationContext(), "hello!", Toast.LENGTH_SHORT).show();
                    break;
                default:
                    super.handleMessage(msg);
            }
        }
    }

    /**
     * Target we publish for clients to send messages to IncomingHandler.
     */
    final Messenger mMessenger = new Messenger(new IncomingHandler());

    /**
     * When binding to the service, we return an interface to our messenger
     * for sending messages to the service.
     */
    @Override
    public IBinder onBind(Intent intent) {
        Toast.makeText(getApplicationContext(), "binding", Toast.LENGTH_SHORT).show();
        return mMessenger.getBinder();
    }
}
请注意,服务就是在 Handler 的 handleMessage() 方法中接收传入的 Message,并根据 what 成员决定下一步操作。
客户端只需根据服务返回的 IBinder 创建一个 Messenger,然后利用 send() 发送一条消息。例如,以下就是一个绑定到服务并向服务传递MSG_SAY_HELLO 消息的简单 Activity:
public class ActivityMessenger extends Activity {
    /** Messenger for communicating with the service. */
    Messenger mService = null;

    /** Flag indicating whether we have called bind on the service. */
    boolean mBound;

    /**
     * Class for interacting with the main interface of the service.
     */
    private ServiceConnection mConnection = new ServiceConnection() {
        public void onServiceConnected(ComponentName className, IBinder service) {
            // This is called when the connection with the service has been
            // established, giving us the object we can use to
            // interact with the service.  We are communicating with the
            // service using a Messenger, so here we get a client-side
            // representation of that from the raw IBinder object.
            mService = new Messenger(service);
            mBound = true;
        }

        public void onServiceDisconnected(ComponentName className) {
            // This is called when the connection with the service has been
            // unexpectedly disconnected -- that is, its process crashed.
            mService = null;
            mBound = false;
        }
    };

    public void sayHello(View v) {
        if (!mBound) return;
        // Create and send a message to the service, using a supported 'what' value
        Message msg = Message.obtain(null, MessengerService.MSG_SAY_HELLO, 0, 0);
        try {
            mService.send(msg);
        } catch (RemoteException e) {
            e.printStackTrace();
        }
    }

    @Override
    protected void onCreate(Bundle savedInstanceState) {
        super.onCreate(savedInstanceState);
        setContentView(R.layout.main);
    }

    @Override
    protected void onStart() {
        super.onStart();
        // Bind to the service
        bindService(new Intent(this, MessengerService.class), mConnection,
            Context.BIND_AUTO_CREATE);
    }

    @Override
    protected void onStop() {
        super.onStop();
        // Unbind from the service
        if (mBound) {
            unbindService(mConnection);
            mBound = false;
        }
    }
}
请注意,此示例并未说明服务如何对客户端作出响应。如果您想让服务作出响应,则还需要在客户端中创建一个 Messenger。然后,当客户端收到 onServiceConnected() 回调时,会向服务发送一条 Message,并在其 send() 方法的 replyTo 参数中包含客户端的 Messenger。
如需查看如何提供双向消息传递的示例,请参阅 MessengerService.java(服务)和 MessengerServiceActivities.java(客户端)示例。
绑定到服务
应用组件(客户端)可通过调用 bindService() 绑定到服务。Android 系统随后调用服务的 onBind() 方法,该方法返回用于与服务交互的 IBinder。
绑定是异步的。bindService() 会立即返回,“不会”使 IBinder 返回客户端。要接收 IBinder,客户端必须创建一个 ServiceConnection 实例,并将其传递给 bindService()。ServiceConnection 包括一个回调方法,系统通过调用它来传递 IBinder。
注:只有 Activity、服务和内容提供程序可以绑定到服务 — 您无法从广播接收器绑定到服务。
因此,要想从您的客户端绑定到服务,您必须:
- 实现
ServiceConnection。您的实现必须重写两个回调方法:
-
系统会调用该方法以传递服务的
onBind()方法返回的IBinder。 - Android 系统会在与服务的连接意外中断时(例如当服务崩溃或被终止时)调用该方法。当客户端取消绑定时,系统“不会” 调用该方法。
onServiceConnected()onServiceDisconnected() -
系统会调用该方法以传递服务的
- 调用
bindService(),传递ServiceConnection实现。 - 当系统调用您的
onServiceConnected()回调方法时,您可以使用接口定义的方法开始调用服务。 - 要断开与服务的连接,请调用
unbindService()。如果应用在客户端仍绑定到服务时销毁客户端,则销毁会导致客户端取消绑定。 更好的做法是在客户端与服务交互完成后立即取消绑定客户端。 这样可以关闭空闲服务。如需了解有关绑定和取消绑定的适当时机的详细信息,请参阅附加说明。
例如,以下代码段通过扩展 Binder 类将客户端与上面创建的服务相连,因此它只需将返回的 IBinder 转换为 LocalService 类并请求 LocalService 实例:
LocalService mService;
private ServiceConnection mConnection = new ServiceConnection() {
    // Called when the connection with the service is established
    public void onServiceConnected(ComponentName className, IBinder service) {
        // Because we have bound to an explicit
        // service that is running in our own process, we can
        // cast its IBinder to a concrete class and directly access it.
        LocalBinder binder = (LocalBinder) service;
        mService = binder.getService();
        mBound = true;
    }

    // Called when the connection with the service disconnects unexpectedly
    public void onServiceDisconnected(ComponentName className) {
        Log.e(TAG, "onServiceDisconnected");
        mBound = false;
    }
};
客户端可通过将此 ServiceConnection 传递至 bindService() 绑定到服务。例如:
Intent intent = new Intent(this, LocalService.class);
bindService(intent, mConnection, Context.BIND_AUTO_CREATE);
bindService()的第一个参数是一个Intent,用于显式命名要绑定的服务(但 Intent 可能是隐式的)- 第二个参数是
ServiceConnection对象 - 第三个参数是一个指示绑定选项的标志。它通常应该是
BIND_AUTO_CREATE,以便创建尚未激活的服务。其他可能的值为BIND_DEBUG_UNBIND和BIND_NOT_FOREGROUND,或0(表示无)。
附加说明
以下是一些有关绑定到服务的重要说明:
- 您应该始终捕获
DeadObjectException异常,它们是在连接中断时引发的。这是远程方法引发的唯一异常。 - 对象是跨进程计数的引用。
- 您通常应该在客户端生命周期的匹配引入 (bring-up) 和退出 (tear-down) 时刻期间配对绑定和取消绑定。 例如:
- 如果您只需要在 Activity 可见时与服务交互,则应在
onStart()期间绑定,在onStop()期间取消绑定。 - 如果您希望 Activity 在后台停止运行状态下仍可接收响应,则可在
onCreate()期间绑定,在onDestroy()期间取消绑定。请注意,这意味着您的 Activity 在其整个运行过程中(甚至包括后台运行期间)都需要使用服务,因此如果服务位于其他进程内,那么当您提高该进程的权重时,系统终止该进程的可能性会增加。
注:通常情况下,切勿在 Activity 的
onResume()和onPause()期间绑定和取消绑定,因为每一次生命周期转换都会发生这些回调,您应该使发生在这些转换期间的处理保持在最低水平。此外,如果您的应用内的多个 Activity 绑定到同一服务,并且其中两个 Activity 之间发生了转换,则如果当前 Activity 在下一个 Activity 绑定(恢复期间)之前取消绑定(暂停期间),系统可能会销毁服务并重建服务。 (Activity文档中介绍了这种有关 Activity 如何协调其生命周期的 Activity 转换。) - 如果您只需要在 Activity 可见时与服务交互,则应在
如需查看更多显示如何绑定到服务的示例代码,请参阅 ApiDemos 中的 RemoteService.java 类。
管理绑定服务的生命周期
当服务与所有客户端之间的绑定全部取消时,Android 系统便会销毁服务(除非还使用 onStartCommand() 启动了该服务)。因此,如果您的服务是纯粹的绑定服务,则无需对其生命周期进行管理 — Android 系统会根据它是否绑定到任何客户端代您管理。
不过,如果您选择实现 onStartCommand() 回调方法,则您必须显式停止服务,因为系统现在已将服务视为已启动。在此情况下,服务将一直运行到其通过 stopSelf() 自行停止,或其他组件调用 stopService() 为止,无论其是否绑定到任何客户端。
此外,如果您的服务已启动并接受绑定,则当系统调用您的 onUnbind() 方法时,如果您想在客户端下一次绑定到服务时接收 onRebind() 调用,则可选择返回 true。onRebind() 返回空值,但客户端仍在其 onServiceConnected() 回调中接收 IBinder。下文图 1 说明了这种生命周期的逻辑。
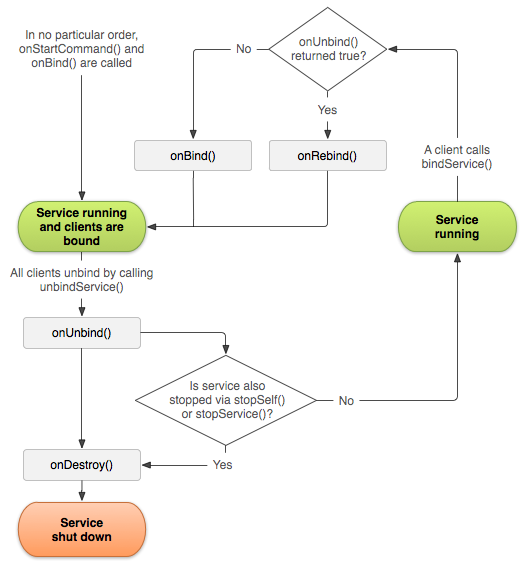
图 1. 允许绑定的已启动服务的生命周期。
如需了解有关已启动服务生命周期的详细信息,请参阅服务文档。
Android 接口定义语言 (AIDL)
AIDL(Android 接口定义语言)与您可能使用过的其他 IDL 类似。 您可以利用它定义客户端与服务使用进程间通信 (IPC) 进行相互通信时都认可的编程接口。 在 Android 上,一个进程通常无法访问另一个进程的内存。 尽管如此,进程需要将其对象分解成操作系统能够识别的原语,并将对象编组成跨越边界的对象。 编写执行这一编组操作的代码是一项繁琐的工作,因此 Android 会使用 AIDL 来处理。
注:只有允许不同应用的客户端用 IPC 方式访问服务,并且想要在服务中处理多线程时,才有必要使用 AIDL。 如果您不需要执行跨越不同应用的并发 IPC,就应该通过实现一个 Binder 创建接口;或者,如果您想执行 IPC,但根本不需要处理多线程,则使用 Messenger 类来实现接口。无论如何,在实现 AIDL 之前,请您务必理解绑定服务。
在您开始设计 AIDL 接口之前,要注意 AIDL 接口的调用是直接函数调用。 您不应该假设发生调用的线程。 视调用来自本地进程还是远程进程中的线程,实际情况会有所差异。 具体而言:
- 来自本地进程的调用在发起调用的同一线程内执行。如果该线程是您的主 UI 线程,则该线程继续在 AIDL 接口中执行。 如果该线程是其他线程,则其便是在服务中执行您的代码的线程。 因此,只有在本地线程访问服务时,您才能完全控制哪些线程在服务中执行(但如果真是这种情况,您根本不应该使用 AIDL,而是应该通过实现 Binder 类创建接口)。
- 来自远程进程的调用分派自平台在您的自有进程内部维护的线程池。 您必须为来自未知线程的多次并发传入调用做好准备。 换言之,AIDL 接口的实现必须是完全线程安全实现。
oneway关键字用于修改远程调用的行为。使用该关键字时,远程调用不会阻塞;它只是发送事务数据并立即返回。接口的实现最终接收此调用时,是以正常远程调用形式将其作为来自Binder线程池的常规调用进行接收。 如果oneway用于本地调用,则不会有任何影响,调用仍是同步调用。
定义 AIDL 接口
您必须使用 Java 编程语言语法在 .aidl 文件中定义 AIDL 接口,然后将它保存在托管服务的应用以及任何其他绑定到服务的应用的源代码(src/ 目录)内。
您开发每个包含 .aidl 文件的应用时,Android SDK 工具都会生成一个基于该 .aidl 文件的 IBinder 接口,并将其保存在项目的 gen/ 目录中。服务必须视情况实现 IBinder 接口。然后客户端应用便可绑定到该服务,并调用 IBinder 中的方法来执行 IPC。
如需使用 AIDL 创建绑定服务,请执行以下步骤:
- 创建 .aidl 文件
此文件定义带有方法签名的编程接口。
- 实现接口
Android SDK 工具基于您的
.aidl文件,使用 Java 编程语言生成一个接口。此接口具有一个名为Stub的内部抽象类,用于扩展Binder类并实现 AIDL 接口中的方法。您必须扩展Stub类并实现方法。 - 向客户端公开该接口
注意:在 AIDL 接口首次发布后对其进行的任何更改都必须保持向后兼容性,以避免中断其他应用对您的服务的使用。 也就是说,因为必须将您的 .aidl 文件复制到其他应用,才能让这些应用访问您的服务的接口,因此您必须保留对原始接口的支持。
1. 创建 .aidl 文件
AIDL 使用简单语法,使您能通过可带参数和返回值的一个或多个方法来声明接口。 参数和返回值可以是任意类型,甚至可以是其他 AIDL 生成的接口。
您必须使用 Java 编程语言构建 .aidl 文件。每个 .aidl 文件都必须定义单个接口,并且只需包含接口声明和方法签名。
默认情况下,AIDL 支持下列数据类型:
- Java 编程语言中的所有原语类型(如
int、long、char、boolean等等) StringCharSequenceListList中的所有元素都必须是以上列表中支持的数据类型、其他 AIDL 生成的接口或您声明的可打包类型。 可选择将List用作“通用”类(例如,List<String>)。另一端实际接收的具体类始终是ArrayList,但生成的方法使用的是List接口。MapMap中的所有元素都必须是以上列表中支持的数据类型、其他 AIDL 生成的接口或您声明的可打包类型。 不支持通用 Map(如Map<String,Integer>形式的 Map)。 另一端实际接收的具体类始终是HashMap,但生成的方法使用的是Map接口。
您必须为以上未列出的每个附加类型加入一个 import 语句,即使这些类型是在与您的接口相同的软件包中定义。
定义服务接口时,请注意:
- 方法可带零个或多个参数,返回值或空值。
- 所有非原语参数都需要指示数据走向的方向标记。可以是
in、out或inout(见以下示例)。原语默认为
in,不能是其他方向。注意:您应该将方向限定为真正需要的方向,因为编组参数的开销极大。
.aidl文件中包括的所有代码注释都包含在生成的IBinder接口中(import 和 package 语句之前的注释除外)- 只支持方法;您不能公开 AIDL 中的静态字段。
以下是一个 .aidl 文件示例:
// IRemoteService.aidl
package com.example.android;

// Declare any non-default types here with import statements

/** Example service interface */
interface IRemoteService {
    /** Request the process ID of this service, to do evil things with it. */
    int getPid();

    /** Demonstrates some basic types that you can use as parameters
     * and return values in AIDL.
     */
    void basicTypes(int anInt, long aLong, boolean aBoolean, float aFloat,
            double aDouble, String aString);
}
只需将您的 .aidl 文件保存在项目的 src/ 目录内,当您开发应用时,SDK 工具会在项目的 gen/ 目录中生成 IBinder 接口文件。生成的文件名与 .aidl文件名一致,只是使用了 .java 扩展名(例如,IRemoteService.aidl 生成的文件名是 IRemoteService.java)。
如果您使用 Android Studio,增量编译几乎会立即生成 Binder 类。 如果您不使用 Android Studio,则 Gradle 工具会在您下一次开发应用时生成 Binder 类 — 您应该在编写完 .aidl 文件后立即用 gradle assembleDebug (或 gradle assembleRelease)编译项目,以便您的代码能够链接到生成的类。
2. 实现接口
当您开发应用时,Android SDK 工具会生成一个以 .aidl 文件命名的 .java 接口文件。生成的接口包括一个名为 Stub 的子类,这个子类是其父接口(例如,YourInterface.Stub)的抽象实现,用于声明 .aidl 文件中的所有方法。
注:Stub 还定义了几个帮助程序方法,其中最引人关注的是 asInterface(),该方法带 IBinder(通常便是传递给客户端 onServiceConnected() 回调方法的参数)并返回存根接口实例。 如需了解如何进行这种转换的更多详细信息,请参见调用 IPC 方法一节。
如需实现 .aidl 生成的接口,请扩展生成的 Binder 接口(例如,YourInterface.Stub)并实现从 .aidl 文件继承的方法。
以下是一个使用匿名实例实现名为 IRemoteService 的接口(由以上 IRemoteService.aidl 示例定义)的示例:
private final IRemoteService.Stub mBinder = new IRemoteService.Stub() {
    public int getPid(){
        return Process.myPid();
    }
    public void basicTypes(int anInt, long aLong, boolean aBoolean,
        float aFloat, double aDouble, String aString) {
        // Does nothing
    }
};
现在,mBinder 是 Stub 类的一个实例(一个 Binder),用于定义服务的 RPC 接口。 在下一步中,将向客户端公开该实例,以便客户端能与服务进行交互。
在实现 AIDL 接口时应注意遵守以下这几个规则:
- 由于不能保证在主线程上执行传入调用,因此您一开始就需要做好多线程处理准备,并将您的服务正确地编译为线程安全服务。
- 默认情况下,RPC 调用是同步调用。如果您明知服务完成请求的时间不止几毫秒,就不应该从 Activity 的主线程调用服务,因为这样做可能会使应用挂起(Android 可能会显示“Application is Not Responding”对话框)— 您通常应该从客户端内的单独线程调用服务。
- 您引发的任何异常都不会回传给调用方。
3. 向客户端公开该接口
您为服务实现该接口后,就需要向客户端公开该接口,以便客户端进行绑定。 要为您的服务公开该接口,请扩展 Service 并实现 onBind(),以返回一个类实例,这个类实现了生成的 Stub(见前文所述)。以下是一个向客户端公开 IRemoteService 示例接口的服务示例。
public class RemoteService extends Service {
    @Override
    public void onCreate() {
        super.onCreate();
    }

    @Override
    public IBinder onBind(Intent intent) {
        // Return the interface
        return mBinder;
    }

    private final IRemoteService.Stub mBinder = new IRemoteService.Stub() {
        public int getPid(){
            return Process.myPid();
        }
        public void basicTypes(int anInt, long aLong, boolean aBoolean,
            float aFloat, double aDouble, String aString) {
            // Does nothing
        }
    };
}
现在,当客户端(如 Activity)调用 bindService() 以连接此服务时,客户端的 onServiceConnected() 回调会接收服务的 onBind() 方法返回的 mBinder实例。
客户端还必须具有对 interface 类的访问权限,因此如果客户端和服务在不同的应用内,则客户端的应用 src/ 目录内必须包含 .aidl 文件(它生成 android.os.Binder 接口 — 为客户端提供对 AIDL 方法的访问权限)的副本。
当客户端在 onServiceConnected() 回调中收到 IBinder 时,它必须调用 YourServiceInterface.Stub.asInterface(service) 以将返回的参数转换成YourServiceInterface 类型。例如:
IRemoteService mIRemoteService;
private ServiceConnection mConnection = new ServiceConnection() {
    // Called when the connection with the service is established
    public void onServiceConnected(ComponentName className, IBinder service) {
        // Following the example above for an AIDL interface,
        // this gets an instance of the IRemoteInterface, which we can use to call on the service
        mIRemoteService = IRemoteService.Stub.asInterface(service);
    }

    // Called when the connection with the service disconnects unexpectedly
    public void onServiceDisconnected(ComponentName className) {
        Log.e(TAG, "Service has unexpectedly disconnected");
        mIRemoteService = null;
    }
};
如需查看更多示例代码,请参见 ApiDemos 中的 RemoteService.java 类。
通过 IPC 传递对象
通过 IPC 接口把某个类从一个进程发送到另一个进程是可以实现的。 不过,您必须确保该类的代码对 IPC 通道的另一端可用,并且该类必须支持Parcelable 接口。支持 Parcelable 接口很重要,因为 Android 系统可通过它将对象分解成可编组到各进程的原语。
如需创建支持 Parcelable 协议的类,您必须执行以下操作:
- 让您的类实现
Parcelable接口。 - 实现
writeToParcel,它会获取对象的当前状态并将其写入Parcel。 - 为您的类添加一个名为
CREATOR的静态字段,这个字段是一个实现Parcelable.Creator接口的对象。 - 最后,创建一个声明可打包类的
.aidl文件(按照下文Rect.aidl文件所示步骤)。如果您使用的是自定义编译进程,切勿在您的编译中添加
.aidl文件。 此.aidl文件与 C 语言中的头文件类似,并未编译。
AIDL 在它生成的代码中使用这些方法和字段将您的对象编组和取消编组。
例如,以下这个 Rect.aidl 文件可创建一个可打包的 Rect 类:
package android.graphics;

// Declare Rect so AIDL can find it and knows that it implements
// the parcelable protocol.
parcelable Rect;
以下示例展示了 Rect 类如何实现 Parcelable 协议。
import android.os.Parcel;
import android.os.Parcelable;

public final class Rect implements Parcelable {
    public int left;
    public int top;
    public int right;
    public int bottom;

    public static final Parcelable.Creator<Rect> CREATOR = new
Parcelable.Creator<Rect>() {
        public Rect createFromParcel(Parcel in) {
            return new Rect(in);
        }

        public Rect[] newArray(int size) {
            return new Rect[size];
        }
    };

    public Rect() {
    }

    private Rect(Parcel in) {
        readFromParcel(in);
    }

    public void writeToParcel(Parcel out) {
        out.writeInt(left);
        out.writeInt(top);
        out.writeInt(right);
        out.writeInt(bottom);
    }

    public void readFromParcel(Parcel in) {
        left = in.readInt();
        top = in.readInt();
        right = in.readInt();
        bottom = in.readInt();
    }
}
Rect 类中的编组相当简单。看一看 Parcel 上的其他方法,了解您可以向 Parcel 写入哪些其他类型的值。
警告:别忘记从其他进程接收数据的安全影响。 在本例中,Rect 从 Parcel 读取四个数字,但要由您来确保无论调用方目的为何这些数字都在相应的可接受值范围内。 如需了解有关如何防止应用受到恶意软件侵害、保证应用安全的更多信息,请参见安全与权限。
调用 IPC 方法
调用类必须执行以下步骤,才能调用使用 AIDL 定义的远程接口:
- 在项目
src/目录中加入.aidl文件。 - 声明一个
IBinder接口实例(基于 AIDL 生成)。 - 实现
ServiceConnection。 - 调用
Context.bindService(),以传入您的ServiceConnection实现。 - 在您的
onServiceConnected()实现中,您将收到一个IBinder实例(名为service)。调用YourInterfaceName.Stub.asInterface((IBinder)service),以将返回的参数转换为 YourInterface 类型。 - 调用您在接口上定义的方法。您应该始终捕获
DeadObjectException异常,它们是在连接中断时引发的;这将是远程方法引发的唯一异常。 - 如需断开连接,请使用您的接口实例调用
Context.unbindService()。
有关调用 IPC 服务的几点说明:
- 对象是跨进程计数的引用。
- 您可以将匿名对象作为方法参数发送。
如需了解有关绑定到服务的详细信息,请阅读绑定服务文档。
以下这些示例代码摘自 ApiDemos 项目的远程服务示例代码,展示了如何调用 AIDL 创建的服务。
public static class Binding extends Activity {
    /** The primary interface we will be calling on the service. */
    IRemoteService mService = null;
    /** Another interface we use on the service. */
    ISecondary mSecondaryService = null;

    Button mKillButton;
    TextView mCallbackText;

    private boolean mIsBound;

    /**
     * Standard initialization of this activity.  Set up the UI, then wait
     * for the user to poke it before doing anything.
     */
    @Override
    protected void onCreate(Bundle savedInstanceState) {
        super.onCreate(savedInstanceState);

        setContentView(R.layout.remote_service_binding);

        // Watch for button clicks.
        Button button = (Button)findViewById(R.id.bind);
        button.setOnClickListener(mBindListener);
        button = (Button)findViewById(R.id.unbind);
        button.setOnClickListener(mUnbindListener);
        mKillButton = (Button)findViewById(R.id.kill);
        mKillButton.setOnClickListener(mKillListener);
        mKillButton.setEnabled(false);

        mCallbackText = (TextView)findViewById(R.id.callback);
        mCallbackText.setText("Not attached.");
    }

    /**
     * Class for interacting with the main interface of the service.
     */
    private ServiceConnection mConnection = new ServiceConnection() {
        public void onServiceConnected(ComponentName className,
                IBinder service) {
            // This is called when the connection with the service has been
            // established, giving us the service object we can use to
            // interact with the service.  We are communicating with our
            // service through an IDL interface, so get a client-side
            // representation of that from the raw service object.
            mService = IRemoteService.Stub.asInterface(service);
            mKillButton.setEnabled(true);
            mCallbackText.setText("Attached.");

            // We want to monitor the service for as long as we are
            // connected to it.
            try {
                mService.registerCallback(mCallback);
            } catch (RemoteException e) {
                // In this case the service has crashed before we could even
                // do anything with it; we can count on soon being
                // disconnected (and then reconnected if it can be restarted)
                // so there is no need to do anything here.
            }

            // As part of the sample, tell the user what happened.
            Toast.makeText(Binding.this, R.string.remote_service_connected,
                    Toast.LENGTH_SHORT).show();
        }

        public void onServiceDisconnected(ComponentName className) {
            // This is called when the connection with the service has been
            // unexpectedly disconnected -- that is, its process crashed.
            mService = null;
            mKillButton.setEnabled(false);
            mCallbackText.setText("Disconnected.");

            // As part of the sample, tell the user what happened.
            Toast.makeText(Binding.this, R.string.remote_service_disconnected,
                    Toast.LENGTH_SHORT).show();
        }
    };

    /**
     * Class for interacting with the secondary interface of the service.
     */
    private ServiceConnection mSecondaryConnection = new ServiceConnection() {
        public void onServiceConnected(ComponentName className,
                IBinder service) {
            // Connecting to a secondary interface is the same as any
            // other interface.
            mSecondaryService = ISecondary.Stub.asInterface(service);
            mKillButton.setEnabled(true);
        }

        public void onServiceDisconnected(ComponentName className) {
            mSecondaryService = null;
            mKillButton.setEnabled(false);
        }
    };

    private OnClickListener mBindListener = new OnClickListener() {
        public void onClick(View v) {
            // Establish a couple connections with the service, binding
            // by interface names.  This allows other applications to be
            // installed that replace the remote service by implementing
            // the same interface.
            Intent intent = new Intent(Binding.this, RemoteService.class);
            intent.setAction(IRemoteService.class.getName());
            bindService(intent, mConnection, Context.BIND_AUTO_CREATE);
            intent.setAction(ISecondary.class.getName());
            bindService(intent, mSecondaryConnection, Context.BIND_AUTO_CREATE);
            mIsBound = true;
            mCallbackText.setText("Binding.");
        }
    };

    private OnClickListener mUnbindListener = new OnClickListener() {
        public void onClick(View v) {
            if (mIsBound) {
                // If we have received the service, and hence registered with
                // it, then now is the time to unregister.
                if (mService != null) {
                    try {
                        mService.unregisterCallback(mCallback);
                    } catch (RemoteException e) {
                        // There is nothing special we need to do if the service
                        // has crashed.
                    }
                }

                // Detach our existing connection.
                unbindService(mConnection);
                unbindService(mSecondaryConnection);
                mKillButton.setEnabled(false);
                mIsBound = false;
                mCallbackText.setText("Unbinding.");
            }
        }
    };

    private OnClickListener mKillListener = new OnClickListener() {
        public void onClick(View v) {
            // To kill the process hosting our service, we need to know its
            // PID.  Conveniently our service has a call that will return
            // to us that information.
            if (mSecondaryService != null) {
                try {
                    int pid = mSecondaryService.getPid();
                    // Note that, though this API allows us to request to
                    // kill any process based on its PID, the kernel will
                    // still impose standard restrictions on which PIDs you
                    // are actually able to kill.  Typically this means only
                    // the process running your application and any additional
                    // processes created by that app as shown here; packages
                    // sharing a common UID will also be able to kill each
                    // other's processes.
                    Process.killProcess(pid);
                    mCallbackText.setText("Killed service process.");
                } catch (RemoteException ex) {
                    // Recover gracefully from the process hosting the
                    // server dying.
                    // Just for purposes of the sample, put up a notification.
                    Toast.makeText(Binding.this,
                            R.string.remote_call_failed,
                            Toast.LENGTH_SHORT).show();
                }
            }
        }
    };

    // ----------------------------------------------------------------------
    // Code showing how to deal with callbacks.
    // ----------------------------------------------------------------------

    /**
     * This implementation is used to receive callbacks from the remote
     * service.
     */
    private IRemoteServiceCallback mCallback = new IRemoteServiceCallback.Stub() {
        /**
         * This is called by the remote service regularly to tell us about
         * new values.  Note that IPC calls are dispatched through a thread
         * pool running in each process, so the code executing here will
         * NOT be running in our main thread like most other things -- so,
         * to update the UI, we need to use a Handler to hop over there.
         */
        public void valueChanged(int value) {
            mHandler.sendMessage(mHandler.obtainMessage(BUMP_MSG, value, 0));
        }
    };

    private static final int BUMP_MSG = 1;

    private Handler mHandler = new Handler() {
        @Override public void handleMessage(Message msg) {
            switch (msg.what) {
                case BUMP_MSG:
                    mCallbackText.setText("Received from service: " + msg.arg1);
                    break;
                default:
                    super.handleMessage(msg);
            }
        }

    };
}


 1945
1945

 被折叠的 条评论
为什么被折叠?
被折叠的 条评论
为什么被折叠?
 到【灌水乐园】发言


