


一、介绍
Nginx是lgor Sysoev为俄罗斯访问量第二的rambler.ru站点设计开发的。从2004年发布至今,凭借开源的力量,已经接近成熟与完善。
Nginx功能丰富,可作为HTTP服务器,也可作为反向代理服务器,邮件服务器。支持FastCGI、SSL、Virtual Host、URL Rewrite、Gzip等功能。并且支持很多第三方的模块扩展。
Nginx的稳定性、功能集、示例配置文件和低系统资源的消耗让他后来居上,在全球活跃的网站中有12.18%的使用比率,大约为2220万个网站。
Nginx常用功能
1、Http代理,反向代理:作为web服务器最常用的功能之一,尤其是反向代理。Nginx在做反向代理时,提供性能稳定,并且能够提供配置灵活的转发功能。Nginx可以根据不同的正则匹配,采取不同的转发策略,比如图片文件结尾的走文件服务器,动态页面走web服务器,只要你正则写的没问题,又有相对应的服务器解决方案,你就可以随心所欲的玩。并且Nginx对返回结果进行错误页跳转,异常判断等。如果被分发的服务器存在异常,他可以将请求重新转发给另外一台服务器,然后自动去除异常服务器。

2、负载均衡
Nginx提供的负载均衡策略有2种:内置策略和扩展策略。内置策略为轮询,加权轮询,Ip hash。扩展策略,就天马行空,只有你想不到的没有他做不到的啦,你可以参照所有的负载均衡算法,给他一一找出来做下实现。
上3个图,理解这三种负载均衡算法的实现

3、web缓存
Nginx可以对不同的文件做不同的缓存处理,配置灵活,并且支持FastCGI_Cache,主要用于对FastCGI的动态程序进行缓存。配合着第三方的ngx_cache_purge,对制定的URL缓存内容可以的进行增删管理。
二、安装方法:
1、首先从http://nginx.org/位置下载nginx。
2、解压tar -xzvf nginx-1.17.6.tar.gz
3、安装依赖,如:yum install pcre-devel zlib-devel
4、通过./configure --prefix=/usr/local/nginx安装,安装目录会被放在/usr/local/nginx目录
5、然后执行make,make install,如下图所示:

6、此时会在/usr/local/nginx,如下图所示:

7、然后启动nginx,如:

8、此时在浏览器中输入http://192.168.3.200/,如下图所示:

9、开启nginx反向代理功能,需要配置/usr/local/nginx/conf/nginx.conf,文件内容如下:
#user  nobody;
worker_processes  1;

#error_log  logs/error.log;
#error_log  logs/error.log  notice;
#error_log  logs/error.log  info;

#pid        logs/nginx.pid;


events {
    worker_connections  1024;
}


http {
    include       mime.types;
    default_type  application/octet-stream;

    #log_format  main  '$remote_addr - $remote_user [$time_local] "$request" '
    #                  '$status $body_bytes_sent "$http_referer" '
    #                  '"$http_user_agent" "$http_x_forwarded_for"';

    #access_log  logs/access.log  main;

    sendfile        on;
    #tcp_nopush     on;

    #keepalive_timeout  0;
    keepalive_timeout  65;

    #gzip  on;

    server {
        listen       80;
        server_name  localhost;

        #charset koi8-r;

        #access_log  logs/host.access.log  main;

        location / {
            root   html;
            index  index.html index.htm;
        }

        #error_page  404              /404.html;

        # redirect server error pages to the static page /50x.html
        #
        error_page   500 502 503 504  /50x.html;
        location = /50x.html {
            root   html;
        }

        # proxy the PHP scripts to Apache listening on 127.0.0.1:80
        #
        #location ~ \.php$ {
        #    proxy_pass   http://127.0.0.1;
        #}

        # pass the PHP scripts to FastCGI server listening on 127.0.0.1:9000
        #
        #location ~ \.php$ {
        #    root           html;
        #    fastcgi_pass   127.0.0.1:9000;
        #    fastcgi_index  index.php;
        #    fastcgi_param  SCRIPT_FILENAME  /scripts$fastcgi_script_name;
        #    include        fastcgi_params;
        #}

        # deny access to .htaccess files, if Apache's document root
        # concurs with nginx's one
        #
        #location ~ /\.ht {
        #    deny  all;
        #}
    }


    # another virtual host using mix of IP-, name-, and port-based configuration
    #
    #server {
    #    listen       8000;
    #    listen       somename:8080;
    #    server_name  somename  alias  another.alias;

    #    location / {
    #        root   html;
    #        index  index.html index.htm;
    #    }
    #}


    # HTTPS server
    #
    #server {
    #    listen       443 ssl;
    #    server_name  localhost;

    #    ssl_certificate      cert.pem;
    #    ssl_certificate_key  cert.key;

    #    ssl_session_cache    shared:SSL:1m;
    #    ssl_session_timeout  5m;

    #    ssl_ciphers  HIGH:!aNULL:!MD5;
    #    ssl_prefer_server_ciphers  on;

    #    location / {
    #        root   html;
    #        index  index.html index.htm;
    #    }
    #}

}
10、在配置文件中加入:
location ~ /rec_sys$ {
            fastcgi_pass 127.0.0.1:8099;
            include fastcgi_params;
        }
如下图所示:

11、然后重启nginx,可以通过/usr/local/nginx/sbin/nginx -s reload进行重启服务。
12、由于8099服务还没有开启,因此需要配置一个8099的服务,这里使用一个网管协议(spwan-cgi)来将可执行文件作为一个服务来提供
13、安装spwan-cgi
(1)首先执行wget https://github.com/lighttpd/spawn-fcgi/archive/spawn-fcgi-1.6.4.tar.gz,如下图所示:

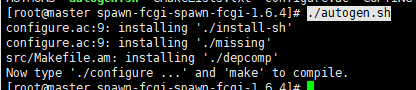
(2)解压,然后执行:./autogen.sh,如下图所示:
(3)然后执行./configure,make,make install
(4)安装好之后可以通过spawn-fcgi -v进行测试,如下图所示:
![]()
14、然后编写c++代码,代码如下:
#include <iostream>
#include <string>
#include <stdio.h>
#include <stdlib.h>
#include <fcgi_stdio.h>
#include <fcgiapp.h>
using namespace std;

inline void send_response(FCGX_Request& request,const string& resp_str){
        FCGX_FPrintF(request.out,"Content-type: text/html;charset=utf-8\r\n\r\n");
        FCGX_FPrintF(request.out,"%s",resp_str.c_str());
        FCGX_Finish_r(&request);
}
int main(int argc,char **argv){
        FCGX_Init();
        FCGX_Request request;
        FCGX_InitRequest(&request,0,0);
        while(FCGX_Accept_r(&request)>=0){
                string query_str = FCGX_GetParam("QUERY_STRING",request.envp);
                cout<<"query str: "<<query_str<<endl;
                send_response(request,query_str);
        }
        return 0;
}
此时会出现server.cpp:5:24: 致命错误:fcgi_stdio.h:没有那个文件或目录错误,如下图所示:

15、然后需要安装fcgi-2.4.1-SNAP-0910052249.tar.gz,下载地址为:链接:https://pan.baidu.com/s/1n_R4Y_3rvswrQ7UzzviP1A
提取码:2lii
16、解压,然后进入解压目录执行:./configure,make,make install,在make时提示如下错误:
fcgio.cpp: In destructor 'virtual fcgi_streambuf::~fcgi_streambuf()':
fcgio.cpp:50:14: error: 'EOF' was not declared in this scope
     overflow(EOF);
              ^
fcgio.cpp: In member function 'virtual int fcgi_streambuf::overflow(int)':
fcgio.cpp:70:72: error: 'EOF' was not declared in this scope
             if (FCGX_PutStr(pbase(), plen, this->fcgx) != plen) return EOF;
                                                                        ^
fcgio.cpp:75:14: error: 'EOF' was not declared in this scope
     if (c != EOF)
              ^
fcgio.cpp: In member function 'virtual int fcgi_streambuf::sync()':
fcgio.cpp:86:18: error: 'EOF' was not declared in this scope
     if (overflow(EOF)) return EOF;
                  ^
fcgio.cpp:87:41: error: 'EOF' was not declared in this scope
     if (FCGX_FFlush(this->fcgx)) return EOF;
                                         ^
fcgio.cpp: In member function 'virtual int fcgi_streambuf::underflow()':
fcgio.cpp:113:35: error: 'EOF' was not declared in this scope
             if (glen <= 0) return EOF;
                                   ^
make[2]: *** [fcgio.lo] 错误 1
make[2]: 离开目录“/usr/local/src/fcgi-2.4.1-SNAP-0910052249/libfcgi”
make[1]: *** [all-recursive] 错误 1
make[1]: 离开目录“/usr/local/src/fcgi-2.4.1-SNAP-0910052249”
make: *** [all] 错误 2
如下图所示:

然后修改当前目录下的include/fcgio.h文件,在文件中加入:#include <cstdio>,如下图所示:

再次make即可
17、然后再次执行g++ -lfcgi server.cpp -o server即可成功,如下图所示:

16、然后通过spawn-fcgi -a 127.0.0.1 -p 8099 -f /sunxj/student11/spawan_cgi_demo/server命令将server绑定到nginx上(注意文件必须是绝对路径),意思是将server可执行文件挂在到nginx的8099端口上,执行结果如下:
![]()
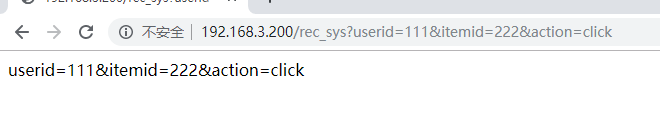
18、在浏览器中通过http://192.168.3.200/rec_sys?userid=111&itemid=222&action=click请求,如下图所示:
19、配置负载均衡方法:首先有三台机器,master,slave1,slave2(都必须安装nginx,spawan-cgi,fcgi-2.4.1-SNAP-0910052249.tar.gz),那么master作为分发器,slave1,slave2作为服务器,首先配置nginx.conf的http下加入:
    upstream recserver{
        server slave1:80;
        server slave2:80;
    }
将原来的
        location ~ /rec_sys$ {
            fastcgi_pass 127.0.0.1:8099;
            include fastcgi_params;
        }
修改为:
location ~ /rec_sys$ {
                proxy_pass http://recserver;
        }
如下图所示:

配置文件如下:
#user  nobody;
worker_processes  1;

#error_log  logs/error.log;
#error_log  logs/error.log  notice;
#error_log  logs/error.log  info;

#pid        logs/nginx.pid;


events {
    worker_connections  1024;
}


http {
    upstream recserver{
	server slave1:80;
	server slave2:80;
    }
    include       mime.types;
    default_type  application/octet-stream;

    #log_format  main  '$remote_addr - $remote_user [$time_local] "$request" '
    #                  '$status $body_bytes_sent "$http_referer" '
    #                  '"$http_user_agent" "$http_x_forwarded_for"';

    #access_log  logs/access.log  main;

    sendfile        on;
    #tcp_nopush     on;

    #keepalive_timeout  0;
    keepalive_timeout  65;

    #gzip  on;

    server {
        listen       80;
        server_name  localhost;

        #charset koi8-r;

        #access_log  logs/host.access.log  main;

        location / {
            root   html;
            index  index.html index.htm;
            proxy_pass http://recserver;
        }
	location ~ /rec_sys$ {
		proxy_pass http://recserver;
	}
        #error_page  404              /404.html;

        # redirect server error pages to the static page /50x.html
        #
        error_page   500 502 503 504  /50x.html;
        location = /50x.html {
            root   html;
        }

        # proxy the PHP scripts to Apache listening on 127.0.0.1:80
        #
        #location ~ \.php$ {
        #    proxy_pass   http://127.0.0.1;
        #}

        # pass the PHP scripts to FastCGI server listening on 127.0.0.1:9000
        #
        #location ~ \.php$ {
        #    root           html;
        #    fastcgi_pass   127.0.0.1:9000;
        #    fastcgi_index  index.php;
        #    fastcgi_param  SCRIPT_FILENAME  /scripts$fastcgi_script_name;
        #    include        fastcgi_params;
        #}

        # deny access to .htaccess files, if Apache's document root
        # concurs with nginx's one
        #
        #location ~ /\.ht {
        #    deny  all;
        #}
    }


    # another virtual host using mix of IP-, name-, and port-based configuration
    #
    #server {
    #    listen       8000;
    #    listen       somename:8080;
    #    server_name  somename  alias  another.alias;

    #    location / {
    #        root   html;
    #        index  index.html index.htm;
    #    }
    #}


    # HTTPS server
    #
    #server {
    #    listen       443 ssl;
    #    server_name  localhost;

    #    ssl_certificate      cert.pem;
    #    ssl_certificate_key  cert.key;

    #    ssl_session_cache    shared:SSL:1m;
    #    ssl_session_timeout  5m;

    #    ssl_ciphers  HIGH:!aNULL:!MD5;
    #    ssl_prefer_server_ciphers  on;

    #    location / {
    #        root   html;
    #        index  index.html index.htm;
    #    }
    #}

}
20、在slave1和slave2中的nginx配置文件中server中加入:
        location ~ /rec_sys$ {
            fastcgi_pass 127.0.0.1:8099;
            include fastcgi_params;
        }
配置文件如下:
#user  nobody;
worker_processes  1;

#error_log  logs/error.log;
#error_log  logs/error.log  notice;
#error_log  logs/error.log  info;

#pid        logs/nginx.pid;


events {
    worker_connections  1024;
}


http {
    include       mime.types;
    default_type  application/octet-stream;

    #log_format  main  '$remote_addr - $remote_user [$time_local] "$request" '
    #                  '$status $body_bytes_sent "$http_referer" '
    #                  '"$http_user_agent" "$http_x_forwarded_for"';

    #access_log  logs/access.log  main;

    sendfile        on;
    #tcp_nopush     on;

    #keepalive_timeout  0;
    keepalive_timeout  65;

    #gzip  on;

    server {
        listen       80;
        server_name  localhost;

        #charset koi8-r;

        #access_log  logs/host.access.log  main;

        location / {
            root   html;
            index  index.html index.htm;
        }

        location ~ /rec_sys$ {
            fastcgi_pass 127.0.0.1:8099;
            include fastcgi_params;
        }
        #error_page  404              /404.html;

        # redirect server error pages to the static page /50x.html
        #
        error_page   500 502 503 504  /50x.html;
        location = /50x.html {
            root   html;
        }

        # proxy the PHP scripts to Apache listening on 127.0.0.1:80
        #
        #location ~ \.php$ {
        #    proxy_pass   http://127.0.0.1;
        #}

        # pass the PHP scripts to FastCGI server listening on 127.0.0.1:9000
        #
        #location ~ \.php$ {
        #    root           html;
        #    fastcgi_pass   127.0.0.1:9000;
        #    fastcgi_index  index.php;
        #    fastcgi_param  SCRIPT_FILENAME  /scripts$fastcgi_script_name;
        #    include        fastcgi_params;
        #}

        # deny access to .htaccess files, if Apache's document root
        # concurs with nginx's one
        #
        #location ~ /\.ht {
        #    deny  all;
        #}
    }


    # another virtual host using mix of IP-, name-, and port-based configuration
    #
    #server {
    #    listen       8000;
    #    listen       somename:8080;
    #    server_name  somename  alias  another.alias;

    #    location / {
    #        root   html;
    #        index  index.html index.htm;
    #    }
    #}


    # HTTPS server
    #
    #server {
    #    listen       443 ssl;
    #    server_name  localhost;

    #    ssl_certificate      cert.pem;
    #    ssl_certificate_key  cert.key;

    #    ssl_session_cache    shared:SSL:1m;
    #    ssl_session_timeout  5m;

    #    ssl_ciphers  HIGH:!aNULL:!MD5;
    #    ssl_prefer_server_ciphers  on;

    #    location / {
    #        root   html;
    #        index  index.html index.htm;
    #    }
    #}

}
21、重启三台机器上的nginx:/usr/local/nginx/sbin/nginx -s reload
此时三台机器都可以访问80,如下图所示:

22、编写代码使用glog打印日志的方式,那么首先安装glog模块,安装方法为:
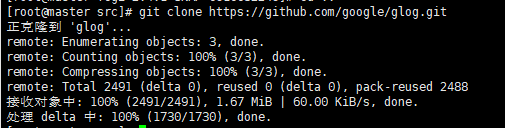
(1)安装google-glog,首先下载google-glog,如:git clone https://github.com/google/glog.git,如下图所示:
(2)进入到glog文件夹中,然后执行:./autogen.sh , ./configure , make , make install即可安装
(3)编写代码文件server_glog.cpp,代码如下:
#include <iostream>
#include <string>
#include <stdio.h>
#include <stdlib.h>
#include <fcgi_stdio.h>
#include <fcgiapp.h>
#include <glog/logging.h>
using namespace std;

inline void send_response(FCGX_Request& request,const string& resp_str){
        FCGX_FPrintF(request.out,"Content-type: text/html;charset=utf-8\r\n\r\n");
        FCGX_FPrintF(request.out,"%s",resp_str.c_str());
        FCGX_Finish_r(&request);
}
int main(int argc,char **argv){
        FCGX_Init();
        FCGX_Request request;
        FCGX_InitRequest(&request,0,0);

        FLAGS_log_dir = "/sunxj/student11/spawan_cgi_demo/logs";
        FLAGS_max_log_size = 100;
        FLAGS_logbufsecs=0;
        google::InitGoogleLogging(argv[0]);
        while(FCGX_Accept_r(&request)>=0){
                string query_str = FCGX_GetParam("QUERY_STRING",request.envp);
                cout<<"query str: "<<query_str<<endl;

                LOG(INFO)<<query_str;
                LOG(WARNING)<<query_str;
                LOG(ERROR)<<query_str;
                send_response(request,query_str);
        }
        return 0;
}
(4)然后使用g++ -lglog -lfcgi server_glog.cpp -o server_glog编译,如下图所示:
![]()
(5)将server_glog托管到nginx上,使用命令:
spawn-fcgi -a 127.0.0.1 -p 8099 -f /sunxj/student11/spawan_cgi_demo/server_glog如下图所示:

23、然后将server文件分发到slave1和slave2机器上,然后分别执行spawn-fcgi -a 127.0.0.1 -p 8099 -f /sunxj/student11/spawan_cgi_demo/server_glog,会出现如下错误:
spawn-fcgi: child exited with: 127
如下图所示:
![]()
24、此问题是由于在挂载时用到的库是去/usr/lib或/usr/lib64目录找打,而在安装时安装到了/usr/local/lib,/usr/local/lib64目录下,因此需要创建软连接,如:
ln -s /usr/local/lib/libfcgi.so.0 /usr/lib/libfcgi.so.0
ln -s /usr/local/lib/libfcgi.so.0 /usr/lib64/libfcgi.so.0
ln -s /usr/local/lib/libglog.so.0 /usr/lib/libglog.so.0
ln -s /usr/local/lib/libglog.so.0 /usr/lib64/libglog.so.0
如下图所示:

25、在挂载之前需要先创建/sunxj/student11/spawan_cgi_demo/logs目录,然后再次spawn-fcgi -a 127.0.0.1 -p 8099 -f /sunxj/student11/spawan_cgi_demo/server_glog即可成功,如下图所示:


26、然后在浏览器中输入:http://master/rec_sys?userid=111&itemid=222&action=click,此时会在slave2上将日志打印出来,由于只请求了一次,它被分发到了slave2上了,如下图所示:

27、然后通过tail -f logs/server_glog.ERROR实时监听,如下图所示:

28、再次刷新网页就会分发到slave1上,如下图所示:

29、同样使用tail -f logs/server_glog.ERROR实时监听,如下图所示:

30、然后多请求几次如下图所示:

31、一共请求了9次,分别分发到slave1上4次,slave2上5次,而且是有一个规律就是不是随机分配的,而是顺序分配的,就是分发依次后就会向下一台服务器分发。
32、到此配置完成。


 702
702


 被折叠的 条评论
为什么被折叠?
被折叠的 条评论
为什么被折叠?
 到【灌水乐园】发言


