


阅读过许多的开源项目,发现实际开发过程中还是使用于xml文件形式居多,同时也建议使用xml文件形式,至于本节的内容是为了保证知识点的完整性,读者了解注解形式即可,当然面对业务逻辑简单的应用程序,也可以选择使用注解形式整合Mybatis
创建数据表
CREATE TABLE `customer` (
  `id` int(10) NOT NULL AUTO_INCREMENT,
  `username` varchar(255) NOT NULL,
  `job` varchar(255) NOT NULL,
  `phone` varchar(255) NOT NULL,
  PRIMARY KEY (`id`)
) ENGINE=InnoDB AUTO_INCREMENT=1 DEFAULT CHARSET=utf8 COLLATE=utf8_unicode_ci;
-- ----------------------------
-- Records of customer
-- ----------------------------
INSERT INTO `customer` VALUES ('1', '小明', '医生','13567344567');
INSERT INTO `customer` VALUES ('2', '小红', '教师','18756576778');
添加项目依赖
我们选择使用MyBatis操作数据库,所以需要添加一些依赖,在项目pom.xml文件<dependencies></dependencies>标签内添加如下代码
        <!--mybatis-spring适配器-->
        <dependency>
            <groupId>org.mybatis.spring.boot</groupId>
            <artifactId>mybatis-spring-boot-starter</artifactId>
            <version>2.0.1</version>
        </dependency>
        <!--mysql驱动包-->
        <dependency>
            <groupId>mysql</groupId>
            <artifactId>mysql-connector-java</artifactId>
        </dependency>
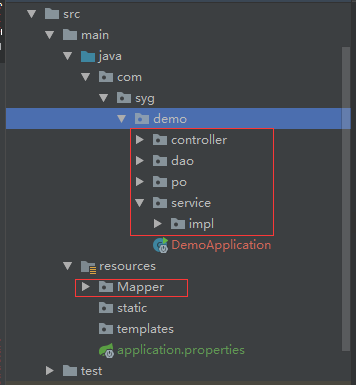
创建项目目录结构
在项目启动类同级包下新建所需包,并在resources中创建Mapper文件夹
创建实现方法
Customer.java
在com.syg.demo.po下创建数据表Customer对应的实体
package com.syg.demo.po;
public class Customer {
private Integer id;
private String username;
private String job;
private String phone;
public Integer getId() {
return id;
}
public void setId(Integer id) {
this.id = id;
}
public String getUsername() {
return username;
}
public void setUsername(String username) {
this.username = username;
}
public String getJob() {
return job;
}
public void setJob(String job) {
this.job = job;
}
public String getPhone() {
return phone;
}
public void setPhone(String phone) {
this.phone = phone;
}
}
CustomerDao.java
在com.syg.demo.dao下创建mapper接口,通过@Mapper注解使SpringBoot自动创建customerDao对象加入到容器中,使用@Select注解创建查询语句
package com.syg.demo.dao;
import com.syg.demo.po.Customer;
import org.apache.ibatis.annotations.Mapper;
import org.apache.ibatis.annotations.Select;
@Mapper
public interface CustomerDao {
@Select("SELECT * FROM customer WHERE id = #{id}")
public Customer findCustomerById(Integer id);
}
CutomerService
在com.syg.demo.service下创建Service层接口方法
package com.syg.demo.service;
import com.syg.demo.po.Customer;
public interface CustomerService {
public Customer findCustomerById(Integer id);
}
CustomerServiceImpl
在com.syg.demo.service.impl下创建CustomerServiceImpl具体实现Service接口方法,使用@Service表示为Service层,同时使SpringBoot自动创建customerService对象加入到容器中,在方法中使用@Autowired注解调用容器中的customerDao对象,并调用其查询方法
package com.syg.demo.service.impl;
import com.syg.demo.dao.CustomerDao;
import com.syg.demo.po.Customer;
import com.syg.demo.service.CustomerService;
import org.springframework.beans.factory.annotation.Autowired;
import org.springframework.stereotype.Service;
@Service
public class CustomerServiceImpl implements CustomerService {
@Autowired
private CustomerDao customerDao;
//查询客户
public Customer findCustomerById(Integer id){
return this.customerDao.findCustomerById(id);
}
}
CustomerController
在com.syg.demo.controller下创建CustomerController,使用@RestController注解表示为Controller层,在方法中使用@Autowired注解调用容器中的customerService对象,并调用其实现的查询方法,通过@GetMapping定义GET方式访问的路由地址,方法定义的参数id由url传递
package com.syg.demo.controller;
import com.syg.demo.po.Customer;
import com.syg.demo.service.CustomerService;
import org.springframework.beans.factory.annotation.Autowired;
import org.springframework.web.bind.annotation.GetMapping;
import org.springframework.web.bind.annotation.RestController;
@RestController
public class CustomerController {
@Autowired
private CustomerService customerService;
@GetMapping("/findCustomerById")
public Customer findCustomerById(Integer id){
return customerService.findCustomerById(id);
}
}
编写相关配置
打开resources目录下application.properties文件,编写如下配置:
#修改服务器端口 server.port=8081 #指定数据库驱动 spring.datasource.driver-class-name=com.mysql.jdbc.Driver #数据库jdbc连接url地址 spring.datasource.url=jdbc:mysql://127.0.0.1:3306/test?useUnicode=true&characterEncoding=utf-8&useSSL=true&serverTimezone=UTC #数据库账号 spring.datasource.username=root spring.datasource.password=123456
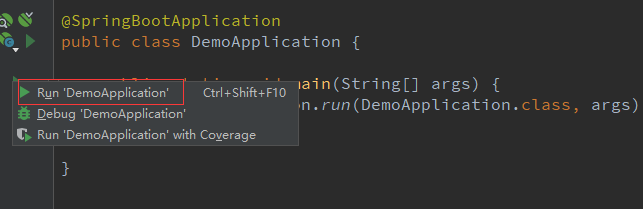
访问测试
重新运行项目
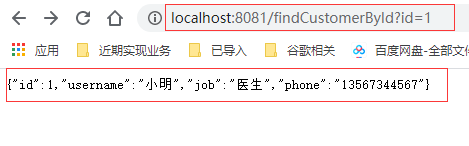
打开路由器,输入url地址:http://localhost:8081/findCustomerById?id=1
可以成功访问到Id为1的数据
阅读更多技术文章,及时获取内容更新,请扫码关注微信公众号-大数据School!
 欢迎评论区留下你的精彩评论~ 觉得文章不错可以分享到朋友圈让更多的小伙伴看到哦~
客官!在看一下呗


 5万+
5万+


 被折叠的 条评论
为什么被折叠?
被折叠的 条评论
为什么被折叠?
 到【灌水乐园】发言


