jsp页面实现验证码功能

先在jsp页面中添加相应的控件


上述提到的ValiImageServlet代码在下面,span标签是前台验证不可为空,此处没有作用,可以不写

此次实现的是后台对验证码的判断:

在后台的servlet 中:

//1处理乱码问题(与验证码没有关系。。。)
        //请求乱码--post
        request.setCharacterEncoding("utf-8");
        //应答乱码
        response.setContentType("text/html;charset=utf-8");

2接收表单参数

String valistr=request.getParameter("valistr");--

//3 表单验证  非空验证------在对应的servlet中

此处的  WebUtils.isEmpty(*)是一个类

代码:

public static boolean isEmpty(String str){
        if(str==null||"".equals(str.trim())){
            return true;
        }
        return false;
    }

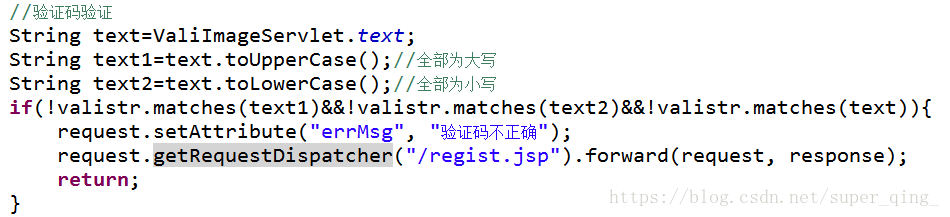
判断验证码是否正确:---可以全部大写或者全部小写
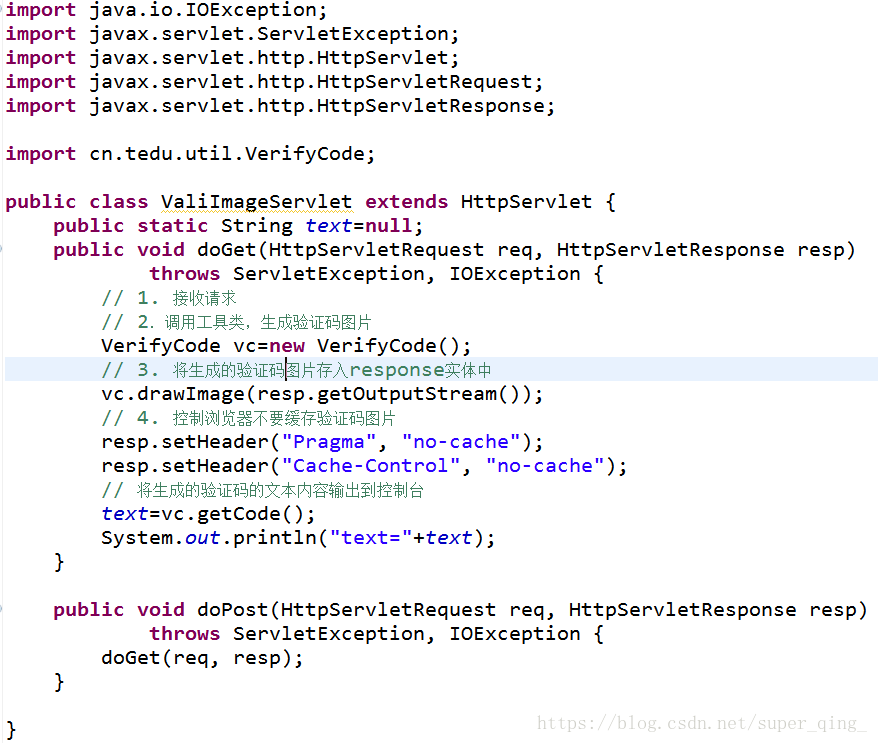
最后是生成验证码图片的代码

结果


正确没有提示----


  • 5
    点赞
  • 45
    收藏
    觉得还不错? 一键收藏
  • 2
    评论
以下是使用 JSP 页面实现验证码登录的示例代码: 1.创建一个Controller类: ```java @Controller public class LoginController { private static final String SESSION_KEY_CHECKCODE = "checkCode"; @GetMapping("/login") public String login() { return "login"; } @PostMapping("/login") public String login(String username, String password, String checkCode, HttpSession session, Model model) { // 验证码校验 String checkCodeSession = (String) session.getAttribute(SESSION_KEY_CHECKCODE); if (!checkCode.equalsIgnoreCase(checkCodeSession)) { model.addAttribute("errorMsg", "验证码错误"); return "login"; } // 用户名和密码校验 if ("admin".equals(username) && "123456".equals(password)) { // 登录成功 return "redirect:/success"; } else { // 登录失败 model.addAttribute("errorMsg", "用户名或密码错误"); return "login"; } } @GetMapping("/checkCode") public void checkCode(HttpServletRequest request, HttpServletResponse response, HttpSession session) throws IOException { // 定义图片宽、高 int width = 100; int height = 50; // 创建 BufferedImage 对象,设置图片大小和类型 BufferedImage img = new BufferedImage(width, height, BufferedImage.TYPE_INT_RGB); // 获取 Graphics2D 对象,用于绘制图形 Graphics2D graphics2D = img.createGraphics(); // 设置背景色 graphics2D.setColor(Color.WHITE); graphics2D.fillRect(0, 0, width, height); // 设置字体 graphics2D.setFont(new Font("宋体", Font.BOLD, 20)); // 随机生成 4 位验证码 StringBuilder sb = new StringBuilder(); Random random = new Random(); for (int i = 0; i < 4; i++) { int num = random.nextInt(10); sb.append(num); graphics2D.setColor(new Color(random.nextInt(255), random.nextInt(255), random.nextInt(255))); graphics2D.drawString(String.valueOf(num), i * 20, 30); } // 将验证码存入 session 中 session.setAttribute(SESSION_KEY_CHECKCODE, sb.toString()); // 释放 Graphics2D 对象 graphics2D.dispose(); // 将验证码图片输出到浏览器 ImageIO.write(img, "JPEG", response.getOutputStream()); } @GetMapping("/success") public String success() { return "success"; } } ``` 2.创建一个login.jsp页面: ```html <!DOCTYPE html> <html> <head> <meta charset="UTF-8"> <title>验证码登录</title> </head> <body> <h2>验证码登录</h2> <form method="post" action="/login"> <label for="username">用户名:</label> <input type="text" id="username" name="username"/><br/> <label for="password">密码:</label> <input type="password" id="password" name="password"/><br/> <label for="checkCode">验证码:</label> <input type="text" id="checkCode" name="checkCode"/> <img src="/checkCode"/><br/> <input type="submit" value="登录"/> </form> <div style="color: red">${errorMsg}</div> </body> </html> ``` 3.创建一个success.jsp页面: ```html <!DOCTYPE html> <html> <head> <meta charset="UTF-8"> <title>登录成功</title> </head> <body> <h2>登录成功</h2> </body> </html> ``` 4.运行代码,在浏览器中访问 "http://localhost:8080/login" 即可看到验证码登录页面。 注意:此示例仅包含基本的验证码登录功能,实际应用中需要添加身份验证、安全性等方面的特性。

“相关推荐”对你有帮助么?

  • 非常没帮助
  • 没帮助
  • 一般
  • 有帮助
  • 非常有帮助
提交
评论 2
添加红包

请填写红包祝福语或标题

红包个数最小为10个

红包金额最低5元

当前余额3.43前往充值 >
需支付:10.00
成就一亿技术人!
领取后你会自动成为博主和红包主的粉丝 规则
hope_wisdom
发出的红包
实付
使用余额支付
点击重新获取
扫码支付
钱包余额 0

抵扣说明:

1.余额是钱包充值的虚拟货币,按照1:1的比例进行支付金额的抵扣。
2.余额无法直接购买下载,可以购买VIP、付费专栏及课程。

余额充值