


本系列文章是Suricata官方文档的翻译加上自己对其的理解,部分图片也是来自那篇文章,当然由于初学,很多方面的理解不够透彻,随着深入后面会对本文进行一定的修正和完善。
Suricata使用Yaml作为其配置文件的格式,关于Yaml可以参考YAML-维基百科。其中Suricata默认的配置文件是suricata.yaml,以硬编码的形式写在源代码中,当然也可以在执行的时候添加-c+指定位置的yaml文件来自定义配置文件。配置文件的第一行内容是%YAML 1.1表示其使用了Yaml 1.1的语法。由于配置项较多,因此将分为多篇文章来进行说明,本文是第一篇。
max-pending-packets
该选项设置了suricata能够同时处理的数据包的数量,最少为1,最大值取决于内存的大小,更大的内存可以设置更大的值并拥有更好的性能,默认值是1024。但是官方文档中并没有指出其数量与内存之间的具体关系。设置格式为:
<code class="hljs lasso has-numbering"><span class="hljs-keyword">max</span><span class="hljs-attribute">-pending</span><span class="hljs-attribute">-packets</span>: <span class="hljs-number">1024</span></code><ul class="pre-numbering" style="display: block;"><li>1</li></ul>
runmodes
该选项设置了suricata的运行方式,使用命令./suricata --list-runmodes可以查看所有的运行方式,部分截图如下:
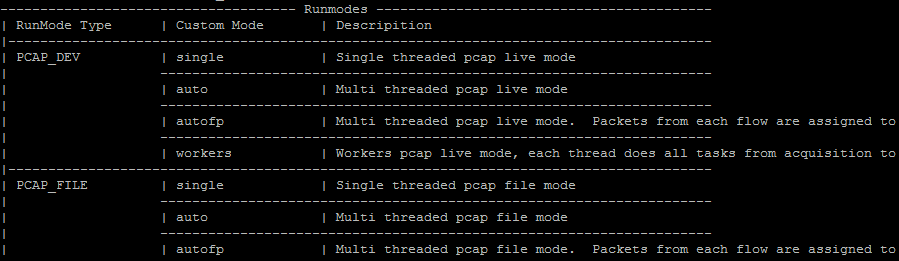
在介绍运行方式(Runmodes)之前首先了解一下suricata的基本组成。Suricata是由所谓的线程(threads)、线程模块(thread-modules)和队列(queues)组成。Suricata是一个多线程的程序,因此在同一时刻会有多个线程在工作。线程模块是依据功能来划分的,比如一个模块用于解析数据包,另一个模块用于检测数据包等。每个数据包可能会有多个不同的线程进行处理,队列就是用于将数据包从一个线程传递到另一个线程。与此同时,一个线程可以拥有多个线程模块,但是在某一时刻只有一个模块在运行(原文是If they have more modules, they can only be active on a a time.看不大懂,感觉是这个意思)。
Suricata的运行方式就是上面介绍的线程(threads)、线程模块(thread-modules)和队列(queues)三种元素的不同组合方式。上图中的RunMode Type并不是配置文件中的runmodes选项,而是后面的Custom Mode也就是自定义模式才可以在此处设置。比如默认的Runmodes是autofp,在线实时检测流量的模式中其结构如下,单线程模块获取数据包和解码,多线程模块检测,单模块输出:
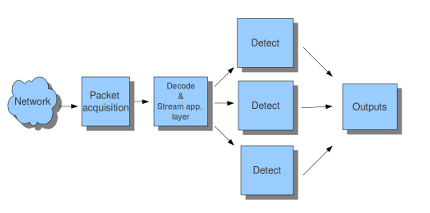
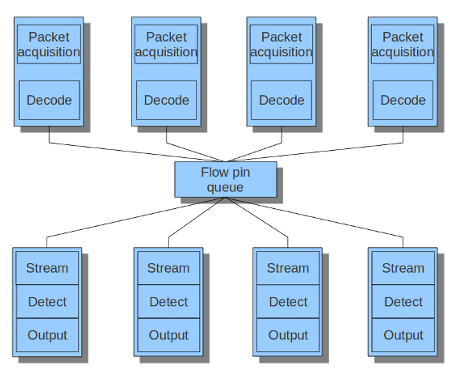
而在pfring模式下的autofp则有所不同,可以看到它有多个模块获取及解码数据包,通过流绑定队列分配到多个检测模块中进行检测,这应该是pfring模式获取数据包效率更高的原因:
default-packet-size
之前的max-pending-packets选项设置了最多同时处理的数据包数量,这些同时处理的数据包都是需要存储在内存中的,所以需要对每个数据包的大小进行限制,而当前选项就是做这个事的。虽然有时候可能需要检测较大的数据包,但是大部分情况下为了性能还是需要做出一定的限制。其配置方式如下,默认值是1514,这也是TCP数据包的最大长度(当数据超过这个长度便会使用TCP报文重组技术):
<code class="hljs http has-numbering"><span class="hljs-attribute">default-packet-size</span>: <span class="hljs-string">1514</span></code><ul class="pre-numbering" style="display: block;"><li>1</li></ul>
user and group
用于设置启动suricata的用户及其分组。
action-order
action指的是每条规则匹配时需要执行的操作,比如下面这条规则执行alert警告操作:

而当前字段设置的是多条规则同时匹配的时候的执行顺序。action共有四种:pass、drop、reject、alert。
<code class="hljs rust has-numbering">pass指的是处理的数据包匹配当前规则时直接跳过后面的所有规则,也就是说不匹配后面的规则
<span class="hljs-keyword">drop</span>只能工作在IPS模式下,当数据包匹配到<span class="hljs-keyword">drop</span>的规则时则会被丢弃并且产生一个警告
reject会给数据包的发送和接收端都发生一个拒绝的数据包,如果原本的协议是TCP,则发生reset数据包,否则发送ICMP错误的数据包,同时产生一个警告。在IPS模式下也会丢弃匹配到的数据包
alert则对发送和接收者都没有影响,只会生成一个警告</code><ul class="pre-numbering" style="display: block;"><li>1</li><li>2</li><li>3</li><li>4</li></ul>
Suricata按照规则的出现顺序依次加载,但是处理的顺序则根据配置文件中设置的action重要程度来排列。默认的顺序如下,表示当一个数据包匹配多条规则时,优先处理的是pass的规则,其次是drop,然后是reject,最后是alert:
<code class="hljs haml has-numbering">action-order:
 -<span class="ruby"> pass
</span> -<span class="ruby"> drop
</span> -<span class="ruby"> reject
</span> -<span class="ruby"> alert</span></code><ul class="pre-numbering" style="display: block;"><li>1</li><li>2</li><li>3</li><li>4</li><li>5</li></ul>
Splitting configuration in multiple files
标题并不是关键字,而是指一个配置文件可以按照功能分割成多个文件,这样后面修改某一方面的配置就可以到指定的配置文件中修改,同样可以增加可读性。配置文件通过include进行包含,比如outputs.yaml:
<code class="hljs r has-numbering"><span class="hljs-comment"># outputs.yaml</span>
- fast
    enabled: yes
    filename: fast.log
    append: yes

- unified2-alert:
    enabled: yes
<span class="hljs-keyword">...</span></code><ul class="pre-numbering" style="display: block;"><li>1</li><li>2</li><li>3</li><li>4</li><li>5</li><li>6</li><li>7</li><li>8</li><li>9</li></ul>
主配置文件如下:
<code class="hljs r has-numbering"><span class="hljs-comment"># suricata.yaml</span>
<span class="hljs-keyword">...</span>
outputs: !include outputs.yaml
<span class="hljs-keyword">...</span></code><ul class="pre-numbering" style="display: block;"><li>1</li><li>2</li><li>3</li><li>4</li></ul>
default-log-dir
Suricata默认的日志存储目录是/var/log/suricata,在配置文件中可以通过当前选项指定,比如程序目录下的log文件夹,也可以在运行时的-l参数指定:
<code class="hljs rust has-numbering">default-<span class="hljs-keyword">log</span>-<span class="hljs-keyword">dir</span>:./<span class="hljs-keyword">log</span></code><ul class="pre-numbering" style="display: block;"><li>1</li></ul>
outputs
outputs选项下有很多可以输出的配置选项,包括警告、检测的数据包、产生的结果等。在配置的过程中并不需要开启每一种输出,根据自己的需求进行配置。
警告输出(fast.log)
这个日志输出由单行的警告信息组成,比如下面这个输出例子由四个警告组成:

其配置如下:
<code class="hljs coffeescript has-numbering"><span class="hljs-comment"># a line based alerts log similar to Snort's fast.log</span>
- <span class="hljs-attribute">fast</span>:
    <span class="hljs-attribute">enabled</span>: <span class="hljs-literal">yes</span>
    <span class="hljs-attribute">filename</span>: fast.log
    <span class="hljs-attribute">append</span>: <span class="hljs-literal">yes</span></code><ul class="pre-numbering" style="display: block;"><li>1</li><li>2</li><li>3</li><li>4</li><li>5</li></ul>
事件输出(eve.log)
Suricata可以在匹配一条规则后记录一条信息,该条信息包括数据包的时间戳、五元组信息、对应的签名信息等,默认存储在日志目录下的eve.log文件中。下面是几条典型的eve日志,这些日志是json格式的,因此很多其他的程序可以对其进行处理产生进一步的输出:

可以对其进行如下配置,输出的类型可以多种多样,包括文件、系统日志、输出到socket等,输出的内容可以包括匹配到有alert、http、dns等规则的数据包信息。简单的说比如一条规则的action是alert,检测到有一个数据包匹配这条规则,那数据包和规则的信息则会储存到事件日志中:
<code class="hljs coffeescript has-numbering">  <span class="hljs-comment"># Extensible Event Format (nicknamed EVE) event log in JSON format</span>
  - eve-<span class="hljs-attribute">log</span>:
      <span class="hljs-attribute">enabled</span>: <span class="hljs-literal">yes</span>
      <span class="hljs-attribute">type</span>: file <span class="hljs-comment">#file|syslog|unix_dgram|unix_stream</span>
      <span class="hljs-attribute">filename</span>: eve.json
      <span class="hljs-comment"># the following are valid when type: syslog above</span>
      <span class="hljs-comment">#identity: "suricata" </span>
      <span class="hljs-comment">#facility: local5</span>
      <span class="hljs-comment">#level: Info ## possible levels: Emergency, Alert, Critical,</span>
                   <span class="hljs-comment">## Error, Warning, Notice, Info, Debug</span>
      <span class="hljs-attribute">types</span>:
        - alert
        - <span class="hljs-attribute">http</span>:
            <span class="hljs-attribute">extended</span>: <span class="hljs-literal">yes</span>     <span class="hljs-comment"># enable this for extended logging information</span>
        - dns
        - <span class="hljs-attribute">tls</span>:
            <span class="hljs-attribute">extended</span>: <span class="hljs-literal">yes</span>     <span class="hljs-comment"># enable this for extended logging information</span>
        - <span class="hljs-attribute">files</span>:
            force-<span class="hljs-attribute">magic</span>: <span class="hljs-literal">no</span>   <span class="hljs-comment"># force logging magic on all logged files</span>
            force-<span class="hljs-attribute">md5</span>: <span class="hljs-literal">no</span>     <span class="hljs-comment"># force logging of md5 checksums</span>
        <span class="hljs-comment">#- drop</span>
        - ssh</code><ul class="pre-numbering" style="display: block;"><li>1</li><li>2</li><li>3</li><li>4</li><li>5</li><li>6</li><li>7</li><li>8</li><li>9</li><li>10</li><li>11</li><li>12</li><li>13</li><li>14</li><li>15</li><li>16</li><li>17</li><li>18</li><li>19</li><li>20</li><li>21</li><li>22</li></ul>
当然也可以把不同类别的信息输出到不同的日志文件中,如下配置表明alert和drop输出到eve-ips.json,http等协议输出到eve-nsm.json:
<code class="hljs haml has-numbering">outputs:
  -<span class="ruby"> eve-<span class="hljs-symbol">log:</span>
</span>      enabled: yes
      type: file
      filename: eve-ips.json
      types:
        -<span class="ruby"> alert
</span>        -<span class="ruby"> drop
</span>
  -<span class="ruby"> eve-<span class="hljs-symbol">log:</span>
</span>      enabled: yes
      type: file
      filename: eve-nsm.json
      types:
        -<span class="ruby"> http
</span>        -<span class="ruby"> dns
</span>        -<span class="ruby"> tls</span></code><ul class="pre-numbering" style="display: block;"><li>1</li><li>2</li><li>3</li><li>4</li><li>5</li><li>6</li><li>7</li><li>8</li><li>9</li><li>10</li><li>11</li><li>12</li><li>13</li><li>14</li><li>15</li><li>16</li><li>17</li></ul>
还有一些其他的输出方法及格式可以参考EveJSONFormat。
数据包输出(unified2.alert)
当suricata检测到一个可疑的数据包时便可以将整个数据包以二进制的方式存储到文件中,目前已经支持了IPv4和IPv6的数据包。其输出的格式可以被Barnyard2 (参考网页)程序处理,这是一个用于将suricata输出的包存储到数据库中的程序,可以配合
Sguil(参考网页)进行对网络流量的实时监控和输出。一般上的配置格式如下,由于这里对每个文件的大小有32M的限制,所以在文件大于这个值时便会新建一个文件继续存储:
<code class="hljs lasso has-numbering"><span class="hljs-subst">-</span> unified2<span class="hljs-attribute">-alert</span>:               <span class="hljs-variable">#The</span> <span class="hljs-keyword">log</span><span class="hljs-attribute">-name</span><span class="hljs-built_in">.</span>
    enabled: yes                <span class="hljs-variable">#This</span> <span class="hljs-keyword">log</span> is enabled<span class="hljs-built_in">.</span> <span class="hljs-built_in">Set</span> <span class="hljs-string">'no'</span> <span class="hljs-keyword">to</span> disable<span class="hljs-built_in">.</span>
    filename: unified2<span class="hljs-built_in">.</span>alert    <span class="hljs-variable">#The</span> name of the file <span class="hljs-keyword">in</span> the default logging directory<span class="hljs-built_in">.</span>
    limit: <span class="hljs-number">32</span>mb                   <span class="hljs-variable">#The</span> file size limit <span class="hljs-keyword">in</span> megabytes<span class="hljs-built_in">.</span> </code><ul class="pre-numbering" style="display: block;"><li>1</li><li>2</li><li>3</li><li>4</li></ul>
在这个选项里还有一个X-Forwarded-For功能,这个功能是用来记录经过多个HTTP代理服务器之后真正的客户端IP地址,而不是代理服务器的IP地址,HTTP协议会在头里面加入一个X-Forwarded-For字段以记录原始IP以及经过的每个代理服务器的IP,详细可参考X-Forwarded-For-维基百科,无论是在客户端的代理还是服务端的反向代理(百度百科)都非常有用,默认是关闭的:
<code class="hljs vhdl has-numbering">    # HTTP X-Forwarded-<span class="hljs-keyword">For</span> support by adding the unified2 extra header that
    # will contain the actual client IP address <span class="hljs-keyword">or</span> by overwriting the source
    # IP address (helpful <span class="hljs-keyword">when</span> inspecting traffic that <span class="hljs-keyword">is</span> being reversed
    # proxied).
    xff:
       enabled: no
       # Two operation modes are available, <span class="hljs-string">"extra-data"</span> <span class="hljs-keyword">and</span> <span class="hljs-string">"overwrite"</span>. Note
       # that <span class="hljs-keyword">in</span> the <span class="hljs-string">"overwrite"</span> mode, <span class="hljs-keyword">if</span> the reported IP address <span class="hljs-keyword">in</span> the HTTP
       # X-Forwarded-<span class="hljs-keyword">For</span> header <span class="hljs-keyword">is</span> <span class="hljs-keyword">of</span> a different version <span class="hljs-keyword">of</span> the packet
       # received, it will fall-back <span class="hljs-keyword">to</span> <span class="hljs-string">"extra-data"</span> mode.
       mode: extra-data
       # Header name were the actual IP address will be reported, <span class="hljs-keyword">if</span> more than
       # one IP address <span class="hljs-keyword">is</span> present, the last IP address will be the one taken
       # into consideration.
       header: X-Forwarded-<span class="hljs-keyword">For</span></code><ul class="pre-numbering" style="display: block;"><li>1</li><li>2</li><li>3</li><li>4</li><li>5</li><li>6</li><li>7</li><li>8</li><li>9</li><li>10</li><li>11</li><li>12</li><li>13</li><li>14</li><li>15</li></ul>
HTTP日志(http.log)
HTTP日志会记录所有的HTTP流量信息,包含了http请求、HOST字段、URI字段和User-Agent字段,这里是普通的输出,除此之外也可以在eve-log中指定http以便输出json格式的内容。另外也可以设置是否扩展以输出更多的信息,未扩展时输出的内容:
<code class="hljs coffeescript has-numbering"><span class="hljs-number">07</span>/<span class="hljs-number">01</span>/<span class="hljs-number">2014</span>-<span class="hljs-number">04</span>:<span class="hljs-number">20</span>:<span class="hljs-number">14.338309</span> vg.<span class="hljs-literal">no</span> [**] / [**] Mozilla/<span class="hljs-number">5.0</span> (Macintosh; Intel Mac OS X <span class="hljs-number">10</span>_9_2)
AppleWebKit/<span class="hljs-number">537.36</span> (KHTML, like Gecko) Chrome/<span class="hljs-number">35.0</span><span class="hljs-number">.1916</span><span class="hljs-number">.114</span> Safari/<span class="hljs-number">537.36</span> [**]
<span class="hljs-number">192.168</span><span class="hljs-number">.1</span><span class="hljs-number">.6</span>:<span class="hljs-number">64685</span><span class="hljs-function"> -></span> <span class="hljs-number">195.88</span><span class="hljs-number">.54</span><span class="hljs-number">.16</span>:<span class="hljs-number">80</span></code><ul class="pre-numbering" style="display: block;"><li>1</li><li>2</li><li>3</li></ul>
扩展之后输出的内容:
<code class="hljs asciidoc has-numbering">07/01/2014-04:21:06.994705 vg.no [*<span class="hljs-strong">*] / [*</span><span class="hljs-strong">*] Mozilla/5.0 (Macintosh; Intel Mac OS X 10_9_2)
AppleWebKit/537.36 (KHTML, like Gecko) Chrome/35.0.1916.114 Safari/537.36 [*</span><span class="hljs-strong">*] <no referer> [*</span><span class="hljs-strong">*]
GET [*</span><span class="hljs-strong">*] HTTP/1.1 [*</span><span class="hljs-strong">*] 301 => http://www.vg.no/ [*</span><span class="hljs-strong">*] 239 bytes [*</span><span class="hljs-strong">*] 192.168.1.6:64726 -> 195.88.54.16:80</span></code><ul class="pre-numbering" style="display: block;"><li>1</li><li>2</li><li>3</li></ul>
关于此项的配置如下,扩展选项默认关闭,用户还可以通过customformat来自定义输出的格式,同时也可以配置输出到socket文件:
<code class="hljs sql has-numbering">- http-log:                     #The log-name.
    enabled: yes                #This log is enabled. <span class="hljs-operator"><span class="hljs-keyword">Set</span> <span class="hljs-string">'no'</span> <span class="hljs-keyword">to</span> disable.
    filename: http.log          #The name <span class="hljs-keyword">of</span> the file <span class="hljs-keyword">in</span> the <span class="hljs-keyword">default</span> logging directory.
    append: yes/<span class="hljs-keyword">no</span>              #<span class="hljs-keyword">If</span> this <span class="hljs-keyword">option</span> <span class="hljs-keyword">is</span> <span class="hljs-keyword">set</span> <span class="hljs-keyword">to</span> yes, the <span class="hljs-keyword">last</span> filled http.log-file will <span class="hljs-keyword">not</span> be
                                # overwritten while restarting Suricata.
    #extended: yes               # <span class="hljs-keyword">If</span> <span class="hljs-keyword">set</span> <span class="hljs-keyword">to</span> yes more information <span class="hljs-keyword">is</span> written about the event.
    #custom: yes       # enabled the custom logging format (defined <span class="hljs-keyword">by</span> customformat)
    #customformat: <span class="hljs-string">"%{%D-%H:%M:%S}t.%z %{X-Forwarded-For}i %H %m %h %u %s %B %a:%p -> %A:%P"</span>
    #filetype: regular # <span class="hljs-string">'regular'</span>, <span class="hljs-string">'unix_stream'</span> <span class="hljs-keyword">or</span> <span class="hljs-string">'unix_dgram'</span></span></code><ul class="pre-numbering" style="display: block;"><li>1</li><li>2</li><li>3</li><li>4</li><li>5</li><li>6</li><li>7</li><li>8</li><li>9</li></ul>
还有一个存储DNS流量的配置,与HTTP的类似,就不做过多解释了。
数据包日志(pcap-log)
通过pcap-log选项可以保存所有的数据包,这样在检测到问题数据包时就能更容易地找到之前的流量以便对整个事件进行确认和分析。基本配置如下,与之前的HTTP日志一样,pcap文件也是可以限定大小和文件数的,当一个文件达到限制的大小时便会创建一个新文件,同时这里还有文件数量的限制:
<code class="hljs sql has-numbering">- pcap-log:
    enabled:  yes
    filename: log.pcap

    # Limit in MB.
    limit: 32mb
    # If <span class="hljs-operator"><span class="hljs-keyword">set</span> <span class="hljs-keyword">to</span> a <span class="hljs-keyword">value</span> will enable ring buffer mode. Will keep Maximum <span class="hljs-keyword">of</span> <span class="hljs-string">"max-files"</span> <span class="hljs-keyword">of</span> <span class="hljs-keyword">size</span> <span class="hljs-string">"limit"</span>
    <span class="hljs-aggregate">max</span>-files: <span class="hljs-number">2000</span>

    mode: normal # <span class="hljs-string">"normal"</span> (<span class="hljs-keyword">default</span>) <span class="hljs-keyword">or</span> sguil.
    #sguil_base_dir: /nsm_data/
    #ts-format: usec # sec <span class="hljs-keyword">or</span> usec <span class="hljs-keyword">second</span> format (<span class="hljs-keyword">default</span>) <span class="hljs-keyword">is</span> filename.sec usec <span class="hljs-keyword">is</span> filename.sec.usec
    use-stream-depth: <span class="hljs-keyword">no</span> #<span class="hljs-keyword">If</span> <span class="hljs-keyword">set</span> <span class="hljs-keyword">to</span> <span class="hljs-string">"yes"</span> packets seen <span class="hljs-keyword">after</span> reaching stream inspection depth <span class="hljs-keyword">are</span> ignored. <span class="hljs-string">"no"</span> logs <span class="hljs-keyword">all</span> packets</span></code><ul class="pre-numbering" style="display: block;"><li>1</li><li>2</li><li>3</li><li>4</li><li>5</li><li>6</li><li>7</li><li>8</li><li>9</li><li>10</li><li>11</li><li>12</li><li>13</li></ul>
配置中的mode有两种情况,一个是普通的normal,会将文件存储在之前指定的日志存储目录,而sguil模式则需要sguil_base_dir选项指定目录,并且存储的文件按照日期划分目录,并加上时间戳:
<code class="hljs lasso has-numbering"><span class="hljs-variable">$sguil</span><span class="hljs-attribute">-base</span><span class="hljs-attribute">-dir</span>/YYYY<span class="hljs-attribute">-MM</span><span class="hljs-attribute">-DD</span><span class="hljs-subst">/</span><span class="hljs-variable">$filename.</span><span class="hljs-subst"><</span>timestamp<span class="hljs-subst">></span></code><ul class="pre-numbering" style="display: block;"><li>1</li></ul>
最后一个use-stream-depth选项,如果设为“yes”只会存储不大于stream.reassembly.depth长度的数据,后面的将会舍弃(在一个stream中),“no”则会存储所有的数据包。
详细的警告日志(alert-debug.log)
如果开启这一选项,suricata会记录每一个警告产生的详细信息,包括数据包、规则等各种信息。一个典型的输出如下所示,这些信息可以使得维护人员更快的排除误报、检查规则的问题等:

虽然这个功能非常有用,但是在生产环境中启动并不是一个明智的行为,它会在检测流时处理和输出大量的信息,导致性能有很大的下降,因此默认的配置是不开启的:
<code class="hljs vbscript has-numbering">- alert-debug:                  #The <span class="hljs-built_in">log</span>-name.
    enabled: no                 #This <span class="hljs-built_in">log</span> <span class="hljs-keyword">is</span> <span class="hljs-keyword">not</span> enabled. <span class="hljs-keyword">Set</span> <span class="hljs-comment">'yes' to enable.</span>
    filename: alert-debug.<span class="hljs-built_in">log</span>   #The name of the file <span class="hljs-keyword">in</span> the <span class="hljs-keyword">default</span> logging directory.
    append: yes/no              #<span class="hljs-keyword">If</span> this <span class="hljs-keyword">option</span> <span class="hljs-keyword">is</span> <span class="hljs-keyword">set</span> <span class="hljs-keyword">to</span> yes, the last filled fast.<span class="hljs-built_in">log</span>-file will <span class="hljs-keyword">not</span> be
                                # overwritten <span class="hljs-keyword">while</span> restarting Suricata. </code><ul class="pre-numbering" style="display: block;"><li>1</li><li>2</li><li>3</li><li>4</li><li>5</li></ul>
Syslog
这个选项决定了是否将suricata的警告输出到syslog文件中,配置如下:
<code class="hljs lasso has-numbering"><span class="hljs-subst">-</span> syslog:                       <span class="hljs-variable">#This</span> is a output<span class="hljs-attribute">-module</span> <span class="hljs-keyword">to</span> direct <span class="hljs-keyword">log</span><span class="hljs-attribute">-output</span> <span class="hljs-keyword">to</span> several directions<span class="hljs-built_in">.</span>
     enabled: no                <span class="hljs-variable">#The</span> use of this output<span class="hljs-attribute">-module</span> is <span class="hljs-literal">not</span> enabled<span class="hljs-built_in">.</span>
     facility: local5           <span class="hljs-variable">#In</span> this option you can <span class="hljs-built_in">set</span> a syslog facility<span class="hljs-built_in">.</span>
     level: Info                <span class="hljs-variable">#In</span> this option you can <span class="hljs-built_in">set</span> the level of output<span class="hljs-built_in">.</span> The possible levels are:
                                <span class="hljs-variable">#Emergency</span>, Alert, Critical, Error, Warning, Notice, Info <span class="hljs-literal">and</span> Debug<span class="hljs-built_in">.</span></code><ul class="pre-numbering" style="display: block;"><li>1</li><li>2</li><li>3</li><li>4</li><li>5</li></ul>
可以看到syslog选项默认是关闭的,如果开启,facility字段表示产生日志的分类为local5。关于syslog日志处理系统的更多信息可以参考Syslog-维基百科。
Drop.log
当suricata工作在IPS模式下的时候,可以使用drop操作的规则,这些drop掉的数据包信息就会存储在drop.log文件中,配置如下:
<code class="hljs lasso has-numbering"><span class="hljs-subst">-</span> drop:
     enabled: yes              <span class="hljs-variable">#The</span> option is enabled<span class="hljs-built_in">.</span>
     filename: drop<span class="hljs-built_in">.</span><span class="hljs-keyword">log</span>        <span class="hljs-variable">#The</span> <span class="hljs-keyword">log</span><span class="hljs-attribute">-name</span> of the file for dropped packets<span class="hljs-built_in">.</span>
     append: yes               <span class="hljs-variable">#If</span> this option is <span class="hljs-built_in">set</span> <span class="hljs-keyword">to</span> yes, the last filled drop<span class="hljs-built_in">.</span><span class="hljs-keyword">log</span><span class="hljs-attribute">-file</span> will <span class="hljs-literal">not</span> be
                               <span class="hljs-variable">#overwritten</span> <span class="hljs-keyword">while</span> restarting Suricata<span class="hljs-built_in">.</span> <span class="hljs-keyword">If</span> <span class="hljs-built_in">set</span> <span class="hljs-keyword">to</span> <span class="hljs-string">'no'</span> the last filled drop<span class="hljs-built_in">.</span><span class="hljs-keyword">log</span> file will be overwritten<span class="hljs-built_in">.</span></code><ul class="pre-numbering" style="display: block;"><li>1</li><li>2</li><li>3</li><li>4</li><li>5</li></ul>
检测引擎相关配置
detect-engine
Suricata在对流量检测之前需要将所有的规则签名加载到内存,而数据包在匹配规则时并不需要匹配所有的规则,事实上大量的规则是完全没必要匹配的,比如当前数据包时基于UDP协议的,那TCP的所有规则都是没有必要匹配的。因此需要根据一定的依据对所有的规则进行分组,这样数据包只需要与符合条件的分组内的所有规则进行匹配即可。而需要如何分组则是一个关键的问题。
下面是detect-engine的一种配置。profile选项有high、low和medium三种。high表示分组较多,但是会占用更多的内存,性能也会更好;low则正好相反,占用更少的内存,性能也相对较差;medium是默认配置,是性能和内存使用的折中选择。除此之外高级用户可以在custom-values字段自定义分组的配置,如下是根据数据包来源、源地址、目的地址、源端口、目的端口来进行分组,这些数字可以根据实际需要的性能和需求进行调整:
<code class="hljs lasso has-numbering">detect<span class="hljs-attribute">-engine</span>:
   <span class="hljs-attribute">-profile</span>: medium         <span class="hljs-variable">#The</span> balance between performance <span class="hljs-literal">and</span> memory usage<span class="hljs-built_in">.</span> This is the default setting<span class="hljs-built_in">.</span>
   <span class="hljs-subst">-</span> custom<span class="hljs-attribute">-values</span>:
       toclient_src_groups: <span class="hljs-number">2</span>
       toclient_dst_groups: <span class="hljs-number">2</span>
       toclient_sp_groups: <span class="hljs-number">2</span>
       toclient_dp_groups: <span class="hljs-number">3</span>
       toserver_src_groups: <span class="hljs-number">2</span>
       toserver_dst_groups: <span class="hljs-number">4</span>
       toserver_sp_groups: <span class="hljs-number">2</span>
       toserver_dp_groups: <span class="hljs-number">25</span>
   <span class="hljs-subst">-</span> sgh<span class="hljs-attribute">-mpm</span><span class="hljs-attribute">-context</span>: auto
   <span class="hljs-subst">-</span> inspection<span class="hljs-attribute">-recursion</span><span class="hljs-attribute">-limit</span>: <span class="hljs-number">3000</span></code><ul class="pre-numbering" style="display: block;"><li>1</li><li>2</li><li>3</li><li>4</li><li>5</li><li>6</li><li>7</li><li>8</li><li>9</li><li>10</li><li>11</li><li>12</li><li>13</li></ul>
数据包检测规则的分组图可以看得更清楚:
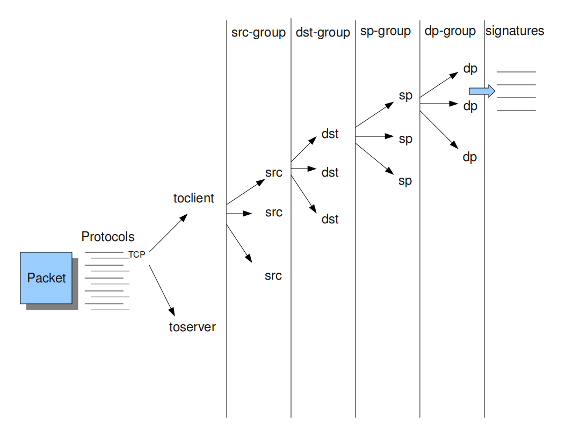
接下来是sgh-mpm-context,这个字段指明MPM算法使用的content是否公用。当其值为auto时,是否公用取决于配置文件中指定MPM的算法,若为ac或ac-gfbs,则使用single模式,表示所有的规则分组使用单个MPM-content,其余算法则使用full模式,每个分组拥有自己的MPM-content。而当sgh-mpm-context字段的值为single或full时则不受MPM算法的影响。关于suricata的MPM机制可以参考fast_parttern,后面的配置也会做进一步的说明。
最后的inspection-recursion-limit则是为了减少suricata的出错次数,因为网络流量状况非常复杂,suricata难免会遇上无限循环或是递归地处理数据包的情况,这时指定一个最大值,当循环或递归次数大于这个值则停止处理当前数据包。
CUDA(Compute United Device Architecture)
CUDA的翻译是统一计算设备架构,为的是让CPU和GPU在执行运算的时候发挥自身的优势,协同处理,详细可参考CUDA-维基百科。由于这项技术是NVIDIA主导的,且出现时间并不长,因此suricata只是在MPM多模匹配中可以使用,并且只有在编译前的configure时加入–enable-cuda才具有这项功能,并且目前其他的GPU并不支持这项功能。因此这里就不做过多介绍,等后面这项技术推广开来,便有更加实用的意义。
pattern-matcher
之前已经了解过,suricata在content的多模匹配支持很多算法,不同的算法有不同的优缺点。设置如下,可选的算法包括b2g, b2gc, b2gm, b3g, wumanber, ac和ac-gfbs(最后两个是1.0.3版本才加入的):
<code class="hljs http has-numbering"><span class="hljs-attribute">mpm-algo</span>: <span class="hljs-string">b2gc</span></code><ul class="pre-numbering" style="display: block;"><li>1</li></ul>
部分算法的详细配置如下,search_algo表示当前算法所使用的扫描或搜索算法,比如b2gc算法的扫描算法(scan algorithms)有B2gScan和B2gScanBNDMq,搜索算法(search algorithms)有B2gSearch和B2gSearchBNDMq;hash_size表示每种算法的hash表的最大空间,从小到大依次是lowest (2048) - low (4096) - medium (8192) - high (16384) - higher (32768) – max (65536),越大匹配的性能越好,但对内存的要求也更高;bf_size选项决定了布隆过滤器(Bloom filter-维基百科)占用内存的大小,可选的值为low (512) - medium (1024) - high (2048),也是从小到大排列,性能也是越来越好:
<code class="hljs lasso has-numbering">pattern<span class="hljs-attribute">-matcher</span>:
  <span class="hljs-subst">-</span> b2gc:
      search_algo: B2gSearchBNDMq
      hash_size: low                    <span class="hljs-variable">#Determines</span> the size of the hash<span class="hljs-attribute">-table</span><span class="hljs-built_in">.</span>
      bf_size: medium                   <span class="hljs-variable">#Determines</span> the size of the bloom<span class="hljs-subst">-</span> filter<span class="hljs-built_in">.</span>
  <span class="hljs-subst">-</span> b3g:
      search_algo: B3gSearchBNDMq
      hash_size: low                    <span class="hljs-variable">#See</span> hash<span class="hljs-attribute">-size</span> <span class="hljs-attribute">-b2gc</span><span class="hljs-built_in">.</span>
      bf_size: medium                   <span class="hljs-variable">#See</span> bf<span class="hljs-attribute">-size</span> <span class="hljs-attribute">-b2gc</span><span class="hljs-built_in">.</span>
  <span class="hljs-subst">-</span> wumanber:
      hash_size: low                    <span class="hljs-variable">#See</span> hash<span class="hljs-attribute">-size</span> <span class="hljs-attribute">-b2gc</span><span class="hljs-built_in">.</span>
      bf_size: medium                   <span class="hljs-variable">#See</span> bf<span class="hljs-attribute">-size</span> <span class="hljs-attribute">-b2gc</span><span class="hljs-built_in">.</span></code><ul class="pre-numbering" style="display: block;"><li>1</li><li>2</li><li>3</li><li>4</li><li>5</li><li>6</li><li>7</li><li>8</li><li>9</li><li>10</li><li>11</li><li>12</li></ul>
参考链接
https://redmine.openinfosecfoundation.org/projects/suricata/wiki/Suricatayaml
http://zh.wikipedia.org/wiki/YAML
https://redmine.openinfosecfoundation.org/projects/suricata/wiki/Runmodes
https://redmine.openinfosecfoundation.org/projects/suricata/wiki/EveJSONOutput
https://github.com/firnsy/barnyard2
http://en.wikipedia.org/wiki/Sguil
http://zh.wikipedia.org/wiki/X-Forwarded-For
http://baike.baidu.com/link?url=D2rVWCZz7t62A3ZgDEosF2-sgOdIAaoAk4iwrGkTqF3KRVE_14n-B0eUypHJDa8zCygUhRTbtDYF4i-k0kgMvq
http://de.wikipedia.org/wiki/Syslog
http://zh.wikipedia.org/wiki/CUDA
http://zh.wikipedia.org/wiki/%E5%B8%83%E9%9A%86%E8%BF%87%E6%BB%A4%E5%99%A8


 34万+
34万+

 被折叠的 条评论
为什么被折叠?
被折叠的 条评论
为什么被折叠?
 到【灌水乐园】发言


