springboot简单案例

springboot 创建第一个简单的web案例。

使用工具idea;java8;maven-3.5.4

1、使用idea创建一个project ,选择Spring Initializr ,下一步,下一步,选择web项,下一步,finish.

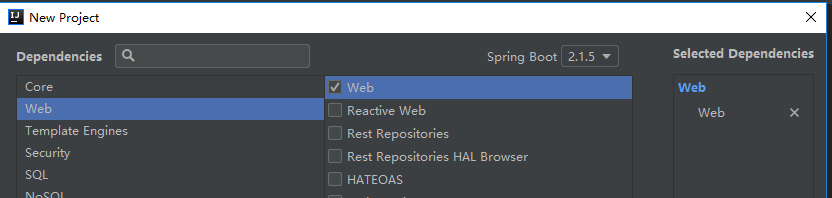
2、pom.xml用来配置依赖,打开后能看到有web的相关依赖

<dependencies>
        <!--web相关依赖-->
        <dependency>
            <groupId>org.springframework.boot</groupId>
            <artifactId>spring-boot-starter-web</artifactId>
        </dependency>
        <!--测试类test依赖-->
        <dependency>
            <groupId>org.springframework.boot</groupId>
            <artifactId>spring-boot-starter-test</artifactId>
            <scope>test</scope>
        </dependency>
</dependencies>

3、在DemoApplication类的同目录下创建一个ControllerDemo类如下

import org.springframework.web.bind.annotation.RequestMapping;
import org.springframework.web.bind.annotation.RestController;

@RestController
@RequestMapping("/test")
public class ControllerDemo {
    @RequestMapping("/demo01")
    public String demo01(){
        return "hello world!";
    }
}

4、启动DemoApplication.java 该类在创建工程时自动生成

5、运行程序时查看日志端口为8080,使用浏览器进行访问:http://localhost:8080/test/demo01

这样一个简单的springbootweb案例就完成了。

  • 2
    点赞
  • 1
    收藏
    觉得还不错? 一键收藏
  • 0
    评论
以下是一个简单SpringBoot项目案例,该项目实现了一个简单的RESTful API,用于管理学生信息: 1.创建SpringBoot项目 首先,我们需要创建一个SpringBoot项目。可以使用Spring Initializr(https://start.spring.io/)来创建一个基本的SpringBoot项目,也可以使用IDE(如IntelliJ IDEA或Eclipse)来创建。 2.添加依赖 在pom.xml文件中添加以下依赖: ```xml <dependencies> <!-- Spring Web --> <dependency> <groupId>org.springframework.boot</groupId> <artifactId>spring-boot-starter-web</artifactId> </dependency> <!-- Spring Data JPA --> <dependency> <groupId>org.springframework.boot</groupId> <artifactId>spring-boot-starter-data-jpa</artifactId> </dependency> <!-- H2 Database --> <dependency> <groupId>com.h2database</groupId> <artifactId>h2</artifactId> <scope>runtime</scope> </dependency> </dependencies> ``` 这些依赖将帮助我们构建一个基本的Web应用程序,并使用JPA和H2数据库。 3.创建实体类 创建一个名为Student的实体类,该类包含id、name和age属性: ```java @Entity public class Student { @Id @GeneratedValue(strategy = GenerationType.IDENTITY) private Long id; private String name; private Integer age; // getters and setters } ``` 4.创建Repository 创建一个名为StudentRepository的接口,该接口继承自JpaRepository,并提供一些自定义方法: ```java @Repository public interface StudentRepository extends JpaRepository<Student, Long> { List<Student> findByName(String name); } ``` 5.创建Controller 创建一个名为StudentController的类,该类包含一些RESTful API: ```java @RestController @RequestMapping("/students") public class StudentController { @Autowired private StudentRepository studentRepository; @GetMapping("") public List<Student> getAllStudents() { return studentRepository.findAll(); } @GetMapping("/{id}") public Student getStudentById(@PathVariable Long id) { return studentRepository.findById(id).orElse(null); } @PostMapping("") public Student createStudent(@RequestBody Student student) { return studentRepository.save(student); } @PutMapping("/{id}") public Student updateStudent(@PathVariable Long id, @RequestBody Student student) { Student existingStudent = studentRepository.findById(id).orElse(null); if (existingStudent != null) { existingStudent.setName(student.getName()); existingStudent.setAge(student.getAge()); return studentRepository.save(existingStudent); } else { return null; } } @DeleteMapping("/{id}") public void deleteStudent(@PathVariable Long id) { studentRepository.deleteById(id); } @GetMapping("/search") public List<Student> searchStudents(@RequestParam String name) { return studentRepository.findByName(name); } } ``` 6.运行应用程序 现在,我们可以运行应用程序并测试RESTful API。可以使用Postman或类似的工具来测试API。

“相关推荐”对你有帮助么?

  • 非常没帮助
  • 没帮助
  • 一般
  • 有帮助
  • 非常有帮助
提交
评论
添加红包

请填写红包祝福语或标题

红包个数最小为10个

红包金额最低5元

当前余额3.43前往充值 >
需支付:10.00
成就一亿技术人!
领取后你会自动成为博主和红包主的粉丝 规则
hope_wisdom
发出的红包
实付
使用余额支付
点击重新获取
扫码支付
钱包余额 0

抵扣说明:

1.余额是钱包充值的虚拟货币,按照1:1的比例进行支付金额的抵扣。
2.余额无法直接购买下载,可以购买VIP、付费专栏及课程。

余额充值