


Android中自定义Dialog布局的两种方式比较
在百度里搜索了自定义Dialog布局的方法,方法几乎一致,按照那个方法最终得到的效果总是不理想。一度狂躁不已,然后刷了会知乎,心情平静下来后,Google一番,终于找到了解决方法。特地分享给大家。
方式一:使用Dialog.getWindow().setContentView()函数自定义布局。
先给出自定义的布局my_dialog_layout.xml:
<?xml version="1.0" encoding="utf-8"?>
<LinearLayout xmlns:android="http://schemas.android.com/apk/res/android"
    android:layout_width="match_parent"
    android:layout_height="match_parent"
    android:orientation="vertical" >

    <LinearLayout
        android:layout_width="match_parent"
        android:layout_height="wrap_content"
        android:orientation="vertical" >

        <TextView
            android:id="@+id/textView1"
            android:layout_width="wrap_content"
            android:layout_height="wrap_content"
            android:layout_margin="20dp"
            android:paddingLeft="10dp"
            android:text="请选择"
            android:textColor="#ff2525"
            android:textSize="20sp" />

        <View
            android:layout_width="match_parent"
            android:layout_height="1dp"
            android:layout_marginLeft="20dp"
            android:layout_marginRight="20dp"
            android:background="#969696" />

        <Button
            android:id="@+id/button1"
            android:layout_width="match_parent"
            android:layout_height="wrap_content"
            android:layout_marginLeft="20dp"
            android:layout_marginRight="20dp"
            android:gravity="left|center_vertical"
            android:padding="10dp"
            android:text="第一个功能"
            android:textColor="#2a2a2a"
            android:textSize="15sp" />

        <View
            android:layout_width="match_parent"
            android:layout_height="1px"
            android:layout_marginLeft="20dp"
            android:layout_marginRight="20dp"
            android:background="#a6a6a6" />

        <Button
            android:id="@+id/button2"
            android:layout_width="match_parent"
            android:layout_height="wrap_content"
            android:layout_marginLeft="20dp"
            android:layout_marginRight="20dp"
            android:gravity="left|center_vertical"
            android:padding="10dp"
            android:text="第二个功能"
            android:textColor="#2a2a2a"
            android:textSize="15sp" />

        <View
            android:layout_width="match_parent"
            android:layout_height="1px"
            android:layout_marginLeft="20dp"
            android:layout_marginRight="20dp"
            android:background="#a6a6a6" />

        <Button
            android:id="@+id/button3"
            android:layout_width="match_parent"
            android:layout_height="wrap_content"
            android:layout_marginLeft="20dp"
            android:layout_marginRight="20dp"
            android:gravity="left|center_vertical"
            android:padding="10dp"
            android:text="第三个功能"
            android:textColor="#2a2a2a"
            android:textSize="15sp" />
    </LinearLayout>

</LinearLayout>
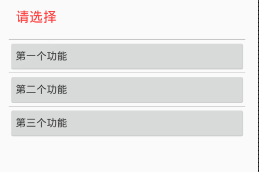
该布局在androidStudio的视图预览器中显示效果如下:
ok,方式一的做法是这样的:
AlertDialog alertDialog = new AlertDialog.Builder(MainActivity.this).create();
alertDialog.show();
//新建alertDialog 实例,注意:!!!
//alertDialog.show()在setContentView()之前调用!!!
Window window = alertDialog.getWindow();
window.setContentView(R.layout.my_dialog_layout);

 //获取自定义布局的相关控件,定义相关操作。
Button button1 = (Button ) window.findViewById(R.id.button1);
Button button1 = (Button ) window.findViewById(R.id.button1); wButton button1 = (Button ) window.findViewById(R.id.button1);
嗯,方式一大致就是这样。简化其他操作,代码就是这样:
public void createDialog(){

AlertDialog dialog = new AlertDialog.Builder(MainActivity.this).create();
//创建一个AlertDialog对象
dialog.show();
//自定义布局
View view = getLayoutInflater().inflate(R.layout.my_dialog_layout, null);
//设置自定义的布局
dialog.getWindow().setContentView(view);
}
最后自定义效果的样式是这样的:
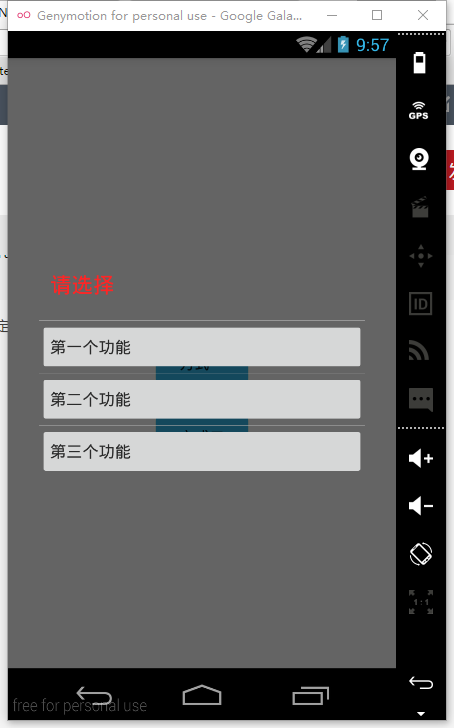
可以看到,Dialog的背景全部变成了灰色,只有我们自定义的控件,但是,样式和我们想要的不一样。
方式二:使用Dialog.getWindow().setView()函数自定义布局。
ok,方式二的做法是这样的:
AlertDialog dialog = new AlertDialog.Builder(MainActivity.this).create();
//创建一个AlertDialog对象

View view = getLayoutInflater().inflate(R.layout.my_dialog_layout, null);//自定义布局
dialog.setView(view, 0, 0, 0, 0);//把自定义的布局设置到dialog中,注意,布局设置一定要在show之前。从第二个参数分别填充内容与边框之间左、上、右、下、的像素
dialog.show();//一定要先show出来再设置dialog的参数,不然就不会改变dialog的大小了
最后运行效果如下:
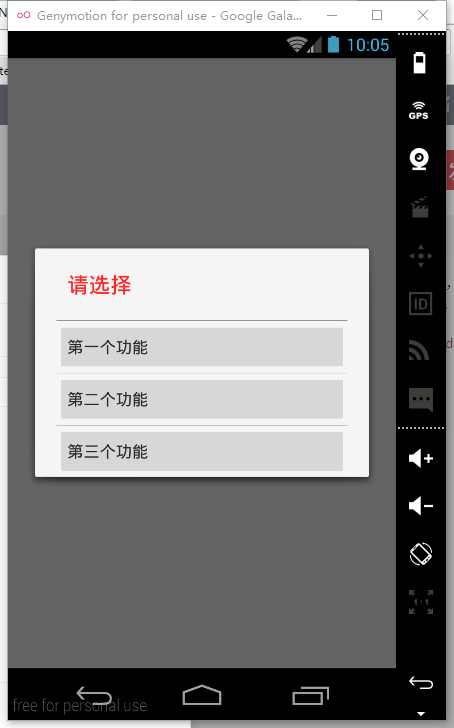
综上所述,使用方式二是实现自定义布局的较好的方式。
后记
至于如何改变布局的透明度等,请参考以下博文。
自定义AlertDialog和 PopupWindown的实现。


 74
74


 被折叠的 条评论
为什么被折叠?
被折叠的 条评论
为什么被折叠?
 到【灌水乐园】发言


