


通过Spring websocket 用户校验和业务会话绑定我们学会了如何将业务会话绑定到spring websocket会话上。通过这一节,我们来分析一下会话和订阅的实现
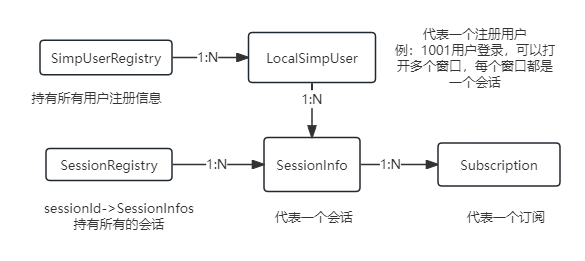
用户会话的数据结构
SessionInfo 用户会话
用户会话定义如下:
private static final class SessionInfo {

		// subscriptionId -> Subscription
		private final Map<String, Subscription> subscriptionMap = new ConcurrentHashMap<>();

		public Collection<Subscription> getSubscriptions() {
			return this.subscriptionMap.values();
		}

		@Nullable
		public Subscription getSubscription(String subscriptionId) {
			return this.subscriptionMap.get(subscriptionId);
		}

		public void addSubscription(Subscription subscription) {
			this.subscriptionMap.putIfAbsent(subscription.getId(), subscription);
		}

		@Nullable
		public Subscription removeSubscription(String subscriptionId) {
			return this.subscriptionMap.remove(subscriptionId);
		}
	}
- 用户会话中有subscriptionMap。这个表示一个会话中,可以有多个订阅,可以根据subscriptionId找到订阅。
SessionRegistry 用户会话注册
private static final class SessionRegistry {

		private final ConcurrentMap<String, SessionInfo> sessions = new ConcurrentHashMap<>();

		@Nullable
		public SessionInfo getSession(String sessionId) {
			return this.sessions.get(sessionId);
		}

		public void forEachSubscription(BiConsumer<String, Subscription> consumer) {
			this.sessions.forEach((sessionId, info) ->
				info.getSubscriptions().forEach(subscription -> consumer.accept(sessionId, subscription)));
		}

		public void addSubscription(String sessionId, Subscription subscription) {
			SessionInfo info = this.sessions.computeIfAbsent(sessionId, _sessionId -> new SessionInfo());
			info.addSubscription(subscription);
		}

		@Nullable
		public SessionInfo removeSubscriptions(String sessionId) {
			return this.sessions.remove(sessionId);
		}
	}
- SessionRegistry 中sessions 表示多个会话。根据sessionId可以找到唯一一个会话SessionInfo
Subscription 用户订阅
	private static final class Subscription {

		private final String id;

		private final String destination;

		private final boolean isPattern;

		@Nullable
		private final Expression selector;

		public Subscription(String id, String destination, boolean isPattern, @Nullable Expression selector) {
			Assert.notNull(id, "Subscription id must not be null");
			Assert.notNull(destination, "Subscription destination must not be null");
			this.id = id;
			this.selector = selector;
			this.destination = destination;
			this.isPattern = isPattern;
		}

		public String getId() {
			return this.id;
		}

		public String getDestination() {
			return this.destination;
		}

		public boolean isPattern() {
			return this.isPattern;
		}

		@Nullable
		public Expression getSelector() {
			return this.selector;
		}

		@Override
		public boolean equals(@Nullable Object other) {
			return (this == other ||
					(other instanceof Subscription && this.id.equals(((Subscription) other).id)));
		}

		@Override
		public int hashCode() {
			return this.id.hashCode();
		}

		@Override
		public String toString() {
			return "subscription(id=" + this.id + ")";
		}
	}
SimpUserRegistry 用户注册接口
用户注册的接口如下:
public interface SimpUserRegistry {

	/**
	根据用户名,获取到用户信息
	 * Get the user for the given name.
	 * @param userName the name of the user to look up
	 * @return the user, or {@code null} if not connected
	 */
	@Nullable
	SimpUser getUser(String userName);

	/**
	获取现在所有的注册的用户
	 * Return a snapshot of all connected users.
	 * <p>The returned set is a copy and will not reflect further changes.
	 * @return the connected users, or an empty set if none
	 */
	Set<SimpUser> getUsers();

	/**
	获取在线用户数量
	 * Return the count of all connected users.
	 * @return the number of connected users
	 * @since 4.3.5
	 */
	int getUserCount();

	/**
	 * Find subscriptions with the given matcher.
	 * @param matcher the matcher to use
	 * @return a set of matching subscriptions, or an empty set if none
	 */
	Set<SimpSubscription> findSubscriptions(SimpSubscriptionMatcher matcher);

}
SimpUser实际上就是代表着一个用户,我们来看其实现:LocalSimpUser的定义
	private static class LocalSimpUser implements SimpUser {
		private final String name;
		private final Principal user;
		private final Map<String, SimpSession> userSessions = new ConcurrentHashMap<>(1);
		public LocalSimpUser(String userName, Principal user) {
			Assert.notNull(userName, "User name must not be null");
			this.name = userName;
			this.user = user;
		}
	}
userSessions 表示当前一个用户可以对应多个会话。
这个Principal 是啥,还记得我们上一节通过Spring websocket 用户校验和业务会话绑定中,我们是怎么注册用户的吗
    private void connect(Message<?> message, StompHeaderAccessor accessor) {
        //1通过请求头获取到token
        String token = accessor.getFirstNativeHeader(WsConstants.TOKEN_HEADER);
        //2如果token为空或者用户id没有解析出来,抛出异常,spring会将此websocket连接关闭
        if (StringUtils.isEmpty(token)) {
            throw new MessageDeliveryException("token missing!");
        }
        String userId = TokenUtil.parseToken(token);
        if (StringUtils.isEmpty(userId)) {
            throw new MessageDeliveryException("userId missing!");
        }
        //这个是每个会话都会有的一个sessionId
        String simpleSessionId = (String) message.getHeaders().get(SimpMessageHeaderAccessor.SESSION_ID_HEADER);

        //3创建自己的业务会话session对象
        UserSession userSession = new UserSession();
        userSession.setSimpleSessionId(simpleSessionId);
        userSession.setUserId(userId);
        userSession.setCreateTime(LocalDateTime.now());
        //4关联用户的会话。通过msgOperations.convertAndSendToUser(username, "/topic/subNewMsg", msg); 此方法,可以发送给用户消息
        accessor.setUser(new UserSessionPrincipal(userSession));
    }
从token中解析出用户的userId,并通过下面的代码,把当前用户和会话绑定起来。一个用户实际上是可以绑定多个会话的。
accessor.setUser(new UserSessionPrincipal(userSession));
总结一下用户和会话之间的关系,如下图
订阅过程的源码分析
前端订阅的代码如下
  stompClient.subscribe("/user/topic/answer", function (response) {
      createElement("answer", response.body);
  });
当后端收到订阅消息后,会由SimpleBrokerMessageHandler来处理
	@Override
	protected void handleMessageInternal(Message<?> message) {
		MessageHeaders headers = message.getHeaders();
		String destination = SimpMessageHeaderAccessor.getDestination(headers);
		String sessionId = SimpMessageHeaderAccessor.getSessionId(headers);

		updateSessionReadTime(sessionId);

		if (!checkDestinationPrefix(destination)) {
			return;
		}

		SimpMessageType messageType = SimpMessageHeaderAccessor.getMessageType(headers);
		if (SimpMessageType.MESSAGE.equals(messageType)) {
			logMessage(message);
			sendMessageToSubscribers(destination, message);
		}
		else if (SimpMessageType.CONNECT.equals(messageType)) {
			logMessage(message);
			if (sessionId != null) {
				if (this.sessions.get(sessionId) != null) {
					if (logger.isWarnEnabled()) {
						logger.warn("Ignoring CONNECT in session " + sessionId + ". Already connected.");
					}
					return;
				}
				long[] heartbeatIn = SimpMessageHeaderAccessor.getHeartbeat(headers);
				long[] heartbeatOut = getHeartbeatValue();
				Principal user = SimpMessageHeaderAccessor.getUser(headers);
				MessageChannel outChannel = getClientOutboundChannelForSession(sessionId);
				this.sessions.put(sessionId, new SessionInfo(sessionId, user, outChannel, heartbeatIn, heartbeatOut));
				SimpMessageHeaderAccessor connectAck = SimpMessageHeaderAccessor.create(SimpMessageType.CONNECT_ACK);
				initHeaders(connectAck);
				connectAck.setSessionId(sessionId);
				if (user != null) {
					connectAck.setUser(user);
				}
				connectAck.setHeader(SimpMessageHeaderAccessor.CONNECT_MESSAGE_HEADER, message);
				connectAck.setHeader(SimpMessageHeaderAccessor.HEART_BEAT_HEADER, heartbeatOut);
				Message<byte[]> messageOut = MessageBuilder.createMessage(EMPTY_PAYLOAD, connectAck.getMessageHeaders());
				getClientOutboundChannel().send(messageOut);
			}
		}
		else if (SimpMessageType.DISCONNECT.equals(messageType)) {
			logMessage(message);
			if (sessionId != null) {
				Principal user = SimpMessageHeaderAccessor.getUser(headers);
				handleDisconnect(sessionId, user, message);
			}
		}
		else if (SimpMessageType.SUBSCRIBE.equals(messageType)) {
			logMessage(message);
			this.subscriptionRegistry.registerSubscription(message);
		}
		else if (SimpMessageType.UNSUBSCRIBE.equals(messageType)) {
			logMessage(message);
			this.subscriptionRegistry.unregisterSubscription(message);
		}
	}
当消息类型为SUBSCRIBE时,会调用subscriptionRegistry.registerSubscription(message)
接着来看下subscriptionRegistry.registerSubscription(message)
//AbstractSubscriptionRegistry
	@Override
	public final void registerSubscription(Message<?> message) {
		MessageHeaders headers = message.getHeaders();

		SimpMessageType messageType = SimpMessageHeaderAccessor.getMessageType(headers);
		if (!SimpMessageType.SUBSCRIBE.equals(messageType)) {
			throw new IllegalArgumentException("Expected SUBSCRIBE: " + message);
		}

		String sessionId = SimpMessageHeaderAccessor.getSessionId(headers);
		if (sessionId == null) {
			if (logger.isErrorEnabled()) {
				logger.error("No sessionId in  " + message);
			}
			return;
		}

		String subscriptionId = SimpMessageHeaderAccessor.getSubscriptionId(headers);
		if (subscriptionId == null) {
			if (logger.isErrorEnabled()) {
				logger.error("No subscriptionId in " + message);
			}
			return;
		}

		String destination = SimpMessageHeaderAccessor.getDestination(headers);
		if (destination == null) {
			if (logger.isErrorEnabled()) {
				logger.error("No destination in " + message);
			}
			return;
		}

		addSubscriptionInternal(sessionId, subscriptionId, destination, message);
	}
这个代码很简单,就是从消息中取出三个东西,sessionId, subscriptionId, destination,进行注册。
//DefaultSubscriptionRegistry
	@Override
	protected void addSubscriptionInternal(
			String sessionId, String subscriptionId, String destination, Message<?> message) {

		boolean isPattern = this.pathMatcher.isPattern(destination);
		Expression expression = getSelectorExpression(message.getHeaders());
		Subscription subscription = new Subscription(subscriptionId, destination, isPattern, expression);

		this.sessionRegistry.addSubscription(sessionId, subscription);
		this.destinationCache.updateAfterNewSubscription(sessionId, subscription);
	}
	//其实就是添加到sessions map中。会话里把订阅添加到订阅map中
		public void addSubscription(String sessionId, Subscription subscription) {
			SessionInfo info = this.sessions.computeIfAbsent(sessionId, _sessionId -> new SessionInfo());
			info.addSubscription(subscription);
		}
其实就是添加到sessions map中。会话里把订阅添加到订阅map中
那用户和会话是如何关联起来的?
- 当订阅事件发生时,取出当前的Principal( accessor.setUser(xxx)设置的),然后生成LocalSimpleUser,即用户
- 把当前会话,添加到当前用户会话中。这样就给用户绑定好了会话了。
用户会话事件
通过Spring事件机制,管理注册用户信息和会话,包括订阅、取消订阅,会话断连。代码如下
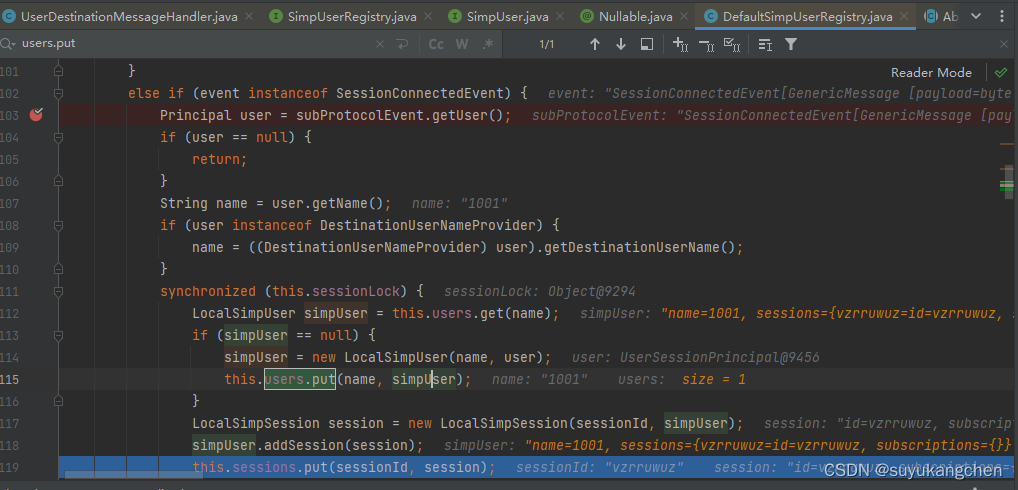
//DefaultSimpUserRegistry
	@Override
	public void onApplicationEvent(ApplicationEvent event) {
		AbstractSubProtocolEvent subProtocolEvent = (AbstractSubProtocolEvent) event;
		Message<?> message = subProtocolEvent.getMessage();
		MessageHeaders headers = message.getHeaders();

		String sessionId = SimpMessageHeaderAccessor.getSessionId(headers);
		Assert.state(sessionId != null, "No session id");

		if (event instanceof SessionSubscribeEvent) {
			LocalSimpSession session = this.sessions.get(sessionId);
			if (session != null) {
				String id = SimpMessageHeaderAccessor.getSubscriptionId(headers);
				String destination = SimpMessageHeaderAccessor.getDestination(headers);
				if (id != null && destination != null) {
					session.addSubscription(id, destination);
				}
			}
		}
		else if (event instanceof SessionConnectedEvent) {
			Principal user = subProtocolEvent.getUser();
			if (user == null) {
				return;
			}
			String name = user.getName();
			if (user instanceof DestinationUserNameProvider) {
				name = ((DestinationUserNameProvider) user).getDestinationUserName();
			}
			synchronized (this.sessionLock) {
				LocalSimpUser simpUser = this.users.get(name);
				if (simpUser == null) {
					simpUser = new LocalSimpUser(name, user);
					this.users.put(name, simpUser);
				}
				LocalSimpSession session = new LocalSimpSession(sessionId, simpUser);
				simpUser.addSession(session);
				this.sessions.put(sessionId, session);
			}
		}
		else if (event instanceof SessionDisconnectEvent) {
			synchronized (this.sessionLock) {
				LocalSimpSession session = this.sessions.remove(sessionId);
				if (session != null) {
					LocalSimpUser user = session.getUser();
					user.removeSession(sessionId);
					if (!user.hasSessions()) {
						this.users.remove(user.getName());
					}
				}
			}
		}
		else if (event instanceof SessionUnsubscribeEvent) {
			LocalSimpSession session = this.sessions.get(sessionId);
			if (session != null) {
				String subscriptionId = SimpMessageHeaderAccessor.getSubscriptionId(headers);
				if (subscriptionId != null) {
					session.removeSubscription(subscriptionId);
				}
			}
		}
	}
优雅停机
当服务器停机时,最好给客户端发送断连消息,而不是让客户端过了一段时间发现连接断开。
Spring websocket是如何来实现优雅停机的?
public class SubProtocolWebSocketHandler
		implements WebSocketHandler, SubProtocolCapable, MessageHandler, SmartLifecycle {
	@Override
	public final void stop() {
		synchronized (this.lifecycleMonitor) {
			this.running = false;
			this.clientOutboundChannel.unsubscribe(this);
		}

		// Proactively notify all active WebSocket sessions
		for (WebSocketSessionHolder holder : this.sessions.values()) {
			try {
				holder.getSession().close(CloseStatus.GOING_AWAY);
			}
			catch (Throwable ex) {
				if (logger.isWarnEnabled()) {
					logger.warn("Failed to close '" + holder.getSession() + "': " + ex);
				}
			}
		}
	}

	@Override
	public final void stop(Runnable callback) {
		synchronized (this.lifecycleMonitor) {
			stop();
			callback.run();
		}
	}
}
其奥秘就是其实现了SmartLifecycle。这个是Spring的生命周期接口。我们可以通过实现此接口,在相应的生命周期阶段注册回调事件!
上面的代码,通过调用stop接口,给客户端发送了一个断连的消息。即实现了关机时的主动通知断连。


 1914
1914


 被折叠的 条评论
为什么被折叠?
被折叠的 条评论
为什么被折叠?
 到【灌水乐园】发言


