


前言
假设一台机器支持两万的并发量,现在我们需要保证八万的并发量。首先想到的是升级服务器的配置,比如提高 CPU 执行频率,加大内存等提高机器的物理性能来解决此问题。但是单台机器的性能毕竟是有限的。
这个时候我们就可以增加服务器的数量,将用户请求分发到不同的服务器上分担压力,这就是负载均衡。那我们就需要有一个第三方组件充当负载均衡器,由它负责将不同的请求分发到不同的服务器上。这里介绍 Nginx 的负载均衡功能。

Nginx作为 tcp 负载均衡模块的原因:
- 把
client的请求按照负载算法分发到具体的业务服务器ChatServer上 - 能够
ChantServer保持心跳机制,检测ChatServer故障 - 能够发现新添加的
ChatServer设备,方便扩展服务器数量
1. Ubuntu下nginx安装
在服务器快速集群环境搭建中,都迫切需要一个能拿来即用的负载均衡器,nginx在1.9版本之前,只支持http协议web服务器的负载均衡,从1.9版本开始以后,nginx开始支持tcp的长连接负载均衡,但是nginx默认并没有编译tcp负载均衡模块,编写它时,需要加入–with-stream参数来激活这个模块。
nginx编译加入–with-stream参数激活tcp负载均衡块
1、安装包下载
地址:https://nginx.org/download/
2、上传至Ubuntu中并解压缩
tar -zxvf nginx-1.16.1.tar.gz
nginx编译安装需要先安装pcre、openssl、zlib等库。也可以直接编译执行下面的configure命令,
根据错误提示信息,安装相应缺少的库即可。
下面的make命令会向系统路径拷贝文件,需要在root用户下执行
sudo ./configure -with-stream
sudo make && make install
编译完成后,默认安装在了/usr/local/aginx目录。
cd /usr/local/nginx

可执行文件在sbin目录里面,配置文件在conf日录里面。
sudo vim ./conf/nginx.conf
sudo ./sbin/nginx -s reload#重读conf
sudo ./sbin/nginx#启动
2. nginx的tcp负载配置
在bash中使用
sudo netstat -tanp
查看当前tcp连接情况
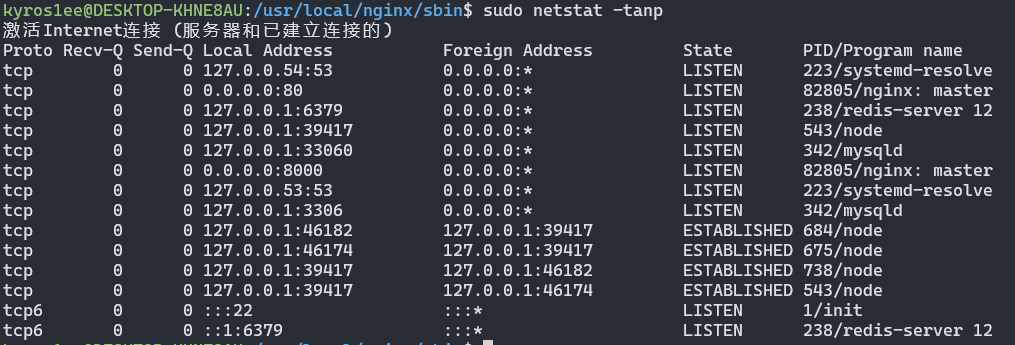
安装的nginx默认会启动监听,要注意一下他们的端口位置
在events与http之间添加tcp的配置,如下:
#user  nobody;
worker_processes  1;

#error_log  logs/error.log;
#error_log  logs/error.log  notice;
#error_log  logs/error.log  info;

#pid        logs/nginx.pid;


events {
    worker_connections  1024;
}

# nginx tcp loadbalance config
stream {
	upstream MyServer {
		server 127.0.0.1:6000 weight=1 max_fails=3 fail_timeout=30s;
		server 127.0.0.1:6002 weight=1 max_fails=3 fail_timeout=30s;
	}

	server {
		proxy_connect_timeout 1s;
		#proxy_timeout 3s;
		listen 8080;
		proxy_pass MyServer;
		tcp_nodelay on;
	}
}

http {
    include       mime.types;
    default_type  application/octet-stream;

    #log_format  main  '$remote_addr - $remote_user [$time_local] "$request" '
    #                  '$status $body_bytes_sent "$http_referer" '
    #                  '"$http_user_agent" "$http_x_forwarded_for"';

    #access_log  logs/access.log  main;

    sendfile        on;
    #tcp_nopush     on;

    #keepalive_timeout  0;
    keepalive_timeout  65;

    #gzip  on;

    server {
        listen       90;
        server_name  localhost;

        #charset koi8-r;

        #access_log  logs/host.access.log  main;

        location / {
            root   html;
            index  index.html index.htm;
        }

        #error_page  404              /404.html;

        # redirect server error pages to the static page /50x.html
        #
        error_page   500 502 503 504  /50x.html;
        location = /50x.html {
            root   html;
        }


}
其中,tcp部分为
# nginx tcp loadbalance config
stream { #这里的端口指向的是服务器端口
	upstream MyServer { #要添加多少个服务器,就在下面开放多少个端口
		server 127.0.0.1:6000 weight=1 max_fails=3 fail_timeout=30s;
		server 127.0.0.1:6002 weight=1 max_fails=3 fail_timeout=30s;
	}

	server {
		proxy_connect_timeout 1s; #设置代理连接超时时间
		#proxy_timeout 3s;
		listen 8080;	#监听端口,客户端连接此端口即可,nginx自动处理分配消息给服务器
		proxy_pass MyServer;	#代理的名字
		tcp_nodelay on;
	}
}
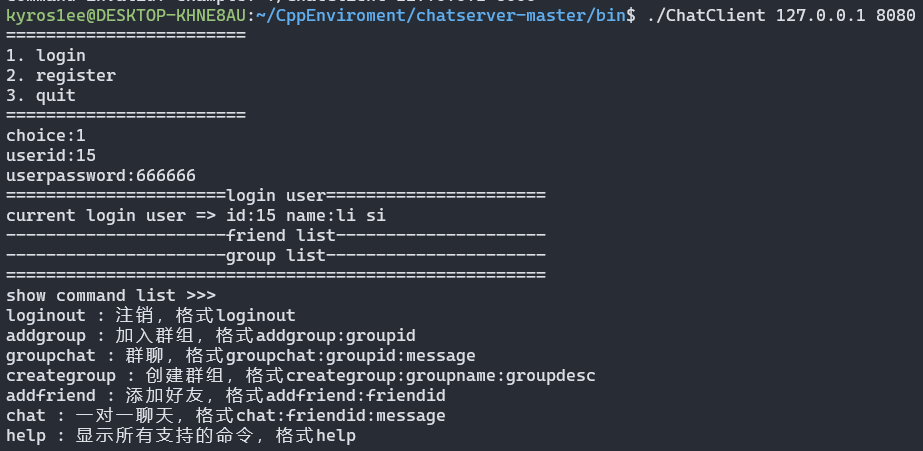
客户端只需连接nginx配置的监听端口,即可与服务器进行通信


 被折叠的 条评论
为什么被折叠?
被折叠的 条评论
为什么被折叠?
 到【灌水乐园】发言


