


<span style="font-size:24px;"></span><span style="font-size:24px;">//
// ZYAppDelegate.m
// Calculator
//
// Created by mac on 15-7-30.
// Copyright (c) 2015年 zhiyou. All rights reserved.
//
#import "ZYAppDelegate.h"
@implementation ZYAppDelegate
- (BOOL)application:(UIApplication *)application didFinishLaunchingWithOptions:(NSDictionary *)launchOptions
{
self.window = [[UIWindow alloc] initWithFrame:[[UIScreen mainScreen] bounds]];
// Override point for customization after application launch.
self.window.backgroundColor = [UIColor whiteColor];
[self.window makeKeyAndVisible];
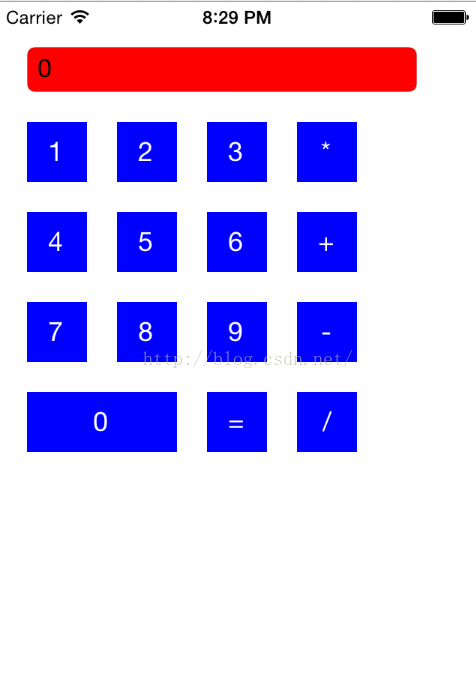
show=[[UITextField alloc] initWithFrame:CGRectMake(20, 30, 260, 30)];
show.borderStyle=UITextBorderStyleRoundedRect;
show.text=@"0";
show.backgroundColor=[UIColor redColor];
[self.window addSubview:show];
UIButton *btn1=[UIButton buttonWithType:UIButtonTypeCustom];
btn1.frame=CGRectMake(20, 80, 40, 40);
[btn1 setTitle:@"1" forState:UIControlStateNormal];
btn1.backgroundColor=[UIColor blueColor];
btn1.tag=1;
[btn1 addTarget:self action:@selector(onClick:) forControlEvents:UIControlEventTouchUpInside];
[self.window addSubview:btn1];
UIButton *btn2=[UIButton buttonWithType:UIButtonTypeCustom];
btn2.frame=CGRectMake(80, 80, 40, 40);
[btn2 setTitle:@"2" forState:UIControlStateNormal];
btn2.backgroundColor=[UIColor blueColor];
btn2.tag=2;
[btn2 addTarget:self action:@selector(onClick:) forControlEvents:UIControlEventTouchUpInside];
[self.window addSubview:btn2];
UIButton *btn3=[UIButton buttonWithType:UIButtonTypeCustom];
btn3.frame=CGRectMake(140, 80, 40, 40);
[btn3 setTitle:@"3" forState:UIControlStateNormal];
btn3.backgroundColor=[UIColor blueColor];
btn3.tag=3;
[btn3 addTarget:self action:@selector(onClick:) forControlEvents:UIControlEventTouchUpInside];
[self.window addSubview:btn3];
UIButton *btn4=[UIButton buttonWithType:UIButtonTypeCustom];
btn4.frame=CGRectMake(20, 140, 40, 40);
[btn4 setTitle:@"4" forState:UIControlStateNormal];
btn4.backgroundColor=[UIColor blueColor];
btn4.tag=4;
[btn4 addTarget:self action:@selector(onClick:) forControlEvents:UIControlEventTouchUpInside];
[self.window addSubview:btn4];
UIButton *btn5=[UIButton buttonWithType:UIButtonTypeCustom];
btn5.frame=CGRectMake(80, 140, 40, 40);
[btn5 setTitle:@"5" forState:UIControlStateNormal];
btn5.backgroundColor=[UIColor blueColor];
btn5.tag=5;
[btn5 addTarget:self action:@selector(onClick:) forControlEvents:UIControlEventTouchUpInside];
[self.window addSubview:btn5];
UIButton *btn6=[UIButton buttonWithType:UIButtonTypeCustom];
btn6.frame=CGRectMake(140, 140, 40, 40);
[btn6 setTitle:@"6" forState:UIControlStateNormal];
btn6.backgroundColor=[UIColor blueColor];
btn6.tag=6;
[btn6 addTarget:self action:@selector(onClick:) forControlEvents:UIControlEventTouchUpInside];
[self.window addSubview:btn6];
UIButton *btn7=[UIButton buttonWithType:UIButtonTypeCustom];
btn7.frame=CGRectMake(20, 200, 40, 40);
[btn7 setTitle:@"7" forState:UIControlStateNormal];
btn7.backgroundColor=[UIColor blueColor];
btn7.tag=7;
[btn7 addTarget:self action:@selector(onClick:) forControlEvents:UIControlEventTouchUpInside];
[self.window addSubview:btn7];
UIButton *btn8=[UIButton buttonWithType:UIButtonTypeCustom];
btn8.frame=CGRectMake(80, 200, 40, 40);
[btn8 setTitle:@"8" forState:UIControlStateNormal];
btn8.backgroundColor=[UIColor blueColor];
btn8.tag=8;
[btn8 addTarget:self action:@selector(onClick:) forControlEvents:UIControlEventTouchUpInside];
[self.window addSubview:btn8];
UIButton *btn9=[UIButton buttonWithType:UIButtonTypeCustom];
btn9.frame=CGRectMake(140, 200, 40, 40);
[btn9 setTitle:@"9" forState:UIControlStateNormal];
btn9.backgroundColor=[UIColor blueColor];
btn9.tag=9;
[btn9 addTarget:self action:@selector(onClick:) forControlEvents:UIControlEventTouchUpInside];
[self.window addSubview:btn9];
UIButton *btn0=[UIButton buttonWithType:UIButtonTypeCustom];
btn0.frame=CGRectMake(20, 260, 100, 40);
[btn0 setTitle:@"0" forState:UIControlStateNormal];
btn0.backgroundColor=[UIColor blueColor];
btn0.tag=10;
[btn0 addTarget:self action:@selector(onClick:) forControlEvents:UIControlEventTouchUpInside];
[self.window addSubview:btn0];
UIButton *jia=[UIButton buttonWithType:UIButtonTypeCustom];
jia.frame=CGRectMake(200, 140, 40, 40);
[jia setTitle:@"+" forState:UIControlStateNormal];
jia.backgroundColor=[UIColor blueColor];
jia.tag=100101;
[jia addTarget:self action:@selector(click:) forControlEvents:UIControlEventTouchUpInside];
[self.window addSubview:jia];
UIButton *jian=[UIButton buttonWithType:UIButtonTypeCustom];
jian.frame=CGRectMake(200, 200, 40, 40);
[jian setTitle:@"-" forState:UIControlStateNormal];
jian.backgroundColor=[UIColor blueColor];
jian.tag=100102;
[jian addTarget:self action:@selector(click:) forControlEvents:UIControlEventTouchUpInside];
[self.window addSubview:jian];
UIButton *cheng=[UIButton buttonWithType:UIButtonTypeCustom];
cheng.frame=CGRectMake(200, 80, 40, 40);
[cheng setTitle:@"*" forState:UIControlStateNormal];
cheng.backgroundColor=[UIColor blueColor];
cheng.tag=100103;
[cheng addTarget:self action:@selector(click:) forControlEvents:UIControlEventTouchUpInside];
[self.window addSubview:cheng];
UIButton *chu=[UIButton buttonWithType:UIButtonTypeCustom];
chu.frame=CGRectMake(200, 260, 40, 40);
[chu setTitle:@"/" forState:UIControlStateNormal];
chu.backgroundColor=[UIColor blueColor];
chu.tag=100104;
[chu addTarget:self action:@selector(click:) forControlEvents:UIControlEventTouchUpInside];
[self.window addSubview:chu];
UIButton *deng=[UIButton buttonWithType:UIButtonTypeCustom];
deng.frame=CGRectMake(140, 260, 40, 40);
[deng setTitle:@"=" forState:UIControlStateNormal];
deng.backgroundColor=[UIColor blueColor];
deng.tag=100105;
[deng addTarget:self action:@selector(equal) forControlEvents:UIControlEventTouchUpInside];
[self.window addSubview:deng];
return YES;
}
-(void)onClick:(UIButton *)btn{
switch (btn.tag) {
case 1:
num1=@"1";
show.text=num1;
a=[num1 intValue];
break;
case 2:
num1=@"2";
show.text=num1;
a=[num1 intValue];
break;
case 3:
num1=@"3";
show.text=num1;
a=[num1 intValue];
break;
case 4:
num1=@"4";
show.text=num1;
a=[num1 intValue];
break;
case 5:
num1=@"5";
show.text=num1;
a=[num1 intValue];
break;
case 6:
num1=@"6";
show.text=num1;
a=[num1 intValue];
break;
case 7:
num1=@"7";
show.text=num1;
a=[num1 intValue];
break;
case 8:
num1=@"8";
show.text=num1;
a=[num1 intValue];
break;
case 9:
num1=@"9";
show.text=num1;
a=[num1 intValue];
break;
case 10:
num1=@"0";
show.text=num1;
a=[num1 intValue];
break;
default:
break;
}
}
-(void)click:(UIButton *)btn{
switch (btn.tag) {
case 100101:
b=1;
c=a;
break;
case 100102:
b=2;
c=a;
break;
case 100103:
b=3;
c=a;
break;
case 100104:
b=4;
c=a;
break;
}
}
-(void)equal{
if (b==1) {
show.text=[NSString stringWithFormat:@"%d",(c+a)];
}
if (b==2) {
show.text=[NSString stringWithFormat:@"%d",(c-a)];
}
if (b==3) {
show.text=[NSString stringWithFormat:@"%d",(c*a)];
}
if (b==4) {
show.text=[NSString stringWithFormat:@"%d",(c/a)];
}
}
-(void)touchesBegan:(NSSet *)touches withEvent:(UIEvent *)event
{
[self.window endEditing:YES];
}
- (void)applicationWillResignActive:(UIApplication *)application
{
// Sent when the application is about to move from active to inactive state. This can occur for certain types of temporary interruptions (such as an incoming phone call or SMS message) or when the user quits the application and it begins the transition to the background state.
// Use this method to pause ongoing tasks, disable timers, and throttle down OpenGL ES frame rates. Games should use this method to pause the game.
}
- (void)applicationDidEnterBackground:(UIApplication *)application
{
// Use this method to release shared resources, save user data, invalidate timers, and store enough application state information to restore your application to its current state in case it is terminated later.
// If your application supports background execution, this method is called instead of applicationWillTerminate: when the user quits.
}
- (void)applicationWillEnterForeground:(UIApplication *)application
{
// Called as part of the transition from the background to the inactive state; here you can undo many of the changes made on entering the background.
}
- (void)applicationDidBecomeActive:(UIApplication *)application
{
// Restart any tasks that were paused (or not yet started) while the application was inactive. If the application was previously in the background, optionally refresh the user interface.
}
- (void)applicationWillTerminate:(UIApplication *)application
{
// Called when the application is about to terminate. Save data if appropriate. See also applicationDidEnterBackground:.
}
@end
</span>


 430
430

 被折叠的 条评论
为什么被折叠?
被折叠的 条评论
为什么被折叠?
 到【灌水乐园】发言


