


一、消息中间件概述
1、什么是消息中间件
MQ全称为Message Queue,消息队列是应用程序和应用程序之间的通信方法。
2、AMQP和JMS
MQ是消息通信的模型;实现MQ的大致有两种主流方式:AMQP、JMS。
(1)AMQP
AMQP是一种协议(Advanced Message Queue 高级消息队列协议),更准确的说是一种binary wire-level protocol(链接协议)。这是其和JMS的本质差别,AMQP不从API层进行限定,而是直接定义网络交换的数据格式。
(2)JMS
JMS即Java消息服务(JavaMessage Service)应用程序接口,是一个Java平台中关于面向消息中间件(MOM)的API,用于在两个应用程序之间,或分布式系统中发送消息,进行异步通信。
(3)AMQP 与 JMS 区别
JMS是定义了统一的接口,来对消息操作进行统一;AMQP是通过规定协议来统一数据交互的格式
JMS限定了必须使用Java语言;AMQP只是协议,不规定实现方式,因此是跨语言的。
JMS规定了两种消息模式;而AMQP的消息模式更加丰富。
3、消息队列产品
市场上常见的消息队列有如下:
ActiveMQ:基于JMS ZeroMQ:基于C语言开发
RabbitMQ:基于AMQP协议,erlang语言开发,稳定性好
RocketMQ:基于JMS,阿里巴巴产品
Kafka:类似MQ的产品;分布式消息系统,高吞吐量
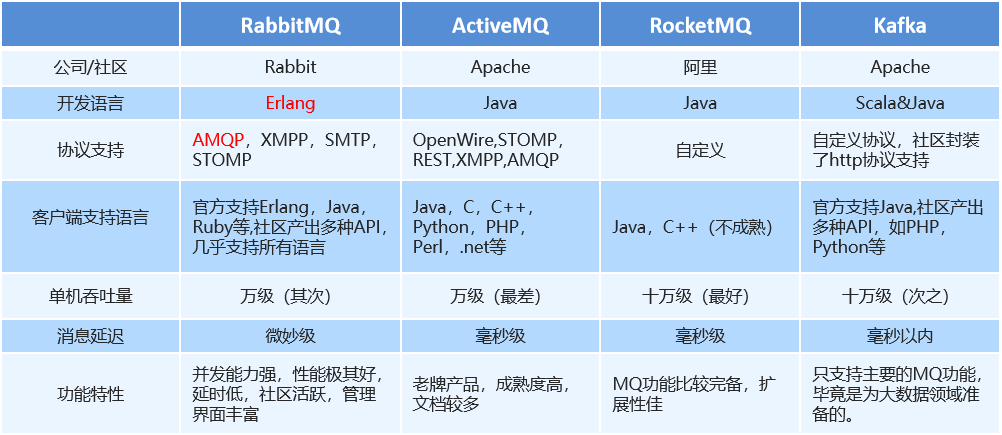
4、RabbitMQ介绍
RabbitMQ是由erlang语言开发,基于AMQP(Advanced Message Queue 高级消息队列协议)协议实现的消息队列,它是一种应用程序之间的通信方法,消息队列在分布式系统开发中应用非常广泛。
RabbitMQ提供了6种模式:
Hello World简单模式
Work queue工作队列模式
Publish/Subscribe发布与订阅模式
Routing路由模式
Topics主题模式
RPC远程调用模式(远程调用,不太算MQ;暂不作介绍)

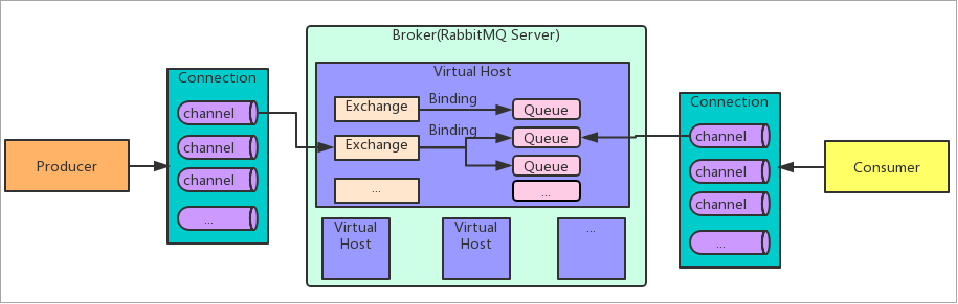
RabbitMQ中的相关概念:
- Broker:接收和分发消息的应用,RabbitMQ Server就是 Message Broker。
- Virtual host:出于多租户和安全因素设计的,把 AMQP 的基本组件划分到一个虚拟的分组中,类似于网络中的 namespace 概念。当多个不同的用户使用同一个 RabbitMQ server 提供的服务时,可以划分出多个vhost,每个用户在自己的 vhost 创建 exchange/queue 等。
- Connection:publisher/consumer 和 broker 之间的 TCP 连接 。
- Channel:如果每一次访问 RabbitMQ都建立一个 Connection,在消息量大的时候建立 TCP Connection的开销将是巨大的,效率也较低。Channel 是在connection 内部建立的逻辑连接,如果应用程序支持多线程,通常每个thread创建单独的 channel 进行通讯,AMQP method 包含了channel id 帮助客户端和message broker 识别 channel,所以 channel之间是完全隔离的。Channel 作为轻量级的 Connection 极大减少了操作系统建立 TCP connection 的开销 。
- Exchange:message 到达 broker的第一站,根据分发规则,匹配查询表中的 routing key,分发消息到queue 中去。常用的类型有:direct(point-to-point), topic (publish-subscribe) and fanout (multicast) 。
- Queue:消息最终被送到这里等待 consumer 取走。
- Binding:exchange 和 queue之间的虚拟连接,binding 中可以包含 routing key。Binding 信息被保存到 exchange 中的查询表中,用于 message 的分发依据。
RabbitMQ 基础架构如下图:
二、AMQP
1、相关概念介绍
AMQP 一个提供统一消息服务的应用层标准高级消息队列协议,是应用层协议的一个开放标准,为面向消息的中间件设计。
AMQP是一个二进制协议,拥有一些现代化特点:多信道、协商式,异步,安全,扩平台,中立,高效。
RabbitMQ是AMQP协议的Erlang的实现。
| 概念 | 说明 |
|---|---|
| 连接Connection | 一个网络连接,比如TCP/IP套接字连接。 |
| 会话Session | 端点之间的命名对话。在一个会话上下文中,保证“恰好传递一次”。 |
| 信道Channel | 多路复用连接中的一条独立的双向数据流通道。为会话提供物理传输介质。 |
| 客户端Client | AMQP连接或者会话的发起者。AMQP是非对称的,客户端生产和消费消息,服务器存储和路由这些消息。 |
| 服务节点Broker | 消息中间件的服务节点;一般情况下可以将一个RabbitMQ Broker看作一台RabbitMQ 服务器。 |
| 端点 | AMQP对话的任意一方。一个AMQP连接包括两个端点(一个是客户端,一个是服务器)。 |
| 消费者Consumer | 一个从消息队列里请求消息的客户端程序。 |
| 生产者Producer | 一个向交换机发布消息的客户端应用程序。 |
2、RabbitMQ运转流程
在入门案例中:
- 生产者发送消息
- 生产者创建连接(Connection),开启一个信道(Channel),连接到RabbitMQ Broker;
- 声明队列并设置属性;如是否排它,是否持久化,是否自动删除;
- 将路由键(空字符串)与队列绑定起来;
- 发送消息至RabbitMQ Broker;
- 关闭信道;
- 关闭连接;
- 消费者接收消息
- 消费者创建连接(Connection),开启一个信道(Channel),连接到RabbitMQ Broker
- 向Broker 请求消费相应队列中的消息,设置相应的回调函数;
- 等待Broker回应闭关投递响应队列中的消息,消费者接收消息;
- 确认(ack,自动确认)接收到的消息;
- RabbitMQ从队列中删除相应已经被确认的消息;
- 关闭信道;
- 关闭连接;

3、生产者流转过程说明
- 客户端与代理服务器Broker建立连接。会调用newConnection() 方法,这个方法会进一步封装Protocol Header 0-9-1 的报文头发送给Broker ,以此通知Broker 本次交互采用的是AMQPO-9-1 协议,紧接着Broker 返回Connection.Start 来建立连接,在连接的过程中涉及Connection.Start/.Start-OK 、Connection.Tune/.Tune-Ok ,Connection.Open/ .Open-Ok 这6 个命令的交互。
- 客户端调用connection.createChannel方法。此方法开启信道,其包装的channel.open命令发送给Broker,等待channel.basicPublish方法,对应的AMQP命令为Basic.Publish,这个命令包含了content Header 和content Body()。content Header 包含了消息体的属性,例如:投递模式,优先级等,content Body 包含了消息体本身。
- 客户端发送完消息需要关闭资源时,涉及到Channel.Close和Channl.Close-Ok 与Connetion.Close和Connection.Close-Ok的命令交互。

4、消费者流转过程说明
- 消费者客户端与代理服务器Broker建立连接。会调用newConnection() 方法,这个方法会进一步封装Protocol Header 0-9-1 的报文头发送给Broker ,以此通知Broker 本次交互采用的是AMQPO-9-1 协议,紧接着Broker 返回Connection.Start 来建立连接,在连接的过程中涉及Connection.Start/.Start-OK 、Connection.Tune/.Tune-Ok ,Connection.Open/ .Open-Ok 这6 个命令的交互。
- 消费者客户端调用connection.createChannel方法。和生产者客户端一样,协议涉及Channel . Open/Open-Ok命令。
- 在真正消费之前,消费者客户端需要向Broker 发送Basic.Consume 命令(即调用channel.basicConsume 方法〉将Channel 置为接收模式,之后Broker 回执Basic . Consume - Ok 以告诉消费者客户端准备好消费消息。
- Broker 向消费者客户端推送(Push) 消息,即Basic.Deliver 命令,这个命令和Basic.Publish 命令一样会携带Content Header 和Content Body。
- 消费者接收到消息并正确消费之后,向Broker 发送确认,即Basic.Ack 命令。
- 客户端发送完消息需要关闭资源时,涉及到Channel.Close和Channl.Close-Ok 与Connetion.Close和Connection.Close-Ok的命令交互。

三、Linux安装RabbitMQ
1.下载erlang和rabbitmq(版本要对应)

2.在线安装依赖环境
yum install gcc
yum install socat

3.安装erlang和RabbitMQ
mkdir rabbitmq
cd rabbitmq
# 上传 erlang-22.0.7-1.el7.x86_64.rpm 安装包
rpm -ivh erlang-22.0.7-1.el7.x86_64.rpm                     #安装


# 上传 rabbitmq-server-3.7.17-1.el7.noarch.rpm 安装包
rpm -ivh rabbitmq-server-3.7.17-1.el7.noarch.rpm            # 安装

4.开启管理界面及配置
# 开启管理界面
rabbitmq-plugins enable rabbitmq_management

# 启动rabbitmq服务
systemctl start rabbitmq-server
访问http://虚拟机ip地址:15672,默认自带了guest/guest的用户名和密码

原因:rabbitmq从3.3.0开始禁止使用guest/guest权限通过除localhost外的访问
解决方法:
找到这个文件rabbit.app
/usr/lib/rabbitmq/lib/rabbitmq_server-3.7.7/ebin/rabbit.app

将:{loopback_users, [<<”guest”>>]},
改为:{loopback_users, []},

重启rabbitmq服务,再次登录就成功了
四、RabbitMQ入门
创建项目,并添加依赖

<dependency>
     <groupId>com.rabbitmq</groupId>
     <artifactId>amqp-client</artifactId>
     <version>5.6.0</version>
</dependency>
1、Hello World简单模式
(1)编写生产者
package edu.whpu.simple;

import com.rabbitmq.client.Channel;
import com.rabbitmq.client.Connection;
import com.rabbitmq.client.ConnectionFactory;
import java.io.IOException;
import java.util.concurrent.TimeoutException;

public class Producer {
    static final String QUEUE_NAME = "simple_queue";
    public static void main(String[] args) throws IOException, TimeoutException {
        //创建连接工厂
        ConnectionFactory connectionFactory = new ConnectionFactory();
        //主机地址  默认为 localhost
        connectionFactory.setHost("192.168.175.128");
        //连接端口   默认为 5672
        connectionFactory.setPort(5672);
        //虚拟主机名称   默认为 /
        connectionFactory.setVirtualHost("/");
        //连接用户名  默认为guest
        connectionFactory.setUsername("wenbin");
        //连接密码    默认为guest
        connectionFactory.setPassword("123456");

        //创建连接
        Connection connection = connectionFactory.newConnection();

        // 创建频道
        Channel channel = connection.createChannel();

        // 声明(创建)队列
        /**
         * 参数1:队列名称
         * 参数2:是否定义持久化队列
         * 参数3:是否独占本次连接
         * 参数4:是否在不使用的时候自动删除队列
         * 参数5:队列其它参数
         */
        channel.queueDeclare(QUEUE_NAME, true, false, false, null);

        // 要发送的信息
        String message = "你好,小兔子!";

        /**
         * 参数1:交换机名称,如果没有指定则使用默认Default Exchange
         * 参数2:路由key,简单模式可以传递队列名称
         * 参数3:消息其它属性
         * 参数4:消息内容
         */
        channel.basicPublish("", QUEUE_NAME, null, message.getBytes());
        System.out.println("已发送消息:" + message);

        // 关闭资源
        channel.close();
        connection.close();
    }
}
在执行上述的消息发送之后;可以登录rabbitMQ的管理控制台,可以发现队列和其消息:


(2)抽取创建connection的工具类
package edu.whpu.util;

import com.rabbitmq.client.Connection;
import com.rabbitmq.client.ConnectionFactory;

public class ConnectionUtil {
    public static Connection getConnection() throws Exception {
        //创建连接工厂
        ConnectionFactory connectionFactory = new ConnectionFactory();
        //主机地址;默认为 localhost
        connectionFactory.setHost("192.168.175.128");
        //连接端口;默认为 5672
        connectionFactory.setPort(5672);
        //虚拟主机名称;默认为 /
        connectionFactory.setVirtualHost("/");
        //连接用户名;默认为guest
        connectionFactory.setUsername("wenbin");
        //连接密码;默认为guest
        connectionFactory.setPassword("123456");

        //创建连接
        return connectionFactory.newConnection();
    }
}
(3)编写消费者
Connection connection = ConnectionUtil.getConnection();

        // 创建频道
        Channel channel = connection.createChannel();

        // 声明(创建)队列
        /**
         * 参数1:队列名称
         * 参数2:是否定义持久化队列
         * 参数3:是否独占本次连接
         * 参数4:是否在不使用的时候自动删除队列
         * 参数5:队列其它参数
         */
        channel.queueDeclare(Producer.QUEUE_NAME, true, false, false, null);

        //创建消费者;并设置消息处理
        DefaultConsumer consumer = new DefaultConsumer(channel){
            @Override
            /**
             * consumerTag 消息者标签,在channel.basicConsume时候可以指定
             * envelope 消息包的内容,可从中获取消息id,消息routingkey,交换机,消息和重传标志(收到消息失败后是否需要重新发送)
             * properties 属性信息
             * body 消息
             */
            public void handleDelivery(String consumerTag, Envelope envelope, AMQP.BasicProperties properties, byte[] body) throws IOException {
                //路由key
                System.out.println("路由key为:" + envelope.getRoutingKey());
                //交换机
                System.out.println("交换机为:" + envelope.getExchange());
                //消息id
                System.out.println("消息id为:" + envelope.getDeliveryTag());
                //收到的消息
                System.out.println("接收到的消息为:" + new String(body, "utf-8"));
            }
        };
        //监听消息
        /**
         * 参数1:队列名称
         * 参数2:是否自动确认,设置为true为表示消息接收到自动向mq回复接收到了,mq接收到回复会删除消息,设置为false则需要手动确认
         * 参数3:消息接收到后回调
         */
        channel.basicConsume(Producer.QUEUE_NAME, true, consumer);

        //不关闭资源,应该一直监听消息
        //channel.close();
        //connection.close();

(4)小结
上述的入门案例中中其实使用的是如下的简单模式:

在上图的模型中,有以下概念:
- P:生产者,也就是要发送消息的程序
- C:消费者:消息的接受者,会一直等待消息到来。
- Queue:消息队列,图中红色部分。类似一个邮箱,可以缓存消息;生产者向其中投递消息,消费者从其中取出消息。
2、Work queue工作队列模式
(1)编写生产者
package edu.whpu.work;

import com.rabbitmq.client.Channel;
import com.rabbitmq.client.Connection;
import edu.whpu.util.ConnectionUtil;

public class Producer {
    static final String QUEUE_NAME = "work_queue";

    public static void main(String[] args) throws Exception {
        //创建连接
        Connection connection = ConnectionUtil.getConnection();

        // 创建频道
        Channel channel = connection.createChannel();

        // 声明(创建)队列
        /**
         * 参数1:队列名称
         * 参数2:是否定义持久化队列
         * 参数3:是否独占本次连接
         * 参数4:是否在不使用的时候自动删除队列
         * 参数5:队列其它参数
         */
        channel.queueDeclare(QUEUE_NAME, true, false, false, null);

        for (int i = 1; i <= 30; i++) {
            // 发送信息
            String message = "你好;小兔子!work模式--" + i;
            /**
             * 参数1:交换机名称,如果没有指定则使用默认Default Exchage
             * 参数2:路由key,简单模式可以传递队列名称
             * 参数3:消息其它属性
             * 参数4:消息内容
             */
            channel.basicPublish("", QUEUE_NAME, null, message.getBytes());
            System.out.println("已发送消息:" + message);
        }

        // 关闭资源
        channel.close();
        connection.close();
    }
}


(2)编写消费者1
package edu.whpu.work;

import com.rabbitmq.client.*;
import edu.whpu.util.ConnectionUtil;
import java.io.IOException;

public class Consumer1 {
    public static void main(String[] args) throws Exception {
        Connection connection = ConnectionUtil.getConnection();

        // 创建频道
        Channel channel = connection.createChannel();

        // 声明(创建)队列
        /**
         * 参数1:队列名称
         * 参数2:是否定义持久化队列
         * 参数3:是否独占本次连接
         * 参数4:是否在不使用的时候自动删除队列
         * 参数5:队列其它参数
         */
        channel.queueDeclare(Producer.QUEUE_NAME, true, false, false, null);

        //一次只能接收并处理一个消息
        channel.basicQos(1);

        //创建消费者;并设置消息处理
        DefaultConsumer consumer = new DefaultConsumer(channel) {
            @Override
            /**
             * consumerTag 消息者标签,在channel.basicConsume时候可以指定
             * envelope 消息包的内容,可从中获取消息id,消息routingkey,交换机,消息和重传标志(收到消息失败后是否需要重新发送)
             * properties 属性信息
             * body 消息
             */
            public void handleDelivery(String consumerTag, Envelope envelope, AMQP.BasicProperties properties, byte[] body) throws IOException {
                try {
                    //路由key
                    System.out.println("路由key为:" + envelope.getRoutingKey());
                    //交换机
                    System.out.println("交换机为:" + envelope.getExchange());
                    //消息id
                    System.out.println("消息id为:" + envelope.getDeliveryTag());
                    //收到的消息
                    System.out.println("消费者1-接收到的消息为:" + new String(body, "utf-8"));
                    Thread.sleep(1000);

                    //确认消息
                    channel.basicAck(envelope.getDeliveryTag(), false);
                } catch (InterruptedException e) {
                    e.printStackTrace();
                }
            }
        };
        //监听消息
        /**
         * 参数1:队列名称
         * 参数2:是否自动确认,设置为true为表示消息接收到自动向mq回复接收到了,mq接收到回复会删除消息,设置为false则需要手动确认
         * 参数3:消息接收到后回调
         */
        channel.basicConsume(Producer.QUEUE_NAME, false, consumer);
    }
}
(3)编写消费者2
package edu.whpu.work;

import com.rabbitmq.client.*;
import edu.whpu.util.ConnectionUtil;
import java.io.IOException;

public class Consumer2 {
    public static void main(String[] args) throws Exception {
        Connection connection = ConnectionUtil.getConnection();

        // 创建频道
        Channel channel = connection.createChannel();

        // 声明(创建)队列
        /**
         * 参数1:队列名称
         * 参数2:是否定义持久化队列
         * 参数3:是否独占本次连接
         * 参数4:是否在不使用的时候自动删除队列
         * 参数5:队列其它参数
         */
        channel.queueDeclare(Producer.QUEUE_NAME, true, false, false, null);

        //一次只能接收并处理一个消息
        channel.basicQos(1);

        //创建消费者;并设置消息处理
        DefaultConsumer consumer = new DefaultConsumer(channel){
            @Override
            /**
             * consumerTag 消息者标签,在channel.basicConsume时候可以指定
             * envelope 消息包的内容,可从中获取消息id,消息routingkey,交换机,消息和重传标志(收到消息失败后是否需要重新发送)
             * properties 属性信息
             * body 消息
             */
            public void handleDelivery(String consumerTag, Envelope envelope, AMQP.BasicProperties properties, byte[] body) throws IOException {
                try {
                    //路由key
                    System.out.println("路由key为:" + envelope.getRoutingKey());
                    //交换机
                    System.out.println("交换机为:" + envelope.getExchange());
                    //消息id
                    System.out.println("消息id为:" + envelope.getDeliveryTag());
                    //收到的消息
                    System.out.println("消费者2-接收到的消息为:" + new String(body, "utf-8"));
                    Thread.sleep(1000);

                    //确认消息
                    channel.basicAck(envelope.getDeliveryTag(), false);
                } catch (InterruptedException e) {
                    e.printStackTrace();
                }
            }
        };
        //监听消息
        /**
         * 参数1:队列名称
         * 参数2:是否自动确认,设置为true为表示消息接收到自动向mq回复接收到了,mq接收到回复会删除消息,设置为false则需要手动确认
         * 参数3:消息接收到后回调
         */
        channel.basicConsume(Producer.QUEUE_NAME, false, consumer);
    }
}
启动两个消费者,然后再启动生产者发送消息;到IDEA的两个消费者对应的控制台查看是否竞争性的接收到消息。


(4)小结
在一个队列中如果有多个消费者,那么消费者之间对于同一个消息的关系是竞争的关系。

3、Publish/Subscribe发布与订阅模式
前面2个案例中,只有3个角色:
- P:生产者,也就是要发送消息的程序
- C:消费者:消息的接受者,会一直等待消息到来。
- Queue:消息队列,图中红色部分
而在订阅模型中,多了一个exchange角色,而且过程略有变化:

- P:生产者,也就是要发送消息的程序,但是不再发送到队列中,而是发给X(交换机)
- C:消费者,消息的接受者,会一直等待消息到来。
- Queue:消息队列,接收消息、缓存消息。
- Exchange:交换机,图中的X。一方面,接收生产者发送的消息。另一方面,知道如何处理消息,例如递交给某个特别队列、递交给所有队列、或是将消息丢弃。到底如何操作,取决于Exchange的类型。
Exchange有常见以下3种类型:
- Fanout:广播,将消息交给所有绑定到交换机的队列
- Direct:定向,把消息交给符合指定routing key 的队列
- Topic:通配符,把消息交给符合routing pattern(路由模式) 的队列
Exchange(交换机)只负责转发消息,不具备存储消息的能力,因此如果没有任何队列与Exchange绑定,或者没有符合路由规则的队列,那么消息会丢失!
(1)编写生产者
package edu.whpu.ps;

import com.rabbitmq.client.BuiltinExchangeType;
import com.rabbitmq.client.Channel;
import com.rabbitmq.client.Connection;
import edu.whpu.util.ConnectionUtil;

/**
 * 发布与订阅使用的交换机类型为:fanout
 */
public class Producer {
    //交换机名称
    static final String FANOUT_EXCHANGE = "fanout_exchange";
    //队列名称
    static final String FANOUT_QUEUE_1 = "fanout_queue_1";
    //队列名称
    static final String FANOUT_QUEUE_2 = "fanout_queue_2";


    public static void main(String[] args) throws Exception {

        //创建连接
        Connection connection = ConnectionUtil.getConnection();

        // 创建频道
        Channel channel = connection.createChannel();

        /**
         * 声明交换机
         * 参数1:交换机名称
         * 参数2:交换机类型,fanout、topic、direct、headers
         */
        channel.exchangeDeclare(FANOUT_EXCHANGE, BuiltinExchangeType.FANOUT);


        // 声明(创建)队列
        /**
         * 参数1:队列名称
         * 参数2:是否定义持久化队列
         * 参数3:是否独占本次连接
         * 参数4:是否在不使用的时候自动删除队列
         * 参数5:队列其它参数
         */
        channel.queueDeclare(FANOUT_QUEUE_1, true, false, false, null);
        channel.queueDeclare(FANOUT_QUEUE_2, true, false, false, null);

        //队列绑定交换机
        channel.queueBind(FANOUT_QUEUE_1, FANOUT_EXCHANGE, "");
        channel.queueBind(FANOUT_QUEUE_2, FANOUT_EXCHANGE, "");

        for (int i = 1; i <= 10; i++) {
            // 发送信息
            String message = "你好;小兔子!发布订阅模式--" + i;
            /**
             * 参数1:交换机名称,如果没有指定则使用默认Default Exchage
             * 参数2:路由key,简单模式可以传递队列名称
             * 参数3:消息其它属性
             * 参数4:消息内容
             */
            channel.basicPublish(FANOUT_EXCHANGE, "", null, message.getBytes());
            System.out.println("已发送消息:" + message);
        }

        // 关闭资源
        channel.close();
        connection.close();
    }
}
(2)编写消费者1
package edu.whpu.ps;

import com.rabbitmq.client.*;
import edu.whpu.util.ConnectionUtil;
import java.io.IOException;

public class Consumer1 {
    public static void main(String[] args) throws Exception {
        Connection connection = ConnectionUtil.getConnection();

        // 创建频道
        Channel channel = connection.createChannel();

        //声明交换机
        channel.exchangeDeclare(Producer.FANOUT_EXCHANGE, BuiltinExchangeType.FANOUT);

        // 声明(创建)队列
        /**
         * 参数1:队列名称
         * 参数2:是否定义持久化队列
         * 参数3:是否独占本次连接
         * 参数4:是否在不使用的时候自动删除队列
         * 参数5:队列其它参数
         */
        channel.queueDeclare(Producer.FANOUT_QUEUE_1, true, false, false, null);

        //队列绑定交换机
        channel.queueBind(Producer.FANOUT_QUEUE_1, Producer.FANOUT_EXCHANGE, "");

        //创建消费者;并设置消息处理
        DefaultConsumer consumer = new DefaultConsumer(channel){
            @Override
            /**
             * consumerTag 消息者标签,在channel.basicConsume时候可以指定
             * envelope 消息包的内容,可从中获取消息id,消息routingkey,交换机,消息和重传标志(收到消息失败后是否需要重新发送)
             * properties 属性信息
             * body 消息
             */
            public void handleDelivery(String consumerTag, Envelope envelope, AMQP.BasicProperties properties, byte[] body) throws IOException {
                //路由key
                System.out.println("路由key为:" + envelope.getRoutingKey());
                //交换机
                System.out.println("交换机为:" + envelope.getExchange());
                //消息id
                System.out.println("消息id为:" + envelope.getDeliveryTag());
                //收到的消息
                System.out.println("消费者1-接收到的消息为:" + new String(body, "utf-8"));
            }
        };
        //监听消息
        /**
         * 参数1:队列名称
         * 参数2:是否自动确认,设置为true为表示消息接收到自动向mq回复接收到了,mq接收到回复会删除消息,设置为false则需要手动确认
         * 参数3:消息接收到后回调
         */
        channel.basicConsume(Producer.FANOUT_QUEUE_1, true, consumer);
    }
}
(3)编写消费者2
package edu.whpu.ps;

import com.rabbitmq.client.*;
import edu.whpu.util.ConnectionUtil;
import java.io.IOException;
import java.nio.charset.StandardCharsets;

public class Consumer2{
    public static void main(String[] args) throws Exception {
        Connection connection = ConnectionUtil.getConnection();

        // 创建频道
        Channel channel = connection.createChannel();

        //声明交换机
        channel.exchangeDeclare(Producer.FANOUT_EXCHANGE, BuiltinExchangeType.FANOUT);

        // 声明(创建)队列
        /**
         * 参数1:队列名称
         * 参数2:是否定义持久化队列
         * 参数3:是否独占本次连接
         * 参数4:是否在不使用的时候自动删除队列
         * 参数5:队列其它参数
         */
        channel.queueDeclare(Producer.FANOUT_QUEUE_2, true, false, false, null);

        //队列绑定交换机
        channel.queueBind(Producer.FANOUT_QUEUE_2, Producer.FANOUT_EXCHANGE, "");

        //创建消费者;并设置消息处理
        DefaultConsumer consumer = new DefaultConsumer(channel){
            @Override
            /**
             * consumerTag 消息者标签,在channel.basicConsume时候可以指定
             * envelope 消息包的内容,可从中获取消息id,消息routingkey,交换机,消息和重传标志(收到消息失败后是否需要重新发送)
             * properties 属性信息
             * body 消息
             */
            public void handleDelivery(String consumerTag, Envelope envelope, AMQP.BasicProperties properties, byte[] body) throws IOException {
                //路由key
                System.out.println("路由key为:" + envelope.getRoutingKey());
                //交换机
                System.out.println("交换机为:" + envelope.getExchange());
                //消息id
                System.out.println("消息id为:" + envelope.getDeliveryTag());
                //收到的消息
                System.out.println("消费者2-接收到的消息为:" + new String(body, StandardCharsets.UTF_8));
            }
        };
        //监听消息
        /**
         * 参数1:队列名称
         * 参数2:是否自动确认,设置为true为表示消息接收到自动向mq回复接收到了,mq接收到回复会删除消息,设置为false则需要手动确认
         * 参数3:消息接收到后回调
         */
        channel.basicConsume(Producer.FANOUT_QUEUE_2, true, consumer);
    }
}
(4)测试
启动所有消费者,然后使用生产者发送消息;在每个消费者对应的控制台可以查看到生产者发送的所有消息;到达广播的效果。
在执行完测试代码后,其实到RabbitMQ的管理后台找到Exchanges选项卡,点击 fanout_exchange 的交换机,可以查看到如下的绑定:

(5)小结
交换机需要与队列进行绑定,绑定之后;一个消息可以被多个消费者都收到。
发布订阅模式与工作队列模式的区别
- 工作队列模式不用定义交换机,而发布/订阅模式需要定义交换机
- 发布/订阅模式的生产方是面向交换机发送消息,工作队列模式的生产方是面向队列发送消息(底层使用默认交换机)。
- 发布/订阅模式需要设置队列和交换机的绑定,工作队列模式不需要设置,实际上工作队列模式会将队列绑 定到默认的交换机 。
4、Routing路由模式
模式说明

路由模式特点:
- 队列与交换机的绑定,不能是任意绑定了,而是要指定一个
RoutingKey(路由key) - 消息的发送方在 向 Exchange发送消息时,也必须指定消息的
RoutingKey。 - Exchange不再把消息交给每一个绑定的队列,而是根据消息的
Routing Key进行判断,只有队列的Routingkey与消息的Routing key完全一致,才会接收到消息

图解:
P: 生产者,向Exchange发送消息,发送消息时,会指定一个routing key。
X: Exchange(交换机),接收生产者的消息,然后把消息递交给 与routing key完全匹配的队列
C1:消费者,其所在队列指定了需要routing key 为 error 的消息
C2:消费者,其所在队列指定了需要routing key 为 info、error、warning 的消息
(1)编写生产者
package edu.whpu.routing;

import com.rabbitmq.client.BuiltinExchangeType;
import com.rabbitmq.client.Channel;
import com.rabbitmq.client.Connection;
import edu.whpu.util.ConnectionUtil;

/**
 * 路由模式的交换机类型为:direct
 */
public class Producer {
    //交换机名称
    static final String DIRECT_EXCHANGE = "direct_exchange";
    //队列名称
    static final String DIRECT_QUEUE_INSERT = "direct_queue_insert";
    //队列名称
    static final String DIRECT_QUEUE_UPDATE = "direct_queue_update";

    public static void main(String[] args) throws Exception {

        //创建连接
        Connection connection = ConnectionUtil.getConnection();

        // 创建频道
        Channel channel = connection.createChannel();

        /**
         * 声明交换机
         * 参数1:交换机名称
         * 参数2:交换机类型,fanout、topic、direct、headers
         */
        channel.exchangeDeclare(DIRECT_EXCHANGE, BuiltinExchangeType.DIRECT);

        // 声明(创建)队列
        /**
         * 参数1:队列名称
         * 参数2:是否定义持久化队列
         * 参数3:是否独占本次连接
         * 参数4:是否在不使用的时候自动删除队列
         * 参数5:队列其它参数
         */
        channel.queueDeclare(DIRECT_QUEUE_INSERT, true, false, false, null);
        channel.queueDeclare(DIRECT_QUEUE_UPDATE, true, false, false, null);

        //队列绑定交换机
        channel.queueBind(DIRECT_QUEUE_INSERT, DIRECT_EXCHANGE, "insert");
        channel.queueBind(DIRECT_QUEUE_UPDATE, DIRECT_EXCHANGE, "update");

        // 发送信息
        String message = "新增了商品。路由模式;routing key 为 insert " ;
        /**
         * 参数1:交换机名称,如果没有指定则使用默认Default Exchange
         * 参数2:路由key,简单模式可以传递队列名称
         * 参数3:消息其它属性
         * 参数4:消息内容
         */
        channel.basicPublish(DIRECT_EXCHANGE, "insert", null, message.getBytes());
        System.out.println("已发送消息:" + message);

        // 发送信息
        message = "修改了商品。路由模式;routing key 为 update" ;
        /**
         * 参数1:交换机名称,如果没有指定则使用默认Default Exchange
         * 参数2:路由key,简单模式可以传递队列名称
         * 参数3:消息其它属性
         * 参数4:消息内容
         */
        channel.basicPublish(DIRECT_EXCHANGE, "update", null, message.getBytes());
        System.out.println("已发送消息:" + message);

        // 关闭资源
        channel.close();
        connection.close();
    }
}
(2)编写消费者1
package edu.whpu.routing;

import edu.whpu.util.ConnectionUtil;
import com.rabbitmq.client.*;
import java.io.IOException;
import java.nio.charset.StandardCharsets;

public class Consumer2 {
    public static void main(String[] args) throws Exception {
        Connection connection = ConnectionUtil.getConnection();

        // 创建频道
        Channel channel = connection.createChannel();

        //声明交换机
        channel.exchangeDeclare(Producer.DIRECT_EXCHANGE, BuiltinExchangeType.DIRECT);

        // 声明(创建)队列
        /**
         * 参数1:队列名称
         * 参数2:是否定义持久化队列
         * 参数3:是否独占本次连接
         * 参数4:是否在不使用的时候自动删除队列
         * 参数5:队列其它参数
         */
        channel.queueDeclare(Producer.DIRECT_QUEUE_UPDATE, true, false, false, null);

        //队列绑定交换机
        channel.queueBind(Producer.DIRECT_QUEUE_UPDATE, Producer.DIRECT_EXCHANGE, "update");

        //创建消费者;并设置消息处理
        DefaultConsumer consumer = new DefaultConsumer(channel){
            @Override
            /**
             * consumerTag 消息者标签,在channel.basicConsume时候可以指定
             * envelope 消息包的内容,可从中获取消息id,消息routingkey,交换机,消息和重传标志(收到消息失败后是否需要重新发送)
             * properties 属性信息
             * body 消息
             */
            public void handleDelivery(String consumerTag, Envelope envelope, AMQP.BasicProperties properties, byte[] body) throws IOException {
                //路由key
                System.out.println("路由key为:" + envelope.getRoutingKey());
                //交换机
                System.out.println("交换机为:" + envelope.getExchange());
                //消息id
                System.out.println("消息id为:" + envelope.getDeliveryTag());
                //收到的消息
                System.out.println("消费者2-接收到的消息为:" + new String(body, StandardCharsets.UTF_8));
            }
        };
        //监听消息
        /**
         * 参数1:队列名称
         * 参数2:是否自动确认,设置为true为表示消息接收到自动向mq回复接收到了,mq接收到回复会删除消息,设置为false则需要手动确认
         * 参数3:消息接收到后回调
         */
        channel.basicConsume(Producer.DIRECT_QUEUE_UPDATE, true, consumer);
    }
}
(3)编写消费者2
package edu.whpu.routing;

import edu.whpu.util.ConnectionUtil;
import com.rabbitmq.client.*;
import java.io.IOException;
import java.nio.charset.StandardCharsets;

public class Consumer2 {
    public static void main(String[] args) throws Exception {
        Connection connection = ConnectionUtil.getConnection();

        // 创建频道
        Channel channel = connection.createChannel();

        //声明交换机
        channel.exchangeDeclare(Producer.DIRECT_EXCHANGE, BuiltinExchangeType.DIRECT);

        // 声明(创建)队列
        /**
         * 参数1:队列名称
         * 参数2:是否定义持久化队列
         * 参数3:是否独占本次连接
         * 参数4:是否在不使用的时候自动删除队列
         * 参数5:队列其它参数
         */
        channel.queueDeclare(Producer.DIRECT_QUEUE_UPDATE, true, false, false, null);

        //队列绑定交换机
        channel.queueBind(Producer.DIRECT_QUEUE_UPDATE, Producer.DIRECT_EXCHANGE, "update");

        //创建消费者;并设置消息处理
        DefaultConsumer consumer = new DefaultConsumer(channel){
            @Override
            /**
             * consumerTag 消息者标签,在channel.basicConsume时候可以指定
             * envelope 消息包的内容,可从中获取消息id,消息routingkey,交换机,消息和重传标志(收到消息失败后是否需要重新发送)
             * properties 属性信息
             * body 消息
             */
            public void handleDelivery(String consumerTag, Envelope envelope, AMQP.BasicProperties properties, byte[] body) throws IOException {
                //路由key
                System.out.println("路由key为:" + envelope.getRoutingKey());
                //交换机
                System.out.println("交换机为:" + envelope.getExchange());
                //消息id
                System.out.println("消息id为:" + envelope.getDeliveryTag());
                //收到的消息
                System.out.println("消费者2-接收到的消息为:" + new String(body, StandardCharsets.UTF_8));
            }
        };
        //监听消息
        /**
         * 参数1:队列名称
         * 参数2:是否自动确认,设置为true为表示消息接收到自动向mq回复接收到了,mq接收到回复会删除消息,设置为false则需要手动确认
         * 参数3:消息接收到后回调
         */
        channel.basicConsume(Producer.DIRECT_QUEUE_UPDATE, true, consumer);
    }
}
(4)测试
启动所有消费者,然后使用生产者发送消息;在消费者对应的控制台可以查看到生产者发送对应routing key对应队列的消息;到达按照需要接收的效果。
在执行完测试代码后,其实到RabbitMQ的管理后台找到Exchanges选项卡,点击 direct_exchange 的交换机,可以查看到如下的绑定:

(5)小结
Routing模式要求队列在绑定交换机时要指定routing key,消息会转发到符合routing key的队列。
5、Topics主题模式
模式说明
Topic类型与Direct相比,都是可以根据RoutingKey把消息路由到不同的队列。只不过Topic类Exchange可以让队列在绑定Routing key 的时候使用通配符!
Routingkey一般都是有一个或多个单词组成,多个单词之间以”.”分割,例如:item.insert
通配符规则:
#:匹配一个或多个词
*:匹配不多不少恰好1个词
举例:
item.#:能够匹配item.insert.abc 或者 item.insert
item.*:只能匹配item.insert


(1)编写生产者
package edu.whpu.topic;

import edu.whpu.util.ConnectionUtil;
import com.rabbitmq.client.BuiltinExchangeType;
import com.rabbitmq.client.Channel;
import com.rabbitmq.client.Connection;

/**
 * 通配符Topic的交换机类型为:topic
 */
public class Producer{
    //交换机名称
    static final String TOPIC_EXCHANGE = "topic_exchange";
    //队列名称
    static final String TOPIC_QUEUE_1 = "topic_queue_1";
    //队列名称
    static final String TOPIC_QUEUE_2 = "topic_queue_2";

    public static void main(String[] args) throws Exception {

        //创建连接
        Connection connection = ConnectionUtil.getConnection();

        // 创建频道
        Channel channel = connection.createChannel();

        /**
         * 声明交换机
         * 参数1:交换机名称
         * 参数2:交换机类型,fanout、topic、topic、headers
         */
        channel.exchangeDeclare(TOPIC_EXCHANGE, BuiltinExchangeType.TOPIC);


        // 发送信息
        String message = "新增了商品。Topic模式;routing key 为 item.insert " ;
        channel.basicPublish(TOPIC_EXCHANGE, "item.insert", null, message.getBytes());
        System.out.println("已发送消息:" + message);

        // 发送信息
        message = "修改了商品。Topic模式;routing key 为 item.update" ;
        channel.basicPublish(TOPIC_EXCHANGE, "item.update", null, message.getBytes());
        System.out.println("已发送消息:" + message);

        // 发送信息
        message = "删除了商品。Topic模式;routing key 为 item.delete" ;
        channel.basicPublish(TOPIC_EXCHANGE, "item.delete", null, message.getBytes());
        System.out.println("已发送消息:" + message);

        // 关闭资源
        channel.close();
        connection.close();
    }
}
(2)编写消费者1
package edu.whpu.topic;

import com.rabbitmq.client.*;
import edu.whpu.util.ConnectionUtil;
import java.io.IOException;

public class Consumer1 {
    public static void main(String[] args) throws Exception {
        Connection connection = ConnectionUtil.getConnection();

        // 创建频道
        Channel channel = connection.createChannel();

        //声明交换机
        channel.exchangeDeclare(Producer.TOPIC_EXCHANGE, BuiltinExchangeType.TOPIC);

        // 声明(创建)队列
        /**
         * 参数1:队列名称
         * 参数2:是否定义持久化队列
         * 参数3:是否独占本次连接
         * 参数4:是否在不使用的时候自动删除队列
         * 参数5:队列其它参数
         */
        channel.queueDeclare(Producer.TOPIC_QUEUE_1, true, false, false, null);

        //队列绑定交换机
        channel.queueBind(Producer.TOPIC_QUEUE_1, Producer.TOPIC_EXCHANGE, "item.update");
        channel.queueBind(Producer.TOPIC_QUEUE_1, Producer.TOPIC_EXCHANGE, "item.delete");

        //创建消费者;并设置消息处理
        DefaultConsumer consumer = new DefaultConsumer(channel){
            @Override
            /**
             * consumerTag 消息者标签,在channel.basicConsume时候可以指定
             * envelope 消息包的内容,可从中获取消息id,消息routingkey,交换机,消息和重传标志(收到消息失败后是否需要重新发送)
             * properties 属性信息
             * body 消息
             */
            public void handleDelivery(String consumerTag, Envelope envelope, AMQP.BasicProperties properties, byte[] body) throws IOException {
                //路由key
                System.out.println("路由key为:" + envelope.getRoutingKey());
                //交换机
                System.out.println("交换机为:" + envelope.getExchange());
                //消息id
                System.out.println("消息id为:" + envelope.getDeliveryTag());
                //收到的消息
                System.out.println("消费者1-接收到的消息为:" + new String(body, "utf-8"));
            }
        };

        //监听消息
        /**
         * 参数1:队列名称
         * 参数2:是否自动确认,设置为true为表示消息接收到自动向mq回复接收到了,mq接收到回复会删除消息,设置为false则需要手动确认
         * 参数3:消息接收到后回调
         */
        channel.basicConsume(Producer.TOPIC_QUEUE_1, true, consumer);
    }
}
(3)编写消费者2
package edu.whpu.topic;

import com.rabbitmq.client.*;
import edu.whpu.util.ConnectionUtil;
import java.io.IOException;

public class Consumer2 {

    public static void main(String[] args) throws Exception {
        Connection connection = ConnectionUtil.getConnection();

        // 创建频道
        Channel channel = connection.createChannel();

        //声明交换机
        channel.exchangeDeclare(Producer.TOPIC_EXCHANGE, BuiltinExchangeType.TOPIC);

        // 声明(创建)队列
        /**
         * 参数1:队列名称
         * 参数2:是否定义持久化队列
         * 参数3:是否独占本次连接
         * 参数4:是否在不使用的时候自动删除队列
         * 参数5:队列其它参数
         */
        channel.queueDeclare(Producer.TOPIC_QUEUE_2, true, false, false, null);

        //队列绑定交换机
        channel.queueBind(Producer.TOPIC_QUEUE_2, Producer.TOPIC_EXCHANGE, "item.*");

        //创建消费者;并设置消息处理
        DefaultConsumer consumer = new DefaultConsumer(channel){
            @Override
            /**
             * consumerTag 消息者标签,在channel.basicConsume时候可以指定
             * envelope 消息包的内容,可从中获取消息id,消息routingkey,交换机,消息和重传标志(收到消息失败后是否需要重新发送)
             * properties 属性信息
             * body 消息
             */
            public void handleDelivery(String consumerTag, Envelope envelope, AMQP.BasicProperties properties, byte[] body) throws IOException {
                //路由key
                System.out.println("路由key为:" + envelope.getRoutingKey());
                //交换机
                System.out.println("交换机为:" + envelope.getExchange());
                //消息id
                System.out.println("消息id为:" + envelope.getDeliveryTag());
                //收到的消息
                System.out.println("消费者2-接收到的消息为:" + new String(body, "utf-8"));
            }
        };

        //监听消息
        /**
         * 参数1:队列名称
         * 参数2:是否自动确认,设置为true为表示消息接收到自动向mq回复接收到了,mq接收到回复会删除消息,设置为false则需要手动确认
         * 参数3:消息接收到后回调
         */
        channel.basicConsume(Producer.TOPIC_QUEUE_2, true, consumer);
    }
}
(3)测试
启动所有消费者,然后使用生产者发送消息;在消费者对应的控制台可以查看到生产者发送对应routing key对应队列的消息;到达按照需要接收的效果;并且这些routing key可以使用通配符。
在执行完测试代码后,其实到RabbitMQ的管理后台找到Exchanges选项卡,点击 topic_exchange 的交换机,可以查看到如下的绑定:

(5)小结
Topic主题模式可以实现 Publish/Subscribe发布与订阅模式 和 Routing路由模式 的功能;只是Topic在配置routing key 的时候可以使用通配符,显得更加灵活。
RabbitMQ工作模式总结:
简单模式 HelloWorld
一个生产者、一个消费者,不需要设置交换机(使用默认的交换机)
工作队列模式 Work Queue
一个生产者、多个消费者(竞争关系),不需要设置交换机(使用默认的交换机)
发布订阅模式 Publish/subscribe
需要设置类型为fanout的交换机,并且交换机和队列进行绑定,当发送消息到交换机后,交换机会将消息发送到绑定的队列
路由模式 Routing
需要设置类型为direct的交换机,交换机和队列进行绑定,并且指定routing key,当发送消息到交换机后,交换机会根据routing key将消息发送到对应的队列
通配符模式 Topic
需要设置类型为topic的交换机,交换机和队列进行绑定,并且指定通配符方式的routing key,当发送消息到交换机后,交换机会根据routing key将消息发送到对应的队列
五、Spring整合RabbitMQ
1、搭建生产者工程
(1)创建工程,导入依赖
<dependency>
      <groupId>org.springframework</groupId>
      <artifactId>spring-context</artifactId>
      <version>5.1.7.RELEASE</version>
</dependency>

<dependency>
      <groupId>org.springframework.amqp</groupId>
      <artifactId>spring-rabbit</artifactId>
      <version>2.1.8.RELEASE</version>
</dependency>

<dependency>
       <groupId>junit</groupId>
       <artifactId>junit</artifactId>
       <version>4.12</version>
</dependency>

<dependency>
       <groupId>org.springframework</groupId>
       <artifactId>spring-test</artifactId>
       <version>5.1.7.RELEASE</version>
</dependency>
(2)配置整合
rabbitmq.properties连接参数
rabbitmq.host=192.168.175.128
rabbitmq.port=5672
rabbitmq.username=wenbin
rabbitmq.password=123456
rabbitmq.virtual-host=/
spring整合rabbitmq:spring-rabbitmq-consumer.xml配置文件
<?xml version="1.0" encoding="UTF-8"?>
<beans xmlns="http://www.springframework.org/schema/beans"
       xmlns:xsi="http://www.w3.org/2001/XMLSchema-instance"
       xmlns:context="http://www.springframework.org/schema/context"
       xmlns:rabbit="http://www.springframework.org/schema/rabbit"
       xsi:schemaLocation="http://www.springframework.org/schema/beans
       http://www.springframework.org/schema/beans/spring-beans.xsd
       http://www.springframework.org/schema/context
       https://www.springframework.org/schema/context/spring-context.xsd
       http://www.springframework.org/schema/rabbit
       http://www.springframework.org/schema/rabbit/spring-rabbit.xsd">

    <!--加载配置文件-->
    <context:property-placeholder location="classpath:rabbitmq.properties"/>

    <!-- 定义rabbitmq connectionFactory -->
    <rabbit:connection-factory id="connectionFactory" host="${rabbitmq.host}"
                               port="${rabbitmq.port}"
                               username="${rabbitmq.username}"
                               password="${rabbitmq.password}"
                               virtual-host="${rabbitmq.virtual-host}"/>
    <!--定义管理交换机、队列-->
    <rabbit:admin connection-factory="connectionFactory"/>

    <!--定义持久化队列,不存在则自动创建;不绑定到交换机则绑定到默认交换机
    默认交换机类型为direct,名字为:"",路由键为队列的名称
    -->
    <!--
        id:bean的名称
        name:queue的名称
        auto-declare:自动创建
        auto-delete:自动删除。 最后一个消费者和该队列断开连接后,自动删除队列
        exclusive:是否独占
        durable:是否持久化
    -->
    <rabbit:queue id="spring_queue1" name="spring_queue1"    auto-declare="true"/>
    <rabbit:queue id="spring_queue2" name="spring_queue2"    auto-declare="true"/>


    <!-- ~~~~~~~~~~~~~Publisher-Subscribe发布与订阅者模式~~~~~~~~~~~~ -->
    <!-- ~~~~~~~~~~~~~~交换机类型:fanout广播,所有队列都能收到消息~~~~~~~~~ -->
    <!--定义广播交换机中的持久化队列,不存在则自动创建-->
    <rabbit:queue id="spring_fanout_queue_1" name="spring_fanout_queue_1" auto-declare="true"/>
    <!--定义广播交换机中的持久化队列,不存在则自动创建-->
    <rabbit:queue id="spring_fanout_queue_2" name="spring_fanout_queue_2" auto-declare="true"/>
    <!--定义广播类型交换机;并绑定上述两个队列-->
    <rabbit:fanout-exchange id="spring_fanout_exchange" name="spring_fanout_exchange"  auto-declare="true">
        <rabbit:bindings>
            <rabbit:binding  queue="spring_fanout_queue_1"/>
            <rabbit:binding  queue="spring_fanout_queue_2"/>
        </rabbit:bindings>
    </rabbit:fanout-exchange>


    <!-- ~~~~~~~~~~~~~Routing路由模式~~~~~~~~~~~~~~~ -->
    <!-- ~~~~~~~~~~~~~交换机类型;direct定向~~~~~~~~~~~~~~~~~~~ -->
    <rabbit:queue id="spring_direct_queue_1" name="spring_direct_queue_1"  auto-declare="true"/>
    <rabbit:queue id="spring_direct_queue_2" name="spring_direct_queue_2"  auto-declare="true"/>
    <rabbit:direct-exchange name="spring_direct_exchange" id="spring_direct_exchange" auto-declare="true">
        <rabbit:bindings>
            <rabbit:binding queue="spring_direct_queue_1" key="error"/>
            <rabbit:binding queue="spring_direct_queue_1" key="info"/>
            <rabbit:binding queue="spring_direct_queue_1" key="debug"/>
            <rabbit:binding queue="spring_direct_queue_2" key="error"/>
        </rabbit:bindings>
    </rabbit:direct-exchange>


    <!-- ~~~~~~~~~~~~~Topic通配符模式~~~~~~~~~~~~~~~ -->
    <!-- ~~~~~~~~~~~交换机类型:topic通配符;*匹配一个单词,#匹配多个单词 ~~~~~~~~~~~~~~~~ -->
    <!--定义广播交换机中的持久化队列,不存在则自动创建-->
    <rabbit:queue id="spring_topic_queue_star" name="spring_topic_queue_star"  auto-declare="true"/>
    <!--定义广播交换机中的持久化队列,不存在则自动创建-->
    <rabbit:queue id="spring_topic_queue_well" name="spring_topic_queue_well" auto-declare="true"/>
    <!--定义广播交换机中的持久化队列,不存在则自动创建-->
    <rabbit:queue id="spring_topic_queue_well2" name="spring_topic_queue_well2" auto-declare="true"/>
    <rabbit:topic-exchange id="spring_topic_exchange"  name="spring_topic_exchange" auto-declare="true">
        <rabbit:bindings>
            <rabbit:binding pattern="heima.*"  queue="spring_topic_queue_star"/>
            <rabbit:binding pattern="heima.#" queue="spring_topic_queue_well"/>
            <rabbit:binding pattern="itcast.#" queue="spring_topic_queue_well2"/>
        </rabbit:bindings>
    </rabbit:topic-exchange>

    <!--定义rabbitTemplate对象操作可以在代码中方便发送消息-->
    <rabbit:template id="rabbitTemplate" connection-factory="connectionFactory"/>
</beans>
(3)发送消息
@RunWith(SpringJUnit4ClassRunner.class)
@ContextConfiguration("classpath:spring-rabbitmq-producer.xml")
public class ProducerTest {
    @Autowired
    private RabbitTemplate rabbitTemplate;

    /**
     * 发送广播
     * 交换机类型为 fanout
     * 绑定到该交换机的所有队列都能够收到消息
     */
    @Test
    public void fanoutTest(){
        /**
         * 参数1:交换机名称
         * 参数2:路由键名(广播设置为空)
         * 参数3:发送的消息内容
         */
        rabbitTemplate.convertAndSend("spring_fanout_exchange", "", "发送到spring_fanout_exchange交换机的广播消息");
    }

    /**
     * 只发队列消息
     * 交换机类型为 direct
     * 路由键为error
     */
    @Test
    public void directTest(){
        //路由键为error
        rabbitTemplate.convertAndSend("spring_direct_queue", "error","发送到spring_direct_exchange交换机的error定向消息。");
    }

    /**
     * 通配符
     * 交换机类型为 topic
     * 匹配路由键的通配符,*表示一个单词,#表示多个单词
     * 绑定到该交换机的匹配队列能够收到对应消息
     */
    @Test
    public void topicTest(){
        /**
         * 参数1:交换机名称
         * 参数2:路由键名
         * 参数3:发送的消息内容
         */
        rabbitTemplate.convertAndSend("spring_topic_exchange", "heima.bj", "发送到spring_topic_exchange交换机heima.bj的消息");
        rabbitTemplate.convertAndSend("spring_topic_exchange", "heima.bj.1", "发送到spring_topic_exchange交换机heima.bj.1的消息");
        rabbitTemplate.convertAndSend("spring_topic_exchange", "heima.bj.2", "发送到spring_topic_exchange交换机heima.bj.2的消息");
        rabbitTemplate.convertAndSend("spring_topic_exchange", "itcast.cn", "发送到spring_topic_exchange交换机itcast.cn的消息");
    }
}
2、搭建消费者工程
导入的依赖、连接参数和生产者一样
spring-rabbitmq-consumer.xml
<?xml version="1.0" encoding="UTF-8"?>
<beans xmlns="http://www.springframework.org/schema/beans"
       xmlns:xsi="http://www.w3.org/2001/XMLSchema-instance"
       xmlns:context="http://www.springframework.org/schema/context"
       xmlns:rabbit="http://www.springframework.org/schema/rabbit"
       xsi:schemaLocation="http://www.springframework.org/schema/beans
       http://www.springframework.org/schema/beans/spring-beans.xsd
       http://www.springframework.org/schema/context
       https://www.springframework.org/schema/context/spring-context.xsd
       http://www.springframework.org/schema/rabbit
       http://www.springframework.org/schema/rabbit/spring-rabbit.xsd">
    <!--加载配置文件-->
    <context:property-placeholder location="classpath:rabbitmq.properties"/>

    <!-- 定义rabbitmq connectionFactory -->
    <rabbit:connection-factory id="connectionFactory" host="${rabbitmq.host}"
                               port="${rabbitmq.port}"
                               username="${rabbitmq.username}"
                               password="${rabbitmq.password}"
                              virtual-host="${rabbitmq.virtual-host}"/>

    <bean id="directListener1" class="edu.whpu.consumer.listener.direct.DirectListener1"/>
    <bean id="directListener2" class="edu.whpu.consumer.listener.direct.DirectListener2"/>
    <bean id="fanoutListener1" class="edu.whpu.consumer.listener.fanout.FanoutListener1"/>
    <bean id="fanoutListener2" class="edu.whpu.consumer.listener.fanout.FanoutListener2"/>
    <bean id="topicListenerStar" class="edu.whpu.consumer.listener.topic.TopicListenerStar"/>
    <bean id="topicListenerWell" class="edu.whpu.consumer.listener.topic.TopicListenerWell"/>
    <bean id="topicListenerWell2" class="edu.whpu.consumer.listener.topic.TopicListenerWell2"/>

    <rabbit:listener-container connection-factory="connectionFactory" auto-declare="true">
        <rabbit:listener ref="directListener1" queue-names="spring_direct_queue_1"/>
        <rabbit:listener ref="directListener2" queue-names="spring_direct_queue_2"/>
        <rabbit:listener ref="fanoutListener1" queue-names="spring_fanout_queue_1"/>
        <rabbit:listener ref="fanoutListener2" queue-names="spring_fanout_queue_2"/>
        <rabbit:listener ref="topicListenerStar" queue-names="spring_topic_queue_star"/>
        <rabbit:listener ref="topicListenerWell" queue-names="spring_topic_queue_well"/>
        <rabbit:listener ref="topicListenerWell2" queue-names="spring_topic_queue_well2"/>
    </rabbit:listener-container>
</beans>
消息监听器
广播监听器1
package edu.whpu.consumer.listener.fanout;

import org.springframework.amqp.core.Message;
import org.springframework.amqp.core.MessageListener;

public class FanoutListener1 implements MessageListener {
    @Override
    public void onMessage(Message message) {
        try {
            String msg = new String(message.getBody(), "utf-8");

            System.out.printf("广播监听器1:接收路由名称为:%s,路由键为:%s,队列名为:%s的消息:%s \n",
                    message.getMessageProperties().getReceivedExchange(),
                    message.getMessageProperties().getReceivedRoutingKey(),
                    message.getMessageProperties().getConsumerQueue(),
                    msg);
        } catch (Exception e) {
            e.printStackTrace();
        }
    }
}
广播监听器2
package edu.whpu.consumer.listener.fanout;

import org.springframework.amqp.core.Message;
import org.springframework.amqp.core.MessageListener;

public class FanoutListener2 implements MessageListener {
    @Override
    public void onMessage(Message message) {
        try {
            String msg = new String(message.getBody(), "utf-8");

            System.out.printf("广播监听器2:接收路由名称为:%s,路由键为:%s,队列名为:%s的消息:%s \n",
                    message.getMessageProperties().getReceivedExchange(),
                    message.getMessageProperties().getReceivedRoutingKey(),
                    message.getMessageProperties().getConsumerQueue(),
                    msg);
        } catch (Exception e) {
            e.printStackTrace();
        }
    }
}
3、测试
六、SpringBoot整合RabbitMQ
生产者工程:
1. application.yml文件配置RabbitMQ相关信息;
2. 在生产者工程中编写配置类,用于创建交换机和队列,并进行绑定
3. 注入RabbitTemplate对象,通过RabbitTemplate对象发送消息到交换机
消费者工程:
1. application.yml文件配置RabbitMQ相关信息
2. 创建消息处理类,用于接收队列中的消息并进行处理
1、搭建生产者工程
(1)创建生产者工程rabbitmq-producer,导入依赖
<dependencies>
		<dependency>
			<groupId>org.springframework.boot</groupId>
			<artifactId>spring-boot-starter-web</artifactId>
		</dependency>
		<dependency>
			<groupId>org.springframework.boot</groupId>
			<artifactId>spring-boot-starter-test</artifactId>
			<scope>test</scope>
		</dependency>
		<dependency>
			<groupId>org.springframework.boot</groupId>
			<artifactId>spring-boot-starter-amqp</artifactId>
		</dependency>
</dependencies>
(2)编写application.yml配置文件
spring:
  rabbitmq:
   username: wenbin
   password: 123456
   host: 192.168.175.128
   port: 5672
   virtual-host: /
(3)编写启动类
package com.wenbin.rabbitmq;

import org.springframework.boot.SpringApplication;
import org.springframework.boot.autoconfigure.SpringBootApplication;

@SpringBootApplication
public class ProducerApplication {
	public static void main(String[] args) {
		SpringApplication.run(ProducerApplication.class, args);
	}
}
(4)编写配置类RabbitmqConfig,创建交换机和队列,并进行绑定
package com.wenbin.rabbitmq.config;

import org.springframework.amqp.core.*;
import org.springframework.context.annotation.Bean;
import org.springframework.context.annotation.Configuration;

@Configuration
public class RabbitmqConfig {
    //交换机名称
    public static final String EXCHANGE_NAME="boot_direct_exchange";

    //队列名称
    public static final String QUEUE1_NAME="boot_direct_queue1";
    public static final String QUEUE2_NAME="boot_direct_queue2";

    //创建direct交换机
    @Bean
    public DirectExchange directExchange(){
        return new DirectExchange(EXCHANGE_NAME,true,false,null);
    }

    //创建队列1
    @Bean("bootQueue1")
    public Queue bootQueue1(){
        return new Queue(QUEUE1_NAME,true,false,false,null);
    }

    //创建队列2
    @Bean("bootQueue2")
    public Queue bootQueue2(){
        return new Queue(QUEUE2_NAME,true,false,false,null);
    }

    //队列和交换机绑定关系
    @Bean
    public Binding bindQueueExchange1(){
        return BindingBuilder.bind(bootQueue1()).to(directExchange()).with("error");
    }

    //队列和交换机绑定关系
    @Bean
    public Binding bindQueueExchange2(){
        return BindingBuilder.bind(bootQueue1()).to(directExchange()).with("debug");
    }

    //队列和交换机绑定关系
    @Bean
    public Binding bindQueueExchange3(){
        return BindingBuilder.bind(bootQueue2()).to(directExchange()).with("error");
    }
}
2、搭建消费者工程
(1)创建消费者工程,并添加依赖
<dependency>
	<groupId>org.springframework.boot</groupId>
	<artifactId>spring-boot-starter-amqp</artifactId>
</dependency>
(2)编写application.yml配置文件
spring:
  rabbitmq:
    username: wenbin
    password: 123456
    host: 192.168.175.128
    port: 5672
    virtual-host: /
(3)编写启动类
package com.wenbin.rabbitmq;

import org.springframework.boot.SpringApplication;
import org.springframework.boot.autoconfigure.SpringBootApplication;

@SpringBootApplication
public class ConsumerApplication {
	public static void main(String[] args) {
		SpringApplication.run(ConsumerApplication.class, args);
	}
}
(4)编写消息监听器
package com.wenbin.rabbitmq.listener;

import org.springframework.amqp.core.Message;
import org.springframework.amqp.rabbit.annotation.RabbitListener;
import org.springframework.stereotype.Component;

@Component
public class RabbitmqListener {
    @RabbitListener(queues = "boot_queue")
    public void ListenerQueue(Message message){
        System.out.println("消费者接收到的消息为:" + message);
    }
}
3、测试
在生产者工程springboot-rabbitmq-producer中创建测试类,发送消息:
package com.wenbin.rabbitmq;

import com.wenbin.rabbitmq.config.RabbitmqConfig;
import org.junit.jupiter.api.Test;
import org.springframework.amqp.rabbit.core.RabbitTemplate;
import org.springframework.beans.factory.annotation.Autowired;
import org.springframework.boot.test.context.SpringBootTest;

@SpringBootTest
class ProducerApplicationTests {

	//1.注入RabbitTemplate
	@Autowired
	private RabbitTemplate rabbitTemplate;

	@Test
	void contextLoads() {
		rabbitTemplate.convertAndSend(RabbitmqConfig.EXCHANGE_NAME,"error","boot mq hello~~~");
	}
}
先运行上述测试程序(交换机和队列才能先被声明和绑定),然后启动消费者;在消费者工程springboot-rabbitmq-consumer中控制台查看是否接收到对应消息。


另外;也可以在RabbitMQ的管理控制台中查看到交换机与队列的绑定:


 2155
2155


 被折叠的 条评论
为什么被折叠?
被折叠的 条评论
为什么被折叠?
 到【灌水乐园】发言


