SpringBoot Quartz 优雅解决Job注入为空

看了网上很多方案,大多都是实现重载 AdaptableJobFactory,然后利用factory.autowireBean()来注入,我在本地实验,可能版本原因,找不到AdaptableJobFactory类,另辟蹊径,实现了这一版。

一.自实现JobFactory接口MyJobFactory,代码从系统原生SimpleJobFactory拿来,只修改其中一行:

将 return jobClass.newInstance() 改为:

return (Job) SpringContextUtils.getBean(jobClass);

可以看出,默认是newInstance()的,自然无法使用spring注入,修改为从SpringContextUtils里获取就可以达到目的


package com.alimama.qa.platform.makaira.taskScheduler;

import com.alimama.qa.platform.utils.SpringContextUtils;
import org.quartz.Job;
import org.quartz.JobDetail;
import org.quartz.Scheduler;
import org.quartz.SchedulerException;
import org.quartz.spi.JobFactory;
import org.quartz.spi.TriggerFiredBundle;
import org.slf4j.Logger;
import org.slf4j.LoggerFactory;

/**
 * @program makaira
 * @description:
 * @author: xiaopeng.sxp
 * @create: 2019/05/06 10:22
 */

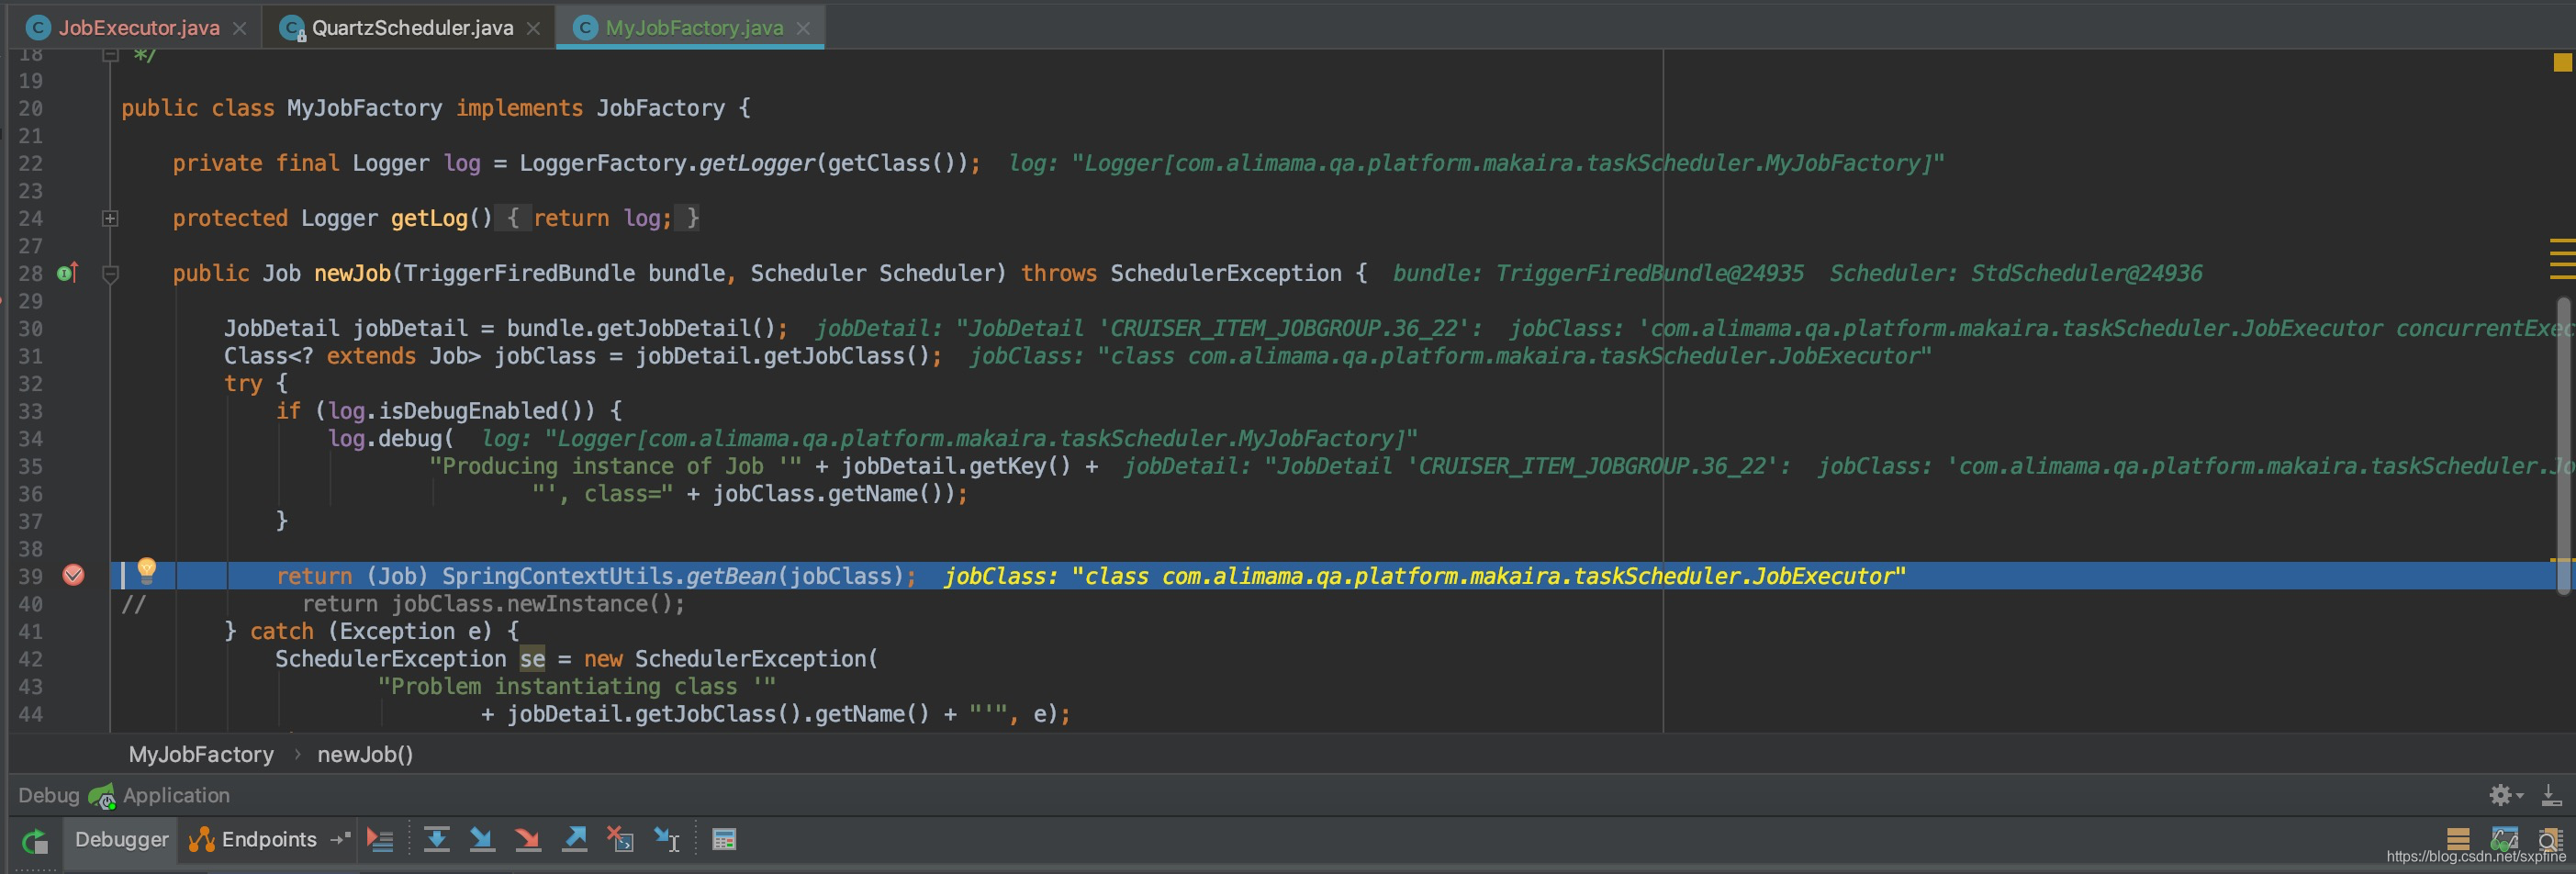
public class MyJobFactory implements JobFactory {

    private final Logger log = LoggerFactory.getLogger(getClass());

    protected Logger getLog() {
        return log;
    }

    public Job newJob(TriggerFiredBundle bundle, Scheduler Scheduler) throws SchedulerException {

        JobDetail jobDetail = bundle.getJobDetail();
        Class<? extends Job> jobClass = jobDetail.getJobClass();
        try {
            if (log.isDebugEnabled()) {
                log.debug(
                        "Producing instance of Job '" + jobDetail.getKey() +
                                "', class=" + jobClass.getName());
            }

            return (Job) SpringContextUtils.getBean(jobClass);
//            return jobClass.newInstance();
        } catch (Exception e) {
            SchedulerException se = new SchedulerException(
                    "Problem instantiating class '"
                            + jobDetail.getJobClass().getName() + "'", e);
            throw se;
        }
    }

}

@Component
public class SpringContextUtils implements ApplicationContextAware {

    public static ApplicationContext applicationContext;

    @Override
    public void setApplicationContext(ApplicationContext applicationContext)
            throws BeansException {
        SpringContextUtils.applicationContext = applicationContext;
    }

    public static Object getBean(String name) {
        return applicationContext.getBean(name);
    }

    public static Object getBean(Class className) {
        return applicationContext.getBean(className);
    }


    public static <T> T getBean(String name, Class<T> requiredType) {
        return applicationContext.getBean(name, requiredType);
    }

    public static boolean containsBean(String name) {
        return applicationContext.containsBean(name);
    }

    public static boolean isSingleton(String name) {
        return applicationContext.isSingleton(name);
    }

    public static Class<? extends Object> getType(String name) {
        return applicationContext.getType(name);
    }

}

二. 使自定义jobFactory替代系统默认实现

跟踪源代码,发现可以在quartz配置文件里指定 jobFactoryClass ,

在系统resource目录里添加quartz.properties文件,可以从jar包里copy一份 ,添加一句:


org.quartz.scheduler.jobFactory.class: com.alimama.qa.platform.makaira.taskScheduler.MyJobFactory

# Customized Properties file for use by StdSchedulerFactory
# to create a Quartz Scheduler Instance, if a different
# properties file is not explicitly specified.
#

org.quartz.scheduler.instanceName: DefaultQuartzScheduler
org.quartz.scheduler.rmi.export: false
org.quartz.scheduler.rmi.proxy: false
org.quartz.scheduler.wrapJobExecutionInUserTransaction: false

org.quartz.threadPool.class: org.quartz.simpl.SimpleThreadPool
org.quartz.threadPool.threadCount: 100
org.quartz.threadPool.threadPriority: 5
org.quartz.threadPool.threadsInheritContextClassLoaderOfInitializingThread: true

org.quartz.jobStore.misfireThreshold: 60000

org.quartz.jobStore.class: org.quartz.simpl.RAMJobStore

org.quartz.scheduler.jobFactory.class: com.alimama.qa.platform.makaira.taskScheduler.MyJobFactory

三. 重启应用,设置断点,看到job里的service已经被注入了

在这里插入图片描述

  • 2
    点赞
  • 2
    收藏
    觉得还不错? 一键收藏
  • 1
    评论
提供的源码资源涵盖了小程序应用等多个领域,每个领域都包含了丰富的实例和项目。这些源码都是基于各自平台的最新技术和标准编写,确保了在对应环境下能够无缝运行。同时,源码中配备了详细的注释和文档,帮助用户快速理解代码结构和实现逻辑。 适用人群: 适合毕业设计、课程设计作业。这些源码资源特别适合大学生群体。无论你是计算机相关专业的学生,还是对其他领域编程感兴趣的学生,这些资源都能为你提供宝贵的学习和实践机会。通过学习和运行这些源码,你可以掌握各平台开发的基础知识,提升编程能力和项目实战经验。 使用场景及目标: 在学习阶段,你可以利用这些源码资源进行课程实践、课外项目或毕业设计。通过分析和运行源码,你将深入了解各平台开发的技术细节和最佳实践,逐步培养起自己的项目开发和问题解决能力。此外,在求职或创业过程中,具备跨平台开发能力的大学生将更具竞争力。 其他说明: 为了确保源码资源的可运行性和易用性,特别注意了以下几点:首先,每份源码都提供了详细的运行环境和依赖说明,确保用户能够轻松搭建起开发环境;其次,源码中的注释和文档都非常完善,方便用户快速上手和理解代码;最后,我会定期更新这些源码资源,以适应各平台技术的最新发展和市场需求。 所有源码均经过严格测试,可以直接运行,可以放心下载使用。有任何使用问题欢迎随时与博主沟通,第一时间进行解答!
当在 Job 类中注入 Spring Bean 时,需要使用 Spring 提供的 JobFactory 来创建 Job 实例,这样 Job 类中的 Bean 才能被正确注入。具体实现步骤如下: 1. 创建一个实现了 Spring 的 JobFactory 接口的类,用于创建 Job 实例。 ```java import org.quartz.Job; import org.quartz.Scheduler; import org.quartz.SchedulerContext; import org.quartz.spi.JobFactory; import org.springframework.beans.factory.annotation.Autowired; import org.springframework.context.ApplicationContext; import org.springframework.stereotype.Component; @Component public class AutowiringSpringBeanJobFactory implements JobFactory { @Autowired private ApplicationContext context; /** * {@inheritDoc} */ @Override public Job newJob(TriggerFiredBundle bundle, Scheduler scheduler) throws SchedulerException { final Job job = (Job) context.getBean(bundle.getJobDetail().getJobClass()); final SchedulerContext schedulerContext = scheduler.getContext(); schedulerContext.put("applicationContext", context); return job; } } ``` 2. 在 Quartz 配置中注册 JobFactory,如下所示: ```java import javax.sql.DataSource; import org.quartz.JobDetail; import org.quartz.Scheduler; import org.quartz.Trigger; import org.quartz.impl.StdSchedulerFactory; import org.quartz.impl.jdbcjobstore.JobStoreTX; import org.quartz.impl.jdbcjobstore.PostgreSQLDelegate; import org.quartz.impl.jdbcjobstore.StdJDBCDelegate; import org.quartz.impl.jdbcjobstore.StdJDBCJobStore; import org.quartz.impl.jdbcjobstore.oracle.OracleDelegate; import org.quartz.spi.JobFactory; import org.springframework.beans.factory.annotation.Autowired; import org.springframework.beans.factory.annotation.Qualifier; import org.springframework.context.ApplicationContext; import org.springframework.context.annotation.Bean; import org.springframework.context.annotation.Configuration; import org.springframework.core.env.Environment; @Configuration public class QuartzConfig { @Autowired private Environment env; @Bean public JobFactory jobFactory(ApplicationContext applicationContext) { AutowiringSpringBeanJobFactory jobFactory = new AutowiringSpringBeanJobFactory(); jobFactory.setApplicationContext(applicationContext); return jobFactory; } @Bean public Scheduler scheduler(Trigger[] triggers, @Qualifier("quartzDataSource") DataSource dataSource) throws SchedulerException { StdSchedulerFactory factory = new StdSchedulerFactory(); factory.initialize(quartzProperties()); Scheduler scheduler = factory.getScheduler(); scheduler.setJobFactory(jobFactory); scheduler.setDataSource(dataSource); scheduler.setQuartzProperties(quartzProperties()); scheduler.start(); for (Trigger trigger : triggers) { scheduler.scheduleJob(trigger.getJobDetail(), trigger); } return scheduler; } @Bean public JobDetail jobDetail() { return JobBuilder.newJob().ofType(MyJob.class) .storeDurably().withIdentity("MyJob").withDescription("Invoke My Job service...").build(); } @Bean public Trigger trigger(JobDetail job) { return TriggerBuilder.newTrigger().forJob(job) .withIdentity("MyJobTrigger").withDescription("My Job trigger").withSchedule(CronScheduleBuilder.cronSchedule(env.getProperty("myjob.cron.expression"))).build(); } @Bean public Properties quartzProperties() { Properties properties = new Properties(); properties.setProperty(StdSchedulerFactory.PROP_SCHED_INSTANCE_NAME, env.getProperty("scheduler.instance.name")); properties.setProperty(StdSchedulerFactory.PROP_SCHED_INSTANCE_ID, env.getProperty("scheduler.instance.id")); properties.setProperty(StdSchedulerFactory.PROP_THREAD_POOL_CLASS, env.getProperty("scheduler.threadPool.class")); properties.setProperty(StdSchedulerFactory.PROP_THREAD_POOL_THREAD_COUNT, env.getProperty("scheduler.threadPool.threadCount")); properties.setProperty(StdSchedulerFactory.PROP_JOB_STORE_CLASS, env.getProperty("scheduler.jobStore.class")); properties.setProperty(StdSchedulerFactory.PROP_JOB_STORE_DRIVER_DELEGATE_CLASS, env.getProperty("scheduler.jobStore.driverDelegateClass")); properties.setProperty(StdSchedulerFactory.PROP_JOB_STORE_USE_PROPERTIES, env.getProperty("scheduler.jobStore.useProperties")); properties.setProperty(StdSchedulerFactory.PROP_JOB_STORE_DATASOURCE, env.getProperty("scheduler.jobStore.dataSource")); properties.setProperty(StdSchedulerFactory.PROP_JOB_STORE_TABLE_PREFIX, env.getProperty("scheduler.jobStore.tablePrefix")); properties.setProperty(StdSchedulerFactory.PROP_JOB_STORE_IS_CLUSTERED, env.getProperty("scheduler.jobStore.isClustered")); properties.setProperty(StdSchedulerFactory.PROP_JOB_STORE_CLUSTER_CHECKIN_INTERVAL, env.getProperty("scheduler.jobStore.clusterCheckinInterval")); properties.setProperty(StdSchedulerFactory.PROP_JOB_STORE_MAX_MISFIRES_TO_HANDLE_AT_A_TIME, env.getProperty("scheduler.jobStore.maxMisfiresToHandleAtATime")); properties.setProperty(StdSchedulerFactory.PROP_JOB_STORE_MISFIRE_THRESHOLD, env.getProperty("scheduler.jobStore.misfireThreshold")); return properties; } } ``` 3. 在 Job 类中注入 Bean,如下所示: ```java import org.quartz.Job; import org.quartz.JobExecutionContext; import org.quartz.JobExecutionException; import org.springframework.beans.factory.annotation.Autowired; import org.springframework.context.ApplicationContext; import org.springframework.stereotype.Component; @Component public class MyJob implements Job { @Autowired private MyService myService; /** * {@inheritDoc} */ @Override public void execute(JobExecutionContext context) throws JobExecutionException { ApplicationContext applicationContext = (ApplicationContext) context.getScheduler().getContext().get("applicationContext"); applicationContext.getAutowireCapableBeanFactory().autowireBean(this); myService.doSomething(); } } ``` 通过这种方式,就可以在 QuartzJob 类中注入 Spring Bean。

“相关推荐”对你有帮助么?

  • 非常没帮助
  • 没帮助
  • 一般
  • 有帮助
  • 非常有帮助
提交
评论 1
添加红包

请填写红包祝福语或标题

红包个数最小为10个

红包金额最低5元

当前余额3.43前往充值 >
需支付:10.00
成就一亿技术人!
领取后你会自动成为博主和红包主的粉丝 规则
hope_wisdom
发出的红包
实付
使用余额支付
点击重新获取
扫码支付
钱包余额 0

抵扣说明:

1.余额是钱包充值的虚拟货币,按照1:1的比例进行支付金额的抵扣。
2.余额无法直接购买下载,可以购买VIP、付费专栏及课程。

余额充值