


1、设置应用程序的图标
右击Wp7应用程序的解决方案,选择属性,设置Icon为自己想要的图片,如下图
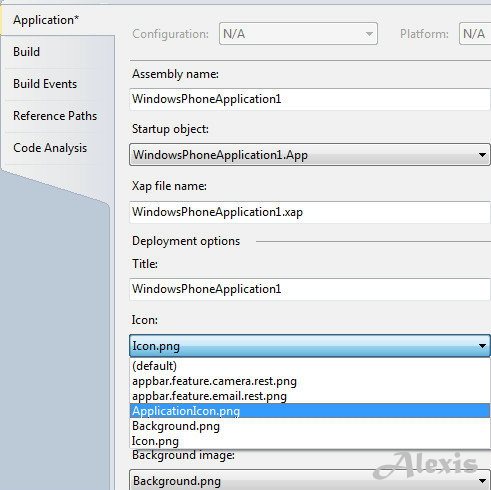
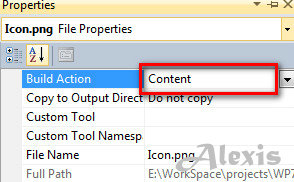
并且要确保图片的build方式为Content,如下图所示:
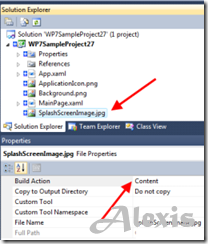
2、 Windows Phone 7中的启动画面
默认情况下,Windows Phone 7 应用程序会使用如下的默认图片作为程序的启动画面,我们可以自己设置Windows Phone 7中的启动画面,可以设置为:1.使用自己的图片作为启动画面 2. 带动画效果的启动画面 3.不使用启动画面
对于1,我们只要将SplashScreenImage替换为自己的图片即可。而对于3,如果不想使用启动画面,我们只需将SplashScreenImage图片移出项目即可。下面着重讲一下如果实现动画启动画面.
这里使用BackgroundWorker类来实现,BackgroundWorker类是开辟一个后台线程来处理一些操作而同时你的UI也能继续响应用户操作的类。更多的关于BackgroundWorker类大家可以Google其用法。在WP7的渲染线程中,如果你想要一个持续响应的用户界面,那么BackgroundWorker类会变得很有用。你可以监听你想要做的操作的进程的事件以及操作完成的信号。我们使用RunWorkerAsync开启后台操作。
注意:我们不应该在BackgroundWorker类的DoWork去操作用户界面。我们可以在ProgressChanged 和RunWorkerCompleted事件中去操作与用户界面相关的操作。关于更多的可以参考MSDN http://msdn.microsoft.com/en-us/library/system.componentmodel.backgroundworker%28VS.95%29.aspx
下面开始创建动画的启动动画的步骤
1. 创建WP7项目,并添加名为AnimatedSplashScreen.xaml的用户控件(UserControl)
2. 在MainPage.xaml.cs添加如下的命名空间,并且编辑后置代码如下
using System.Threading;
using System.Windows.Controls.Primitives;
public partial class MainPage : PhoneApplicationPage
{
BackgroundWorker backroungWorker;
Popup myPopup;
// Constructor
public MainPage()
{
InitializeComponent();
myPopup = new Popup() { IsOpen = true, Child = new AnimatedSplashScreen() };
backroungWorker = new BackgroundWorker();
RunBackgroundWorker();
}
private void RunBackgroundWorker()
{
backroungWorker.DoWork += ((s, args) =>
{
Thread.Sleep(5000);
});
backroungWorker.RunWorkerCompleted += ((s, args) =>
{
this.Dispatcher.BeginInvoke(() =>
{
this.myPopup.IsOpen = false;
}
);
});
backroungWorker.RunWorkerAsync();
}
}
3. 编辑AnimatedSplashScreen.xaml前台代码如下
<StackPanel x:Name="LayoutRoot" Background="Black" Height="800" Width="480">
<TextBlock Text="WindowsPhoneGeek Sample Splash Screen" x:Name="text" Foreground="Green" FontSize="65" TextWrapping="Wrap" Margin="0,20,0,0"/>
<Image Source="logo.png" x:Name="logoImage" Stretch="None" Margin="0,0,0,50">
<Image.Projection>
<PlaneProjection/>
</Image.Projection>
</Image>
<toolkit:PerformanceProgressBar IsIndeterminate="True" Foreground="Green"/>
</StackPanel>
并且添加如下的动画资源
<UserControl.Resources>
<Storyboard x:Key="flippingAnimation" >
<DoubleAnimationUsingKeyFrames Storyboard.TargetProperty="(UIElement.Projection).(PlaneProjection.RotationX)" Storyboard.TargetName="logoImage">
<EasingDoubleKeyFrame KeyTime="0" Value="0"/>
<EasingDoubleKeyFrame KeyTime="0:0:1" Value="1"/>
<EasingDoubleKeyFrame KeyTime="0:0:2" Value="360"/>
</DoubleAnimationUsingKeyFrames>
<ObjectAnimationUsingKeyFrames Storyboard.TargetProperty="Foreground" Storyboard.TargetName="text">
<DiscreteObjectKeyFrame KeyTime="0">
<DiscreteObjectKeyFrame.Value>
<SolidColorBrush Color="White"/>
</DiscreteObjectKeyFrame.Value>
</DiscreteObjectKeyFrame>
<DiscreteObjectKeyFrame KeyTime="0:0:2">
<DiscreteObjectKeyFrame.Value>
<SolidColorBrush Color="Green"/>
</DiscreteObjectKeyFrame.Value>
</DiscreteObjectKeyFrame>
</ObjectAnimationUsingKeyFrames>
</Storyboard>
</UserControl.Resources>
4. 最后编辑其后置代码如下
public AnimatedSplashScreen()
{
InitializeComponent();
Storyboard flippingAnimation = this.Resources["flippingAnimation"]as Storyboard;
flippingAnimation.Begin();
}
3、Popup使用的方法:
private Popup popup;
popup = new Popup();
popup.Child = new 控件类();
//打开
popup.IsOpen = true;
//关闭
popup.IsOpen = false
或者
xaml代码
<Popup x:Name="popup">
<Border>
<StackPanel>
……
</StackPanel>
</Border>
</Popup>
cs代码
//打开
popup.IsOpen = true;
//关闭
popup.IsOpen = false
4、在TextBlock控件中使用<LineBreak></LineBreak>进行换行。
<TextBlock TextWrapping="Wrap">
测试
<LineBreak></LineBreak>
<LineBreak></LineBreak>
测试
<LineBreak></LineBreak>
<LineBreak></LineBreak>
测试
</TextBlock>
5、捕获物理按键返回键,打开页面,离开页面。windows phone有3个物理按键,返回键,开始键,搜索键,后面两个无法在程序中捕获到。
//点击返回按钮
protected override void OnBackKeyPress(System.ComponentModel.CancelEventArgs e)
{
//你的代码
e.Cancel = false;
base.OnBackKeyPress(e);
}
//从其他页面进入该页面
protected override void OnNavigatedTo(System.Windows.Navigation.NavigationEventArgse)
{
//你的代码
base.OnNavigatedTo(e);
}
//离开当前的页面
protected override voidOnNavigatedFrom(System.Windows.Navigation.NavigationEventArgs e)
{
//你的代码
base.OnNavigatedFrom(e);
}
6、获取父控件里面的子控件的方法。之前在判断ListBox控件什么时候滚到底的时候使用过该方法,这个方法很常用。
//获取第一个子类型
public static TFindChildOfType<T>(DependencyObject root) whereT : class
{
varqueue = new Queue<DependencyObject>();
queue.Enqueue(root);
while(queue.Count > 0)
{
DependencyObject current= queue.Dequeue();
for(int i =VisualTreeHelper.GetChildrenCount(current) - 1;0 <= i; i--)
{
var child = VisualTreeHelper.GetChild(current, i);
var typedChild = child asT;
if (typedChild != null)
{
return typedChild;
}
queue.Enqueue(child);
}
}
returnnull;
}
//获取所有的子类型
public staticList<T> FindAllChildOfType<T>(DependencyObject root) where T : class
{
varqueue = new Queue<DependencyObject>();
queue.Enqueue(root);
List<T> allChild = new List<T>();
while(queue.Count > 0)
{
DependencyObject current= queue.Dequeue();
for (int i = VisualTreeHelper.GetChildrenCount(current) - 1; 0 <= i;i--)
{
var child = VisualTreeHelper.GetChild(current, i);
var typedChild = child asT;
if (typedChild != null)
{
allChild.Add(typedChild);
}
queue.Enqueue(child);
}
}
returnallChild;
}
7、使用<ControlTemplate>……</ControlTemplate>来扩展控件的各种自定义化的效果,当你需要在控件上实现一些动画的效果,或者在控件上再嵌入其他的一些控件都可以通过设计一个ControlTemplate来实现。
如实现一个按钮的单击效果:
<Button Content="Button" Height="72" HorizontalAlignment="Left" Margin="103,197,0,0" Name="button1" VerticalAlignment="Top" Width="160">
<Button.Template>
<ControlTemplate>
<Grid Background="Transparent">
<VisualStateManager.VisualStateGroups>
<VisualStateGroup x:Name="CommonStates">
<VisualState x:Name="Pressed">
<Storyboard>
<ObjectAnimationUsingKeyFramesStoryboard.TargetName="ButtonBackground"Storyboard.TargetProperty="Background">
<DiscreteObjectKeyFrameKeyTime="0" Value="YellowGreen"/>
</ObjectAnimationUsingKeyFrames>
<ObjectAnimationUsingKeyFrames Storyboard.TargetName="ButtonBackground" Storyboard.TargetProperty="BorderBrush">
<DiscreteObjectKeyFrameKeyTime="0" Value="YellowGreen"/>
</ObjectAnimationUsingKeyFrames>
</Storyboard>
</VisualState>
</VisualStateGroup>
</VisualStateManager.VisualStateGroups>
<Border x:Name="ButtonBackground" BorderBrush="{TemplateBinding BorderBrush}" BorderThickness="{TemplateBindingBorderThickness}" Background="{TemplateBindingBackground}" Margin="{StaticResource PhoneTouchTargetOverhang}">
<ContentControl x:Name="ContentContainer" Foreground="{TemplateBinding Foreground}" HorizontalContentAlignment="{TemplateBinding HorizontalContentAlignment}"VerticalContentAlignment="{TemplateBinding VerticalContentAlignment}" Padding="{TemplateBindingPadding}"Content="{TemplateBindingContent}"ContentTemplate="{TemplateBinding ContentTemplate}"/>
</Border>
</Grid>
</ControlTemplate>
</Button.Template>
</Button>
8、显示和隐藏手机的顶部托盘,就是顶部那个信号和电池信息那块东西。
//显示
SystemTray.IsVisible = true;
//隐藏
SystemTray.IsVisible = false;


 396
396

 被折叠的 条评论
为什么被折叠?
被折叠的 条评论
为什么被折叠?
 到【灌水乐园】发言


