


一、文章前提:现在,短信登录已经成为了一种普遍的登录方式
二、实现操作:
1、功能实现前提:现在腾讯云或者阿里云申请短信发送功能(注:我是用的腾讯云)
2、代码实现
(1) 前端页面输入手机号,点击发送验证码
(2)后端随机生成6位的验证码,存入redis中
(3)手机收到验证码,点击登录,前端输入的验证码和后端存入redis中的验证码作比较,一致则通过
(4)将输入的手机号和数据库中手机号做对比,若数据库中存在此手机号,则直接登录,若不存在则注册,生成随机的账号,和固定的密码存到数据库中,之后登陆显示为新用户登录。
三、功能实现
1、去腾讯云注册短信服务 地址:https://cloud.tencent.com/
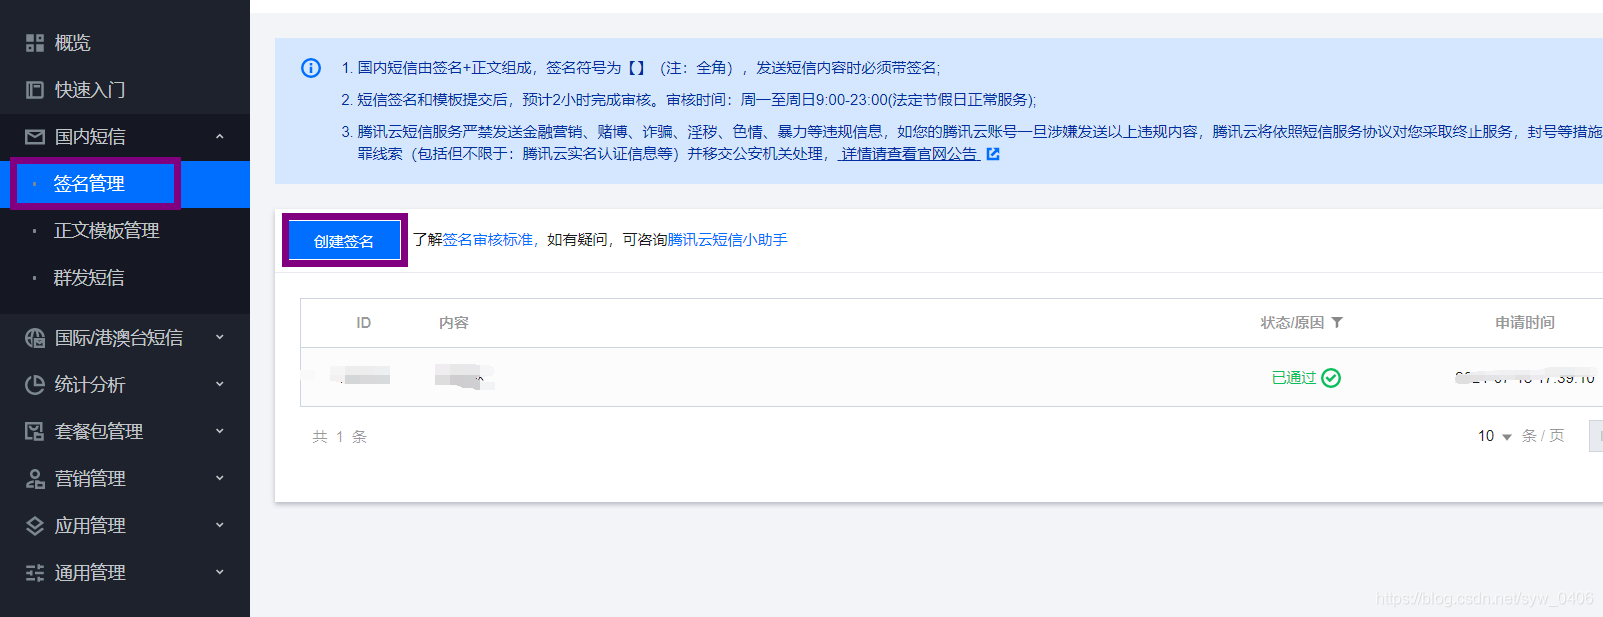
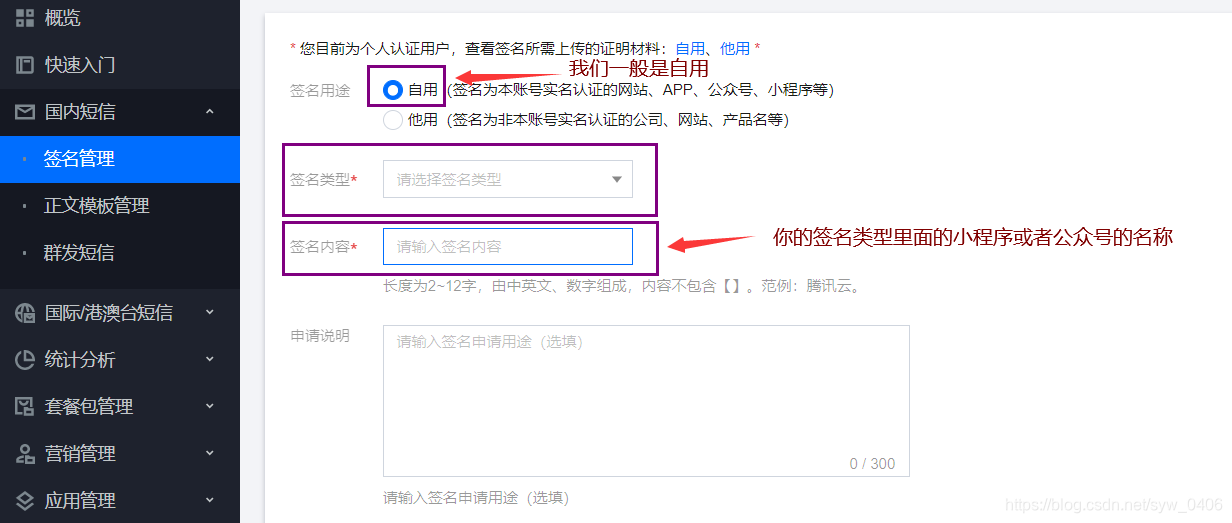
2、之后,需要添加签名模板
首先:点击签名管理,创建签名
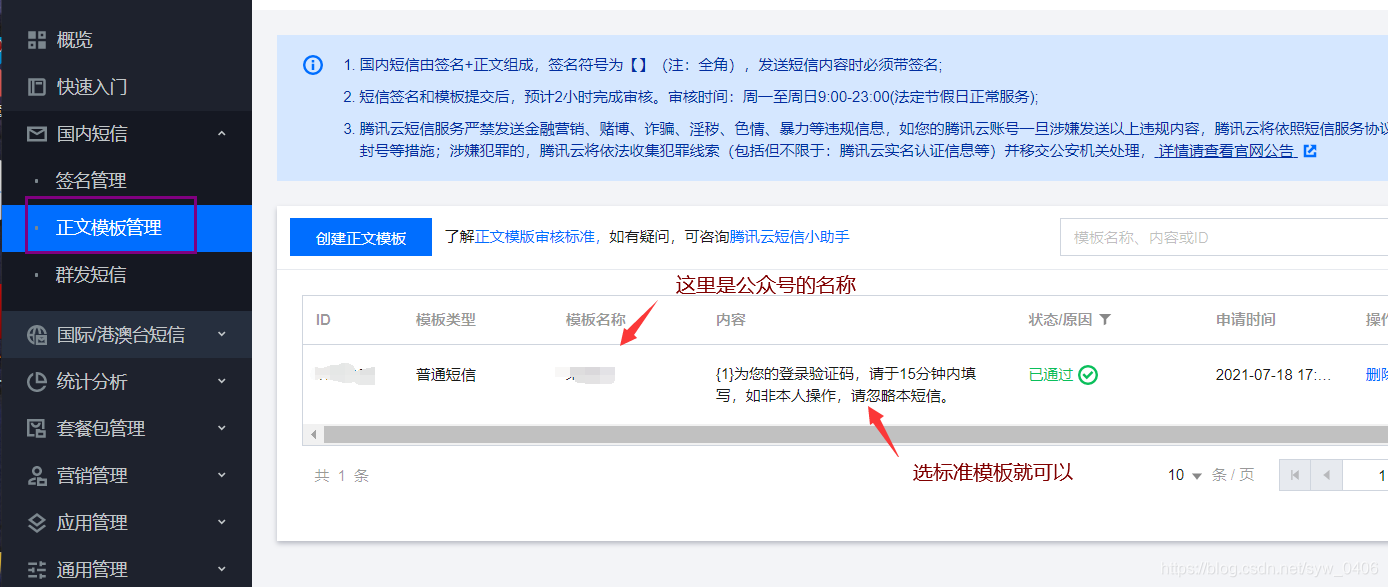
然后添加正文模板:
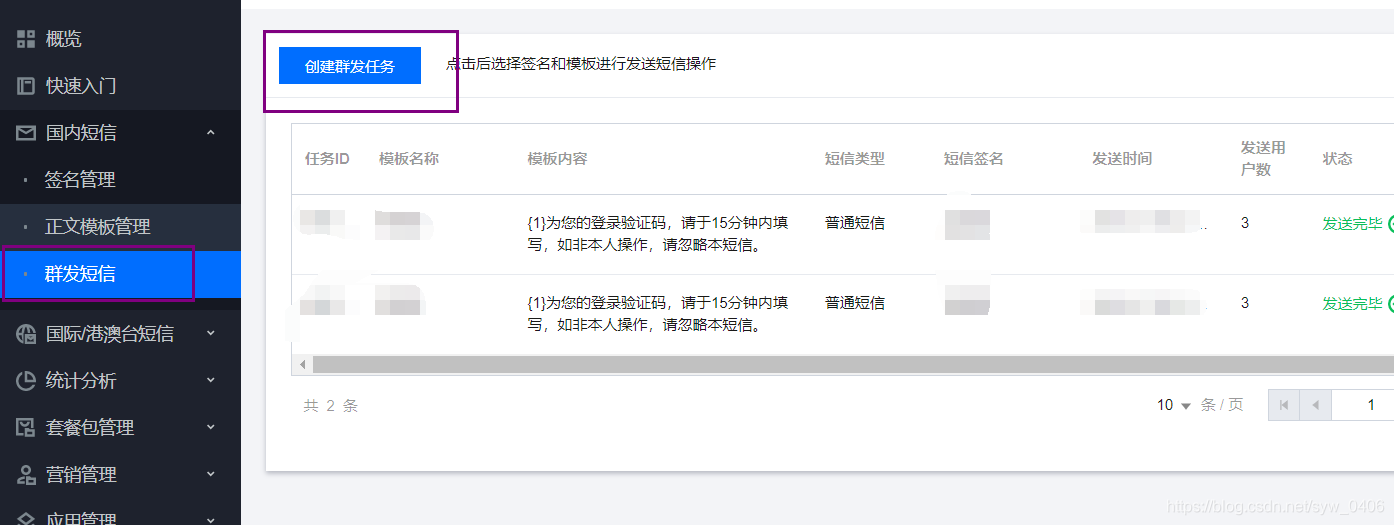
最后都申请通过之后可以群发短信测试一下
注:腾讯云的短信功能有免费的200条可用
代码正文开始:
1、添加maven依赖
<!--短信登录-->
<dependency>
   <groupId>com.tencentcloudapi</groupId>
   <artifactId>tencentcloud-sdk-java</artifactId>
   <version>3.1.87</version>
</dependency>
<dependency>
    <groupId>com.github.qcloudsms</groupId>
    <artifactId>qcloudsms</artifactId>
    <version>1.0.6</version>
</dependency>
2、Util
package com.qcby.teach.help.util;

import com.github.qcloudsms.SmsSingleSender;
import com.github.qcloudsms.SmsSingleSenderResult;

import com.github.qcloudsms.httpclient.HTTPException;

import org.json.JSONException;
import org.json.JSONObject;
import org.springframework.beans.factory.annotation.Autowired;

import javax.servlet.http.HttpServletRequest;
import javax.servlet.http.HttpSession;
import java.io.IOException;

/**
 * @author syw
 * @date 2021年07月22日9:53
 */
public class SMSUtil {
    public static String sendSMS(HttpServletRequest request, String phoneNumber,String code) {
        String reStr = ""; //定义返回值
        // 短信应用AppID
        int appid = 14******81 ;
        // 短信应用AppKey
        String appkey = "5*****9";
        // 短信模板ID
        int templateId = *******;
        // 签名内容
        String smsSign = "***";
        try {
            //参数
            String[] params = {code};
            //创建ssender对象
            SmsSingleSender ssender = new SmsSingleSender(appid, appkey);
            SmsSingleSenderResult result = ssender.sendWithParam("86", phoneNumber,
                    templateId, params, smsSign, "", "");
            System.out.println(result);
            HttpSession session = request.getSession();
            //JSONObject存入数据
            JSONObject json = new JSONObject();
            json.put("Code", code);//存入验证码
            json.put("createTime", System.currentTimeMillis());//存入发送短信验证码的时间
            // 将验证码和短信发送时间码存入SESSION
            request.getSession().setAttribute("MsCode", json);
            reStr = "success";
        } catch (HTTPException e) {
            // HTTP响应码错误
            e.printStackTrace();
        } catch (JSONException e) {
            // json解析错误
            e.printStackTrace();
        } catch (IOException e) {
            // 网络IO错误
            e.printStackTrace();
        }catch (Exception e) {
            // 网络IO错误
            e.printStackTrace();
        }
        return reStr;
    }

}
3、controller层
package com.qcby.teach.help.controller.rest;
import com.qcby.teach.help.common.constant.GlobalConstant;
import com.qcby.teach.help.common.constant.RedisConstant;
import com.qcby.teach.help.common.web.ResultJson;
import com.qcby.teach.help.entity.CustomUserDetails;
import com.qcby.teach.help.entity.SysUser;
import com.qcby.teach.help.entity.User;
import com.qcby.teach.help.entity.vo.SysUserVo;
import com.qcby.teach.help.service.AuthService;
import com.qcby.teach.help.service.SMSLoginService;
import com.qcby.teach.help.util.RedisUtil;
import com.qcby.teach.help.util.SMSUtil;
import com.qcby.teach.help.util.SetAccountUtil;
import com.qcby.teach.help.util.keyUtil;
import lombok.extern.slf4j.Slf4j;
import org.springframework.beans.factory.annotation.Autowired;
import org.springframework.data.redis.core.RedisTemplate;
import org.springframework.security.core.parameters.P;
import org.springframework.web.bind.annotation.RequestBody;
import org.springframework.web.bind.annotation.RequestMapping;
import org.springframework.web.bind.annotation.RestController;
import javax.servlet.http.HttpServletRequest;
import java.text.SimpleDateFormat;
import java.util.Calendar;
import java.util.concurrent.TimeUnit;
import java.util.regex.Pattern;

/**
 * @author syw
 * @date 2021年07月22日10:00
 */
@RestController
@Slf4j
@RequestMapping(GlobalConstant.REST_URL_PREFIX + "/smsLogin")
public class RestSendMessageController {
    //这是我的账号密码登录的service层,自动忽略
    @Autowired
    private AuthService authService;
    @Autowired
    private RedisUtil redisUtil;
    @Autowired
    private SMSLoginService smsLoginService;
    //点击发送验证码
    @RequestMapping("/sendSMS")
    public String sendSMS(HttpServletRequest request, @RequestBody SysUserVo sysUserVo) {
        log.info("sysUserVo{}", sysUserVo);
        Long phoneNum = sysUserVo.getPhoneNum();
        log.info("phoneNum{}", phoneNum);
        //随机生成六位验证码的工具类
        String code = keyUtil.keyUtils();
        log.info(code);
        if (phoneNum != null && !phoneNum.equals("")) {
            //String s = SMSUtil.sendSMS(request, phoneNum.toString(), code);
            redisUtil.set("code", code, RedisConstant.EFFECTIVE_Time);
            return null;
        } else {
            return "error";
        }
    }
    //短信登录
    @RequestMapping("pLogin")
    public ResultJson phoneLogin(@RequestBody SysUserVo sysUserVo) {
        String regex="1([\\d]{10})|((\\+[0-9]{2,4})?\\(?[0-9]+\\)?-?)?[0-9]{7,8}";
        if(!Pattern.matches(regex,String.valueOf(sysUserVo.getPhoneNum()))){
            return ResultJson.error("请输入正确的手机号");
        }
        if(sysUserVo.getPhoneNum()==null){
            return ResultJson.error("输入的手机号为空");
        }
        String fromCode=sysUserVo.getCode();
        if(fromCode.equals(redisUtil.get("code"))){
            SysUser user=smsLoginService.selectByAccount(sysUserVo);
            return ResultJson.ok(200, user);
        }else{
            return ResultJson.error("输入的验证码有误");
        }
    }
}
4、service层(业务层)
package com.qcby.teach.help.service.impl;

import com.baomidou.mybatisplus.extension.service.impl.ServiceImpl;
import com.qcby.teach.help.common.web.ResultJson;
import com.qcby.teach.help.entity.SectorScoreChart;
import com.qcby.teach.help.entity.SysUser;
import com.qcby.teach.help.entity.vo.SysUserRefRoleVo;
import com.qcby.teach.help.entity.vo.SysUserVo;
import com.qcby.teach.help.mapper.SMSLoginMapper;
import com.qcby.teach.help.mapper.SectorScoreChartMapper;
import com.qcby.teach.help.service.AuthService;
import com.qcby.teach.help.service.SMSLoginService;
import com.qcby.teach.help.service.SectorScoreChartService;
import com.qcby.teach.help.service.SysUserService;
import com.qcby.teach.help.util.RedisUtil;
import com.qcby.teach.help.util.SetAccountUtil;
import lombok.extern.slf4j.Slf4j;
import org.springframework.beans.factory.annotation.Autowired;
import org.springframework.security.crypto.bcrypt.BCryptPasswordEncoder;
import org.springframework.stereotype.Service;
import org.springframework.transaction.annotation.Transactional;
import org.springframework.web.bind.annotation.RequestBody;

import java.time.LocalDateTime;

/**
 * @author syw
 * @date 2021年07月27日16:04
 */
@Service
@Slf4j
public class SMSLoginServiceImpl extends ServiceImpl<SMSLoginMapper, SysUser> implements SMSLoginService {
    @Autowired
    private SMSLoginMapper smsLoginMapper;
    @Autowired
    private AuthService authService1;
    @Autowired
    private SysUserService sysUserService;
    @Override
    public SysUserVo pLogin(@RequestBody SysUserVo sysUserVo) {
        return smsLoginMapper.pLogin(sysUserVo);

    }

    @Override
    @Transactional
    public SysUser selectByAccount(SysUserVo sysUserVo) {
        //根据手机号查用户
        SysUser sysUser=smsLoginMapper.selectByAccount(sysUserVo.getPhoneNum());
        //根据手机号查出来的用户不存在
        if (sysUser==null){
            //随机生成账号
            String account1=SetAccountUtil.getAccount();
            log.info(account1);
            SysUser sysUser1 = new SysUser();
            //将随机生成的账号存入数据库中
            sysUser1.setAccount(account1);
            //设置初始登录密码为123456
            sysUser1.setPassword("123456");
            sysUser1.setCreateTime(LocalDateTime.now());
            //将输入的未注册的phoneNum添加到数据库的user表中
            sysUser1.setPhoneNum(sysUserVo.getPhoneNum());
            log.info("sysUser1{}", sysUser1);
            sysUser1.setPassword(new BCryptPasswordEncoder().encode(sysUser1.getPassword()));
            //将新用户的数据添加到数据库中,myBatis Plus 的save方法
            sysUserService.save(sysUser1);
            log.info("sysUser1.getId(){}", sysUser1.getId());
            sysUser1.setPassword("123456");
            sysUser1.setSex(0);
            //随机生成用户名
            sysUser1.setNickName(SetAccountUtil.getNickName());
            return sysUser1;
           }
        else {
            sysUser.setSex(1);
            return sysUser;
        }

    }
5、随机生成账号
package com.qcby.teach.help.util;

import com.qcby.teach.help.entity.SysUser;
import com.qcby.teach.help.entity.vo.SysUserVo;
import com.qcby.teach.help.mapper.SysUserMapper;
import com.qcby.teach.help.service.SMSLoginService;
import com.qcby.teach.help.service.SysUserService;
import org.springframework.beans.factory.annotation.Autowired;

import java.util.Calendar;
import java.util.List;
import java.util.Random;

/**
 * @author syw
 * @date 2021年07月28日9:57
 *
 * 生成随机六位数
 */
public class SetAccountUtil {

    //生成随机数
    public static String getAccount(){
        Random rand=new Random();//生成随机数
        Calendar calendar = Calendar.getInstance();
        int year = calendar.get(Calendar.YEAR);
        System.out.println("当前年份"+year);
        String account=year+"";
        for(int a=0;a<4;a++){
            account+=rand.nextInt(10);//生成8位数字
        }
        return account;


    }
}
6、随机生成短信验证码
package com.qcby.teach.help.util;

import java.util.Random;

/**
 * @author syw
 * @date 2021年07月22日9:55
 */
public class keyUtil {
    public static String keyUtils() {
        String str="0123456789";
        StringBuilder st=new StringBuilder(6);
        for(int i=0;i<6;i++){
            char ch=str.charAt(new Random().nextInt(str.length()));
            st.append(ch);
        }
        String findkey=st.toString().toLowerCase();
        return findkey;
    }

}
这样下来功能就可以实现啦!前端我们只要访问相应的路径,获取到手机号和验证码就可以登录啦!!!easy
这个短信验证登录功能实现之后,在本地测试可以通过,但是部署到服务器上会抛出异常,详情以及解决办法可以看https://blog.csdn.net/syw_0406/article/details/119359914?spm=1001.2014.3001.5501


 3万+
3万+


 被折叠的 条评论
为什么被折叠?
被折叠的 条评论
为什么被折叠?
 到【灌水乐园】发言


