


1. 事件三要素
=> 事件源: 谁身上的事件
=> 事件类型: 什么事件
=> 事件处理函数: 当行为发生的时候, 执行的函数
2. 事件绑定
2-1. DOM 0级 事件
=> 语法: 事件源.on事件类型 = 事件处理函数
=> 同一个事件源的同一个事件类型只能绑定一个事件处理函数
2-2. DOM 2级 事件(事件侦听器)
=> 标准浏览器
-> 语法: 事件源.addEventListener(事件类型, 事件处理函数)
-> 可以给同一个事件源的同一个事件类型绑定多个事件处理函数
-> 顺序绑定顺序执行
=> IE 低版本
-> 语法: 事件源.attachEvent('on事件类型', 事件处理函数)
-> 可以给同一个事件源的同一个事件类型绑定多个事件处理函数
-> 顺序绑定倒序执行
3. 事件解绑
3-1. DOM 0级 事件解绑
=> 语法: 事件源.on事件类型 = null
3-2. DOM 2级 事件解绑
=> 标准浏览器
-> 语法: 事件源.removeEventListener('事件类型', 事件处理函数)
=> IE 低版本
-> 语法: 事件源.detachEnent('on事件类型', 事件处理函数)
=> 注意: DOM 2级事件如果你需要解绑, 那么在绑定的时候, 需要把事件处理函数单独书写, 以函数名的形式进行绑定
4. 事件对象
+ 是事件发生的时候, 浏览器用来记录本次事件的所有详细信息的一个对象数据类型
+ 获取事件对象的方式
=> 标准浏览器, 直接书写形参
=> IE 低版本: window.event
5. 事件对象内的信息
5-1. 鼠标相关信息
=> clientX 和 clientY: 拿到的是光标相对于浏览器可视窗口左上角的坐标位置
=> pageX 和 pageY: 拿到的是光标相对于文档流左上角的坐标位置
=> offsetX 和 offsetY: 拿到的是光标相对于 **事件目标** 左上角的坐标位置
5-2. 键盘相关信息
=> 键盘编码: 事件对象.keyCode
=> 组合按键:
-> altKey
-> shiftKey
-> ctrlKey
-> metaKey
-> 以上四个值都是布尔值
6. 事件传播
+ 当行为发生的时候, 会按照结构父级的顺序, 向上传递事件行为, 直到 window 为止
+ 传播的过程中, 会经历三个阶段
=> 捕获: 从 window 到 事件目标 的过程
=> 目标: 准确触发事件的那个节点
=> 冒泡: 从 事件目标 到 window 的过程
7. 阻止事件传播
+ 标准浏览器: 事件对象.stopPropagation()
+ IE 低版本: 事件对象.cancelBubble = true
事件
+ 就是和页面中的某些节点约定好一个行为, 当行为发生的时候, 执行一段函数
+ 事件三要素:
=> 事件源: 谁身上的事件
=> 事件类型: 什么事件
=> 事件处理函数: 行为发生的时候执行的函数
认识事件
+ 指的是和浏览器内的某一个节点约定一个事情, 当用户发生指定行为的时候
+ 会执行指定的某一段代码
事件三要素:
1. 事件源: 绑定在谁身上的事件
2. 事件类型: 绑定的什么事件
3. 事件处理函数: 当行为发生的时候, 执行的函数
+ 定义: 在事件处理函数内, this 关键字就是 事件源
注意1: 所有的事件类型, 都是只要有行为发生, 有事件处理函数的绑定, 就会触发函数
注意2: 键盘事件所有元素都可以绑定, 但是不是所有元素都能触发(一般绑定给 window, document, 表单元素)
注意3: 表单事件, 不一定非得有 form 标签, 只要是一个表单元素就行
var ele = document.querySelector('div')
事件类型
+ 在 JS 内对事件进行了大致的分类
1. 鼠标事件
+ click
+ dblclick
+ contextmenu
+ mousedown
+ mouseup
+ mousemove
+ mouseover
+ mouseout
+ mouseenter
+ mouseleave
2. 键盘事件
+ keydown
+ keyup
+ keypress
3. 浏览器事件
+ load
+ resize
+ scroll
4. 表单事件
+ focus
+ blur
+ input
+ change
+ reset
+ submit
5. 触摸事件
+ touchstart
+ touchmove
+ touchend
6. 其他事件
+ selectstart
+ ...
鼠标事件
+ 依赖鼠标行为触发的事件
1. click 左键单击
2. dblclick 左键双击
3. contextmenu 右键单击
4. mousedown 鼠标按键按下
5. mouseup 鼠标按键抬起
6. mousemove 鼠标移动
7. mouseover 鼠标移入
8. mouseout 鼠标移出
9. mouseenter 鼠标移入
10. mouseleave 鼠标移出
+ over 和 out 一套, 在移入后代元素的时候 也会触发
+ enter 和 leave 一套, 在移入后代元素的时候 不会触发
<!DOCTYPE html>
<html lang="en">
<head>
  <meta charset="UTF-8">
  <meta name="viewport" content="width=device-width, initial-scale=1.0">
  <meta http-equiv="X-UA-Compatible" content="ie=edge">
  <title>Document</title>
  <style>
    * {
      margin: 0;
      padding: 0;
    }

    div {
      width: 100px;
      height: 100px;
      background-color: pink;
    }

    p {
      width: 50px;
      height: 50px;
      background-color: skyblue;
    }
  </style>
</head>
<body>

  <div>
    <p> </p>
  </div>

  <script>


    var ele = document.querySelector('div')


    // 1.
    // ele.onclick = function () { console.log('鼠标左键单击') }

    // 2.
    // ele.ondblclick = function () { console.log('鼠标左键双击') }

    // 3.
    // ele.oncontextmenu = function () { console.log('鼠标右键单击') }

    // 4.
    // ele.onmousedown = function () { console.log('鼠标按键按下了') }

    // 5.
    // ele.onmouseup = function () { console.log('鼠标按键抬起了') }

    // 6.
    // ele.onmousemove = function () { console.log('鼠标在移动') }

    // 7.
    // ele.onmouseover = function () { console.log('over') }

    // 8.
    // ele.onmouseout = function () { console.log('out') }

    // 9.
    // ele.onmouseenter = function () { console.log('enter') }

    // 10.
    // ele.onmouseleave = function () { console.log('leave') }
  </script>
</body>
</html>
键盘事件
+ 依赖键盘行为触发的事件
1. keydown 键盘按键按下事件
+ 键盘上任何一个按键按下都会触发
2. keyup 键盘按键抬起事件
3. keypress 键盘键入事件
+ 可以真实键入内容 和 回车才会触发
<!DOCTYPE html>
<html lang="en">
<head>
  <meta charset="UTF-8">
  <meta name="viewport" content="width=device-width, initial-scale=1.0">
  <meta http-equiv="X-UA-Compatible" content="ie=edge">
  <title>Document</title>
</head>
<body>

  <input type="text">

  <script>


    var inp = document.querySelector('input')


    // 1.
    // inp.onkeydown = function () { console.log('键盘按下 keydown') }

    // 2.
    // inp.onkeyup = function () { console.log('键盘抬起 keyup') }

    // 3.
    // inp.onkeypress = function () { console.log('鼠标键入 keypress') }

  </script>
</body>
</html>
表单事件
+ 专门为表单元素(form, input, button, select, ...) 准备的事件
+ 其他元素可以绑定, 但是没法触发
1. blur 失焦
2. focus 聚焦
3. input 输入
4. change 改变
=> 失焦时候如果内容和聚焦时候不一样, 才会触发
5. reset 重置
=> 需要绑定给 form 标签
=> 当你点击 reset 按钮的时候, 会触发 form 标签的 重置行为
6. submit 提交
=> 需要绑定给 form 标签
=> 当你点击 submit 按钮的时候, 会触发 form 标签的 提交行为
<!DOCTYPE html>
<html lang="en">
<head>
  <meta charset="UTF-8">
  <meta name="viewport" content="width=device-width, initial-scale=1.0">
  <meta http-equiv="X-UA-Compatible" content="ie=edge">
  <title>Document</title>
</head>
<body>

  <form action="">


    <input type="text">
    <input type="text">
    <input type="text">
    <input type="text">
    <input type="reset">
    <input type="submit">
  </form>

  <script>

    var inp = document.querySelector('input')
    var form = document.querySelector('form')

    // 1.
    // inp.onfocus = function () { console.log('聚焦') }

    // 2.
    // inp.onblur = function () { console.log('失焦') }

    // 3.
    // inp.oninput = function () { console.log('输入内容') }

    // 4.
    // inp.onchange = function () { console.log('表单内容改变') }

    // 5.
    // form.onreset = function () { console.log('表单重置了') }

    // 6.
    form.onsubmit = function () { console.log('表单提交了') }


  </script>
</body>
</html>
触摸事件
+ 专门用在触摸屏幕设备(手机, 平板, 可触摸移动设备)
1. touchstart 触摸开始
2. touchmove 触摸移动
3. touchend 触摸结束
<!DOCTYPE html>
<html lang="en">
<head>
  <meta charset="UTF-8">
  <meta name="viewport" content="width=device-width, initial-scale=1.0">
  <meta http-equiv="X-UA-Compatible" content="ie=edge">
  <title>Document</title>
  <style>
    * {
      margin: 0;
      padding: 0;
    }

    div {
      width: 100px;
      height: 100px;
      background-color: pink;
    }
  </style>
</head>
<body>

  <div></div>

  <script>


    var ele = document.querySelector('div')


    // 1.
    ele.ontouchstart = function () { console.log('触摸开始') }

    // 2.
    ele.ontouchmove = function () { console.log('触摸移动') }

    // 3.
    ele.ontouchend = function () { console.log('触摸结束') }

  </script>
</body>
</html>
其他事件
1. selectstart 选择开始
<!DOCTYPE html>
<html lang="en">
<head>
  <meta charset="UTF-8">
  <meta name="viewport" content="width=device-width, initial-scale=1.0">
  <meta http-equiv="X-UA-Compatible" content="ie=edge">
  <title>Document</title>
</head>
<body>

  <p>圣诞节和法规生涯的功夫可压缩的功夫也刷带有合法雇佣空间丧服一开始打钢副框一个速度快一份给USD亚if股御史大夫雇佣萨福库管员 </p>

  <script>


    document.onselectstart = function () {
      console.log('你竟然想复制')
      return false
    }

    document.onvisibilitychange = function () {
      console.log('你肯定是在摸鱼')
    }
  </script>
</body>
</html>
事件的绑定
在 JS 内有两种事件绑定方式
1. DOM 0级 事件绑定
=> 使用 on 语法进行绑定
=> 语法: 事件源.on事件类型 = 事件处理函数
=> 特点: 同一个事件源的同一个事件类型只能绑定一个事件处理函数
2. DOM 2级 事件绑定(事件侦听器/事件监听器)
=> 标准浏览器
-> 语法: 事件源.addEventListener('事件类型', 事件处理函数)
-> 特点: 同一个事件源的同一个事件类型可以绑定多个事件处理函数, 顺序绑定顺序执行
=> IE 低版本
-> 语法: 事件源.attachEvent('on事件类型', 事件处理函数)
-> 特点: 同一个事件源的同一个事件类型可以绑定多个事件处理函数, 顺序绑定倒序执行
var ele = document.querySelector('div')

    // 1. DOM 0级事件绑定
    // ele.onclick = function () { console.log('我是第一个 DOM 0级 事件绑定的事件处理函数') }
    // ele.onclick = function () { console.log('我是第二个 DOM 0级 事件绑定的事件处理函数') }

    // 2-1. 标准浏览器 DOM 2级 事件绑定
    // ele.addEventListener('click', function () { console.log('我是第一个 DOM 2级 事件绑定的事件处理函数') })
    // ele.addEventListener('click', function () { console.log('我是第二个 DOM 2级 事件绑定的事件处理函数') })
循环绑定事件
+ 在循环绑定事件内, 不能直接使用 var 定义的变量当做 索引
+ 在循环绑定事件内, 可以直接使用 let 定义的变量当做 索引
<!DOCTYPE html>
<html lang="en">
<head>
  <meta charset="UTF-8">
  <meta name="viewport" content="width=device-width, initial-scale=1.0">
  <meta http-equiv="X-UA-Compatible" content="ie=edge">
  <title>Document</title>
  <style>
    * {
      margin: 0;
      padding: 0;
    }

    .box {
      width: 600px;
      height: 300px;
      display: flex;
      border: 3px solid #333;
      margin: 50px auto;
      flex-direction: column;
    }

    .box > ul {
      height: 60px;
      display: flex;
    }

    .box > ul > li {
      flex: 1;
      display: flex;
      justify-content: center;
      align-items: center;
      font-size: 30px;
      background-color: skyblue;
      color: #fff;
      cursor: pointer;
    }

    .box > ul > li.active {
      background-color: orange;
    }

    .box > ol {
      flex: 1;
      position: relative;
    }

    .box > ol > li {
      width: 100%;
      height: 100%;
      position: absolute;
      left: 0;
      top: 0;
      background-color: purple;
      font-size: 100px;
      color: #fff;
      display: none;
    }

    .box > ol > li.active {
      display: block;
    }

  </style>
</head>
<body>


  <div class="box">
    <ul>
      <li class="active">1</li>
      <li>2</li>
      <li>3</li>
    </ul>
    <ol>
      <li class="active">1</li>
      <li>2</li>
      <li>3</li>
    </ol>
  </div>


  <script>
    var btns = document.querySelectorAll('ul > li')
    var tabs = document.querySelectorAll('ol > li')

    // btns 内的每一个绑定点击事件
    for (let i = 0; i < btns.length; i++) {
      btns[i].onclick = function () {
        // 全部去掉类名
        for (let j = 0; j < btns.length; j++) {
          btns[j].className = ''
          tabs[j].className = ''
        }

        // i 配套的加上类名
        btns[i].className = 'active'
        tabs[i].className = 'active'
      }
    }
  </script>

  <script>


    // var lis = document.querySelectorAll('li')

    // for (var i = 0; i < lis.length; i++) {
    //   lis[i].onclick = function () {
    //     console.log(i)
    //   }
    // }

    /*
      全局变量 i === 3
        {
          lis[0].onclick = function () { console.log(i) }
        }
        {
          lis[1].onclick = function () { console.log(i) }
        }
        {
          lis[2].onclick = function () { console.log(i) }
        }
        {
          循环结束
        }
    */

    // for (let i = 0; i < lis.length; i++) {
    //   lis[i].onclick = function () {
    //     console.log(i)
    //   }
    // }

    /*
      {
        i = 0
        lis[0].onclick = function () { console.log(i) }
      }
      {
        i = 1
        lis[1].onclick = function () { console.log(i) }
      }
      {
        i = 2
        lis[2].onclick = function () { console.log(i) }
      }
      {
        i = 3
        循环结束
      }
    */
  </script>
</body>
</html>
事件解绑
+ 取消已经绑定好的事件
1. DOM 0级 事件解绑
+ 语法: 事件源.on事件类型 = null
+ 因为 赋值符号 覆盖的原因, 就可以解绑
2. DOM 2级 事件解绑 - 标准浏览器
+ 语法: 事件源.removeEventListener('事件类型', 要解绑的事件处理函数)
+ 注意: DOM 2级事件如果你需要解绑, 那么在绑定的时候, 需要把函数单独书写, 以函数名的形式进行绑定
3. DOM 2级 事件解绑 - IE 低版本
+ 语法: 事件源.detachEvent('on事件类型', 要解绑的事件处理函数)
+ 注意: DOM 2级事件如果你需要解绑, 那么在绑定的时候, 需要把函数单独书写, 以函数名的形式进行绑定
<!DOCTYPE html>
<html lang="en">
<head>
  <meta charset="UTF-8">
  <meta name="viewport" content="width=device-width, initial-scale=1.0">
  <meta http-equiv="X-UA-Compatible" content="ie=edge">
  <title>Document</title>
  <style>
    * {
      margin: 0;
      padding: 0;
    }

    div {
      width: 200px;
      height: 200px;
      background-color: pink;
    }
  </style>
</head>
<body>

  <div></div>

  <button>解绑事件</button>

  <script>


    var ele = document.querySelector('div')
    var btn = document.querySelector('button')


    // 绑定 DOM 0级 事件
    // ele.onclick = function () { console.log('我是一个事件处理函数') }

    // 标准浏览器绑定 DOM 2级 事件
    // 在事件绑定的时候, 实际上是把 a 函数和 b 函数的地址传递到了 addEventListener 内
    function b() { console.log('222222') }
    ele.addEventListener('click', function a() { console.log('111111') })
    ele.addEventListener('click', b)

    btn.onclick = function () {
      console.log('点击我准备解绑事件')

      // 执行解绑事件的代码

      // 1. DOM 0级 事件解绑
      // ele.onclick = null

      // 2. DOM 2级 事件解绑 - 标准浏览器
      // 解绑的时候, 把 c 函数的地址传递到 removeEventListener 内了
      // ele.removeEventListener('click', function c() { console.log('222222') })
      ele.removeEventListener('click', b)

      console.log('解绑事件的代码执行完毕')
    }


    /*
      补充

      声明式函数的函数名
        + 特指小括号前面那个名字
        + 可以再函数外使用, 可以在函数内使用

      函数表达式(赋值式函数/匿名函数) 的函数名
        + 特指小括号前面那个名字
          => 例子:
            -> var fn = function f() {}
            -> var obj = { fn: function f() {} }
            -> addEventListener(xxx, function f() {})
        + 只能在函数内使用, 在函数外不能用
    */


  </script>
</body>
</html>
事件对象 - Event
+ 是一个对象数据类型, 内部存储的内容是对当前事件的描述信息
+ 概念: 本次事件触发的时候, 对于本次事件细节的所有描述信息的一个对象数据类型
如何获取事件对象
+ 标准浏览器
=> 直接在事件处理函数位置接受一个形参, 形参就是事件对象
=> 会在事件触发的时候, 有浏览器自动传递实参
=> xxx.onclick = function (xxx) {}
=> xxx.addEventLustener('click', function (xxx) {})
+ IE 低版本
=> 直接使用 window.event
var ele = document.querySelector('div')


    // 1. 获取事件对象
    ele.onclick = function (e) {
      // e 是事件处理函数的一个形参
      // 事件处理函数, 是我们和浏览器约定好, 当用户发生了 click 行为的时候, 浏览器帮我调用 事件处理函数
      // 该事件处理函数是被浏览器调用的
      // 浏览器会在调用本次事件处理函数的时候, 把它记录的信息当做实参传递进来
      // console.log(e)

      // 兼容
      e = e || window.event

      // 这里的 e 就一定是事件对象
    }
事件对象内的信息 - 鼠标事件
+ 坐标信息
1. client 一组
=> 语法:
-> 事件对象.clientX
-> 事件对象.clientY
=> 鼠标光标相对于浏览器可视窗口左上角的坐标位置
2. page 一组
=> 语法:
-> 事件对象.pageX
-> 事件对象.pageY
=> 鼠标光标相对于文档流左上角的坐标位置
3. offset 一组
=> 语法:
-> 事件对象.offsetX
-> 事件对象.offsetY
=> 鼠标光标相对于 **触发事件的元素** 左上角的坐标位置
总结: client 家族 和 offset 家族
offset 家族
1. offsetParent
=> 依赖元素获取, 元素.offsetParent
=> 获取到的是元素的 定位父级
2. offsetWidth
=> 依赖元素获取, 元素.offsetWidth
=> 获取到的是元素 内容 + padding + border 区域的宽度
3. offsetHeight
=> 依赖元素获取, 元素.offsetHeight
=> 获取到的是元素 内容 + padding + border 区域的高度
4. offsetLeft
=> 依赖元素获取, 元素.offsetLeft
=> 获取到的是元素 相对于 offsetParent 左边的距离
5. offsetTop
=> 依赖元素获取, 元素.offsetTop
=> 获取到的是元素 相对于 offsetParent 上边的距离
6. offsetX
=> 依赖事件对象获取, 事件对象.offsetX
=> 鼠标光标相对于 **触发事件的元素** 左边的坐标位置
7. offsetY
=> 依赖事件对象获取, 事件对象.offsetY
=> 鼠标光标相对于 **触发事件的元素** 上边的坐标位置
client 家族
1. clientWidth
=> 依赖元素获取, 元素.clientWidth
=> 获取到的是元素 内容 + padding 区域的宽度
2. clientHeight
=> 依赖元素获取, 元素.clientHeight
=> 获取到的是元素 内容 + padding 区域的高度
3. clientLeft
=> 依赖元素获取, 元素.clientLeft
=> 获取到的是元素 左边框 的宽度
4. clientTop
=> 依赖元素获取, 元素.clientTop
=> 获取到的是元素 上边框 的宽度
5. clientX
=> 依赖事件对象获取, 事件对象.clientX
=> 获取到的是光标相对于浏览器可视窗口左边的距离
6. clientY
=> 依赖事件对象获取, 事件对象.clientY
=> 获取到的是光标相对于浏览器可视窗口上边的距离
<!DOCTYPE html>
<html lang="en">
<head>
  <meta charset="UTF-8">
  <meta name="viewport" content="width=device-width, initial-scale=1.0">
  <meta http-equiv="X-UA-Compatible" content="ie=edge">
  <title>Document</title>
  <style>
    * {
      margin: 0;
      padding: 0;
    }

    body {
      width: 3000px;
      height: 3000px;
    }

    div {
      width: 200px;
      height: 200px;
      background-color: pink;
      margin: 100px;
    }

    p {
      width: 100px;
      height: 100px;
      background-color: skyblue;
      position: relative;
      left: 100px;
      top: 100px;
    }
  </style>
</head>
<body>

  <div>
    <p></p>
  </div>

  <script>


    var ele = document.querySelector('div')

    ele.onclick = function (e) {
      console.log('事件对象 : ', e)

      // 1. client 一组
      console.log('clientX : ', e.clientX)
      console.log('clientY : ', e.clientY)

      // 2. page 一组
      console.log('pageX : ', e.pageX)
      console.log('pageY : ', e.pageY)

      // 3. offset 一组
      console.log('offsetX : ', e.offsetX)
      console.log('offsetY : ', e.offsetY)
    }
  </script>
</body>
</html>
实时显示鼠标位置
问题1: 什么时候出现效果 ? 鼠标移动
+ 事件类型: mousemove
问题2: 什么位置出现效果 ? 整个页面
+ 事件源: document
问题3: 我要干什么 ? 实时显示坐标位置
+ 获取到鼠标的光标坐标位置
+ 必须要先拿到事件对象
+ 哪一组坐标 ? client
<!DOCTYPE html>
<html lang="en">
<head>
  <meta charset="UTF-8">
  <meta name="viewport" content="width=device-width, initial-scale=1.0">
  <meta http-equiv="X-UA-Compatible" content="ie=edge">
  <title>Document</title>
</head>
<body>

  <h1>
    X 轴坐标位置 : <span class="x">0</span> <br>
    Y 轴坐标位置 : <span class="y">0</span>
  </h1>

  <script>


    var xBox = document.querySelector('.x')
    var yBox = document.querySelector('.y')

    // 1. 绑定事件
    document.addEventListener('mousemove', function (e) {
      console.log('鼠标移动了')

      // 2. 拿到 client 一组坐标
      var x = e.clientX
      var y = e.clientY

      // 3. 赋值
      xBox.innerText = x
      yBox.innerText = y
    })
  </script>
</body>
</html>
鼠标跟随
<!DOCTYPE html>
<html lang="en">
<head>
  <meta charset="UTF-8">
  <meta name="viewport" content="width=device-width, initial-scale=1.0">
  <meta http-equiv="X-UA-Compatible" content="ie=edge">
  <title>Document</title>
  <style>
    * {
      margin: 0;
      padding: 0;
      list-style: none;
    }

    ul {
      width: 500px;
      margin: 50px;
    }

    li {
      width: 100%;
      height: 60px;
      line-height: 60px;
      font-size: 30px;
      border: 1px solid #333;
      margin-bottom: 10px;
      position: relative;
    }

    p {
      position: absolute;
      left: 500px;
      top: 300px;
      width: 300px;
      height: 150px;
      background-color: pink;

      display: none;

      /* 认识事件在我神身上不会触发, 我不作为事件目标 */
      pointer-events: none;

      font-size: 20px;
      line-height: 20px;

      z-index: 999;
    }
  </style>
</head>
<body>

  <ul>
    <li>我是标题1
      <p>我是提示内容我是提示内容我是提示内容我是提示内容我是提示内容我是提示内容</p>
    </li>
    <li>我是标题2
      <p style="background-color: orange;">我是提示内容我是提示内容我是提示内容我是提示内容我是提示内容我是提示内容</p>
    </li>
    <li>我是标题3
      <p style="background-color: skyblue;">我是提示内容我是提示内容我是提示内容我是提示内容我是提示内容我是提示内容</p>
    </li>
  </ul>

  <script>
    /*
      案例 - 鼠标跟随

      需求:
        + 默认, 提示盒子是隐藏
        + 当鼠标移入哪一个 li 的时候, 哪一个 li 对应的提示盒子显示
        + 当鼠标移出哪一个 li 的时候, 哪一个 li 对应的提示盒子隐藏
        + 当鼠标在哪一个 li 内移动的时候, 哪一个 li 对应的提示盒子跟随鼠标移动

      问题1: 什么时候出现效果 ?
        + 鼠标移入
        + 鼠标移出
        + 鼠标移动
      问题2: 在哪出现效果 ?
        + 每一个 li 标签内
      问题3: 在什么位置坐什么事情 ?
        3-1. 鼠标移入事件内
          => 移入的这个 li 的对应的 p 显示
        3-2. 鼠标移出事件内
          => 移出的这个 li 的对应的 p 隐藏
        3-3. 鼠标移动事件内
          => 拿到鼠标光标坐标位置 ? offset
          => 赋值给 li 对应的 p 的 left 和 top 样式


      分析问题
        + 抖动
        + 当 p 出现的时候, 相对于光标和 li 之间隔了一个 p 标签
        + 此时拿到的 offset 坐标就是相对于 p 的, 也就是 0 0 位置
      解决方案
        + 方案1: 让 p 出现的位置相对光标位置右下移动
        + 方案2: 在 p 身上不出现任何效果, 直接穿透下去(依赖一个 css 样式)
    */

    // 0. 获取元素
    var lis = document.querySelectorAll('ul > li')

    // 1. 循环给每一个 li 绑定 鼠标三个事件
    lis.forEach(function (item) {
      // 1-1. 绑定鼠标移入事件
      item.addEventListener('mouseover', overHandler)
      // 1-2. 绑定鼠标移出事件
      item.addEventListener('mouseout', outHandler)
      // 1-3. 绑定鼠标移动事件
      item.addEventListener('mousemove', moveHandler)
    })

    // 2-1. 鼠标移入事件处理函数
    function overHandler() {
      // 移入的 li 是谁 ?
      // console.log(this)
      // 对应的 p
      // console.log(this.firstElementChild)
      this.firstElementChild.style.display = 'block'
    }

    // 2-2. 鼠标移出事件处理函数
    function outHandler() {
      // 移入的 li 是谁 ?
      // console.log(this)
      // 对应的 p
      // console.log(this.firstElementChild)
      this.firstElementChild.style.display = 'none'
    }

    // 2-3. 鼠标移动事件处理函数
    function moveHandler(e) {
      // 拿到 offset 一组坐标
      // 因为 p 是相对于 li 定位的
      // 我们最好也拿到相对于 li 的坐标位置
      var x = e.offsetX
      var y = e.offsetY

      // 赋值
      this.firstElementChild.style.left = x + 'px'
      this.firstElementChild.style.top = y + 'px'
    }
  </script>
</body>
</html>
案例 - 拖拽
问题: 什么时候出现效果 ?
+ 按下去不放(mousedown) : 允许拖拽状态
+ 鼠标抬起来(mouseup) : 允许拖拽状态
+ 鼠标移动(mousemove) : 盒子跟随鼠标移动
问题: 在什么位置出现效果 ?
+ 按下去 : 盒子内
+ 抬起来 : 盒子内
+ 移动 : document
<!DOCTYPE html>
<html lang="en">
<head>
  <meta charset="UTF-8">
  <meta name="viewport" content="width=device-width, initial-scale=1.0">
  <meta http-equiv="X-UA-Compatible" content="ie=edge">
  <title>Document</title>
  <style>
    * {
      margin: 0;
      padding: 0;
    }

    div {
      width: 100px;
      height: 100px;
      background-color: pink;

      position: absolute;
      left: 0;
      top: 0;
    }
  </style>
</head>
<body>

  <div></div>

  <script>

    // 获取元素
    var ele = document.querySelector('div')

    // 准备一个开关
    var flag = false


    // 1. 绑定鼠标按下事件
    ele.onmousedown = function () {
      console.log('按下')

      // 打开开关
      flag = true
    }

    // 2. 绑定鼠标抬起事件
    ele.addEventListener('mouseup', function () {
      console.log('鼠标抬起')

      // 关闭开关
      flag = false
    })

    // 3. 绑定鼠标移动事件
    document.onmousemove = function (e) {
      // 这里的代码执行, 就会移动
      // 只要这里的代码不执行, 就不会移动了
      if (!flag) return

      var x = e.clientX - ele.offsetWidth / 2
      var y = e.clientY - ele.offsetHeight / 2

      // 赋值
      ele.style.left = x + 'px'
      ele.style.top = y + 'px'
    }


  </script>
</body>
</html>
案例 - 拖拽
问题: 什么时候出现效果 ?
+ 按下去不放(mousedown) : 允许拖拽状态
+ 鼠标抬起来(mouseup) : 允许拖拽状态
+ 鼠标移动(mousemove) : 盒子跟随鼠标移动
问题: 在什么位置出现效果 ?
+ 按下去 : 盒子内
+ 抬起来 : 盒子内
+ 移动 : document
<!DOCTYPE html>
<html lang="en">
<head>
  <meta charset="UTF-8">
  <meta name="viewport" content="width=device-width, initial-scale=1.0">
  <meta http-equiv="X-UA-Compatible" content="ie=edge">
  <title>Document</title>
  <style>
    * {
      margin: 0;
      padding: 0;
    }

    div {
      width: 100px;
      height: 100px;
      background-color: pink;

      position: absolute;
      left: 0;
      top: 0;
    }
  </style>
</head>
<body>

  <div></div>

  <script>


    // 获取元素
    var ele = document.querySelector('div')

    // 准备一个开关
    var flag = false


    // 1. 绑定鼠标按下事件
    ele.onmousedown = function () {
      console.log('按下')

      // 打开开关
      flag = true
    }

    // 2. 绑定鼠标抬起事件
    ele.addEventListener('mouseup', function () {
      console.log('鼠标抬起')

      // 关闭开关
      flag = false
    })

    // 3. 绑定鼠标移动事件
    document.onmousemove = function (e) {
      // 这里的代码执行, 就会移动
      // 只要这里的代码不执行, 就不会移动了
      if (!flag) return

      var x = e.clientX - ele.offsetWidth / 2
      var y = e.clientY - ele.offsetHeight / 2

      // 赋值
      ele.style.left = x + 'px'
      ele.style.top = y + 'px'
    }


  </script>
</body>
</html>
案例 - 拖拽
问题: 什么时候出现效果 ?
+ 按下去不放(mousedown) : 允许拖拽状态
+ 鼠标抬起来(mouseup) : 允许拖拽状态
+ 鼠标移动(mousemove) : 盒子跟随鼠标移动
问题: 在什么位置出现效果 ?
+ 按下去 : 盒子内
+ 抬起来 : 盒子内
+ 移动 : document
分析:
+ 需要让 盒子移动的距离 是光标的相对距离
+ 需要在 鼠标按下 的时候, 记录一个光标位置
+ 需要在 鼠标移动 的时候, 实时记录一个光标位置, 减去开始的位置
<!DOCTYPE html>
<html lang="en">
<head>
  <meta charset="UTF-8">
  <meta name="viewport" content="width=device-width, initial-scale=1.0">
  <meta http-equiv="X-UA-Compatible" content="ie=edge">
  <title>Document</title>
  <style>
    * {
      margin: 0;
      padding: 0;
    }

    div {
      width: 100px;
      height: 100px;
      background-color: pink;

      position: absolute;
      left: 0;
      top: 0;
    }
  </style>
</head>
<body>

  <div></div>

  <script>


    // 获取元素
    var ele = document.querySelector('div')

    // 准备一个开关
    var flag = false

    // 准备两个变量, 记录光标的开始位置
    var startX = 0, startY = 0
    // 准备两个变量, 记录盒子的开始位置
    var startLeft = 0, startTop = 0


    // 1. 绑定鼠标按下事件
    ele.onmousedown = function (e) {
      // 打开开关
      flag = true

      // 记录坐标位置
      startX = e.clientX
      startY = e.clientY

      // 记录盒子开始位置
      startLeft = ele.offsetLeft
      startTop = ele.offsetTop
    }

    // 2. 绑定鼠标抬起事件
    ele.addEventListener('mouseup', function () {
      // 关闭开关
      flag = false
    })

    // 3. 绑定鼠标移动事件
    document.onmousemove = function (e) {
      if (!flag) return
      console.log('鼠标移动')

      // 实时拿到 clientX 和 clientY 键入 startX 和 startY 计算出光标移动的距离
      var moveX = e.clientX - startX
      var moveY = e.clientY - startY

      // 拿到光标的移动 距离, 让盒子也移动这个距离
      // 赋值: 盒子移动之前本身的位置 + 距离
      ele.style.left = startLeft + moveX + 'px'
      ele.style.top = startTop + moveY + 'px'

      console.log(moveX, moveY)
    }
  </script>
</body>
</html>
案例 - 穿墙
需求:
+ 你的光标从盒子哪一个方向移入, 遮罩层就从哪一个方向移入
+ 你的光标从盒子哪一个方向移出, 遮罩层就从哪一个方向移出
核心:
+ 如何判断光标进入盒子的方向
+ 把 盒子 按照对角线虚拟的分成 四个 象限
+ 判断你移入的坐标位置是在哪一个 象限 内
+ 因为坐标原型不能变成斜线
+ 拿到移入坐标相对于盒子中心点的坐标位置
+ 换算出坐标位置相对于盒子中心点的弧度
+ 用弧度换算成角度
<!DOCTYPE html>
<html lang="en">
<head>
  <meta charset="UTF-8">
  <meta name="viewport" content="width=device-width, initial-scale=1.0">
  <meta http-equiv="X-UA-Compatible" content="ie=edge">
  <title>Document</title>
  <style>
    * {
      margin: 0;
      padding: 0;
    }

    div {
      width: 200px;
      height: 200px;
      border: 1px solid #333;
      margin: 250px;
      position: relative;

      overflow: hidden;
    }

    div > span {
      width: 100%;
      height: 100%;
      position: absolute;
      left: -100%;
      top: -100%;
      background-color: yellow;
      opacity: 0.5;

      pointer-events: none;
    }
  </style>
</head>
<body>

  <div>
    <span class="mask"></span>
  </div>

  <script>


    var box = document.querySelector('div')
    var mask = document.querySelector('span')


    // 1. 给 box 绑定鼠标移入事件
    box.onmouseover = handler

    // 2. 给 box 绑定鼠标移出事件
    box.onmouseout = handler

    // 事件处理函数
    function handler(e) {
      // 1. 确定方向(over 和 out 都要做)
      var originX = box.offsetWidth / 2
      var originY = box.offsetHeight / 2
      var mouseX = e.offsetX - originX
      var mouseY = e.offsetY - originY
      var res = Math.atan2(mouseY, mouseX)
      var deg = res * 180 / Math.PI + 180
      var dir = Math.round(deg / 90) % 4

      // 2. 去掉 transition(只有 over 做)
      if (e.type === 'mouseover') mask.style.transition = 'none'

      // 3. 放到指定位置(over 和 out 都要做)
      switch (dir) {
        case 0:
          mask.style.left = '-100%'
          mask.style.top = 0
          break
        case 1:
          mask.style.left = 0
          mask.style.top = '-100%'
          break
        case 2:
          mask.style.left = '100%'
          mask.style.top = 0
          break
        case 3:
          mask.style.left = 0
          mask.style.top = '100%'
          break
      }

      // 4. 让 mask 移动到 00 位置(只有 over 做)
      if (e.type !== 'mouseover') return
      setTimeout(function () {
        mask.style.transition = 'all .3s linear'
        mask.style.left = 0
        mask.style.top = 0
      }, 20)
    }


    // 鼠标移入的事件处理函数
    // function overHandler(e) {
    //   // 2-1. 确定盒子的中心点坐标
    //   var originX = box.offsetWidth / 2
    //   var originY = box.offsetHeight / 2

    //   // 2-2. 确定光标移入盒子的点位(相对于原点的相对坐标位置)
    //   var mouseX = e.offsetX - originX
    //   var mouseY = e.offsetY - originY

    //   // 2-3. 求一个坐标位置的弧度
    //   // 数学求弧度方法: Math.atan2(y轴坐标, x轴坐标)
    //   var res = Math.atan2(mouseY, mouseX)

    //   // 2-4. 弧度换算成角度
    //   var deg = res * 180 / Math.PI + 180

    //   // 2-5. 简化一下角度
    //   // 因为我们的角度目的就是为了 : 判断方向
    //   var dir = Math.round(deg / 90) % 4
    //   // 0  左
    //   // 1  上
    //   // 2  右
    //   // 3  下
    //   // console.log(dir)

    //   // 在瞬间定位以前, 把 transition 去掉
    //   mask.style.transition = 'none'

    //   // 3. 开始根据方向调整 mask 盒子的位置
    //   switch (dir) {
    //     case 0:
    //       mask.style.left = '-100%'
    //       mask.style.top = 0
    //       break
    //     case 1:
    //       mask.style.left = 0
    //       mask.style.top = '-100%'
    //       break
    //     case 2:
    //       mask.style.left = '100%'
    //       mask.style.top = 0
    //       break
    //     case 3:
    //       mask.style.left = 0
    //       mask.style.top = '100%'
    //       break
    //   }

    //   // 4. 让 mask 移动到 00 位置
    //   setTimeout(function () {
    //     // 给 mask 添加一个 transition
    //     mask.style.transition = 'all .3s linear'
    //     mask.style.left = 0
    //     mask.style.top = 0
    //   }, 20)
    // }


    // 鼠标移出的事件处理函数
    // function outHandler(e) {
    //   // 2-1. 确定盒子的中心点坐标
    //   var originX = box.offsetWidth / 2
    //   var originY = box.offsetHeight / 2

    //   // 2-2. 确定光标移入盒子的点位(相对于原点的相对坐标位置)
    //   var mouseX = e.offsetX - originX
    //   var mouseY = e.offsetY - originY

    //   // 2-3. 求一个坐标位置的弧度
    //   // 数学求弧度方法: Math.atan2(y轴坐标, x轴坐标)
    //   var res = Math.atan2(mouseY, mouseX)

    //   // 2-4. 弧度换算成角度
    //   var deg = res * 180 / Math.PI + 180

    //   // 2-5. 简化一下角度
    //   // 因为我们的角度目的就是为了 : 判断方向
    //   var dir = Math.round(deg / 90) % 4


    //   switch (dir) {
    //     case 0:
    //       mask.style.left = '-100%'
    //       mask.style.top = 0
    //       break
    //     case 1:
    //       mask.style.left = 0
    //       mask.style.top = '-100%'
    //       break
    //     case 2:
    //       mask.style.left = '100%'
    //       mask.style.top = 0
    //       break
    //     case 3:
    //       mask.style.left = 0
    //       mask.style.top = '100%'
    //       break
    //   }


    // }

  </script>
</body>
</html>
事件对象内的信息 - 键盘事件
+ 按下的是哪一个按键
+ 按下的是否是组合按键
1. keyCode
+ 语法: 事件对象.keyCode
+ 得到: 一个编码, 每一个按键有一个自主的独立编码
2. 组合按键
+ 每一个键盘事件对象内有四个信息
=> altKey
=> ctrlKey
=> shiftKey
=> metaKey(win: win 键, mac: command)
+ 以上四个按键的值都是 布尔值, true 表示按下, false 表示没有按下
<!DOCTYPE html>
<html lang="en">
<head>
  <meta charset="UTF-8">
  <meta name="viewport" content="width=device-width, initial-scale=1.0">
  <meta http-equiv="X-UA-Compatible" content="ie=edge">
  <title>Document</title>
</head>
<body>

  <input type="text">

  <script>


    var inp = document.querySelector('input')

    inp.onkeydown = function (e) {

      console.log('键盘编码')

      // 1. 键盘编码
      // console.log(e.keyCode)

      // 2. 组合按键
      // console.log('alt : ', e.altKey)
      // console.log('ctrl : ', e.ctrlKey)
      // console.log('shift : ', e.shiftKey)
      // console.log('meta : ', e.metaKey)

      // if (e.ctrlKey && e.keyCode === 65) {
      //   console.log('您按下的是 ctrl + a')
      // }

      if (e.keyCode === 27) {
        inp.value = ''
      }
    }
  </script>
</body>
</html>
事件目标
+ 当事件触发的时候, 那个 准确触发事件的元素
+ 当你给一个元素绑定事件以后
=> 在该元素身上触发行为, 是可以触发事件处理函数的
=> 在该元素的后代元素身上触发行为, 也是可以触发事件处理函数的
+ 获取事件目标:
=> 标准浏览器: 事件对象.target
=> IE 低版本: 事件对象.srcElement
+ 注意: mouseenter 和 mouseleave 天生不行
<!DOCTYPE html>
<html lang="en">
<head>
  <meta charset="UTF-8">
  <meta name="viewport" content="width=device-width, initial-scale=1.0">
  <meta http-equiv="X-UA-Compatible" content="ie=edge">
  <title>Document</title>
  <style>
    * {
      margin: 0;
      padding: 0;
    }

    div {
      width: 500px;
      height: 500px;
      background-color: pink;
    }

    p {
      width: 300px;
      height: 300px;
      background-color: skyblue;

      position: relative;
      top: 110%;
    }
  </style>
</head>
<body>

  <div>
    <p></p>
  </div>

  <script>


    var ele = document.querySelector('div')

    ele.onclick = function (e) {
      console.log('我被点击了')
      console.log(e.target)
    }
  </script>
</body>
</html>
事件传播
+ 概念: 当用户在浏览器内触发指定行为的时候, 会按照元素的 **结构父级** 向上传递该事件行为
+ 从事件目标开始, 传递到window为止
=> 事件目标 -> body -> html -> document -> window
事件传播机制
+ 在事件传播的过程中, 任何浏览器都只能在一个阶段触发事件
+ 在 IE 低版本内, 只能在冒泡阶段触发事件, 不能在捕获阶段触发事件
+ 在其他所有浏览器内, 默认在冒泡阶段触发事件, 保留了在捕获阶段触发事件的能力
在标准浏览器下, 如何进行事件捕获阶段触发的行为
+ DOM 0级 事件, 是没有办法的
+ 只有 addEventListener 是可以可以修改触发阶段的
=> 第三个参数表示 冒泡阶段触发 还是 捕获阶段触发
=> 默认值: false, 表示 冒泡阶段触发
=> 选填值: true, 表示 捕获阶段触发
<!DOCTYPE html>
<html lang="en">
<head>
  <meta charset="UTF-8">
  <meta name="viewport" content="width=device-width, initial-scale=1.0">
  <meta http-equiv="X-UA-Compatible" content="ie=edge">
  <title>Document</title>
  <style>
    * {
      margin: 0;
      padding: 0;
    }

    .outer {
      width: 500px;
      height: 500px;
      background-color: pink;
      margin: 50px auto;
      display: flex;
      justify-content: center;
      align-items: center;
    }

    .center {
      width: 300px;
      height: 300px;
      background-color: skyblue;
      display: flex;
      justify-content: center;
      align-items: center;
    }

    .inner {
      width: 100px;
      height: 100px;
      background-color: orange;
    }
  </style>
</head>
<body>

  <div class="outer">
    <div class="center">
      <div class="inner"></div>
    </div>
  </div>

  <script>


    // 当点击行为发生在 inner 身上的时候, 会执行事件处理函数
    // document.querySelector('.inner').onclick = function () { console.log('inner') }


    // 因为事件传播, 你点击的 inner 身上的时候, 会把 点击行为 传递到 center 身上
    // 只是因为你没有对应的事件处理函数, 所以没有代码执行
    // document.querySelector('.center').onclick = function () { console.log('center') }

    // 当点击行为发生在 outer 身上的时候, 会执行事件处理函数
    // 因为事件传播, 你点击的 inner 身上的时候, 会把 点击行为 传递到 outer 身上
    // document.querySelector('.outer').onclick = function () { console.log('outer') }

    // document.body.onclick = function () { console.log('body') }
    // document.documentElement.onclick = function () { console.log('html') }
    // document.onclick = function () { console.log('document') }
    // window.onclick = function () { console.log('window') }


    document.querySelector('.inner').addEventListener('click', function (e) { console.log('inner') }, false)
    document.querySelector('.center').addEventListener('click', function (e) { console.log('center') }, false)
    document.querySelector('.outer').addEventListener('click', function (e) { console.log('outer') }, true)
    document.body.addEventListener('click', function () { console.log('body') }, false)
    document.documentElement.addEventListener('click', function () { console.log('html') }, false)
    document.addEventListener('click', function () { console.log('document') }, false)
    window.addEventListener('click', function () { console.log('window') }, false)
  </script>
</body>
</html>
阻止事件传播
标准浏览器
+ 事件对象.stopPropagation()
IE 低版本
+ 事件对象.cancelBubble = true
<!DOCTYPE html>
<html lang="en">
<head>
  <meta charset="UTF-8">
  <meta name="viewport" content="width=device-width, initial-scale=1.0">
  <meta http-equiv="X-UA-Compatible" content="ie=edge">
  <title>Document</title>
  <style>
    * {
      margin: 0;
      padding: 0;
    }

    .outer {
      width: 500px;
      height: 500px;
      background-color: pink;
      margin: 50px auto;
      display: flex;
      justify-content: center;
      align-items: center;
    }

    .center {
      width: 300px;
      height: 300px;
      background-color: skyblue;
      display: flex;
      justify-content: center;
      align-items: center;
    }

    .inner {
      width: 100px;
      height: 100px;
      background-color: orange;
    }
  </style>
</head>
<body>

  <div class="outer">
    <div class="inner">
    </div>
  </div>

  <script>

    document.querySelector('.inner').addEventListener('click', function (e) {
      console.log('inner')

      // 阻止事件传播
      e.stopPropagation()
    }, false)

    document.querySelector('.outer').addEventListener('click', function (e) {
      console.log('outer')
    }, false)

  </script>
</body>
</html>
事件委托
+ 把自己的事情委托给别人来做
循环绑定事件
+ 缺点:
1. 给太多的元素绑定了事件, DOM 性能的浪费
2. 对于动态操作的元素不太友好
事件委托
+ 优点:
1. 只给一个元素绑定了一次事件
2. 对于动态操作的元素友好
+ 核心:
=> a元素的事件, 绑定给 a 元素的结构父级
=> 在结构父级的事件内, 通过 事件目标 判断你确实触发的是 a元素
this 和 e.target
+ 如果你用的是循环绑定事件, this 表示当前这个元素
+ 如果你用的是事件委托, e.target 表示当前这个元素
<!DOCTYPE html>
<html lang="en">
<head>
  <meta charset="UTF-8">
  <meta name="viewport" content="width=device-width, initial-scale=1.0">
  <meta http-equiv="X-UA-Compatible" content="ie=edge">
  <title>Document</title>
  <style>
    * {
      margin: 0;
      padding: 0;
      list-style: none;
    }

    ul {
      width: 800px;
      height: 600px;
      background-color: skyblue;
    }

    li {
      width: 100px;
      height: 100px;
      background-color: pink;
      float: left;
      margin: 10px;
    }
  </style>
</head>
<body>

  <button>添加一个 li</button>
  <ul>
    <li>1</li>
    <li>2</li>
    <li>3</li>
    <li>4</li>
    <li>5</li>
    <li>6</li>
  </ul>

  <script>


    // // 1. 点击每一个 li 把当前 li 内的文本内容输出在控制台
    // var lis = document.querySelectorAll('ul > li')
    // lis.forEach(function (item) {
    //   item.onclick = function () { console.log(this.innerText) }
    // })

    // // 2. 点击 button 按钮, 追加一个 li 在最后
    // var btn = document.querySelector('button')
    // var ul = document.querySelector('ul')
    // btn.onclick = function () {
    //   var li = document.createElement('li')
    //   li.innerText = '我是新来的'
    //   ul.appendChild(li)
    // }

    // 利用事件委托来实现
    // 因为 li 都是 ul 的后代元素, 我们只要给 ul 绑定一个点击事件
    // 点击 ul 会触发, 点击 ul 的后代 li 也会触发
    var ul = document.querySelector('ul')

    ul.onclick = function (e) {
      // 在这个事件内, 每一次的事件目标可能不一样
      // 事件目标: 准确触发事件的那个元素
      // 当你点击 ul 触发事件的时候, 事件目标就是 ul
      // 当你点击 li 触发事件的时候, 事件目标就是 li
      // console.log('事件目标 : ', e.target)

      if (e.target.nodeName === 'LI') {
        // 这里的代码能执行, 说明你点击的是 li 标签
        // 输出当前标签内的文本
        console.log(e.target.innerText)
      }
    }

    var btn = document.querySelector('button')
    btn.onclick = function () {
      var li = document.createElement('li')
      li.innerText = '我是新来的'
      ul.appendChild(li)
    }


  </script>
</body>
</html>
案例:本地模拟购物车
<!DOCTYPE html>
<html lang="en">
<head>
  <meta charset="UTF-8">
  <meta name="viewport" content="width=device-width, initial-scale=1.0">
  <meta http-equiv="X-UA-Compatible" content="ie=edge">
  <title>Document</title>
  <style>
    * {
      margin: 0;
      padding: 0;
    }

    ul, ol, li {
      list-style: none;
    }

    .header {
      width: 1200px;
      height: 80px;
      font-size: 40px;
      display: flex;
      justify-content: center;
      align-items: center;
      color: #fff;
      background-color: skyblue;
      margin: 0 auto;
    }

    .cart_box {
      width: 1200px;
      margin: 10px auto;
      border: 2px solid #333;
      display: flex;
      flex-direction: column;
    }

    .top,
    .bottom {
      height: 60px;
      background-color: pink;
      display: flex;
      align-items: center;
      justify-content: space-between;
      box-sizing: border-box;
      padding: 0 10px;
    }

    .bottom span {
      color: red;
      font-size: 22px;
    }

    .bottom button {
      padding: 5px 10px;
      cursor: pointer;
    }

    .center {
      box-sizing: border-box;
      padding: 10px;
    }

    .center > li {
      width: 100%;
      height: 100px;
      border: 1px solid #333;
      box-sizing: border-box;
      margin-bottom: 10px;
      display: flex;
      justify-content: space-between;
      align-items: center;
    }

    .center > li:last-child {
      margin-bottom: 0;
    }

    .center > li > div {
      display: flex;
      justify-content: center;
      align-items: center;
      height: 100%;
      border-right: 1px solid #333;
    }

    .center > li > .select,
    .center > li > .show {
      width: 100px;
    }

    .center > li > .show > img {
      width: 100%;
      height: 100%;
      display: block;
    }

    .center > li > .destroy {
      width: 100px;
      border-right: none;
    }

    .center > li > .title {
      width: 300px;
      align-items: flex-start;
      justify-content: flex-start;
      box-sizing: border-box;
      padding: 5px;
    }

    .center > li > .number {
      flex: 1;
    }

    .center > li > .price,
    .center > li > .subPrice {
      width: 150px;
      color: red;
      font-size: 20px;
    }

    .center > li > .number > button {
      width: 26px;
      height: 26px;
      cursor: pointer;
    }

    .center > li > .number > input {
      outline: none;
      width: 60px;
      height: 22px;
      font-size: 20px;
      text-align: center;
      margin: 0 10px;
    }

    .center > li > .destroy > button {
      background-color: red;
      border: none;
      padding: 5px 10px;
      cursor: pointer;
    }

  </style>
</head>
<body>

  <div class="header">啥都有 · 购物车</div>
  <div class="cart_box">
    <!-- <div class="top">
      <input type="checkbox"> 全选
    </div>
    <ul class="center">
      <li>
        <div class="select">
          <input type="checkbox">
        </div>
        <div class="show">
          <img src="" alt="">
        </div>
        <div class="title">
          商品介绍商品介绍商品介绍商品介绍商品介绍商品介绍商品介绍商品介绍商品介绍商品介绍商品介绍
        </div>
        <div class="price">
          ¥ 100.00
        </div>
        <div class="number">
          <button>-</button>
          <input type="text" value="1">
          <button>+</button>
        </div>
        <div class="subPrice">
          ¥ 100.00
        </div>
        <div class="destroy">
          <button>删除</button>
        </div>
      </li>
    </ul>
    <div class="bottom">
      <div class="totalNum">
        总件数: 5
      </div>
      <div class="btns">
        <button>去结算</button>
        <button>删除所有已选中</button>
        <button>清空购物车</button>
      </div>
      <div class="totalPrice">
        总价格: ¥ <span>100.00</span>
      </div>
    </div> -->
  </div>

  <script>
    /*
      案例 - 本地模拟购物车
    */
  </script>
  <script src="./cart.js"></script>
</body>
</html>
效果图: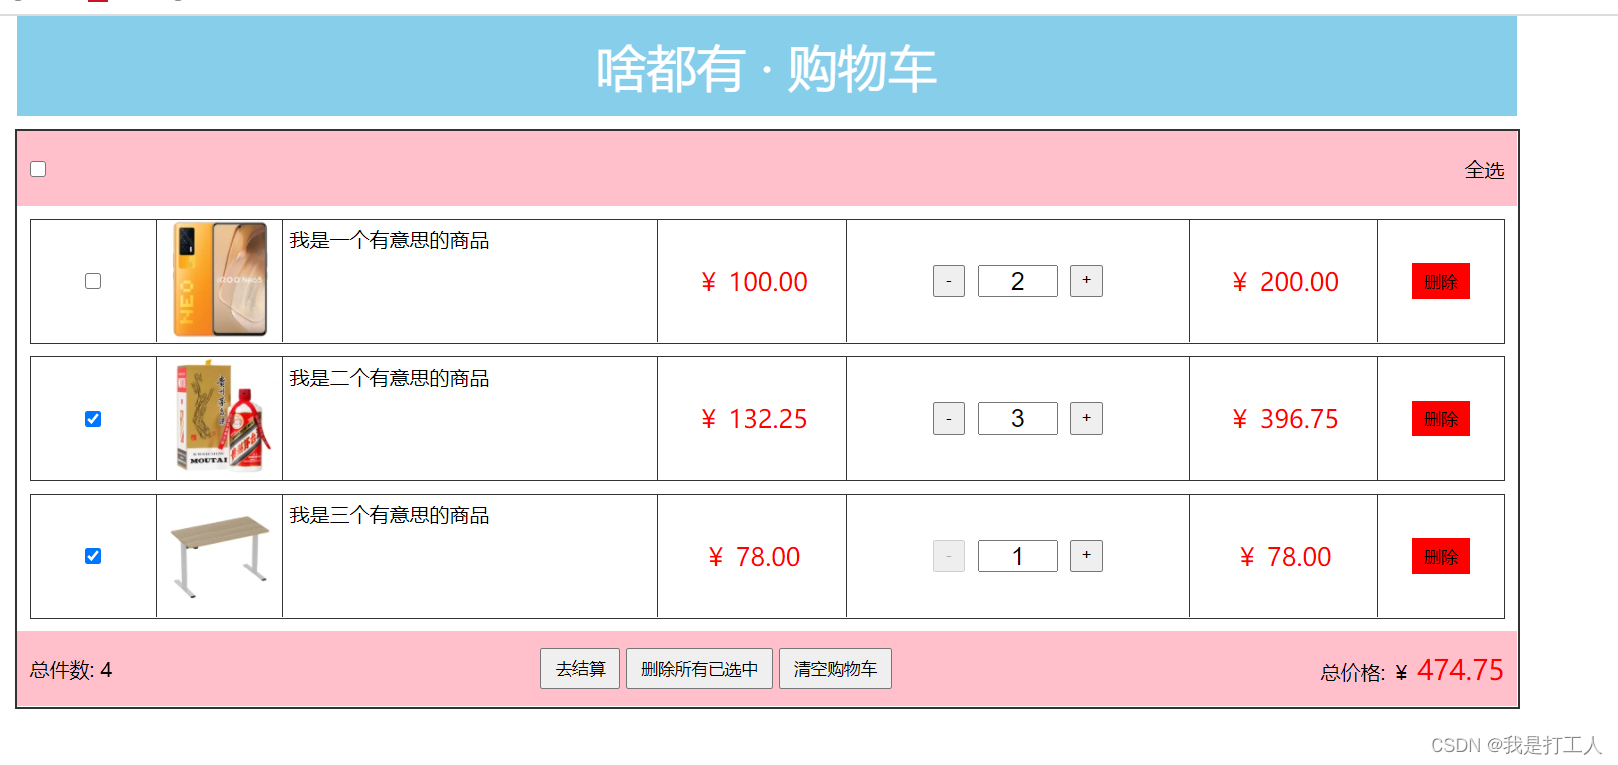
js:
/*
  购物车代码逻辑
*/

// 0. 准备数据
var cart = [
  { id: 1, pic: 'https://img11.360buyimg.com/seckillcms/s140x140_jfs/t1/200034/5/15800/117474/6185007bE3a6bfa6b/7ae82f44cf3883e5.jpg.webp', title: '我是一个有意思的商品', price: 100, buy: 2, is_select: false, number: 17 },
  { id: 2, pic: 'https://img30.360buyimg.com/seckillcms/s140x140_jfs/t1/109545/29/23248/155235/62207f64Ed1861827/ac47d5d653dab37c.jpg.webp', title: '我是二个有意思的商品', price: 132.25, buy: 3, is_select: true, number: 15 },
  { id: 3, pic: 'https://img13.360buyimg.com/seckillcms/s140x140_jfs/t1/91543/4/22529/44567/62201248Ef8ba832f/4dd64b1b6ce71983.jpg.webp', title: '我是三个有意思的商品', price: 78, buy: 1, is_select: true, number: 6 }
]

// 0. 获取元素
var cart_box = document.querySelector('.cart_box')

// 1. 渲染页面
// 打开页面需要用 cart 渲染
// 当你点击删除的时候, 使用 cart 重新渲染
// 当你点击选中状态的时候, 使用 cart 重新渲染
// 当你点击 + 或者 - 的时候, 使用 cart 重新渲染
bindHtml()
function bindHtml() {
  // 根据 cart 渲染页面
  // 哪些内容需要渲染 ? 整体都需要渲染

  // 计算三个总值
  // 1. 计算选中商品的种类数量
  // 2. 计算选中商品小计价格的总和
  // 3. 计算选中商品数量的总和
  var totalSelect = 0, totalNum = 0, totalPrice = 0
  cart.forEach(function (item) {
    if (!item.is_select) return

    totalSelect++
    totalNum += item.buy
    totalPrice += item.buy * item.price
  })

  var str = `
    <div class="top">
      <input class="select_all" type="checkbox" ${ totalSelect === cart.length && totalSelect !== 0 ? 'checked' : '' }> 全选
    </div>
    <ul class="center">
  `

  str += cart.reduce(function (prev, item) {
    return prev + `
      <li>
        <div class="select">
          <input data-id="${ item.id }" class="select_item" type="checkbox" ${ item.is_select ? 'checked' : '' }>
        </div>
        <div class="show">
          <img src="${ item.pic }" alt="">
        </div>
        <div class="title">
          ${ item.title }
        </div>
        <div class="price">
          ¥ ${ item.price.toFixed(2) }
        </div>
        <div class="number">
          <button data-id="${ item.id }" class="sub" ${ item.buy <= 1 ? 'disabled' : '' }>-</button>
          <input type="text" value="${ item.buy }">
          <button data-id="${ item.id }" class="add" ${ item.buy >= item.number ? 'disabled' : '' }>+</button>
        </div>
        <div class="subPrice">
          ¥ ${ (item.price * item.buy).toFixed(2) }
        </div>
        <div class="destroy">
          <button data-id="${ item.id }" class="del">删除</button>
        </div>
      </li>
    `
  }, '')

  str += `
    </ul>
    <div class="bottom">
      <div class="totalNum">
        总件数: ${ totalNum }
      </div>
      <div class="btns">
        <button class="pay" ${ totalSelect === 0 ? 'disabled' : '' }>去结算</button>
        <button class="completed" ${ totalSelect === 0 ? 'disabled' : '' }>删除所有已选中</button>
        <button class="clear" ${ cart.length === 0 ? 'disabled' : '' }>清空购物车</button>
      </div>
      <div class="totalPrice">
        总价格: ¥ <span>${ totalPrice.toFixed(2) }</span>
      </div>
    </div>
  `

  cart_box.innerHTML = str
}

// 2. 绑定事件
bindEvent()
function bindEvent() {
  // 循环绑定事件不友好, 因为页面内容不停的在动态渲染
  // 考虑事件委托
  // 问题: 委托什么事件 ? click
  // 问题: 委托给谁 ? cart_box

  cart_box.addEventListener('click', function (e) {
    // 2-1. 判断你点击的是单个删除按钮
    if (e.target.className === 'del') {
      // 拿到元素身上记录的 data-id 属性
      var id = e.target.dataset.id - 0
      // 找到对应的数据删除
      cart = cart.filter(function (item) { return item.id !== id })
      // 重新渲染
      bindHtml()

      // e.target.parentElement.parentElement.remove()
    }

    // 2-2. 判断你点击的是单个增加按钮
    if (e.target.className === 'add') {
      // 拿到元素身上记录的 data-id 属性
      var id = e.target.dataset.id - 0
      // cart 中找到一个 id 一样的数据
      var info = cart.find(function (item) { return item.id === id })
      // 修改 info 中的 buy
      info.buy++
      // 重新渲染
      bindHtml()
    }

    // 2-3. 判断你点击的是单个减少按钮
    if (e.target.className === 'sub') {
      // 拿到元素身上记录的 data-id 属性
      var id = e.target.dataset.id - 0
      // 找到一个 id 一样的数据
      var info = cart.find(function (item) { return item.id === id })
      // 修改信息
      info.buy--
      // 重新渲染
      bindHtml()
    }

    // 2-4. 判断你点击的是单个状态修改按钮
    if (e.target.className === 'select_item') {
      // 拿到我点击的这个 按钮 是属于数组中哪一条数据渲染出来的 按钮
      /*
        首先
          + 渲染页面的时候, 渲染这个按钮的时候
            => 把属于这个按钮的那一条数据的 id 记录在了按钮身上
          + 点击按钮的时候
            => 从按钮身上拿出来自己记录的 id 信息
            => 就知道我是哪一条数据渲染的按钮, 我就应该修改哪一条数据
            => 从 cart 中找到一个 id 一样的数据
            => 修改这条数据中的 is_select
            => 从新渲染页面
      */
      // 拿到 id
      var id = e.target.dataset.id - 0
      // 找到数组中 id 对应的那一条数据
      var info = cart.find(function (item) { return item.id === id })
      // 修改数据
      info.is_select = !info.is_select
      // 重新渲染
      bindHtml()
    }

    // 2-5. 判断你点击的是全选按钮
    if (e.target.className === 'select_all') {
      // 拿到自己的选中状态
      // 让数组内每一项的 is_select 和自己的选中状态一样
      cart.forEach(function (item) { item.is_select = e.target.checked })
      // 重新渲染
      bindHtml()
    }

    // 2-6. 判断你点击的是去结算按钮
    if (e.target.className === 'pay') {
      console.log('去结算')
    }

    // 2-7. 判断你点击的是删除所有已选中
    if (e.target.className === 'completed') {
      // 把 cart 内 is_select 为 true 的删除掉
      // 保留 is_select 为 false 的删除掉
      // filter 把 所有为 false 的过滤出来
      cart = cart.filter(function (item) { return !item.is_select })
      // 重新渲染
      bindHtml()
    }

    // 2-8. 判断你点击的是清空购物车
    if (e.target.className === 'clear') {
      // 让 cart 变成一个空数组
      cart.length = 0
      // 重新渲染
      bindHtml()
    }
  })
}
阻止事件默认行为
+ 默认行为:
=> 不需要事件绑定, 天生就带有的行为
=> 例子:
-> 鼠标右键单击, 只要行为发生, 会默认出现菜单
-> 表单提交, 只要点击 submit 按钮, 那么表单会自动提交
-> a 标签的点击, 只要点击, 会默认进行连接跳转或者锚点定位
-> ...
+ 阻止默认行为
=> 不让本身应该发生的事件发生
=> 在同类型事件内进行默认事件的阻止
=> 语法:
-> 标准浏览器: 事件对象.preventDefault()
-> IE 低版本: 事件对象.returnValue = false
-> 通用语法: return false, 制作一个 false 作为返回值
-> return false 需要注意的地方
1. 这个代码一定要写在事件处理函数的最后
2. 保证前面的代码不能报错
<!DOCTYPE html>
<html lang="en">
<head>
  <meta charset="UTF-8">
  <meta name="viewport" content="width=device-width, initial-scale=1.0">
  <meta http-equiv="X-UA-Compatible" content="ie=edge">
  <title>Document</title>
</head>
<body>

  <form action="">
    <input type="text">
    <button>提交</button>
  </form>

  <script>

    // 1. 阻止鼠标右键单击行为
    // window.oncontextmenu = function (e) {
    //   // 阻止默认行为
    //   e.preventDefault()
    //   console.log('右键单击了')
    // }


    // 2. 阻止表单自动提交
    document.querySelector('form').onsubmit = function (e) {
      console.log('表单提交了')


      return false
    }
  </script>
</body>
</html>


 1415
1415

 被折叠的 条评论
为什么被折叠?
被折叠的 条评论
为什么被折叠?
 到【灌水乐园】发言


