


本文使用单台虚拟机快速搭建一套ceph环境[mon+osd+rgw]
1.环境准备
- vitualbox或者vmware
- centos7系统
- xshell
2.安装操作系统
安装系统就不展开来说了,帖下本实验中的配置:
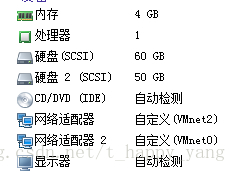
其中50GiB大小的磁盘2是做OSD用的。VMnet2是NET网络,连接外网用,VMnet0是hostonly网络,本机ssh用的。
3.配置ceph yum源
vi /etc/yum.repos.d/ceph.repo添加如下内容
[base]
name=BCLinux-$releasever - Base
baseurl=http://mirrors.bclinux.org/bclinux/el$releasever/os/$basearch/
gpgcheck=0
[updates]
name=BCLinux-$releasever - Updates
baseurl=http://mirrors.bclinux.org/bclinux/el$releasever/updates/$basearch/
gpgcheck=0
[extras]
name=BCLinux-$releasever - Extras
baseurl=http://mirrors.bclinux.org/bclinux/el$releasever/extras/$basearch/
gpgcheck=0
[onest-6.0]
name=onest
baseurl=http://mirrors.bclinux.org/bigcloud/2016.01/onest/$basearch
gpgcheck=0
enabled=1
[onest-6.1]
name=onest
baseurl=http://mirrors.bclinux.org/bigcloud/2017.01/onest/$basearch
gpgcheck=0
enabled=1
[onest-6.1.1]
name=onest
baseurl=http://mirrors.bclinux.org/bigcloud/2017.02/onest/$basearch
#baseurl=http://10.254.9.13/ceph-update/onest-6.1.1
gpgcheck=0
enabled=1
yum makecache4.安装ceph-deploy
yum install ceph-deploy5.配置 /etc/hosts
本虚拟机的IP地址和主机名字写到/etc/hosts文件
192.168.153.137 test6.配置免密钥登录要部署ceph的虚拟机
ssh-keygen #一直回车,使用默认设置生成ssh public key和secret key
ssh-copy-id test
7.创建ceph-deploy工作目录,并且安装必要的软件包
mkdir my
yum -y install ceph-mon ceph-osd ceph-radosgw
8.配置集群
使用ceph-deploy新建一个集群
[root@test my]# cd my
[root@test my]# ceph-deploy new test
[root@test my]# ls -l
total 12
-rw-r--r--. 1 root root  197 May 21 11:42 ceph.conf
-rw-r--r--. 1 root root 2931 May 21 11:42 ceph-deploy-ceph.log
-rw-------. 1 root root   73 May 21 11:42 ceph.mon.keyring
编辑ceph.conf,设置副本数为1,副本的分布的级别为OSD级别
由于只有一台机器,所以副本的分布级别要设置为OSD级别,默认是主机级别。
[global]
fsid = 1bf91a96-38bb-46f6-8b5f-c63857afed4c  #随机生成,你的机器上可能不一样
mon_initial_members = test
mon_host = 192.168.153.137
auth_cluster_required = cephx
auth_service_required = cephx
auth_client_required = cephx
osd_crush_chooseleaf_type = 0
osd_pool_default_size = 1
osd_pool_default_min_size = 1
设置所有文件为可读
[root@test my]# ls -l
total 12
-rw-r--r--. 1 root root  284 May 21 11:45 ceph.conf
-rw-r--r--. 1 root root 2931 May 21 11:42 ceph-deploy-ceph.log
-rw-------. 1 root root   73 May 21 11:42 ceph.mon.keyring
[root@test my]# chmod +r *
[root@test my]# ls -l
total 12
-rw-r--r--. 1 root root  284 May 21 11:45 ceph.conf
-rw-r--r--. 1 root root 2931 May 21 11:42 ceph-deploy-ceph.log
-rw-r--r--. 1 root root   73 May 21 11:42 ceph.mon.keyring
9.初始化MON
[root@test my]# ceph-deploy mon create-initial
[root@test my]# ls -l
total 36
-rw-------. 1 root root   113 May 21 11:47 ceph.bootstrap-mds.keyring
-rw-------. 1 root root   113 May 21 11:47 ceph.bootstrap-osd.keyring
-rw-------. 1 root root   113 May 21 11:47 ceph.bootstrap-rgw.keyring
-rw-------. 1 root root   129 May 21 11:47 ceph.client.admin.keyring
-rw-r--r--. 1 root root   284 May 21 11:45 ceph.conf
-rw-r--r--. 1 root root 11642 May 21 11:47 ceph-deploy-ceph.log
-rw-r--r--. 1 root root    73 May 21 11:42 ceph.mon.keyring
[root@test my]# chmod +r * #设置可读
[root@test my]# ls -l
total 36
-rw-r--r--. 1 root root   113 May 21 11:47 ceph.bootstrap-mds.keyring
-rw-r--r--. 1 root root   113 May 21 11:47 ceph.bootstrap-osd.keyring
-rw-r--r--. 1 root root   113 May 21 11:47 ceph.bootstrap-rgw.keyring
-rw-r--r--. 1 root root   129 May 21 11:47 ceph.client.admin.keyring
-rw-r--r--. 1 root root   284 May 21 11:45 ceph.conf
-rw-r--r--. 1 root root 11642 May 21 11:47 ceph-deploy-ceph.log
-rw-r--r--. 1 root root    73 May 21 11:42 ceph.mon.keyring
现在基本上MON部署好了,当然是一个MON
使用ceph -s命令查看集群状况,因为没有OSD,默认的一个pool是rbd pool,由于没有OSD,一直卡在creating 状态
[root@test my]# ceph -s
    cluster 1bf91a96-38bb-46f6-8b5f-c63857afed4c
     health HEALTH_ERR
            no osds
     monmap e1: 1 mons at {test=192.168.153.137:6789/0}
            election epoch 3, quorum 0 test
     osdmap e1: 0 osds: 0 up, 0 in
            flags sortbitwise,require_jewel_osds
      pgmap v2: 64 pgs, 1 pools, 0 bytes data, 0 objects
            0 kB used, 0 kB / 0 kB avail
                  64 creating
现在添加OSD
10.部署OSD
本虚拟机在一开始有一块50GiB大小的磁盘,使用该磁盘做OSD
[root@test my]# lsblk -f
NAME            FSTYPE      LABEL UUID                                   MOUNTPOINT
fd0
sda
├─sda1          xfs               bfd9b72b-28b8-4425-98f0-c52aee0d098e   /boot
└─sda2          LVM2_member       RDaIgc-DqQM-sih5-M1sy-3oMH-V7kC-Be0U5i
  ├─centos-root xfs               bf3d1d70-8e1d-4255-a603-292453274ce7   /
  ├─centos-swap swap              dc40f032-ae6b-43ed-b69b-453119cbfbea   [SWAP]
  └─centos-home xfs               3623985e-12d7-4020-aaf7-7da7a654dee4   /home
sdb
[root@test my]# ceph-deploy osd prepare test:sdb:sdb
#再次查看磁盘状态
[root@test my]# lsblk -f
NAME            FSTYPE      LABEL UUID                                   MOUNTPOINT
fd0
sda
├─sda1          xfs               bfd9b72b-28b8-4425-98f0-c52aee0d098e   /boot
└─sda2          LVM2_member       RDaIgc-DqQM-sih5-M1sy-3oMH-V7kC-Be0U5i
  ├─centos-root xfs               bf3d1d70-8e1d-4255-a603-292453274ce7   /
  ├─centos-swap swap              dc40f032-ae6b-43ed-b69b-453119cbfbea   [SWAP]
  └─centos-home xfs               3623985e-12d7-4020-aaf7-7da7a654dee4   /home
sdb
├─sdb1          xfs               10c3b256-9867-4659-9eda-5ad56c08012c   /var/lib/ceph/osd/ceph-0
└─sdb2

#再次查看集群状况
[root@test my]# ceph -s
    cluster 1bf91a96-38bb-46f6-8b5f-c63857afed4c
     health HEALTH_OK
     monmap e1: 1 mons at {test=192.168.153.137:6789/0}
            election epoch 3, quorum 0 test
     osdmap e5: 1 osds: 1 up, 1 in
            flags sortbitwise,require_jewel_osds
      pgmap v8: 64 pgs, 1 pools, 0 bytes data, 0 objects
            34136 kB used, 46023 MB / 46056 MB avail
                  64 active+clean
到此RADOS算是部署好了,接下来是部署RADOSGW(RGW)作为对象存储网关,用户可以使用s3cmd和s3browser来通过对象网关将数据上传到RADOS
11.部署RGW
[root@test my]# ceph-deploy rgw create test:rgw1
#查看rgw服务监听的端口,默认是在7480端口
[root@test my]# yum -y install net-tools
[root@test my]# netstat -tunpl|grep ra
Proto Recv-Q Send-Q Local Address           Foreign Address         State       PID/Program name
tcp        0      0 0.0.0.0:7480            0.0.0.0:*               LISTEN      6067/radosgw

#本机curl测试,放回匿名用户的访问结果,表明rgw工作正常
[root@test my]# curl 127.0.0.1:7480
<?xml version="1.0" encoding="UTF-8"?><ListAllMyBucketsResult xmlns="http://s3.amazonaws.com/doc/2006-03-01/"><Owner><ID>anonymous</ID><DisplayName></DisplayName></Owner><Buckets></Buckets></ListAllMyBucketsResult>
创建s3测试用户
[root@test my]# radosgw-admin user create --uid=yly --display-name=yly
2017-05-21 12:00:43.690629 7f8b6cab09c0  0 WARNING: detected a version of libcurl which contains a bug in curl_multi_wait(). enabling a workaround that may degrade performance slightly.
{
    "user_id": "yly",
    "display_name": "yly",
...
            "user": "yly",
            "access_key": "39KJ4DEOHMVV2ZCMVA9P",
            "secret_key": "ndIzh3VRFA833JNAOxQ6CD2EMAoP0tkGJKFCdEDS"
        }
    ],
...
安装s3cmd
[root@test my]# yum -y install s3cmd
#配置s3cmd
[root@test my]# s3cmd --configure

Enter new values or accept defaults in brackets with Enter.
Refer to user manual for detailed description of all options.
Access key and Secret key are your identifiers for Amazon S3. Leave them empty for using the env variables.
Access Key: 39KJ4DEOHMVV2ZCMVA9P
Secret Key: ndIzh3VRFA833JNAOxQ6CD2EMAoP0tkGJKFCdEDS
Default Region [US]:
Encryption password is used to protect your files from reading
by unauthorized persons while in transfer to S3
Encryption password:
Path to GPG program [/usr/bin/gpg]:
When using secure HTTPS protocol all communication with Amazon S3
servers is protected from 3rd party eavesdropping. This method is
slower than plain HTTP, and can only be proxied with Python 2.7 or newer
Use HTTPS protocol [Yes]: No
On some networks all internet access must go through a HTTP proxy.
Try setting it here if you can't connect to S3 directly
HTTP Proxy server name:
New settings:
  Access Key: 39KJ4DEOHMVV2ZCMVA9P
  Secret Key: ndIzh3VRFA833JNAOxQ6CD2EMAoP0tkGJKFCdEDS
  Default Region: US
  Encryption password:
  Path to GPG program: /usr/bin/gpg
  Use HTTPS protocol: False
  HTTP Proxy server name:
  HTTP Proxy server port: 0
Test access with supplied credentials? [Y/n] n
Save settings? [y/N] y
Configuration saved to '/root/.s3cfg'
修改 /root/.s3cfg中的host部分,否则使用的是amazon的s3 endpoint了
guess_mime_type = True
host_base = s3.amazonaws.com
host_bucket = %(bucket)s.s3.amazonaws.com
human_readable_sizes = False

#改为

guess_mime_type = True
host_base = 192.168.153.137:7480    #如果是80端口,host_base = 192.168.153.137,不需要加:80
host_bucket = %(*)s.192.168.153.137
human_readable_sizes = False
使用s3cmd
[root@test my]# s3cmd ls  #列出bucket
[root@test my]# s3cmd mb s3://test1   #创建bucket
Bucket 's3://test1/' created
[root@test my]# s3cmd put ceph.conf s3://test1 #上传对象到bucket
upload: 'ceph.conf' -> 's3://test1/ceph.conf'  [1 of 1]
 284 of 284   100% in    1s   221.81 B/s  done
windows平台下也可以使用s3browser
下载地址 https://s3browser.com/
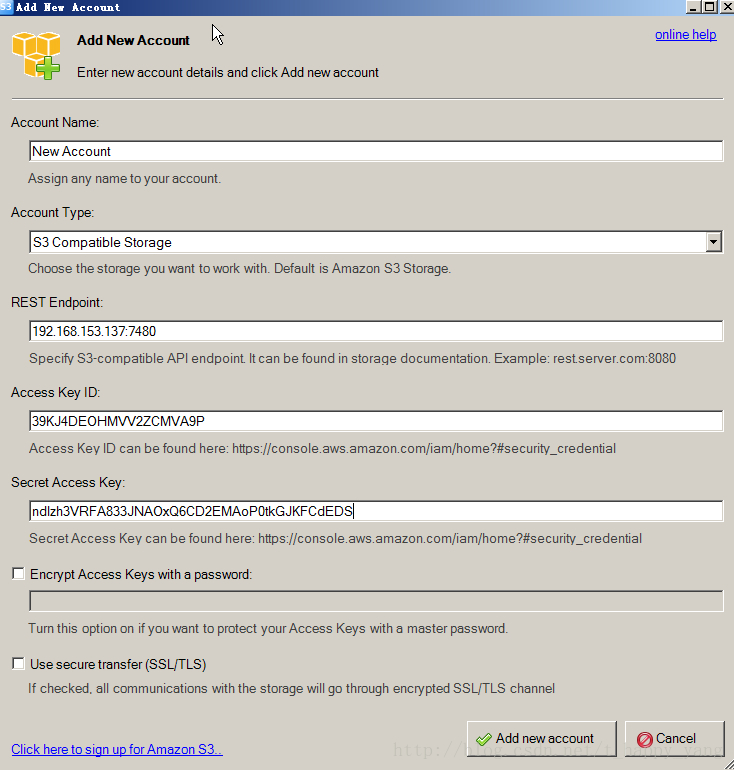
可以查看到刚才用s3cmd上传的对象

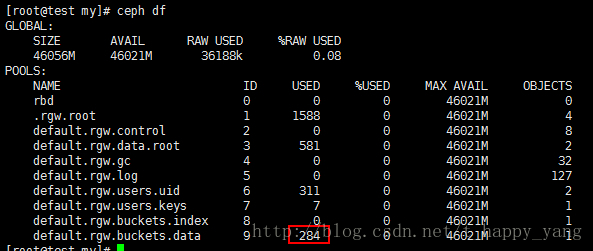
可以看到集群的default.rgw.buckets.data 存储池使用空间为284字节,和上传的文件大小一样
修改RGW的默认端口7480为80端口
[root@test my]# vi /etc/ceph/ceph.conf
[client.rgw.rgw1]
rgw_frontends = "civetweb port=80"[root@test my]# systemctl restart ceph-radosgw@rgw.rgw1 #重启RGW服务
[root@test my]# netstat -tunpl|grep ra
Proto Recv-Q Send-Q Local Address Foreign Address State PID/Program name
tcp 0 0 0.0.0.0:80 0.0.0.0:* LISTEN 6946/radosgw注意,如果你使用的是s3brower访问RGW,请确保虚拟机的时间和windows集群的时间是同步的。不然会有403错误。
12.拆除集群
[root@test my]# systemctl stop ceph.target #停止服务,MON,OSD,RGW
[root@test my]# umount /dev/sdb1
[root@test my]# ceph-disk zap /dev/sdb #格式化磁盘
[root@test my]# rpm -qa|grep 10.2 | awk '{system("yum remove " $1 " -y ")}' && rm -rf /etc/ceph /var/lib/ceph  /var/run/ceph  #删除rpm包和目录
如果文章对您有所帮助,可以考虑请我喝一瓶农夫山泉。


 533
533


 被折叠的 条评论
为什么被折叠?
被折叠的 条评论
为什么被折叠?
 到【灌水乐园】发言


