


目的:理解Spring Ioc的概念并且会简单地使用 依赖注入实现 控制反转 ;
Ioc(Inversion of Control),控制反转是 Spring的核心,为了解决计算机程序耦合问题;(对于耦合问题,我的理解是:计算机程序部分之间的依赖或是直接牵动性,用我们俗话说:就是牵一发而动全身 在我理解中 就是耦合性强 ; 因此 程序的可迁移性就会下降啦!因此 Ioc是使得耦合性 减低的这么一种思想。)
Q1:	那么Ioc具体是怎么实现的呢?
		平时我们创建对象实例都是直接new一个;在Ioc下,就是借助一个Spring容器替你创建好这个对象,你再调用这个Spring容器就好了;
An:		此时,控制权由调用者给到了Spring容器,因此叫 控制反转;
Q2:  我这个对象是调用者需要用的,我怎么 使得  我要用的对象  和  Spring容器创建的对象  发生联系?
An:	   这就有赖于 依赖注入 了;
总结一下:在Spring中实现Ioc的是:Ioc容器;Ioc的实现方法是 :依赖注入。
接下来就分为 Ioc容器 和 依赖注入两大方向来说;
Ioc容器
Q1:Ioc容器的实现依赖于什么?
An:主要依赖于 两个接口 BeanFactory和ApplicationContext;
BeanFactory
 是管理Bean的工厂,实现Bean的初始化,其中存在许多实现类,其中:org.springframework.beans.factory.BeanFactory.xml.XmlBeanFactory中的该实现类能够实现 根据配置文件xml中的信息来装配bean;
 	实际上:在开发中并不多用
 此时创建BeanFactory实例用的是XML文件的绝对路径(就是它在你电脑文档中的路径)如图示意:
	 即选中你的xml文件 ,右键 选择 property 进入时候你就可以看到如下页面了
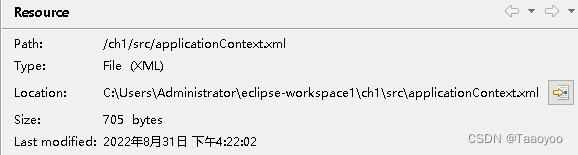
这里的Loation即为此时XML文件的绝对路径
      Path即可看到XML文件的类路径
ApplicationContext
又称为 应用上下文,是BeanFactory的子接口 ,它不仅包含了BeanFactory接口的所有功能,还有对 国际化,资源访问 还有事件传播等内容的支持 ;
通过ApplicationContext创建接口的三种方法:
- 通过ClassPathApplicationContext 创建
此时是从类路径目录下(src根目录)下寻找被指定的XML配置文件;我的例子中就是使用的这个方法;
它正确的使用是需要import相应的包
(不过我个人的习惯是先打,大王根据编译器中的提示,直接借助提示,将所需要的包,import进来)
ApplicationContext appCon = new  ClassPathXmlApplicationContext("applicationContext.xml");
TestDIService ts=(TestDIService)appCon.getBean("testDIService");//这是通过Ioc容器获取实例;
- 通过FileSystemXmlApplicationContext 创建
这里使用的是从 绝对路径中寻找 XML配置文件的位置。
ApplicationContext appCon = new FileSystemXmlApplicationContext("C:\Users\Administrator\eclipse-workspace1\ch1\src\applicationContext.xml");
(TestDIService)appCon.getBean("testDIService");//同样的是获取一个实例
- 通过Web服务器进行实例化ApplicationContext容器
这个还没有正式使用到,后期用到的话,会进行补充
总结:第一种方法相较与第二种是比较灵活的,故而经常使用第一种方法进行实例化ApplicationContext容器;
依赖注入
将这个依赖注入的概念展开来说:就是 使得 Spring 框架创建对象时 ,动态地将其依赖的对象 注入Bean组件中。
	Spring框架的依赖注入有两种实现方式:
		1. 使用 构造方法注入
		2. 使用 属性的setter方法注入
	在接下来的例子中就给大家展示一下这两种 依赖注入的实现方式;

1.使用Eclipse创建Web应用并导入JAR包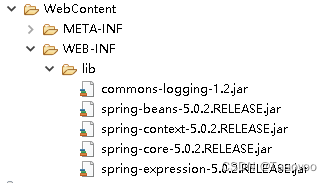
如图所示,添加JAR包,这些JAR包是添加在WebContent->WEB-INF->lib包中的。
2. 创建接口TestDIDao 和接口实现类TestDIDaoImpl
因为Spring解决的是 业务逻辑层和其他各层的耦合问题,因此 面对接口的编程思想被应用;
Q1:为什么解决耦合问题需要 引入 面对接口的编程思想? 它的优势在哪里?
我的想法:耦合 是 两者的联系 比较紧密 ,因此 利用一个接口 使得 多了个中间商,因此关系没有那么紧密 ;即你无需知道内部的实现代码,只需调用接口,就可实现功能,使得更加容易上手,迁移性更好。
Q2:为什么需要使用service接口?
我的想法:需要一个“中间商”来实现 ,不要让 调用者和被调用的实例直接接触。
Q3:
package dao;

public interface TestDIDao {
public void sayHello();
}
package dao;

public class TestDIDaoImpl implements TestDIDao{
public void sayHello() {
	System.out.println("Hello Everyone In CSDN!");
}
}
3. 创建接口TestDIService 和接口实现类TestDIServiceImpl和TestDIServiceImpl1;
package service;

public interface TestDIService {
	public void sayHello();
}
这里的service实现类,实现了 构造方法 实现依赖注入 ;
	其中具体的实现是:使得TestDIDao作为他的私有成员变量,接着写一带参数的TestDIServiceImpl的构造方法。
package service;
import dao.TestDIDao;

public class TestDIServiceImpl implements TestDIService{
	private TestDIDao testDIDao;
public TestDIServiceImpl(TestDIDao testDIDao) {
		super();
		this.testDIDao = testDIDao;
	}

public void sayHello() {
	testDIDao.sayHello();
	System.out.println("TestDIService构造方法实现注入 say:Hello"
			+ ",study hard everyone!");
}
}
这里是service的另一个实现类,实现了依赖注入
	其中的具体实现是:
	将你 希望注入的对象对应的接口 TestDIDao 作为该service实现类的一个成员变量,之后使用setter方法;
	(如下图所示  ,可以点击右键->Source->Generate Getters and Setters 就可以自动生成 setter 和 getter 方法)

package service;
import dao.TestDIDao;

public class TestDIServiceImpl1 implements TestDIService{
	private TestDIDao testDIDao;

	public void setTestDIDao(TestDIDao testDIDao) {
		this.testDIDao = testDIDao;
	}

	public void sayHello() {
		testDIDao.sayHello();
		System.out.println("TestDIService的setter方法实现注入 "
				+ ",study hard everyone!");

	}
}
4. 编写配置文件 applicationContext.xml
<?xml version="1.0" encoding="UTF-8"?>
<beans xmlns="http://www.springframework.org/schema/beans"
	xmlns:xsi="http://www.w3.org/2001/XMLSchema-instance"
	xsi:schemaLocation="http://www.springframework.org/schema/beans
        http://www.springframework.org/schema/beans/spring-beans.xsd">
<bean id="myTestDIDao" class="dao.TestDIDaoImpl"></bean>
<!-- 实现了将dao.TestDIDaoImpl类托管给了Spring ,此时得到了
myTestDIDao这个实例 -->
<bean id="testDIService" class="service.TestDIServiceImpl">
<!--实现了将service.TestDIServiceImpl类托管给Spring ->
<constructor-arg index="0" ref="myTestDIDao">
<!--使用构造方法进行注入,要用到 constructor-arg这个元素:定义类的构造方法,ref:指定某个实例的引用;
总的实现过程:
 将myTestDIDao这个上边已经得到的实例,传给service.TestDIServiceImpl构造方法的第一个参数中,到这就实现了构造方法的依赖注入-->
</constructor-arg>
</bean>
<!-- 使用setter方法进行注入 -->
<bean id="testDIService1" class="service.TestDIServiceImpl1">
<property name="testDIDao" ref="myTestDIDao">
<!--property说明:使用set方法为属性 进行注入;此时name :你在service.TestDIServiceImpl1中设置的 成员变量的名字 ,ref :指定某
个实例的引用 ;
总的实现过程:
通过property元素 ,明白了 bean元素指明了哪一个类中,接着使用set方法实现 注入 ,name 指明往哪一个成员变量的set方法中注入,接着ref 将实例给到set方法的参数中,至此实现 set方法实现 依赖注入-->
</property>
</bean>
</beans>
此时
<bean id="testDIService" class="service.TestDIServiceImpl">
	<constructor-arg index="0" ref="myTestDIDao">
	</constructor-arg>
</bean>
	这是作为一个整体存在的;因为下面那个构造函数就是指向上边给出
来的那个类的构造函数;所以不能脱离开单独使用 constructor-arg 元
素。

同理:
<bean id="testDIService1" class="service.TestDIServiceImpl1">
<property name="testDIDao" ref="myTestDIDao">
</property>
</bean>
也是作为一个整体存在的,此时允许 多个property元素的存在;
5. 创建测试类 TestDI
package test;
import org.springframework.context.ApplicationContext;
import org.springframework.context.support.ClassPathXmlApplicationContext;
import service.TestDIService;
public class TestDI {
	public static void main(String[] args) {
	  ApplicationContext appCon = new  ClassPathXmlApplicationContext("applicationContext.xml");
	  TestDIService ts=(TestDIService)appCon.getBean("testDIService");
	  ts.sayHello();
	  TestDIService ts1=(TestDIService)appCon.getBean("testDIService1");
	  ts1.sayHello();
	  }

}
参考资料:
CSDN:
关于耦合的描述
书籍:
Java EE 框架整合开发入门到实践-Spring+Spring MVC+MyBatis


 194
194


 被折叠的 条评论
为什么被折叠?
被折叠的 条评论
为什么被折叠?
 到【灌水乐园】发言


