


1. 框架原理
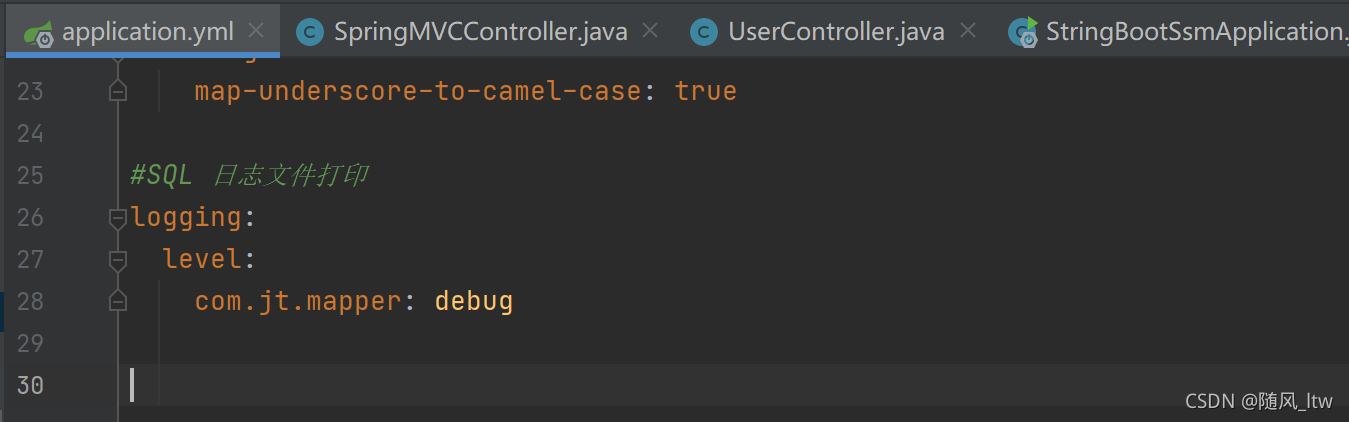
1.1 开启SQL 日志文件打印
1.2 SpringMVC 参数传递的说明
1.2.1 简单参数传值
    @GetMapping("/mvc")
    public Object testDemo(String name) {

        return "参数名称:" + name;
    }
1.2.2 对象接收数据
说明:如果用户传递的数据由多个,则可以使用对象接收
如果使用对象的方式接收,必须要有 Setxxx 方法
    @GetMapping("/mvc")
    public Object testDemo(User user) {

        return "参数名称:" + user;
    }
    /**
     * url:http://localhost:8090/mvc?name1=abc&name2=bcd&age=18&sex=女
     */
    @GetMapping("/mbc2")
    public Object testDemo2(User user, String name1, String name2) {
        return "参数名称:" + user;
    }
1.2.3 对象的引用赋值
问题: 如果前端出现了同名提交的参数问题.则直接影响后台数据接收.所以前端参数要求不能出现重名属性.
解决方案: 利用对象的引用赋值.
<input  type="text" name="name" value="二郎神"/>
<input  type="text" name="age" value="3000"/>
<input  type="text" name="dog.name" value="啸天犬"/>
<input  type="text" name="dog.age" value="1800"/>
1.封装User对象
public class User {
	private Integer id;
	private String name;
	private Integer age;
	private Dog dog; //对象的引用
}

public class Dog {
	private Integer id;
	private String name;
	private Integer age;

}
1.3 RestFul业务说明
1.3.1 编写控制器
    /**
     * 1. 语法:
     * 用户url:
     *      参数是 / 分割
     *      请求路径不能是动词
     * 2. RestFul规范:
     * 由于RestFul结构请求路径都是名词,所以不能区分业务逻辑
     * 所以采用请求类型,严格区分业务需求
     *  GET      查询
     *  POST     新增
     *  PUT      修改
     *  DELETE   删除
     * 3. 参数接收:
     *   参数与参数之间使用 / 分割
     *   参数必须使用 {xxx} 包裹
     *   使用特定的注解@PathVariable("name") String name 接收参数
     *   如果接收参数的名称与对象中的属性名称一致,则可以使用对象接收
     */
    @GetMapping("/user/{name}/{age}/{id}")
//    public Object restFul(@PathVariable("name") String name, Integer age) {
    public Object restFul(User user) {

        userService.update(user);
        return "数据更新成功";
    }
1.3.2 编写 UserService 类
package com.jt.service;

import com.jt.pojo.User;
import java.util.List;

public interface UserService {
    //查询User表中的所有数据
    List<User> findAll();
    User findUserById(Integer id);
    void update(User user);
}
1.3.3 编写UserService 实现类
    @Override
    public void update(User user) {

        userMapper.update(user);
    }
1.3.4 编写UserMapper
    @Update("update demo_user set name=#{name}, age=#{age} where id=#{id}")
    void update(User user);
1.4 Mybatis简化 - SQL注解
只适用一些简单操作,循环遍历不能写
    @Update("update demo_user set name=#{name}, age=#{age} where id=#{id}")
    void update(User user);
2. 前后端调用
2.1 VUE 入门案例
<!DOCTYPE html>
<html>
	<head>
		<meta charset="utf-8">
		<title>VUE入门案例</title>
	</head>
	<body>
		<h1>vue入门案例</h1>
		<div id="app">
			<h3>获取数据: {{msg}}</h3>
		</div>

		<!-- 使用步骤:
			 1.导入js.文件
			 2.准备根标签
			 3.创建vue对象,并且实现挂载.
			 4.定义属性.实现数据动态取值
			 知识补充: new Vue({}) 函数式编程

			 关于变量说明:
				1. js中变量定义 早期 var 全局变量 没有作用域.
				2. let有作用域的概念
				3. const 常量定义  不允许修改

		 -->
		 <script src="../js/vue.js"></script>
		 <script>
			//1.创建VUE对象
			const app = new Vue({
				//
				el: "#app",
				data: {
					msg: "您好VUE JS"
				}
			})
		 </script>
	</body>
</html>
2.2 VUE 生命周期
2.2.1 生命周期函数
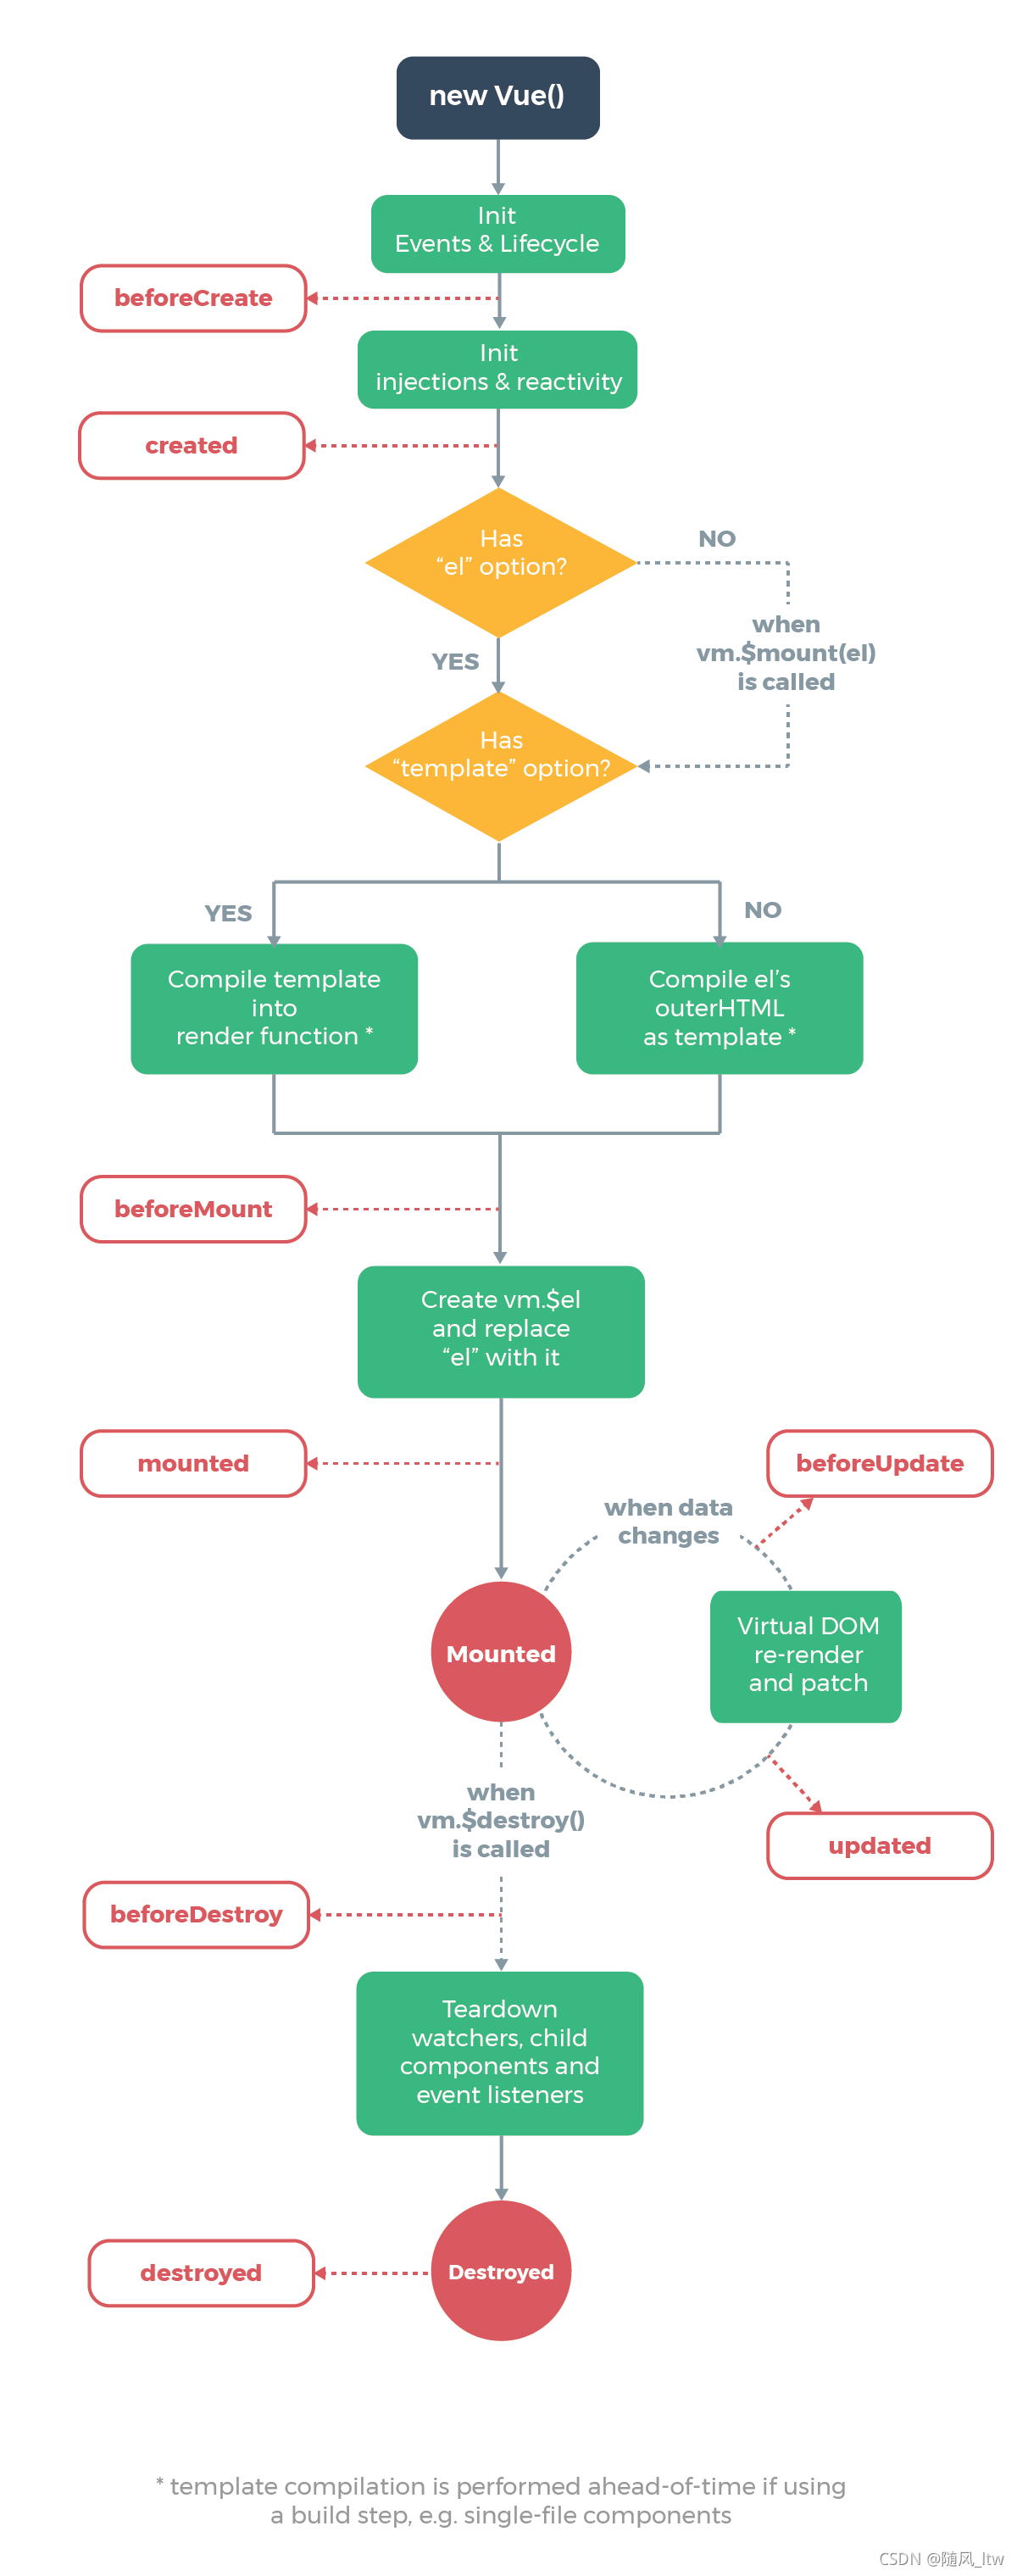
概念: 生命周期函数,是VUE针对与用户提供的扩展的功能.如果编辑了生命周期函数,则vue对象自动执行,无需手动调用.
生命周期函数种类:
- 初始化阶段 beforeCreate created beforeMount mounted VUE对象正在的实例化
- Vue对象的修改 beforeUpdate, updated
- 对象销毁 beforeDestroy destroyed
2.2.2 VUE生命周期函数案例
<!DOCTYPE html>
<html>
	<head>
		<meta charset="utf-8">
		<title>测试vue生命周期函数</title>
	</head>
	<body>

		<div id="app">
			<h3 v-text="msg"></h3>
			<button @click="destroy">销毁</button>
		</div>

		<!--引入js函数类库  -->
		<script src="../js/vue.js"></script>
		<script>
			const app = new Vue({
				el : "#app",
				data : {
					msg: "vue生命周期"
				},

				//在实例初始化之后,数据观测 (data observer) 和 event/watcher 事件配置之前被调用。
				beforeCreate(){
					console.log("beforeCreate")
				},
				//在实例创建完成后被立即调用
				created(){
					console.log("created")
				},
				//在挂载开始之前被调用:相关的 render 函数首次被调用。
				beforeMount(){
					console.log("beforeMount")
				},
				//实例被挂载后调用,这时 el 被新创建的 vm.$el 替换了。
				mounted(){
					console.log("mounted")
				},
				//数据更新时调用,发生在虚拟 DOM 打补丁之前
				beforeUpdate(){
					console.log("beforeUpdate")
				},
				//由于数据更改导致的虚拟 DOM 重新渲染和打补丁,在这之后会调用该钩子。
				updated(){
					console.log("updated")
				},
				//实例销毁之前调用。在这一步,实例仍然完全可用
				beforeDestroy(){
					console.log("beforeDestroy")
				},
				//实例销毁后调用。
				destroyed(){
					console.log("destroyed")
				},
				methods:{
					destroy(){
						//强制VUE对象执行销毁操作
						this.$destroy()
					}
				}
			})
		</script>
	</body>
</html>
3 前后端调用Axios
3.1 Ajax
特点: 局部刷新,异步访问
3.2 Axios 案例练习
3.2.1 编辑页面JS
<!DOCTYPE html>
<html>
	<head>
		<meta charset="utf-8">
		<title></title>
		<script src="../js/axios.js"></script>
	</head>
	<body>
		<h1>Ajax 请求的测试</h1>
		<script>
			let url = "http://localhost:8090/getUser";
			axios.get(url)
				.then(function(promise){
					console.log(promise.data);
				});
		</script>
	</body>
</html>
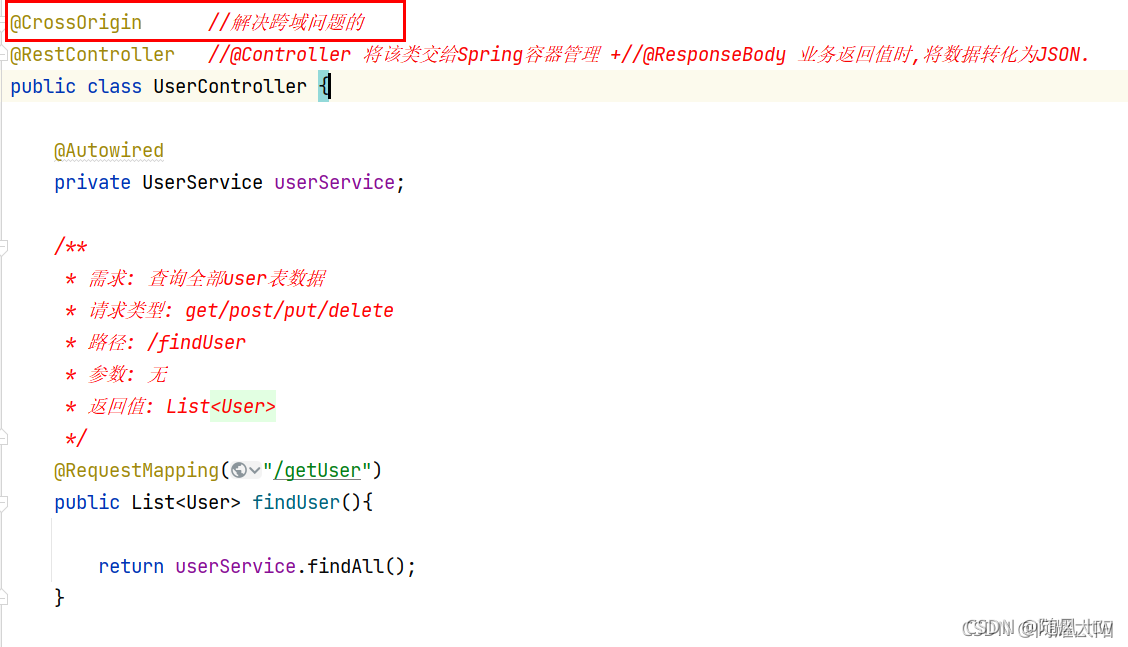
3.2.2 编辑后台UserController
3.3 Axios 作业练习
3.3.1 编辑页面Axios
<!DOCTYPE html>
<html>
	<head>
		<meta charset="utf-8">
		<title>Get请求练习</title>
	</head>
	<body>

		<h1>Ajax项目前测试</h1>
		<!-- 导入js jar包 -->
		<script src="../js/axios.js"></script>
		<script>

			/**
			 * 总结: 前端Get请求参数传递的方式3种
			 * 	方式1: 通过?属性=属性值的方法拼接.
			 * 	方式2: 通过对象的方式实现数据传递.
			 * 	方式3: 利用restFul的结构实现参数传递.
			 *
			 * 作业1:  根据ID查询用户信息
			 * 作业2:  根据age/sex查询用户信息
			 */

			/**
			 *  作业1
			 * 	url地址: http://localhost:8090/axios/findUserById
			 *  参数:    id=1
			 *  返回值:  console.log输出
			 */

			let url1 = "http://localhost:8090/axios/findUserById?id=1"
			axios.get(url1)
			     .then(function(promise){
					 console.log(promise.data)
				 })

			/**
			 *  作业2:  根据age/sex查询用户信息
			 * 	url地址: http://localhost:8090/axios/findUserByAS
			 *  参数:    id=1
			 *  返回值:  console.log输出
			 *  知识点:  根据对象传递参数时,使用params关键字
			 */
			let url2 = "http://localhost:8090/axios/findUserByAS"
			//封装对象
			let user = {
				age: 18,
				sex: "女"
			}
			axios.get(url2,{params : user})
				 .then(function(promise){
					 console.log(promise.data)
				 })
		</script>
	</body>
</html>


 87
87


 被折叠的 条评论
为什么被折叠?
被折叠的 条评论
为什么被折叠?
 到【灌水乐园】发言


