


转载地址:http://blog.csdn.net/guolin_blog/article/details/9526203
那我们开始动手吧,新建一个Android项目,起名叫LrcPhotoWallDemo,这里我使用的是Android 4.0的API。
第一个要考虑的问题就是,我们从哪儿去收集这么多的图片呢?这里我从谷歌官方提供的Demo里将图片源取了出来,我们就从这些网址中下载图片,代码如下所示:
<span style="font-family:Microsoft YaHei;font-size:18px;">public class Images {

	public final static String[] imageUrls = new String[] {

			"https://img-my.csdn.net/uploads/201309/01/1378037235_3453.jpg",
			"https://img-my.csdn.net/uploads/201309/01/1378037235_7476.jpg",
			"https://img-my.csdn.net/uploads/201309/01/1378037235_9280.jpg",
			"https://img-my.csdn.net/uploads/201309/01/1378037234_3539.jpg",
			"https://img-my.csdn.net/uploads/201309/01/1378037234_6318.jpg",
			"https://img-my.csdn.net/uploads/201309/01/1378037194_2965.jpg",
			"https://img-my.csdn.net/uploads/201309/01/1378037193_1687.jpg",
			"https://img-my.csdn.net/uploads/201309/01/1378037193_1286.jpg",
			"https://img-my.csdn.net/uploads/201309/01/1378037192_8379.jpg",
			"https://img-my.csdn.net/uploads/201309/01/1378037178_9374.jpg",
			"https://img-my.csdn.net/uploads/201309/01/1378037177_1254.jpg",
			"https://img-my.csdn.net/uploads/201309/01/1378037177_6203.jpg",
			"https://img-my.csdn.net/uploads/201309/01/1378037152_6352.jpg",
			"https://img-my.csdn.net/uploads/201309/01/1378037151_9565.jpg",
			"https://img-my.csdn.net/uploads/201309/01/1378037151_7904.jpg",
			"https://img-my.csdn.net/uploads/201309/01/1378037148_7104.jpg",
			"https://img-my.csdn.net/uploads/201309/01/1378037129_8825.jpg",
			"https://img-my.csdn.net/uploads/201309/01/1378037128_5291.jpg",
			"https://img-my.csdn.net/uploads/201309/01/1378037128_3531.jpg",
			"https://img-my.csdn.net/uploads/201309/01/1378037127_1085.jpg",
			"https://img-my.csdn.net/uploads/201309/01/1378037095_7515.jpg",
			"https://img-my.csdn.net/uploads/201309/01/1378037094_8001.jpg",
			"https://img-my.csdn.net/uploads/201309/01/1378037093_7168.jpg",
			"https://img-my.csdn.net/uploads/201309/01/1378037091_4950.jpg",
			"https://img-my.csdn.net/uploads/201308/31/1377949643_6410.jpg",
			"https://img-my.csdn.net/uploads/201308/31/1377949642_6939.jpg",
			"https://img-my.csdn.net/uploads/201308/31/1377949630_4505.jpg",
			"https://img-my.csdn.net/uploads/201308/31/1377949630_4593.jpg",
			"https://img-my.csdn.net/uploads/201308/31/1377949629_7309.jpg",
			"https://img-my.csdn.net/uploads/201308/31/1377949629_8247.jpg",
			"https://img-my.csdn.net/uploads/201308/31/1377949615_1986.jpg",
			"https://img-my.csdn.net/uploads/201308/31/1377949614_8482.jpg",
			"https://img-my.csdn.net/uploads/201308/31/1377949614_3743.jpg",
			"https://img-my.csdn.net/uploads/201308/31/1377949614_4199.jpg",
			"https://img-my.csdn.net/uploads/201308/31/1377949599_3416.jpg",
			"https://img-my.csdn.net/uploads/201308/31/1377949599_5269.jpg",
			"https://img-my.csdn.net/uploads/201308/31/1377949598_7858.jpg",
			"https://img-my.csdn.net/uploads/201308/31/1377949598_9982.jpg",
			"https://img-my.csdn.net/uploads/201308/31/1377949578_2770.jpg",
			"https://img-my.csdn.net/uploads/201308/31/1377949578_8744.jpg",
			"https://img-my.csdn.net/uploads/201308/31/1377949577_5210.jpg",
			"https://img-my.csdn.net/uploads/201308/31/1377949577_1998.jpg",
			"https://img-my.csdn.net/uploads/201308/31/1377949482_8813.jpg",
			"https://img-my.csdn.net/uploads/201308/31/1377949481_6577.jpg",
			"https://img-my.csdn.net/uploads/201308/31/1377949480_4490.jpg",
			"https://img-my.csdn.net/uploads/201308/31/1377949455_6792.jpg",
			"https://img-my.csdn.net/uploads/201308/31/1377949455_6345.jpg",
			"https://img-my.csdn.net/uploads/201308/31/1377949442_4553.jpg",
			"https://img-my.csdn.net/uploads/201308/31/1377949441_8987.jpg",
			"https://img-my.csdn.net/uploads/201308/31/1377949441_5454.jpg",
			"https://img-my.csdn.net/uploads/201308/31/1377949454_6367.jpg",
			"https://img-my.csdn.net/uploads/201308/31/1377949442_4562.jpg", };
}
</span>- <LinearLayout xmlns:android="http://schemas.android.com/apk/res/android"
- xmlns:tools="http://schemas.android.com/tools"
- android:layout_width="wrap_content"
- android:layout_height="wrap_content" >
- <GridView
- android:id="@+id/photo_wall"
- android:layout_width="match_parent"
- android:layout_height="wrap_content"
- android:columnWidth="90dip"
- android:stretchMode="columnWidth"
- android:numColumns="auto_fit"
- android:verticalSpacing="10dip"
- android:gravity="center"
- ></GridView>
- </LinearLayout>
可以看到,我们在这个布局文件中仅加入了一个GridView,这也就是我们程序中的“墙”,所有的图片都将贴在这个“墙”上。
接着我们定义GridView中每一个子View的布局,新建一个photo_layout.xml布局,加入如下代码:
- <RelativeLayout xmlns:android="http://schemas.android.com/apk/res/android"
- xmlns:tools="http://schemas.android.com/tools"
- android:layout_width="wrap_content"
- android:layout_height="wrap_content" >
- <ImageView
- android:id="@+id/photo"
- android:layout_width="90dip"
- android:layout_height="90dip"
- android:src="@drawable/empty_photo"
- android:layout_centerInParent="true"
- />
- </RelativeLayout>
接下来新建PhotoWallAdapter做为GridView的适配器,代码如下所示:
<span style="font-family:Microsoft YaHei;font-size:18px;">public class PhotoWallAdapter extends ArrayAdapter<String> implements OnScrollListener {

    /**
     * 记录所有正在下载或等待下载的任务。
     */
    private Set<BitmapWorkerTask> taskCollection;

    /**
     * 图片缓存技术的核心类,用于缓存所有下载好的图片,在程序内存达到设定值时会将最少最近使用的图片移除掉。
     */
    private LruCache<String, Bitmap> mMemoryCache;

    /**
     * GridView的实例
     */
    private GridView mPhotoWall;

    /**
     * 第一张可见图片的下标
     */
    private int mFirstVisibleItem;

    /**
     * 一屏有多少张图片可见
     */
    private int mVisibleItemCount;

    /**
     * 记录是否刚打开程序,用于解决进入程序不滚动屏幕,不会下载图片的问题。
     */
    private boolean isFirstEnter = true;

    @SuppressLint("NewApi") public PhotoWallAdapter(Context context, int textViewResourceId, String[] objects,
            GridView photoWall) {
        super(context, textViewResourceId, objects);
        mPhotoWall = photoWall;
        taskCollection = new HashSet<BitmapWorkerTask>();
        // 获取应用程序最大可用内存
        int maxMemory = (int) Runtime.getRuntime().maxMemory();
        int cacheSize = maxMemory / 8;
        // 设置图片缓存大小为程序最大可用内存的1/8
        mMemoryCache = new LruCache<String, Bitmap>(cacheSize) {
            @Override
            protected int sizeOf(String key, Bitmap bitmap) {
                return bitmap.getByteCount();
            }
        };
        mPhotoWall.setOnScrollListener(this);
    }

    @Override
    public View getView(int position, View convertView, ViewGroup parent) {
        final String url = getItem(position);
        View view;
        if (convertView == null) {
            view = LayoutInflater.from(getContext()).inflate(R.layout.photo_layout, null);
        } else {
            view = convertView;
        }
        final ImageView photo = (ImageView) view.findViewById(R.id.photo);
        // 给ImageView设置一个Tag,保证异步加载图片时不会乱序
        photo.setTag(url);
        setImageView(url, photo);
        return view;
    }

    /**
     * 给ImageView设置图片。首先从LruCache中取出图片的缓存,设置到ImageView上。如果LruCache中没有该图片的缓存,
     * 就给ImageView设置一张默认图片。
     *
     * @param imageUrl
     *            图片的URL地址,用于作为LruCache的键。
     * @param imageView
     *            用于显示图片的控件。
     */
    private void setImageView(String imageUrl, ImageView imageView) {
        Bitmap bitmap = getBitmapFromMemoryCache(imageUrl);
        if (bitmap != null) {
            imageView.setImageBitmap(bitmap);
        } else {
            imageView.setImageResource(R.drawable.empty_photo);
        }
    }

    /**
     * 将一张图片存储到LruCache中。
     *
     * @param key
     *            LruCache的键,这里传入图片的URL地址。
     * @param bitmap
     *            LruCache的键,这里传入从网络上下载的Bitmap对象。
     */
    public void addBitmapToMemoryCache(String key, Bitmap bitmap) {
        if (getBitmapFromMemoryCache(key) == null) {
            mMemoryCache.put(key, bitmap);
        }
    }

    /**
     * 从LruCache中获取一张图片,如果不存在就返回null。
     *
     * @param key
     *   LruCache的键,这里传入图片的URL地址。
     * @return 对应传入键的Bitmap对象,或者null。
     */
    @SuppressLint("NewApi") public Bitmap getBitmapFromMemoryCache(String key) {
        return mMemoryCache.get(key);
    }

  @Override
    public void onScrollStateChanged(AbsListView view, int scrollState) {
        // 仅当GridView静止时才去下载图片,GridView滑动时取消所有正在下载的任务
        if (scrollState == SCROLL_STATE_IDLE) {
            loadBitmaps(mFirstVisibleItem, mVisibleItemCount);
        } else {
            cancelAllTasks();
        }
    }

    @Override
    public void onScroll(AbsListView view, int firstVisibleItem, int visibleItemCount,
            int totalItemCount) {
        mFirstVisibleItem = firstVisibleItem;
        mVisibleItemCount = visibleItemCount;
        // 下载的任务应该由onScrollStateChanged里调用,但首次进入程序时onScrollStateChanged并不会调用,
        // 因此在这里为首次进入程序开启下载任务。
        if (isFirstEnter && visibleItemCount > 0) {
            loadBitmaps(firstVisibleItem, visibleItemCount);
            isFirstEnter = false;
        }
    }

    /**
     * 加载Bitmap对象。此方法会在LruCache中检查所有屏幕中可见的ImageView的Bitmap对象,
     * 如果发现任何一个ImageView的Bitmap对象不在缓存中,就会开启异步线程去下载图片。
     *
     * @param firstVisibleItem
     *            第一个可见的ImageView的下标
     * @param visibleItemCount
     *            屏幕中总共可见的元素数
     */
    private void loadBitmaps(int firstVisibleItem, int visibleItemCount) {
        try {
            for (int i = firstVisibleItem; i < firstVisibleItem + visibleItemCount; i++) {
                String imageUrl = Images.imageUrls[i];
                Bitmap bitmap = getBitmapFromMemoryCache(imageUrl);
                if (bitmap == null) {
                    BitmapWorkerTask task = new BitmapWorkerTask();
                    taskCollection.add(task);
                    task.execute(imageUrl);
                } else {
                    ImageView imageView = (ImageView) mPhotoWall.findViewWithTag(imageUrl);
                    if (imageView != null && bitmap != null) {
                        imageView.setImageBitmap(bitmap);
                    }
                }
            }
        } catch (Exception e) {
            e.printStackTrace();
        }
    }

    /**
     * 取消所有正在下载或等待下载的任务。
     */
    public void cancelAllTasks() {
        if (taskCollection != null) {
            for (BitmapWorkerTask task : taskCollection) {
                task.cancel(false);
            }
        }
    }

    /**
     * 异步下载图片的任务。
     *
     * @author guolin
     */
    class BitmapWorkerTask extends AsyncTask<String, Void, Bitmap> {

        /**
         * 图片的URL地址
         */
        private String imageUrl;

        @Override
        protected Bitmap doInBackground(String... params) {
            imageUrl = params[0];
            // 在后台开始下载图片
            Bitmap bitmap = downloadBitmap(params[0]);
            if (bitmap != null) {
                // 图片下载完成后缓存到LrcCache中
                addBitmapToMemoryCache(params[0], bitmap);
            }
            return bitmap;
        }

        @Override
        protected void onPostExecute(Bitmap bitmap) {
            super.onPostExecute(bitmap);
            // 根据Tag找到相应的ImageView控件,将下载好的图片显示出来。
            ImageView imageView = (ImageView) mPhotoWall.findViewWithTag(imageUrl);
            if (imageView != null && bitmap != null) {
                imageView.setImageBitmap(bitmap);
            }
            taskCollection.remove(this);
        }

        /**
         * 建立HTTP请求,并获取Bitmap对象。
         *
         * @param imageUrl
         *            图片的URL地址
         * @return 解析后的Bitmap对象
         */
        private Bitmap downloadBitmap(String imageUrl) {
            Bitmap bitmap = null;
            HttpURLConnection con = null;
            try {
                URL url = new URL(imageUrl);
                con = (HttpURLConnection) url.openConnection();
                con.setConnectTimeout(5 * 1000);
                con.setReadTimeout(10 * 1000);
                bitmap = BitmapFactory.decodeStream(con.getInputStream());
            } catch (Exception e) {
                e.printStackTrace();
            } finally {
                if (con != null) {
                    con.disconnect();
                }
            }
            return bitmap;
        }

    }

} </span>看了半天,那到底是在哪里下载图片的呢?这是在GridView的滚动监听器中进行的,在onScrollStateChanged()方法中,我们对GridView的滚动状态进行了判断,如果当前GridView是静止的,则调用loadBitmaps()方法去下载图片,如果GridView正在滚动,则取消掉所有下载任务,这样可以保证GridView滚动的流畅性。在loadBitmaps()方法中,我们为屏幕上所有可见的GridView子元素开启了一个线程去执行下载任务,下载成功后将图片存储到LruCache当中,然后通过Tag找到相应的ImageView控件,把下载好的图片显示出来。
由于我们使用了LruCache来缓存图片,所以不需要担心内存溢出的情况,当LruCache中存储图片的总大小达到容量上限的时候,会自动把最近最少使用的图片从缓存中移除。
最后新建或打开MainActivity作为程序的主Activity,代码如下所示:
<span style="font-family:Microsoft YaHei;font-size:18px;">public class MainActivity extends Activity {

    /**
     * 用于展示照片墙的GridView
     */
    private GridView mPhotoWall;

    /**
     * GridView的适配器
     */
    private PhotoWallAdapter adapter;

    @Override
    protected void onCreate(Bundle savedInstanceState) {
        super.onCreate(savedInstanceState);
        setContentView(R.layout.activity_main);
        mPhotoWall = (GridView) findViewById(R.id.photo_wall);
        adapter = new PhotoWallAdapter(this, 0, Images.imageUrls, mPhotoWall);
        mPhotoWall.setAdapter(adapter);
    }

    @Override
    protected void onDestroy() {
        super.onDestroy();
        // 退出程序时结束所有的下载任务
        adapter.cancelAllTasks();
    }

}  </span>
MainActivity中的代码非常简单,没什么需要说明的了,在Activity被销毁时取消掉了所有的下载任务,避免程序在后台耗费流量。另外由于我们使用了网络功能,别忘了在AndroidManifest.xml中加入网络权限的声明。
现在可以运行一下程序了,效果如下图所示:
可以看到,滚动照片墙,会异步加载图片到相应的ImageView上。随着加载图片的增多,会释放掉一些之前加载过的图片,你多滚动几次就可以看得出了。另外为了能让大家明显看出图片的释放情况,我在这个程序中没有使用本地缓存,所有被释放掉的图片再次显示需要从网络上再下载一遍。在实际的项目中配合适当的本地缓存效果会更好。
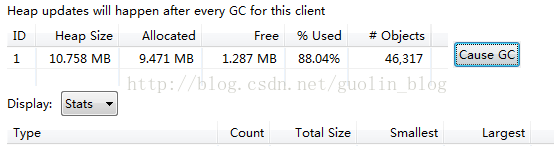
打开DDMS,我们可以发现,由于有LruCache帮我们管理图片缓存,不管如何滚动照片墙,程序内存始终会保持在一个合理的范围内。
本篇文章的重点在于如何对图片进行更好的回收,因此照片墙只是简单地使用GridView进行了展示


 被折叠的 条评论
为什么被折叠?
被折叠的 条评论
为什么被折叠?
 到【灌水乐园】发言


