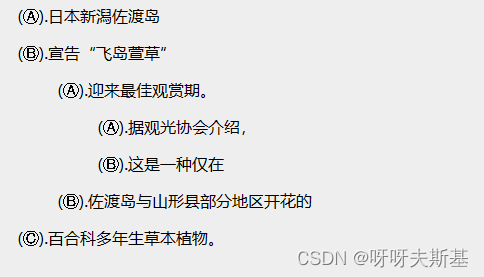
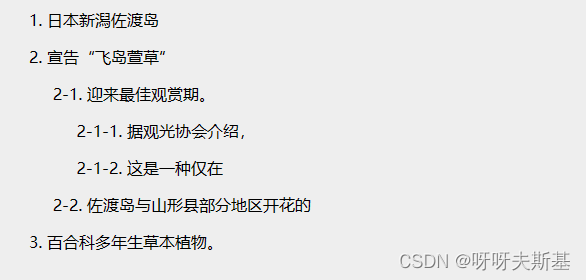
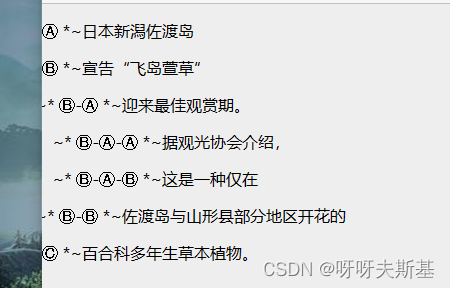
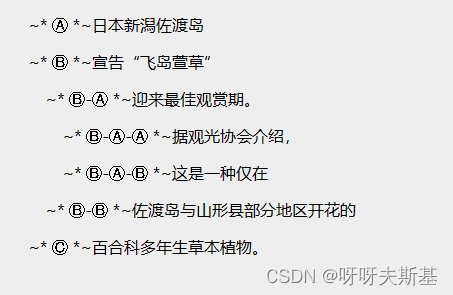
css 实现丰富的序号效果

<ol>
  <li>
    <p>日本新潟佐渡岛</p>
  </li>
  <li>
    <p>宣告“飞岛萱草”</p>
    <ol>
      <li>
        <p>迎来最佳观赏期。</p>
        <ol>
          <li>
            <p>据观光协会介绍,</p>
          </li>
          <li>
            <p>这是一种仅在</p>
          </li>
        </ol>
      </li>
      <li>
        <p>佐渡岛与山形县部分地区开花的</p>
      </li>
    </ol>
  </li>
  <li>
    <p>百合科多年生草本植物。</p>
  </li>
</ol>

默认序号效果:

在这里插入图片描述

list-style-type 改变序号类型

li {
   list-style-type: cjk-ideographic;
 }

在这里插入图片描述
list-style-type 支持不少类型:

  • 1.2.3 decimal
  • a.b.c lower-alpha
  • A.B.C upper-alpha
  • i.ii.iii lower-roman
  • I.II.III upper-roman
  • 一.二.三 cjk-ideographic
  • 子.丑.寅.卯 cjk-earthly-branch
  • 甲.乙.丙.丁 cjk-heavenly-stem

@counter-style 自定义序号类型

@counter-style circled-upper-alpha {
  system: alphabetic;
  symbols: Ⓐ Ⓑ Ⓒ Ⓓ Ⓔ Ⓕ Ⓖ Ⓗ Ⓘ Ⓙ Ⓚ Ⓛ Ⓜ Ⓝ Ⓞ Ⓟ Ⓠ Ⓡ Ⓢ Ⓣ Ⓤ Ⓥ Ⓦ Ⓧ Ⓨ Ⓩ;
  prefix: "(";
  suffix: ").";
}
li {
  list-style-type: circled-upper-alpha;
}

在这里插入图片描述

counters 多级序号

ol {
  counter-reset: my-counter;
}
li {
  counter-increment: my-counter;
}
li::marker {
  content: counters(my-counter, "-") ". ";
}

在这里插入图片描述

使用 counters 时可以指明 counter-style:

@counter-style circled-upper-alpha {
  system: alphabetic;
  symbols: Ⓐ Ⓑ Ⓒ Ⓓ Ⓔ Ⓕ Ⓖ Ⓗ Ⓘ Ⓙ Ⓚ Ⓛ Ⓜ Ⓝ Ⓞ Ⓟ Ⓠ Ⓡ Ⓢ Ⓣ Ⓤ Ⓥ Ⓦ Ⓧ Ⓨ Ⓩ;
  /* content: counter() 中,prefix 和 suffix 不生效 */
  prefix: "(";
  suffix: ").";
}
ol {
  counter-reset: my-counter;
  /* list-style: circled-upper-alpha; */
}
li {
  counter-increment: my-counter;
}
li::marker {
  content: "~* " counters(my-counter, "-", circled-upper-alpha) " *~";
}

::marker 的长度不可控。当序号的文本很长时,显示会有问题:

在这里插入图片描述
给 body 加了margin,序号显示全的效果:
在这里插入图片描述

参考:
张鑫旭 - CSS @counter-style规则详细介绍
张鑫旭 - 关于list-style-type项目符号你应该知道的事情
张鑫旭 - CSS counter计数器(content目录序号自动递增)详解
张鑫旭 - CSS ::marker伪元素简介

  • 3
    点赞
  • 2
    收藏
    觉得还不错? 一键收藏
  • 0
    评论
### 回答1: 下面是一个使用 JavaScript 实现轮播图效果的简单示例: ``` <div class="slideshow-container"> <div class="mySlides"> <img src="img1.jpg" style="width:100%"> </div> <div class="mySlides"> <img src="img2.jpg" style="width:100%"> </div> <div class="mySlides"> <img src="img3.jpg" style="width:100%"> </div> <a class="prev" onclick="plusSlides(-1)">❮</a> <a class="next" onclick="plusSlides(1)">❯</a> </div> <script> var slideIndex = 1; showSlides(slideIndex); function plusSlides(n) { showSlides(slideIndex += n); } function currentSlide(n) { showSlides(slideIndex = n); } function showSlides(n) { var i; var slides = document.getElementsByClassName("mySlides"); if (n > slides.length) {slideIndex = 1} if (n < 1) {slideIndex = slides.length} for (i = 0; i < slides.length; i++) { slides[i].style.display = "none"; } slides[slideIndex-1].style.display = "block"; } </script> <style> .slideshow-container { max-width: 1000px; position: relative; margin: auto; } .mySlides { display: none; } .prev, .next { cursor: pointer; position: absolute; top: 50%; width: auto; padding: 16px; margin-top: -22px; color: white; font-weight: bold; font-size: 18px; transition: 0.6s ease; border-radius: 0 3px 3px 0; } .next { right: 0; border-radius: 3px 0 0 3px; } .prev:hover, .next:hover { background-color: rgba(0,0,0,0.8); } </style> ``` 在这个代码中,我们使用了 HTMLCSS 和 JavaScript 来实现轮播图效果HTML 代码用于定义图片和切换按钮的结构,CSS 用于定义样式,JavaScript 用于实现切换图片的逻辑。 ### 回答2: 实现轮播图效果的方式有很多种,下面是一种简单的实现方式。 HTML代码: ``` <div id="carousel"> <img src="image1.jpg"> <img src="image2.jpg"> <img src="image3.jpg"> </div> ``` CSS样式: ``` #carousel { width: 500px; height: 300px; overflow: hidden; } #carousel img { width: 100%; height: 100%; display: none; } ``` JavaScript代码: ``` var carousel = document.getElementById('carousel'); var images = carousel.getElementsByTagName('img'); var currentIndex = 0; // 显示指定索引的图片 function showImage(index) { // 隐藏正在显示的图片 for (var i = 0; i < images.length; i++) { images[i].style.display = 'none'; } // 显示指定索引的图片 images[index].style.display = 'block'; } // 自动轮播图片 function autoPlay() { // 显示下一张图片 currentIndex++; if (currentIndex >= images.length) { currentIndex = 0; } showImage(currentIndex); } var timer = setInterval(autoPlay, 2000); // 鼠标移入停止自动轮播,移出继续自动轮播 carousel.onmouseover = function() { clearInterval(timer); } carousel.onmouseout = function() { timer = setInterval(autoPlay, 2000); } ``` 以上代码实现了一个简单的轮播图效果,轮播图会自动播放,鼠标移入停止自动播放,移出继续自动播放。可以根据实际需求进行进一步的修改和扩展。 ### 回答3: 轮播图是网页设计中常用的效果,通过自动切换图片来展示多张图片。以下是一个简单的使用JavaScript实现轮播图效果的示例: HTML结构: ```html <div id="slideshow"> <img src="image1.jpg" alt=""> <img src="image2.jpg" alt=""> <img src="image3.jpg" alt=""> </div> ``` CSS样式: ```css #slideshow { width: 500px; height: 300px; overflow: hidden; } #slideshow img { width: 100%; height: 100%; display: none; } ``` JavaScript代码: ```javascript var slideIndex = 0; var slides = document.querySelectorAll('#slideshow img'); slides[slideIndex].style.display = "block"; function nextSlide() { slides[slideIndex].style.display = "none"; slideIndex++; if (slideIndex >= slides.length) { slideIndex = 0; } slides[slideIndex].style.display = "block"; } setInterval(nextSlide, 2000); // 每2秒自动切换图片 ``` 通过上述代码,可以实现一个简单的轮播图效果。其中,`slideIndex`变量表示当前显示的图片序号,`slides`数组保存所有的图片元素。`nextSlide`函数会隐藏当前显示的图片,然后切换到下一张图片进行显示。`setInterval`函数用于定时调用`nextSlide`函数,实现自动切换图片的效果

“相关推荐”对你有帮助么?

  • 非常没帮助
  • 没帮助
  • 一般
  • 有帮助
  • 非常有帮助
提交
评论
添加红包

请填写红包祝福语或标题

红包个数最小为10个

红包金额最低5元

当前余额3.43前往充值 >
需支付:10.00
成就一亿技术人!
领取后你会自动成为博主和红包主的粉丝 规则
hope_wisdom
发出的红包
实付
使用余额支付
点击重新获取
扫码支付
钱包余额 0

抵扣说明:

1.余额是钱包充值的虚拟货币,按照1:1的比例进行支付金额的抵扣。
2.余额无法直接购买下载,可以购买VIP、付费专栏及课程。

余额充值