


前言
对于分布式使用Nginx+Tomcat实现负载均衡,最常用的均衡算法有IP_Hash、轮训、根据权重、随机等。不管对于哪一种负载均衡算法,由于Nginx对不同的请求分发到某一个Tomcat,Tomcat在运行的时候分别是不同的容器里,因此会出现session不同步或者丢失的问题。
实际上实现Session共享的方案很多,其中一种常用的就是使用Tomcat、Jetty等服务器提供的Session共享功能,将Session的内容统一存储在一个数据库(如MySQL)或缓存(如Redis)中。
在以前写的一篇文章中:
使用Redis存储Nginx+Tomcat负载均衡集群的Session:http://blog.csdn.net/xlgen157387/article/details/52024139
这一篇文章中已经学习了一下,如何使用 tomcat-redis-session-manager 开源项目解决分布式session跨域的问题,他的主要思想是利用Servlet容器提供的插件功能,自定义HttpSession的创建和管理策略,并通过配置的方式替换掉默认的策略。tomcat-redis-session-manager重写了Tomcat的org.apache.catalina.session.ManagerBase里边的具体写的操作, 将tomcat的session存储位置指向了Redis:
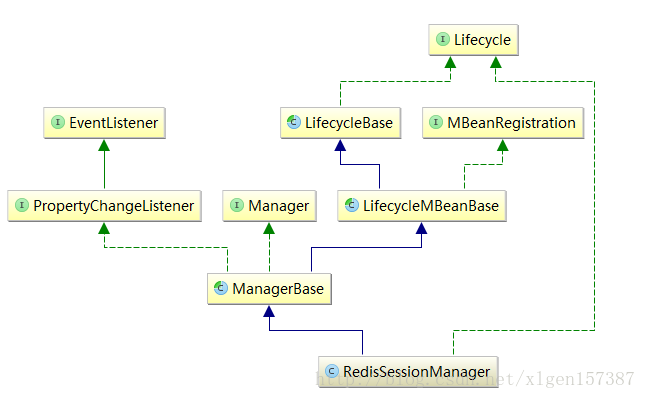
RedisSessionManager继承了org.apache.catalina.session.ManagerBase并重写了add、findSession、createEmptySession、remove等方法,并将对session的增删改查操作指向了对Redis数据存储的操作。
有兴趣可参考一篇Tomcat中session的管理机制:http://www.cnblogs.com/interdrp/p/4935614.html
不过使用过tomcat-redis-session-manager 的都应该知道,配置相对还是有一点繁琐的,需要人为的去修改Tomcat的配置,需要耦合Tomcat等Servlet容器的代码,并且对于分布式Redis集群的管理并不是很好,与之相对的个人认为比较好的一个框架Spring Session可以真正对用户透明的去管理分布式Session。
Spring Session不依赖于Servlet容器,而是Web应用代码层面的实现,直接在已有项目基础上加入spring Session框架来实现Session统一存储在Redis中。如果你的Web应用是基于Spring框架开发的,只需要对现有项目进行少量配置,即可将一个单机版的Web应用改为一个分布式应用,由于不基于Servlet容器,所以可以随意将项目移植到其他容器。
Spring Session使用
官方地址:http://projects.spring.io/spring-session/
官方文档地址:http://docs.spring.io/spring-session/docs/1.3.0.RELEASE/reference/html5/
Spring Session提供了一套创建和管理Servlet HttpSession的方案。Spring Session提供了集群Session(Clustered Sessions)功能,默认采用外置的Redis来存储Session数据,以此来解决Session共享的问题。
一、特性
Spring Session提供以下特性:
- API和用于管理用户会话的实现;
- HttpSession - 允许以应用程序容器(即Tomcat)中性的方式替换HttpSession;
- Clustered Sessions - Spring Session让支持集群会话变得不那么繁琐,并且不和应用程序容器金习性绑定到。
- Multiple Browser Sessions - Spring会话支持在单个浏览器实例中管理多个用户的会话。
- RESTful APIs - Spring Session允许在headers 中提供会话ID以使用RESTful API。
二、基于XML配置方式的Spring Session案例实现
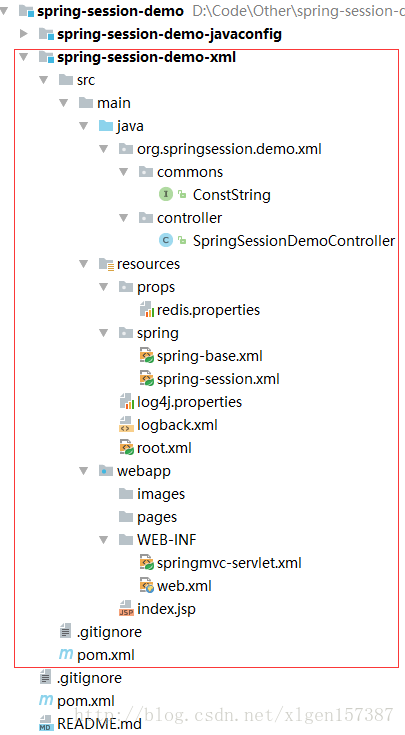
基于SSM框架的一个小案例,Git OS项目代码地址:http://git.oschina.net/xuliugen/spring-session-demo
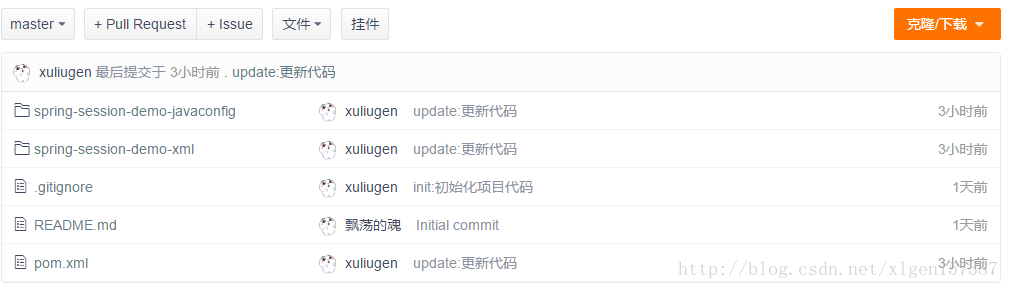
项目展示:
(1)基本环境需求
进行使用Spring Session的话,首先的是已经安装好的有一个 Redis服务器!
(2)添加项目依赖(最基本的依赖使用)
 <dependency>
            <groupId>org.springframework.session</groupId>
            <artifactId>spring-session-data-redis</artifactId>
            <version>1.3.0.RELEASE</version>
            <type>pom</type>
        </dependency>
        <dependency>
            <groupId>biz.paluch.redis</groupId>
            <artifactId>lettuce</artifactId>
            <version>3.5.0.Final</version>
</dependency>- 1
- 2
- 3
- 4
- 5
- 6
- 7
- 8
- 9
- 10
- 11
(3)添加Spring配置文件
添加了必要的依赖之后,我们需要创建相应的Spring配置。Spring配置是要创建一个Servlet过滤器,它用Spring Session支持的HttpSession实现来替换容器本身HttpSession实现。这一步也是Spring Session的核心。
<context:annotation-config/>

<bean class="org.springframework.session.data.redis.config.annotation.web.http.RedisHttpSessionConfiguration"/>

<bean class="org.springframework.data.redis.connection.lettuce.LettuceConnectionFactory"/>- 1
- 2
- 3
- 4
- 5
上述代码注释:

LettuceConnectionFactory实例是配置Redis的ConnectionFactory。
注意:
<bean class="org.springframework.data.redis.connection.lettuce.LettuceConnectionFactory"/>- 1
查看源代码可以看到,默认的Redis链接配置为:
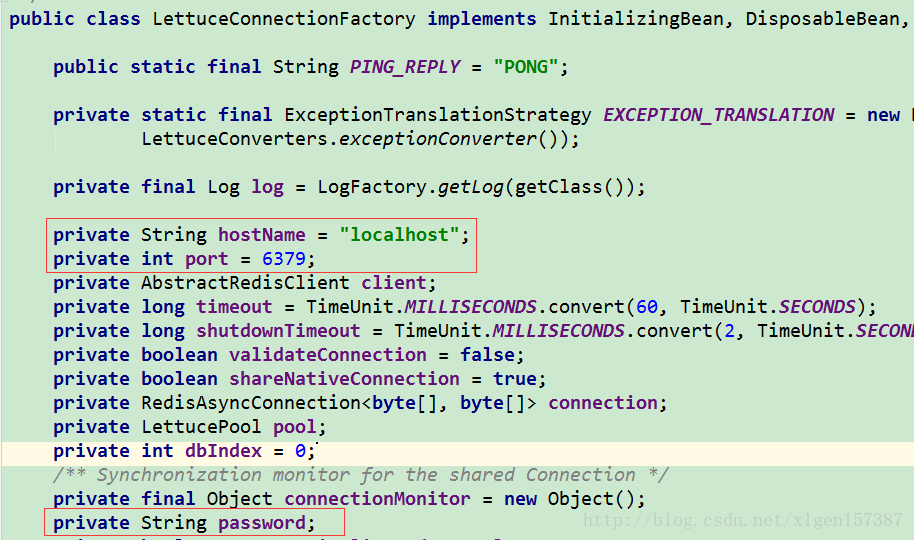
因此,如果有自己的Redis配置,请修改,例如下边的配置:
<bean class="org.springframework.data.redis.connection.lettuce.LettuceConnectionFactory">
     <property name="hostName" value="192.168.1.149"/>
     <property name="port" value="6379"/>
     <property name="password" value="123456"/>
</bean>- 1
- 2
- 3
- 4
- 5
(5)关于Error creating bean with name ‘enableRedisKeyspaceNotificationsInitializer’错误的处理:
添加如下配置让Spring Session不再执行config命令
<util:constant static-field="org.springframework.session.data.redis.config.ConfigureRedisAction.NO_OP"/>- 1
如果不添加的话,会报如下错误:
Context initialization failed org.springframework.beans.factory.BeanCreationException: Error creating bean with name 'enableRedisKeyspaceNotificationsInitializer' defined in class path resource [org/springframework/session/data/redis/config/annotation/web/http/RedisHttpSessionConfiguration.class]:
Invocation of init method failed; nested exception is java.lang.IllegalStateException: Unable to configure Redis to keyspace notifications.
See http://docs.spring.io/spring-session/docs/current/reference/html5/#api-redisoperationssessionrepository-sessiondestroyedevent
Caused by: redis.clients.jedis.exceptions.JedisDataException: ERR unknown command config- 1
- 2
- 3
- 4
(5)在web.xml中添加DelegatingFilterProxy
<filter>
    <filter-name>springSessionRepositoryFilter</filter-name>
    <filter-class>org.springframework.web.filter.DelegatingFilterProxy</filter-class>
</filter>
<filter-mapping>
    <filter-name>springSessionRepositoryFilter</filter-name>
    <url-pattern>/*</url-pattern>
    <dispatcher>REQUEST</dispatcher>
    <dispatcher>ERROR</dispatcher>
</filter-mapping>- 1
- 2
- 3
- 4
- 5
- 6
- 7
- 8
- 9
- 10
DelegatingFilterProxy将通过springSessionRepositoryFilter的名称查找Bean并将其转换为过滤器。对于调用DelegatingFilterProxy的每个请求,也将调用springSessionRepositoryFilter。
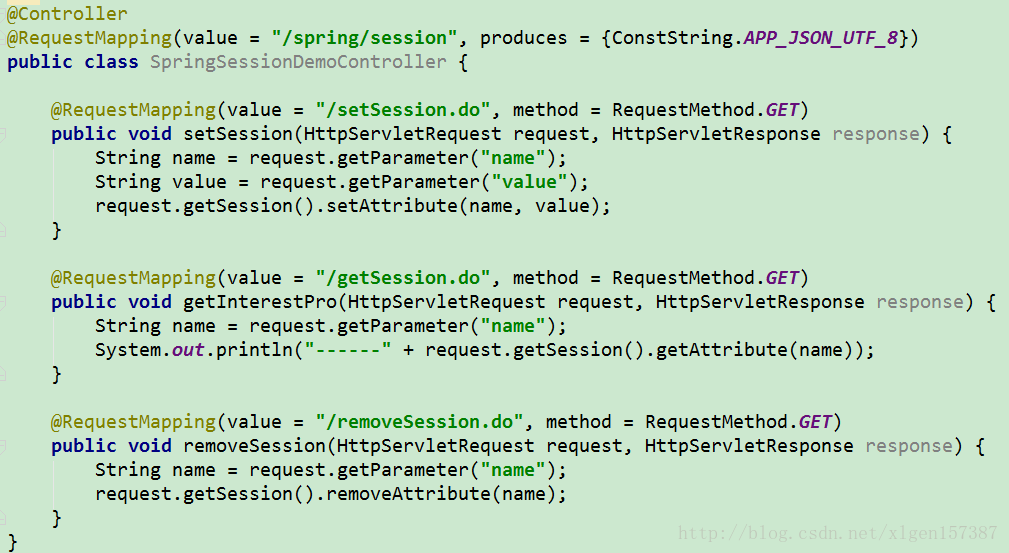
(6)Spring MVC controller代码用于测试:
@Controller
@RequestMapping(value = "/spring/session", produces = {ConstString.APP_JSON_UTF_8})
public class SpringSessionDemoController {

    @RequestMapping(value = "/setSession.do", method = RequestMethod.GET)
    public void setSession(HttpServletRequest request, HttpServletResponse response) {
        String name = request.getParameter("name");
        String value = request.getParameter("value");
        request.getSession().setAttribute(name, value);
    }

    @RequestMapping(value = "/getSession.do", method = RequestMethod.GET)
    public void getInterestPro(HttpServletRequest request, HttpServletResponse response) {
        String name = request.getParameter("name");
        System.out.println("------" + request.getSession().getAttribute(name));
    }

    @RequestMapping(value = "/removeSession.do", method = RequestMethod.GET)
    public void removeSession(HttpServletRequest request, HttpServletResponse response) {
        String name = request.getParameter("name");
        request.getSession().removeAttribute(name);
    }
}- 1
- 2
- 3
- 4
- 5
- 6
- 7
- 8
- 9
- 10
- 11
- 12
- 13
- 14
- 15
- 16
- 17
- 18
- 19
- 20
- 21
- 22
- 23

(7)测试
访问链接:http://localhost:8080/spring/session/setSession.do?name=xuiliugen&value=123456
使用工具查看Redis内容:
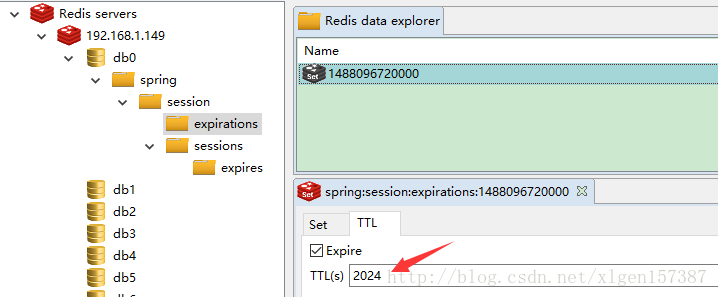
可以发现已经有值了!并且有expirations,可以看到箭头指向的位置,是失效的时间记录值!
(8)到此,Spring Session的使用已经完成!其他具体的细节请参考:http://git.oschina.net/xuliugen/spring-session-demo项目源代码。
总结
对于分布式环境Session跨域共享的问题,不管是使用开源的框架还是使用自己开发的框架,都需要明白的一个问题是:在Tomcat容器中创建Session是一个很耗费内存的事情。因此,我们在自己写类似框架的时候,我们一定要注意的是,并不是Tomcat为我们创建好了Session之后,我们首先获取Session然后再上传到Redis等进行存储,而是直接有我们自己创建Session,这一点是至关重要的!
注:以下步骤是基于XML的方式实现 Spring Session的代码讲解!
先从web.xml文件说起
我们知道Tomcat再启动的时候首先会去加载web.xml 文件,Tomcat启动的时候web.xml被加载的顺序:context-param -> listener -> filter -> servlet。
我们在使用Spring Session的时候,我们配置了一个filter,配置代码如下:
<filter>
     <filter-name>springSessionRepositoryFilter</filter-name>
     <filter-class>org.springframework.web.filter.DelegatingFilterProxy</filter-class>
</filter>
<filter-mapping>
     <filter-name>springSessionRepositoryFilter</filter-name>
     <url-pattern>/*</url-pattern>
     <dispatcher>REQUEST</dispatcher>
     <dispatcher>ERROR</dispatcher>
</filter-mapping>
- 1
- 2
- 3
- 4
- 5
- 6
- 7
- 8
- 9
- 10
- 11
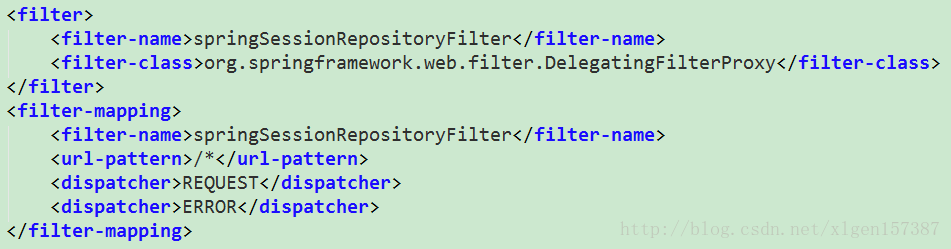
介绍一下DelegatingFilterProxy 这个类:
DelegatingFilterProxy 类将通过springSessionRepositoryFilter 这个名称去查找Spring容器中配置的Bean并将其转换为过滤器,对于调用DelegatingFilterProxy的每个请求,将调用springSessionRepositoryFilter这个过滤器。
如果未指定init-param参数的话,DelegatingFilterProxy就会把filter-name作为要查找的Bean对象,这也是DelegatingFilterProxy类的作用。可以看出每一个请求都会经过该filter,经过该filter的请求也会相应的经过springSessionRepositoryFilter这个过滤器,那么我们就接着看一下springSessionRepositoryFilter这个过滤器。
springSessionRepositoryFilter过滤器的创建
上一过程的DelegatingFilterProxy是从Spring容器中去查找springSessionRepositoryFilter的,那么我们是在哪个地方进行注入springSessionRepositoryFilter的哪?答案是在这里:
<bean class="org.springframework.session.data.redis.config.annotation.web.http.RedisHttpSessionConfiguration"/>- 1

我们在Spring的配置文件中手动注入了RedisHttpSessionConfiguration,这是因为我们默认的使用Redis进行存储Session的。
RedisHttpSessionConfiguration 这个类加了Configuration注解,作为配置文件注入。
RedisHttpSessionConfiguration的作用是创建名为springSessionRepositoryFilter 的Spring Bean,继承自Filter。springSessionRepositoryFilter替换容器默认的HttpSession支持为Spring Session,将Session实例存放在Redis中。
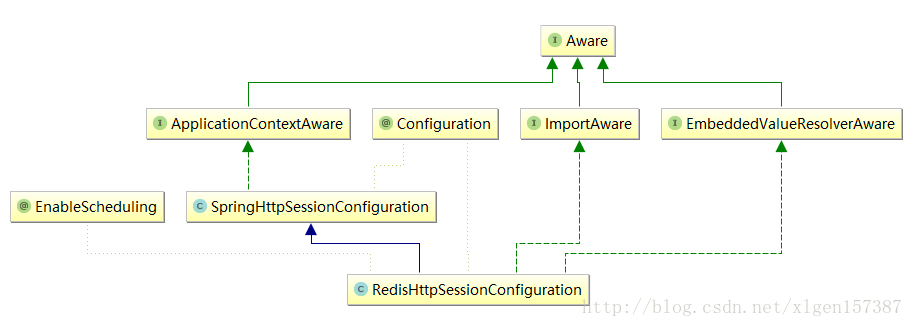
(1)RedisHttpSessionConfiguration 继承关系如下:
@Configuration
@EnableScheduling
public class RedisHttpSessionConfiguration extends SpringHttpSessionConfiguration
        implements EmbeddedValueResolverAware, ImportAware {
}- 1
- 2
- 3
- 4
- 5
(2)RedisHttpSessionConfiguration主要方法和属性如下:
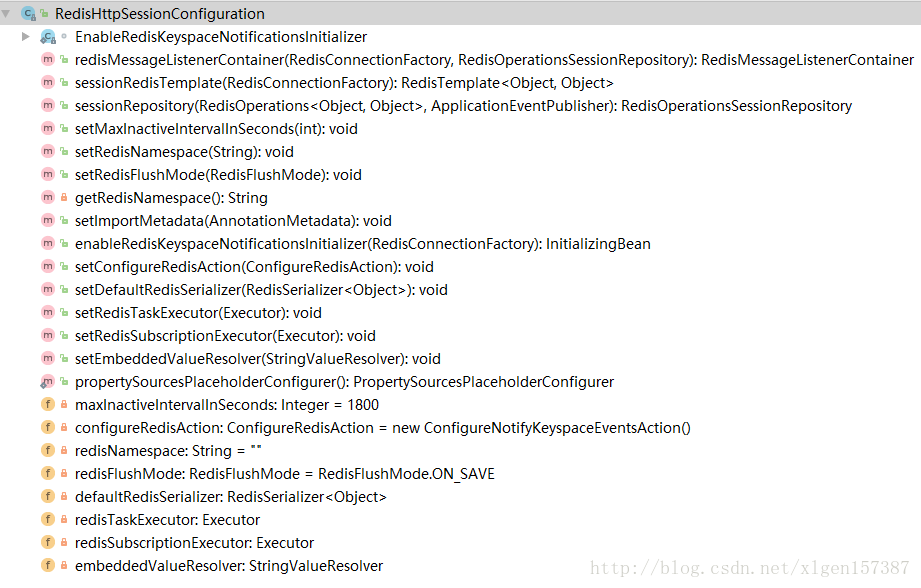
(3)RedisHttpSessionConfiguration通过@Bean的方式将RedisMessageListenerContainer、RedisTemplate、RedisOperationsSessionRepository 等注入到Spring容器中。
(4)RedisHttpSessionConfiguration继承了SpringHttpSessionConfiguration这个类,这个类很重要,SpringHttpSessionConfiguration通过@Bean的方式将springSessionRepositoryFilter注入到容器中:
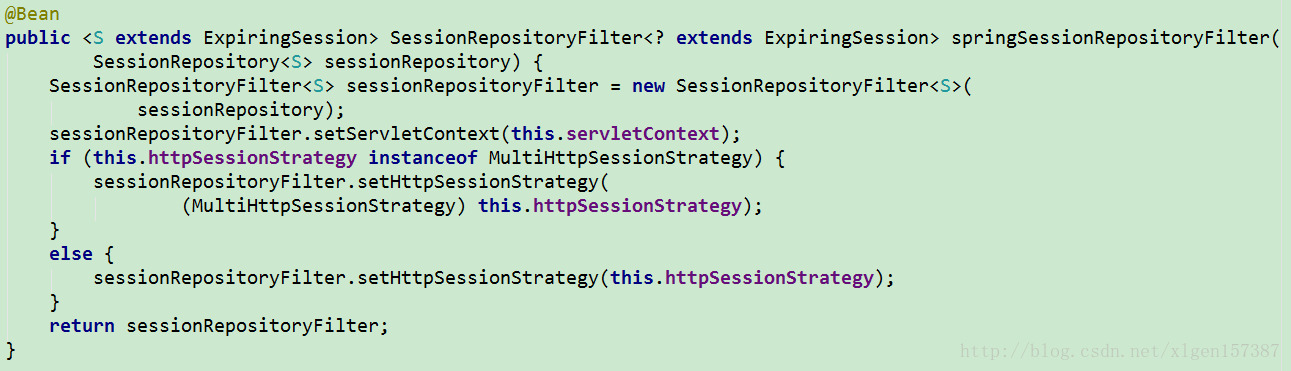
springSessionRepositoryFilter这个过滤器就是前边DelegatingFilterProxy查找的过滤器!
(6)可以看出他是SessionRepositoryFilter类型的,SessionRepositoryFilter的作用就是替换容器默认的javax.servlet.http.HttpSession支持为org.springframework.session.Session。
SessionRepositoryFilter的主要方法和属性如下:
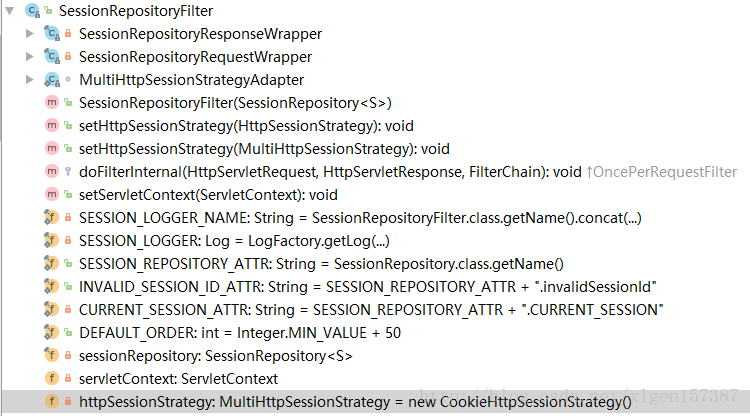
(7)其中SessionRepositoryResponseWrapper、SessionRepositoryRequestWrapper、HttpSessionWrapper为内部类,这个也是很关键的。例如SessionRepositoryRequestWrapper类:
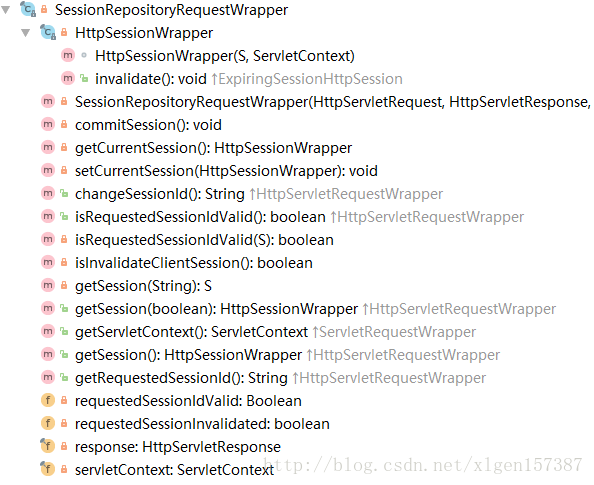
可以看出SessionRepositoryRequestWrapper继承了javax.servlet.http.HttpServletRequestWrapper这个类,我们知道HttpServletRequest接口的默认实现是有HttpServletRequestWrapper的,如下:
(8)因为SessionRepositoryRequestWrapper继承了HttpServletRequestWrapper,而HttpServletRequestWrapper实现了HttpServletRequest接口,在SessionRepositoryRequestWrapper又重写了HttpServletRequest接口中的一些方法,所以才会有:getSession、changeSessionId等这些方法。
到此,我们应该大致明白了,原有的request请求和response都被重新进行了包装。我们也就明白了原有的HttpSeesion是如何被Spring Session替换掉的。
需要注意的是:
The SessionRepositoryFilter must be placed before any Filter that access the HttpSession or that might commit the response to ensure the session is overridden and persisted properly.- 1
案例分析
(1)Controller代码如下:
(2)查看效果:
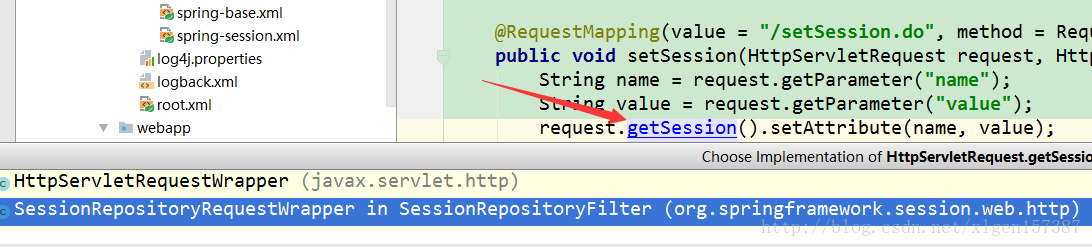
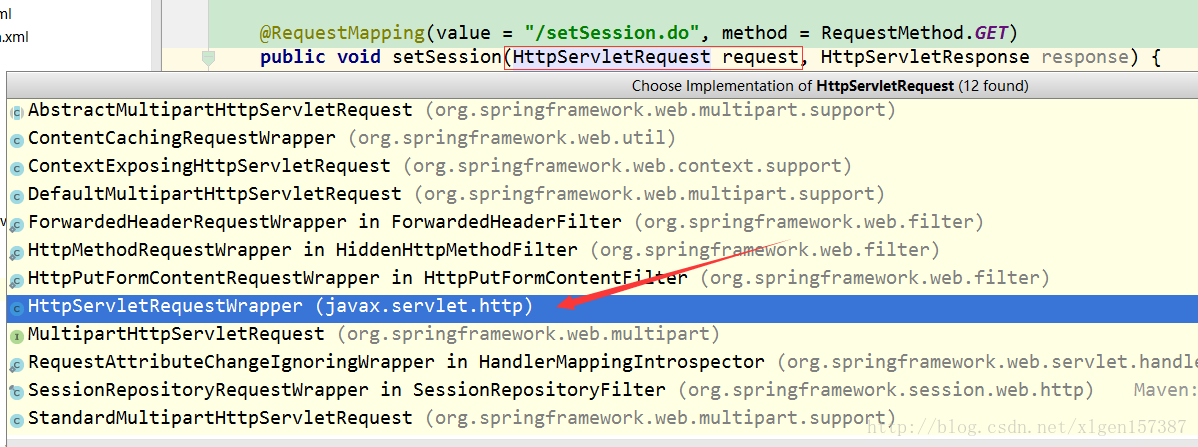
我们通过快捷键查看request.getSession() 的具体实现,就可以看出已经有了SessionRepositoryRequestWrapper 重写的方法。
上述有两个默认的实现,一个是原始的,一个是Spring Session实现的,具体选用哪一种作为实现,这就是我们上边说的DelegatingFilterProxy 代理的作用了,他会将每一个请求过滤,经过DelegatingFilterProxy的每一个请求也会经过springSessionRepositoryFilter过滤器,springSessionRepositoryFilter过滤器就实现了将原有request到SessionRepositoryRequestWrapper的转换,这就是实现了具体的流程!
(3)request.getSession().setAttribute(name, value)的实现:
追踪代码,可以到达下边内容
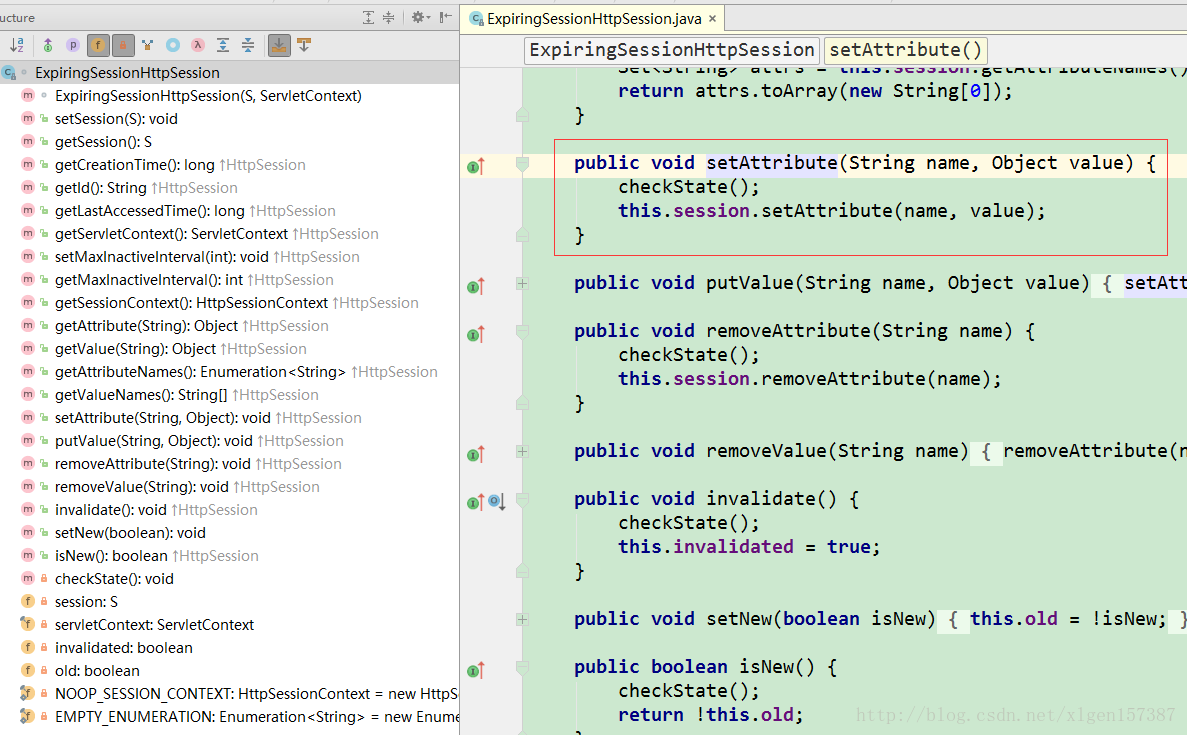
this.session.setAttribute(name, value) 中session是Session接口的定义,具体实现有:

可以看到有Redis相关的操作!
至此,我们应该清楚了,Spring Session的工作原理了!虽然下边的过程没有再去介绍,但是已经很清楚的理解了。
总结
上述讲述了整个Spring Session的执行流程,关于其他细节并没有过多的学习,后期学习会不断补充文章!


 1205
1205


 被折叠的 条评论
为什么被折叠?
被折叠的 条评论
为什么被折叠?
 到【灌水乐园】发言


