


What is Redis?
Redis is often referred as a data structures server. What this means is that Redis provides access to mutable data structures via a set of commands, which are sent using a server-client model with TCP sockets and a simple protocol. So different processes can query and modify the same data structures in a shared way.
Data structures implemented into Redis have a few special properties:
- Redis cares to store them on disk, even if they are always served and modified into the server memory. This means that Redis is fast, but that is also non-volatile.
- Implementation of data structures stress on memory efficiency, so data structures inside Redis will likely use less memory compared to the same data structure modeled using an high level programming language.
- Redis offers a number of features that are natural to find in a database, like replication, tunable levels of durability, cluster, high availability.
Another good example is to think of Redis as a more complex version of memcached, where the operations are not just SETs and GETs, but operations to work with complex data types like Lists, Sets, ordered data structures, and so forth.
If you want to know more, this is a list of selected starting points:
官网: http://redis.io 中文网:http://www.redis.cn/ 文档:http://redisdoc.com/
配置:
- 系统:ubuntu16.04
- redis版本:4.0
- Jedis客户端:2.9
- redis客户端图形用户界面:RedisDesktopManager
搭建步骤
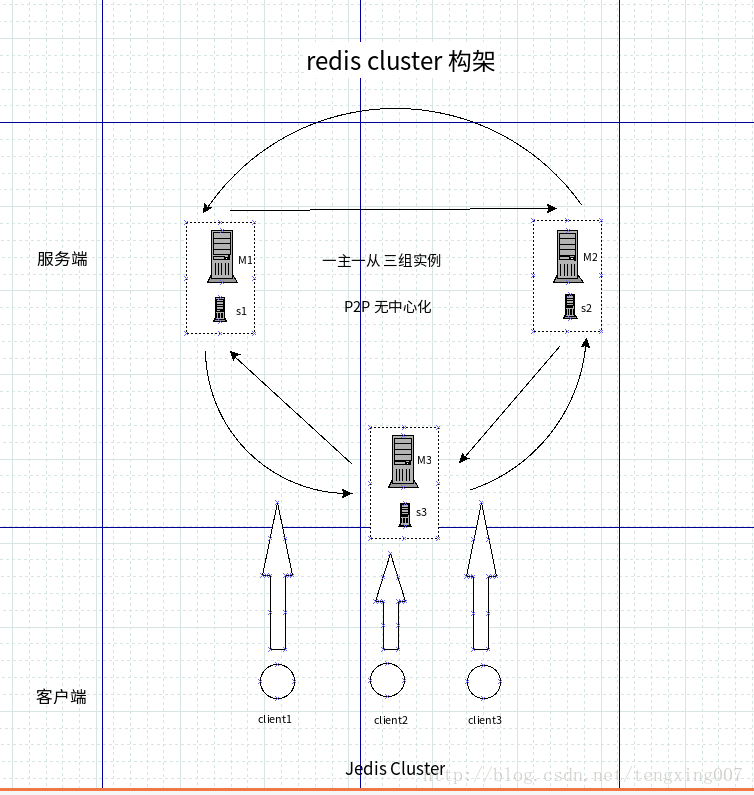
架构方案说明:三组三从,host均为127.0.0.1,port为8001,8002,8003,8004,8005,8006,前三个为maser,后三个为slave
搭建步骤说明:愚者不会和其他博客说的一样去建立6个文件夹,因为最后都是通过redis-server 加上自己的配置文件启动,所以我只需要配置6个文件即可,并且放在一个文件夹.
安装redis4.0
下载安装
### 架构模型
配置redis cluster文件
-配置master
新建master-8001.conf文件并加入一下配置
port  8001
bind  127.0.0.1
daemonize    yes
pidfile  /var/run/master-8001.pid
cluster-enabled  yes
cluster-config-file  master-8001.conf
cluster-node-timeout  15000
appendonly  yes
#当负责一个插槽的主库下线且没有相应的从库进行故障恢复时,集群不可用
cluster-require-full-coverage no
新建master-8001.conf文件并加入一下配置
port  8002
bind  127.0.0.1
daemonize    yes
pidfile  /var/run/master-8002.pid
cluster-enabled  yes
cluster-config-file  master-8002.conf
cluster-node-timeout  15000
appendonly  yes
#当负责一个插槽的主库下线且没有相应的从库进行故障恢复时,集群不可用
cluster-require-full-coverage no
新建master-8001.conf文件并加入一下配置
port  8003
bind  127.0.0.1
daemonize    yes
pidfile  /var/run/master-8003.pid
cluster-enabled  yes
cluster-config-file  master-8003.conf
cluster-node-timeout  15000
appendonly  yes
#当负责一个插槽的主库下线且没有相应的从库进行故障恢复时,集群不可用
cluster-require-full-coverage no
-配置slave
新建slave-8004.conf文件并加入一下配置
port  8004
bind  127.0.0.1
daemonize    yes
pidfile  /var/run/slave-8004.pid
cluster-enabled  yes
cluster-config-file  slave-8004.conf
cluster-node-timeout  15000
appendonly  yes
#当负责一个插槽的主库下线且没有相应的从库进行故障恢复时,集群不可用
cluster-require-full-coverage no
新建slave-8005.conf文件并加入一下配置
port  8005
bind  127.0.0.1
daemonize    yes
pidfile  /var/run/slave-8005.pid
cluster-enabled  yes
cluster-config-file  slave-8005.conf
cluster-node-timeout  15000
appendonly  yes
#当负责一个插槽的主库下线且没有相应的从库进行故障恢复时,集群不可用
cluster-require-full-coverage no
新建slave-8006.conf文件并加入一下配置
port  8006
bind  127.0.0.1
daemonize    yes
pidfile  /var/run/slave-8006.pid
cluster-enabled  yes
cluster-config-file  slave-8006.conf
cluster-node-timeout  15000
appendonly  yes
#当负责一个插槽的主库下线且没有相应的从库进行故障恢复时,集群不可用
cluster-require-full-coverage no
启动Cluster
#启动主从节点(根据自己安装的redis-server和启动配置文件路径自行修改)
$ ~/redis4.0.1/src/redis-server ~/redis-cluster/master-8001.conf
$ ~/redis4.0.1/src/redis-server ~/redis-cluster/master-8002.conf
$ ~/redis4.0.1/src/redis-server ~/redis-cluster/master-8003.conf
$ ~/redis4.0.1/src/redis-server ~/redis-cluster/slave-8004.conf
$ ~/redis4.0.1/src/redis-server ~/redis-cluster/slave-8005.conf
$ ~/redis4.0.1/src/redis-server ~/redis-cluster/slave-8006.conf*
#为主从节点建立集群关系(redis-trib.rb)
# replicas 1 表示分配几台从节点
$ ~/redis4.0.1/src/redis-trib.rb create --replicas 1 127.0.0.1:8001 127.0.0.1:8002 127.0.0.1:8003 127.0.0.1:8004 127.0.0.1:8005 127.0.0.1:8006
按照提示输入yes就会发出建立cluster的请求,几秒之后成功如图所示:
ps:若报错如下则进行ruby安装:
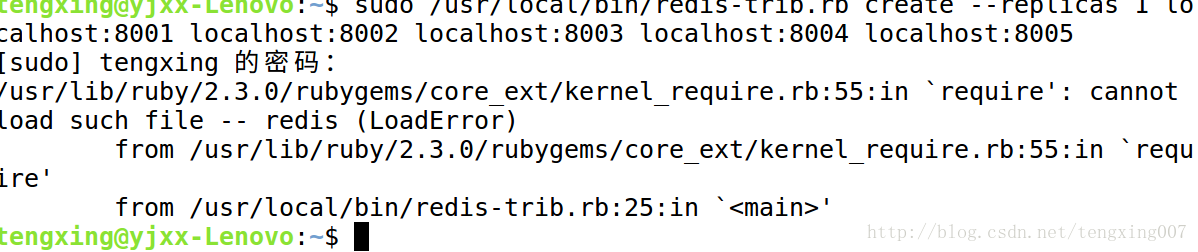
安装ruby(可选)
$ sudo apt-get install ruby ruby-dev
$ sudo gem install redis
验证及其使用
验证
#记得加上-c参数
$ redis-cli -c -p 8000
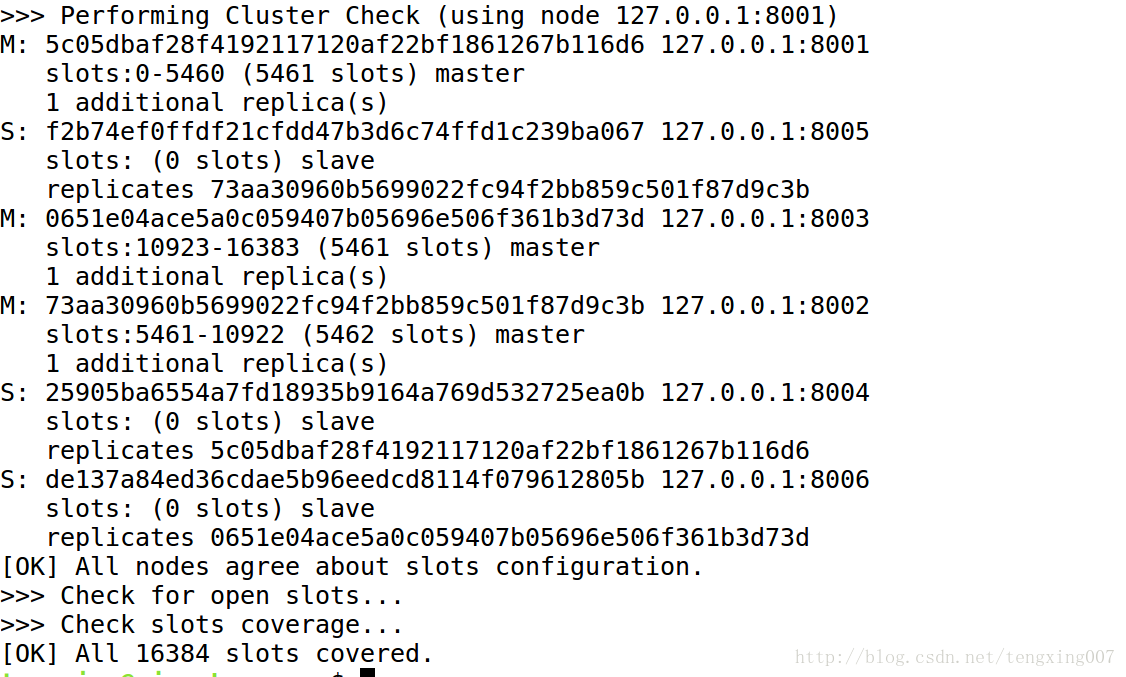
redis 127.0.0.1:8000>cluster nodes显示如下:
基本使用
$ redis-cli -c -p 8000
redis 127.0.0.1:8000> set foo bar
OK
$ redis-cli -c -p 8001
redis 127.0.0.1:8001> get foo

OK
高可用测试
- kill 8001端口的进程
- 重启 redis 8001 端口
RedisDesktopManager使用
用了一下RedisDesktopManager和FastoRedis,但RedisDesktopManager不能支持集群查看和操作,FastoRedis说是说支持集群,但不能操作集群的数据,求问大神有没有更的神器推荐!
这句话来源:https://segmentfault.com/q/1010000008860361/a-1020000009224354
我会持续跟踪,并且我从网上找了跟多redis可视化工具,后面都会做个比较.
后记
redis官方推荐的集群redis cluster已经搭建完毕,但是并不代表代表结束,还需要去仔细分析redis的底层原理及其实现.同时集群配置配置也挺简单的,但是前几天我配置的时候花了一个晚上…..
给出官方教程:http://redisdoc.com/topic/cluster-tutorial.html


 被折叠的 条评论
为什么被折叠?
被折叠的 条评论
为什么被折叠?
 到【灌水乐园】发言


