


POI实现EXCEL单元格合并及边框样式
下面例子为创建产生一个excel,合并单元格,然后为合并后的单元格添加边框
package test;

import java.io.FileOutputStream;
import java.io.IOException;

import org.apache.poi.hssf.usermodel.HSSFCell;
import org.apache.poi.hssf.usermodel.HSSFCellStyle;
import org.apache.poi.hssf.usermodel.HSSFRow;
import org.apache.poi.hssf.usermodel.HSSFSheet;
import org.apache.poi.hssf.usermodel.HSSFWorkbook;
import org.apache.poi.ss.usermodel.BorderStyle;
import org.apache.poi.ss.usermodel.Font;
import org.apache.poi.ss.usermodel.HorizontalAlignment;
import org.apache.poi.ss.util.CellRangeAddress;
import org.apache.poi.ss.util.RegionUtil;

public class ExcelPoiTest {

	public static void main(String[] args) {
		HSSFWorkbook workbook = new HSSFWorkbook();  // 创建一个excel
		// excel生成过程: excel-->sheet-->row-->cell
		HSSFSheet sheet = workbook.createSheet("test"); // 为excel创建一个名为test的sheet页
		/**
		* 行和列起始都是从0开始
		*/
		HSSFRow row = sheet.createRow(1); // 创建一行,参数1表示第2行
		HSSFCell cellB2 = row.createCell(1); // 在B2(2行2列)位置创建一个单元格
		HSSFCell cellB3 = row.createCell(2); // 在B3(2行3列)位置创建一个单元格
		cellB2.setCellValue("单元格B2"); // B2单元格填充内容
		cellB3.setCellValue("单元格B3"); // B3单元格填充内容

		HSSFCellStyle cellStyle = workbook.createCellStyle(); // 单元格样式
		Font fontStyle = workbook.createFont(); // 字体样式
		fontStyle.setBold(true); // 加粗
		fontStyle.setFontName("黑体"); // 字体
		fontStyle.setFontHeightInPoints((short) 11); // 大小
		// 将字体样式添加到单元格样式中
		cellStyle.setFont(fontStyle);
		// 边框,居中
		cellStyle.setAlignment(HorizontalAlignment.CENTER);
		cellStyle.setBorderBottom(BorderStyle.THIN);
		cellStyle.setBorderLeft(BorderStyle.THIN);
		cellStyle.setBorderRight(BorderStyle.THIN);
		cellStyle.setBorderTop(BorderStyle.THIN);
		cellB2.setCellStyle(cellStyle); // 为B2单元格添加样式

		// 合并单元格
		CellRangeAddress cra =new CellRangeAddress(1, 3, 1, 3); // 起始行, 终止行, 起始列, 终止列
		sheet.addMergedRegion(cra);

		// 使用RegionUtil类为合并后的单元格添加边框
		RegionUtil.setBorderBottom(1, cra, sheet); // 下边框
		RegionUtil.setBorderLeft(1, cra, sheet); // 左边框
		RegionUtil.setBorderRight(1, cra, sheet); // 有边框
		RegionUtil.setBorderTop(1, cra, sheet); // 上边框

		// 输出到本地
		String excelName = "/myExcel.xls";
		FileOutputStream out = null;
		try {
			out = new FileOutputStream(excelName);
			workbook.write(out);
			out.flush();
			out.close();
		} catch (Exception e) {
			e.printStackTrace();
		} finally {
			if (out != null)
				try {
					out.close();
				} catch (IOException e) {
					e.printStackTrace();
				}
			out = null;
		}
	}
}
生成的excel样式为
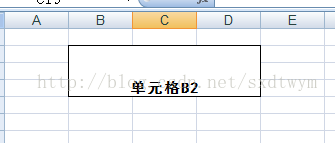
简单说明:
1.excel生成过程: excel-->sheet-->row-->cell
2.索引从0开始
3.合并单元格后保留最左上角的单元格(B3单元格被B2单元格覆盖)
4.合并后单元格边框通过RegionUtil设置,如果删除以下代码
// 使用RegionUtil类为合并后的单元格添加边框
RegionUtil.setBorderBottom(1, cra, sheet); // 下边框
RegionUtil.setBorderLeft(1, cra, sheet); // 左边框
RegionUtil.setBorderRight(1, cra, sheet); // 有边框
RegionUtil.setBorderTop(1, cra, sheet); // 上边框
效果为:
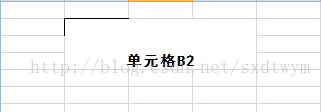
可以看到只有B2单元格有边框。


 1323
1323

 被折叠的 条评论
为什么被折叠?
被折叠的 条评论
为什么被折叠?
 到【灌水乐园】发言


