


Thymeleaf是用来开发Web和独立环境项目的服务器端的Java模版引擎,它具有如下特点:
- 动静结合:Thymeleaf 在有网络和无网络的环境下皆可运行,即它可以让美工在浏览器查看页面的静态效果,也可以让程序员在服务器查看带数据的动态页面效果。这是由于它支持 html 原型,然后在 html 标签里增加额外的属性来达到模板+数据的展示方式。浏览器解释 html 时会忽略未定义的标签属性,所以 thymeleaf 的模板可以静态地运行;当有数据返回到页面时,Thymeleaf 标签会动态地替换掉静态内容,使页面动态显示。
- 多方言支持:它提供标准和spring标准两种方言,可以直接套用模板实现JSTL、 OGNL表达式效果,也可以扩展和创建自定义的方言。
- 与SpringBoot完美整合,SpringBoot提供了Thymeleaf的默认配置,并且为Thymeleaf设置了视图解析器,我们可以像以前操作jsp一样来操作Thymeleaf。代码几乎没有任何区别,就是在模板语法上有区别。
1、基础语法
变量表达式:直接使用th:xx = "${}" 访问java对象属性 。例如:
<form id="userForm">
    <input id="id" name="id" th:value="${user.id}"/>
    <input id="username" name="username" th:value="${user.username}"/>
    <input id="password" name="password" th:value="${user.password}"/>
</form>

<div th:text="hello"></div>

<div th:text="${user.username}"></div>
选择变量表达式 *{}:首先通过th:object 获取对象user,然后再使用th:xx = "*{}"直接获取对象的属性。
<form id="userForm" th:object="${user}">
    <input id="id" name="id" th:value="*{id}"/>
    <input id="username" name="username" th:value="*{username}"/>
    <input id="password" name="password" th:value="*{password}"/>
</form>
链接表达式 @{}:通过链接表达式@{}添加页面路径、静态资源路径。注意通过@{}默认访问的是相对于项目上下文的相对路径,如果想要访问当前服务器根路径可以用~,例如本项目名为blog,服务器下另一个项目为anotherapp
<!--相对项目上下文路径:localhost:8080/blog/main-->
<a th:href="@{/main}">首页</a>
<!--相对服务器根路径:localhost:8080/anotherapp/main-->
<a th:href="@{~/anotherapp/main}">首页</a>
<!--通过webjars引入资源-->
<script th:src="@{/webjars/jquery/jquery.js}"></script>
<link th:href="@{/webjars/bootstrap/css/bootstrap.css}" rel="stylesheet" type="text/css">
在链接表达式中包含变量需要使用占位符,例如使用{userId}作为占位符,在之后的括号中对该变量赋值
<!--访问/user/3/modify-->
<a class="btn-link" th:href="@{/user/{userId}/modify(userId=${user.id})}">修改</a>
如果没有对应的占位符,则变量会以带?的param参数添加到链接后
<!--访问/user/3/modify?catalog=1-->
<a class="btn-link" th:href="@{/user/{userId}/modify(userId=${user.id},catalog=${catalog.id})}">修改</a>
内联表达式
在HTML中使用内联表达式可以简化变量的获取方式。因为 JavaScript无法获取服务端返回的变量,可以通过内联表达式来获取。
其标准格式为:[[${xx}]] ,可以读取服务端变量,也可以调用内置对象的方法。如下两种表达是等价的
<p>Hello, [[${session.user.name}]]!</p>

<p>Hello, <span th:text="${session.user.name}"></span>!</p>
值得注意的是如果在Thymeleaf的js中使用&符号编译会报错,这时可以讲js代码包裹在/<![CDATA[*/ ....../*]]>/之间以通过编译。
例如在JavaScript中获取用户变量和应用路径:
    <script th:inline="javascript">
    	/*<![CDATA[*/
        var user = [[${user}]];`
        var APP_PATH = [[${#request.getContextPath()}]];
        var LANG_COUNTRY = [[${#locale.getLanguage()+'_'+#locale.getCountry()}]];
        /*]]>*/
    </script>
标签引入的JS里面不能使用内联表达式。内联表达式仅在页面生效,因为Thymeleaf只负责解析一级视图,不能识别外部标签JS里面的表达式。
片段表达式 ~{} 用于插入其他页面的内容,是Thymeleaf的特色之一,可以具体到到页面内的标签,这是JSP无法做到的。片段表达式拥有三种语法:
- ~{ viewName } 表示引入完整页面
- ~{ viewName ::selector} 表示在指定页面寻找片段 其中selector可为片段名、jquery选择器等
- ~{ ::selector} 表示在当前页寻找
使用方法:首先通过th:fragment定制片段格式 ,然后通过th:replace 填写片段路径和片段名。例如在your.html中引用common/head.html页面中的static片段:
<!-- /views/common/head.html-->
<head th:fragment="static">
        <script th:src="@{/webjars/jquery/3.3.1/jquery.js}"></script>
</head>

<!-- /views/your.html -->
<div th:replace="~{common/head::static}"></div>
在实际使用中,可以使用更简洁的表达,去掉表达式外壳直接填写片段名。例如:
<div th:replace="common/head::static"></div>
值得注意的是,使用替换路径th:replace 开头请勿添加斜杠,避免部署运行的时候出现路径报错。(因为默认拼接的路径为spring.thymeleaf.prefix = classpath:/templates/)
消息表达式#{msg} 用于获取国际化语言翻译值。例如:
<title th:text="#{user.title}"></title>
在基础语法中,默认支持字符串连接、数学运算、布尔逻辑和三目运算等。例如:
<input name="name" th:value="${'I am '+(user.name!=null?user.name:'NoBody')}"/>
解析器级别注释:元素只有在静态加载页面时可见,当thymeleaf家在页面时会将该注释内的元素删除。相反,原型级注释在静态页面不可见,而在模板执行时就会被加载显示出来
    <!--/*-->
    <div>仅在静态页面可见</div>
    <!--*/-->
    <!--/*/
    <div>模板加载时可见</div>
    /*/-->
2、内置对象
${#ctx}上下文对象,可用于获取其它内置对象。${#vars}: 上下文变量。${#locale}:上下文区域设置。${#request}: HttpServletRequest对象,${param}:获取URL请求中的参数。例如获取http://localhost:8888/order/info?orderId=1001&productName=衬衫,中的参数。需要注意的是第二个获取的参数productName有的时候返回的是String[]类型的数组,直接输入结果是[Ljava.lang.String;@xxx,需要加下标[0]才能取到结果
<span id="order-number" th:text="${param.orderId}">订单号</span>
<div id="product-name" th:text="${param.productName[0]}">商品名称</div>
${#response}: HttpServletResponse对象。${#session}: HttpSession对象。${#servletContext}: ServletContext对象。
例如在后台将数据保存到session,在前端获取并展示
User user=new User();
user.setUserName("小明");
session.setAttribute("userInfo",user);
<div th:text="${#session.userInfo.userName}">用户姓名<div>
3、常用的工具类
#strings:字符串工具类
<p>toUpperCase : <span th:text="${#strings.toUpperCase(itdragonStr)}"/></p>
<p>equals : <span th:text="${#strings.equals(itdragonStr, 'itdragonblog')}"/></p>
<p>indexOf : <span th:text="${#strings.indexOf(itdragonStr, 'r')}"/></p>
<p>substring : <span th:text="${#strings.substring(itdragonStr, 2, 8)}"/></p>
<p>replace : <span th:text="${#strings.replace(itdragonStr, 'it', 'IT')}"/></p>
<p>startsWith : <span th:text="${#strings.startsWith(itdragonStr, 'it')}"/></p>
<p>contains : <span th:text="${#strings.contains(itdragonStr, 'IT')}"/></p>
#lists:List 工具类
    <div th:if="${not #lists.isEmpty(itdragonList)}">
        <p>size : <span th:text="${#lists.size(itdragonList)}"/></p>
        <p>contains : <span th:text="${#lists.contains(itdragonList, 0)}"/></p>
        <p>sort : <span th:text="${#lists.sort(itdragonList)}"/></p>
    </div>
#arrays:数组工具类
<p>length : <span th:text="${#arrays.length(itdragonArray)}"/></p>
<p>contains : <span th:text="${#arrays.contains(itdragonArray, 5)}"/></p>
#sets:Set 工具类#maps:常用Map方法。
<p>size : <span th:text="${#maps.size(itdragonMap)}"/></p>
<p>containsKey : <span th:text="${#maps.containsKey(itdragonMap, 'thName')}"/></p>
<p>containsValue : <span th:text="${#maps.containsValue(itdragonMap, '#maps')}"/></p>
#execInfo:获取页面模板的处理信息。#messages:在变量表达式中获取外部消息的方法,与使用#{…}语法获取的方法相同。#uris:转义部分URL / URI的方法。#conversions:用于执行已配置的转换服务的方法。#dates:时间操作和时间格式化等。#objects:一般对象类,通常用来判断非空#bools:常用的布尔方法。
<p>format : <span th:text="${#dates.format(itdragonDate,'yyyy-MM-dd HH:mm:ss')}"/></p>
<p>day : <span th:text="${#dates.day(itdragonDate)}"/></p>
<p>month : <span th:text="${#dates.month(itdragonDate)}"/></p>
<p>year : <span th:text="${#dates.year(itdragonDate)}"/></p>
<p>dayOfWeekName : <span th:text="${#dates.dayOfWeekName(itdragonDate)}"/></p>
<p>hour : <span th:text="${#dates.hour(itdragonDate)}"/></p>
<p>createNow : <span th:text="${#dates.createNow()}"/></p>
#calendars:用于更复杂时间的格式化。#numbers:格式化数字对象的方法。#aggregates:在数组或集合上创建聚合的方法。#ids:处理可能重复的id属性的方法。
4、迭代循环
想要遍历List集合很简单,配合th:each 即可快速完成迭代。例如遍历用户列表:
<div th:each="user:${userList}">
    账号:<input th:value="${user.username}"/>
    密码:<input th:value="${user.password}"/>
</div>
在集合的迭代过程还可以获取状态变量stat,只需在变量后面指定状态变量名即可,状态变量可用于获取集合的下标/序号(index)、总数(count)、是否为单数(odd)/偶数行(even)、是否为第一个(first)/最后一个(last)。例如:
<div th:each="user,stat:${userList}" th:class="${stat.even}?'even':'odd'">
    下标:<input th:value="${stat.index}"/>
    序号:<input th:value="${stat.count}"/>
    账号:<input th:value="${user.username}"/>
    密码:<input th:value="${user.password}"/>
</div>
如果缺省状态变量名,则迭代器会默认帮我们生成以变量名开头的状态变量 xxStat, 例如:
<div th:each="user:${userList}" th:class="${userStat.even}?'even':'odd'">
    下标:<input th:value="${userStat.index}"/>
    序号:<input th:value="${userStat.count}"/>
    账号:<input th:value="${user.username}"/>
    密码:<input th:value="${user.password}"/>
</div>
5、条件判断
条件判断通常用于动态页面的初始化,例如:
<div th:if="${userList}">
    <div>的确存在..</div>
</div>
如果想取反则使用unless 例如:
<div th:unless="${userList}">
    <div>不存在..</div>
</div>
6、日期格式化
使用默认的日期格式(toString方法) 例如:Mon Dec 03 23:16:50 CST 2018
<input type="text" th:value="${user.createTime}"/>
此时可以通过时间工具类#dates来对日期进行格式化:2018-12-03 23:16:50
<input type="text" th:value="${#dates.format(user.createTime,'yyyy-MM-dd HH:mm:ss')}"/>
7、一个例子
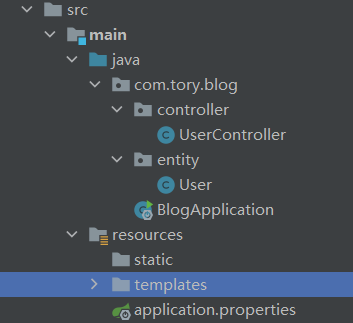
首先通过Spring Initializr创建项目结构如图所示:Thymeleaf页面默认放在src/main/resources/templates目录下,相应的静态资源放在static目录下
然后在gradle文件引入web 、thymeleaf等依赖;此外这里使用了webjars的形式引入了bootstrap和jQuery依赖,webjars以jar的形式对前端常用的库进行管理,以统一项目中使用库的版本。
dependencies {
	implementation 'org.springframework.boot:spring-boot-starter-web'
	implementation('org.springframework.boot:spring-boot-starter-thymeleaf')
	implementation('org.webjars:bootstrap:4.5.0')
	implementation('org.webjars:jquery:3.5.1')

	testImplementation('org.springframework.boot:spring-boot-starter-test') {
		exclude group: 'org.junit.vintage', module: 'junit-vintage-engine'
	}
}
可以在application.properties文件中对thymeleaf进行设置,例如将模板缓存关闭,这样在开发中修改页面后会及时更新;还可以修改模板路径,例如模板页面不放在resources/templates,而是放在自定义的resources/views目录下
# 关闭缓存
spring.thymeleaf.cache=false
# 修改模板路径
spring.thymeleaf.prefix=classpath:/views/
接着在定义controller响应对/users的请求并返回数据到user/user页面:
@RestController
public class UserController {
    private List<User> userList = new ArrayList<>();
    {
        userList.add(new User("1", "socks", "123456", new Date()));
        userList.add(new User("2", "admin", "111111", new Date()));
        userList.add(new User("3", "jacks", "222222", null));
    }
    @GetMapping("/users")
    public ModelAndView index() {
        return new ModelAndView("user/user", "userList", userList);
    }
}

public class User {
    private String id;
    private String username;
    private String password;
    private Date createTime;
    //... 构造器和 get/set方法..
}
在templates目录下创建公用页面:common/head.html ,其中static为页面片段:
注意使用thymeleaf模板需要在<html>标签声明xmlns:th=“http://www.thymeleaf.org”
<!DOCTYPE html>
<html xmlns:th="http://www.thymeleaf.org">
<!--声明static为页面片段名称-->
<head th:fragment="static">
    <link th:href="@{/webjars/bootstrap/4.5.0/css/bootstrap.css}" rel="stylesheet" type="text/css"/>
    <script th:src="@{/webjars/jquery/3.5.1/jquery.js}"></script>
</head>
</html>
接着编写用户列表页: user/user.html 配合th:each显示用户列表信息。
使用说明:这里 th:replace="common/head::static" 表示将引用${spring.thymeleaf.prefix}/common/head.html的static页面片段,值得注意的是由于替换路径默认会拼接前缀路径,所以开头切勿在添加斜杠,否则在打包成JAR部署运行时将提示报Templates not found… 。
<!DOCTYPE html>
<html xmlns:th="http://www.thymeleaf.org">
<head>
    <meta charset="UTF-8"/>
    <title th:text="用户信息">User</title>
    <!--默认拼接前缀路径,开头请勿再添加斜杠,防止部署运行报错!-->
    <script th:replace="common/head::static"></script>
</head>
<body>

<div th:each="user,userStat:${userList}" th:class="${userStat.even}?'even':'odd'">
    序号:<input type="text" th:value="${userStat.count}"/>
    账号:<input type="text" th:value="${user.username}"/>
    密码:<input type="password" th:value="${user.password}"/>
    时间:<input type="text" th:value="${user.createTime}"/>
    时间:<input type="text" th:value="${#dates.format(user.createTime,'yyyy-MM-dd HH:mm:ss')}"/>
</div>

<script th:inline="javascript">
    //通过内联表达式获取用户信息
    var userList = [[${userList}]];
    console.log(userList)
</script>
</body>
</html>
至此大功告成,启动项目,访问用户列表: http://localhost:8080/users ,如图所示:


 4770
4770


 被折叠的 条评论
为什么被折叠?
被折叠的 条评论
为什么被折叠?
 到【灌水乐园】发言


