


Spring Cloud原理及应用
Spring Cloud原理及应用
Spring Cloud为企业级分布式Web系统构建提供了一站式的解决方案。为了简化分布式系统的开发流程和降低开发难度,Spring Cloud以组件化的形式提供了配置管理、服务发现、断路器、智能路由、负载均衡和消息总线等模块,应用程序只需要根据需求引入模块,便可方便地实现对应的功能。
- Spring Cloud Config:Spring Cloud的配置中心,用于将配置存储到服务器中进行集中化管理,支持本地存储、Git和Subversion 3种存储方式。配置中心除了Spring Cloud Config,还有Apollo配置中心和基于ZooKeeper等方式实现的配置中心。
- Spring Cloud Bus:Spring Cloud的事件消息总线,用于监听和传播集群中事件的状态的变化,例如集群中配置的变化检测和广播等。
- Eureka:Netflix提供的服务注册和发现组件,集群中各个服务以REST的方式将服务注册到注册中心,并与注册中心保持心跳连接,主要用于服务发现和自动故障转移。
- Zuul:Netflix Zuul为集群提供通用网关的功能,前端服务访问后端服务均需要通过Zuul的动态路由来实现。同时可以在Zuul上实现服务的弹性扩展、安全监测、统一权限认证等功能。
- Archaius:Netflix提供的配置管理库,用于实现动态化属性配置和验证、线程安全配置操作、轮询框架、回调机制等功能。
- Consul:Consul是基于Golang开发的一个服务注册、发现和配置工具,其功能与Eureka类似。
- Spring Cloud for Cloud Foundry:Spring Cloud for Cloud Foundry Pivotal通过OAuth 2.0协议绑定服务到Cloud Foundry,Cloud Foundry是VMware推出的开源PaaS云平台。
- Spring Cloud Sleuth:Spring的日志收集工具包,封装了Dapper和Log-based追踪及Zipkin和HTrace操作,为Spring Cloud的应用实现了一种分布式链路追踪解决方案。
- Spring Cloud Data Flow:Spring Cloud Data Flow是一个混合计算模型,结合了流式数据与批量数据的处理方式,为Spring Cloud处理大数据提供了可能。
- Spring Cloud Security:基于Spring Security工具包实现的安全管理组件,主要用于应用程序的安全访问和控制。
- Spring Cloud ZooKeeper:Spring Cloud ZooKeeper封装了操作ZooKeeper的API,用于方便地操作ZooKeeper并实现服务发现和配置管理功能。
- Spring Cloud Stream:Spring的流式数据处理工具包,封装了Redis、RabbitMQ、Kafka等消息的接收和发送功能,用于快速实现流式数据分析功能。
- Spring Cloud CLI:基于Spring Boot CLI,Spring可以让用户使用命令行方式快速建立云组件。
- Ribbon:Netflix Ribbon用于分布式系统API调用的负载均衡,提供随机负载、轮询负载等多种负载均衡策略,常配合服务发现和断路器使用。
- Turbine:Netflix Turbine是实时消息或事件流的聚合工具,常用来监控集群下Hystrix的健康指标数据。
- Feign:Feign是一种声明式、模板化的HTTP访问客户端。
- Spring Cloud Task:Spring Cloud Task是Spring Cloud提供的分布式环境下集群任务的统一管理和调度工具。
- Spring Cloud Connectors:Spring Cloud Connectors为在云平台上运行的基于JVM的应用程序提供了一个简单的抽象,可以在JVM运行时发现绑定的服务和部署信息,并且支持将发现的服务注册为Spring Bean。
- Spring Cloud Cluster:提供LeaderShip(选举)功能,如ZooKeeper、Redis、Hazelcast、Consul等常见状态模式的抽象和实现。
- Spring Cloud Starters:Spring Boot式的启动项目,为Spring Cloud提供开箱即用的依赖管理。
Spring Boot
Spring Boot是由Pivotal团队开发的全新的Spring开发框架,其设计的初衷是简化Spring应用复杂的搭建及开发过程。该框架提供了一套简单的Spring模块依赖和管理工具,从而避免了开发人员处理复杂的模块依赖和版本冲突问题,同时提供打包即可用的Web服务,成为快速应用开发领域(RapidApplication Development)的领导者。Spring Boot的特点如下。
- 快速创建独立的Spring应用程序。
- 嵌入Tomcat和Undertow等Web容器,实现快速部署。
- 自动配置JAR包依赖和版本控制,简化Maven配置。
- 自动装配Spring实例,不需要XML配置。
- 提供诸如性能指标、健康检查、外部配置等线上监控和配置功能。
Spring Boot的使用
Spring Boot把传统的Spring项目从繁杂的XML配置中解放出来,应用只需要用注解自动扫描即可,同时Spring Boot为应用提供了统一的JAR管理和维护,不需要应用程序管理复杂的JAR依赖和处理多版本冲突问题,只需要在pom.xml文件中加入对应模块的Starter即可。对内部的JAR依赖的管理,Spring Boot会自动维护。具体使用过程如下。
- Spring Boot的引入
Spring Boot项目定义简单,使用方便,第一步需要在pom.xml文件中引入org.springframework.boot及相关依赖。pom.xml文件如下。
<?xml version="1.0" encoding="UTF-8"?>
<project xmlns="http://maven.apache.org/POM/4.0.0" xmlns:xsi="http://www.w3.org/2001/XMLSchema-instance"
	xsi:schemaLocation="http://maven.apache.org/POM/4.0.0 https://maven.apache.org/xsd/maven-4.0.0.xsd">
	<modelVersion>4.0.0</modelVersion>
<!-- 1:定义SpringBoot项目,并从parent repositor获取相应资源-->
	<parent>
		<groupId>org.springframework.boot</groupId>
		<artifactId>spring-boot-starter-parent</artifactId>
		<version>2.3.5.RELEASE</version>
		<relativePath/> <!-- lookup parent from repository -->
	</parent>
	<!-- 2:定义项目的id-->
	<groupId>com.alex</groupId>
	<artifactId>springboot</artifactId>
	<version>1.0.0.1-SNAPSHOT</version>
	<name>springboot</name>
	<description>Demo project for Spring Boot</description>
	<!-- 3:定义Java版本-->
	<properties>
		<java.version>1.8</java.version>
	</properties>

	<dependencies>
	<!-- 4:定义spring-boot-starter-web依赖, Spring会自动提取依赖的JAR和版本-->
		<dependency>
			<groupId>org.springframework.boot</groupId>
			<artifactId>spring-boot-starter-web</artifactId>
		</dependency>
	<!-- 5:定义spring-boot-starter-test依赖-->
		<dependency>
			<groupId>org.springframework.boot</groupId>
			<artifactId>spring-boot-starter-test</artifactId>
			<scope>test</scope>
		</dependency>
	</dependencies>
	<build>
		<plugins>
			<plugin>
				<groupId>org.springframework.boot</groupId>
				<artifactId>spring-boot-maven-plugin</artifactId>
			</plugin>
		</plugins>
	</build>
</project>
- 配置文件设置
Spring Boot的配置分为application.properties和application.yml两种,两种配置有语法差别,但其实现的功能相同。下面的配置文件通过server.port=9090设置了服务端口为9090,如果不设置,则默认端口为Tomcat的8080,通过server.name=hello设置了服务名称为hello。
server.port = 9090 #服务端口号
server.name = hello #服务名称
server.tomcat.url-encoding = UTF-8 #以Tomcat为Web容器时的字符编码为UTF-8
#spring.data.mongodb.uri = mongodb://localhost:27017/mydb #MongoDB连接地址定义
#spring.http.encoding.charset=UTF-8 #HTTP请求的字符编码为UTF-8
#spring.http.multipart.max-file-size=10MB #设置文件上传时单个文件的大小限制
#spring.hhtp.multipart.max-request-size=100MB #设置文件上传时总文件的大小限制
#spring.mvc.static-path-pattern=/** #设置静态资源的请求路径
#spring.resources.static-locations=classpath:/static/,classpath:/public/
#设置静态资源的路径,多个用逗号隔开
# MySQL数据库配置
#hibernate.dialect=org.hibernate.dialect.MySQL5Dialect #设置数据库方言为MySQL
#hibernate.show_sql=true #设置是否显示SQL语句
#hibernate.hbm2dll.auto=update #设置使用Hibernate的自动建表
#entitymanager.packagesToScan=com.zslin #设置自动扫描的包路径
#spring.datasource.url=jdbc:mysql://localhost:3306/customer?\
#useUnicode=true&characterEncoding=utf-8&userSSL=true&autoReconnect=true
#设置MySQL数据库连接
#spring.datasource.username=root #设置数据库用户名
#spring.datasource.password=123 #设置数据库root用户对应的密码
#spring.datasource.driver-class-name=com.mysql.jdbc.Driver #设置数据库驱动名称
- 定义启动类
启动类是Spring Boot项目的入口,应用程序通过在类上设置一个@SpringBootApplication注解,声明该类是一个SpringBoot启动类,Spring Boot会扫描启动类所在的包及其子包中的所有类的注解,并将其加载到Spring Boot的容器中进行管理。只需要在main()函数中执行SpringApplication.run(SpringbootApplication.class,args),便完成了启动类的定义。
@SpringBootApplication
public class SpringbootApplication {
	public static void main(String[] args){
		SpringApplication.run(SpringbootApplication.class, args);
	}
}
- 定义控制器
在SpringbootApplication的根目录下定义一个控制器,用于Web接口的访问。控制器的定义方式和在Spring项目中控制器的常规定义方式一样。
@RestController
public class BaseController{
	@RequestMapping("/hello")
	public String home() {
		return "Hello World!";
	}
}
- 项目启动和访问
在SpringbootApplication上单击右键执行run,便可启动该Spring Boot服务;在浏览器地址栏中输入127.0.0.1:9090/hello,便能访问定义好的REST服务。
SpringBoot的常用组件及其使用
Spring Boot的核心特点是通过Starter能快速将各个组件集成到应用中,并提供良好的操作接口。下面将简单介绍常用组件的使用。
Spring Boot使用MySQL
Spring Boot基于Starter能够快速将不同的服务组件集成到应用程序中。Spring Boot服务组件的集成过程分为引入Starter、设置application.properties和使用服务组件(组件会根据配置文件自动装配)3步。
- 引入Starter
<dependency>
	<groupId>org.springframework.boot</groupId>
	<artifactId>spring-boot-starter-jdbc</artifactId>
</dependency>
- 设置application.properties
spring.datasource.url=jdbc:mysql://localhost/test #数据库地址
spring.datasource.username=dbuser #数据库用户名
spring.datasource.password=dbpass #数据库密码
spring.datasource.driver-class-name=com.mysql.jdbc.Driver #数据库驱动
- 使用服务组件
@Component
public class MyBean {
	private final JdbcTemplate jdbcTemplate;
	@Autowired
	public MyBean(JdbcTemplate jdbcTemplate){
		this.jdbcTemplate=jdbcTemplate;
	}
}
Spring Boot使用Redis
- 引入Starter
<dependency>
	<groupId>org.springframework.boot</groupId>
	<artifactId>spring-boot-starter-data-redis</artifactId>
</dependency>
- 设置application.properties
#Redis数据库名称(默认为0)
spring.redis.database=0
#Redis数据库地址
spring.redis.host=172.31.19.222
#Redis数据库端口
spring.redis.port=6379
#Redis数据库密码(默认为空)
spring.redis.password
#Redis连接池的最大连接数(使用负值表示没有限制)
spring.redis.pool.max-active=8
#Redis连接池的最大阻塞等待时间(使用负值表示没有限制)
spring.redis.pool.max-wait=-1
#Redis连接池中的最大空闲连接
spring.redis.pool.max-idle=8
#Redis连接池中的最小空闲连接
spring.redis.pool.min-idle=0
- 使用服务组件
@Component
 public class MyBean {
	 private StringRedisTemplate template;
	 @Autowired
	 public MyBean (StringRedisTemplate template) {
		this.template template;
	}
}
Spring Boot使用MongoDB
- 引入Starter
<dependency>
	<groupId>org.springframework.boot</groupId>
	<artifactId>spring-boot-starter-data-mongodb</artifactId>
</dependency>
- 设置application.properties
#数据库连接地址
spring.data.mongodb.uri=mongodb://user:secret@mongo1.example.com:12345,mongo2.example.com:23456/test
- 使用服务组件
@Component
 public class MyBean {
	 private MongoTemplate template;
	 @Autowired
	 public MyBean (MongoTemplate template) {
		this.template template;
	}
}
Spring Boot使用Neo4j
- 引入Starter
<dependency>
	<groupId>org.springframework.boot</groupId>
	<artifactId>spring-boot-starter-data-neo4j</artifactId>
</dependency>
- 设置application.properties
spring.data.neo4j.uri=bolt://my-server:7687 #neo4图数据库地址
spring.data.neo4j.username=neo4j #Neo4图数据库用户名
spring.data.neo4j.password=secret #Ne4图数据库密码
- 使用服务组件
@Component
 public class MyBean {
	 private final Session session;
	 @Autowired
	 public MyBean (Session session) {
		this.session = session;
	}
}
Spring Boot使用Solr
- 引入Starter
<dependency>
	<groupId>org.springframework.boot</groupId>
	<artifactId>spring-boot-starter-data-solr</artifactId>
</dependency>
- 设置application.properties
#Solr数据库地址
spring.data.solr.host: http://127.0.0.1:8080/solr/ciri_core
- 使用服务组件
@Component
 public class MyBean {
	 private SolrClient solr;
	 @Autowired
	 public MyBean (SolrClient  solr) {
		this.solr= solr;
	}
}
Spring Boot使用ElasticSearch
- 引入Starter
<dependency>
	<groupId>org.springframework.boot</groupId>
	<artifactId>spring-boot-starter-data-elasticsearch</artifactId>
</dependency>
- 设置application.properties
#ElasticSearch数据库地址
spring.data.elasticsearch.cluster-nodes=locahost:9300
- 使用服务组件
@Component
 public class MyBean {
	 private final ElasticsearchTemplate template;
	 @Autowired
	 public MyBean (ElasticsearchTemplate template) {
		this.template= template;
	}
}
Spring Boot使用Cassandra
- 引入Starter
<dependency>
	<groupId>org.springframework.boot</groupId>
	<artifactId>spring-boot-starter-data-cassandra</artifactId>
</dependency>
- 设置application.properties
#Cassandra的命名空间
spring.data.cassandra.keyspace-name=mykeyspace
#Cassandra数据库地址
spring.data.cassandra.contact-points=cassandrahost1.cassandrahost2
- 使用服务组件
@Component
 public class MyBean {
	 private final CassandraTemplate template;
	 @Autowired
	 public MyBean (CassandraTemplate template) {
		this.template= template;
	}
}
Spring Boot使用RabbitMQ
- 引入Starter
<dependency>
	<groupId>org.springframework.boot</groupId>
	<artifactId>spring-boot-starter-data-rabbitmq</artifactId>
</dependency>
- 设置application.properties
spring.rabbitmg.host=localhost #RabbitMQ服务地址
spring.rabbitmg.port=5672 #RabbitMQ端口号
spring.rabbitmg.username=admin #RabbitMQ用户名
spring.rabbitmq.password=secret #RabbitMQ密码
- 使用服务组件
@Component
 public class MyBean {
	 private final AmgpAdmin amgpAdmin:
	 private final AmgpTemplate amgpTemplate;
	 @Autowired
	 public MyBean (AmgpAdmin amgpAdmin, AmgpTemplate amgpTemplate) {
		this.amgpAdmin= amgpAdmin;
		this.amgpTemplate = amgpTemplate;
	}
}
- 定义队列
@Configuration
public class QueueConf {
	//定义Queue实例对象,队列名称为someQueue
	@Bean(name="message")
	public Queue queueMessage(){
		return new Queue("someQueue");
	}
}
- 发送消息
@Component
public class MyBeanSender {
	@Autowired
	private AmqpTemplate template;
	public void send() {
	//向队列someQueue发送一条信息hello,rabbit
	template.convertAndSend("someQueue","hello,rabbit");
	}
}
- 接收消息
@Component
public class MyBean {
	//监听和接收队列someQueue上的消息
	@RabbitListener(queues = "someQueue")
	public void processMessage(String content){}
}
Spring Boot使用Kafka
- 引入Starter
<dependency>
	<groupId>org.springframework.boot</groupId>
	<artifactId>spring-boot-starter-data-kafka</artifactId>
</dependency>
- 设置application.properties
#Kafka服务地址
spring.kafka.bootstrap-servers=localhost:9092
#Kafka消费组
spring.kafka.consumer.group-id=myGroup
- 使用服务组件
@Component
 public class MyBean {
	 private final KafkaTemplate kafkaTemplate;
	 @Autowired
	 public MyBean (KafkaTemplate kafkaTemplate) {
		this.kafkaTemplate= kafkaTemplate;
	}
	public Response sendKafka(){
		//向Kafka的someTopic发送一条消息
		kafkaTemplate.send("someTopic","key",message);
	}
}
- 接收消息
@Component
public class MyBean {
	//监听并接收someTopic上的消息
 	@KafkaListener(topics ="someTopic")
	public void processMessage (String content){
 		System.out.printIn ("message: " content);
	}
}
Spring Cloud Config
随着项目复杂度的增加和微服务开发组件的细化,散落在服务器各个角落的微服务组件需要一套在线的配置服务;一方面为整个服务提供统一的配置,避免在每个微服务中修改配置带来的不便和易出错的问题;另一方面保证了微服务配置能自动化更新到各个组件中,避免在修改配置后重启时出现服务不稳定的情况。
Spring Cloud Config为分布式系统提供统一的配置管理工具,应用程序在使用过程中可以像使用本地配置一样方便地添加、访问、修改配置中心的配置。Spring Cloud Config将Environment的PropertySource抽象和配置中心的配置进行映射,以便应用程序可以在任何场景下获取和修改配置。
Spring Cloud Config的原理
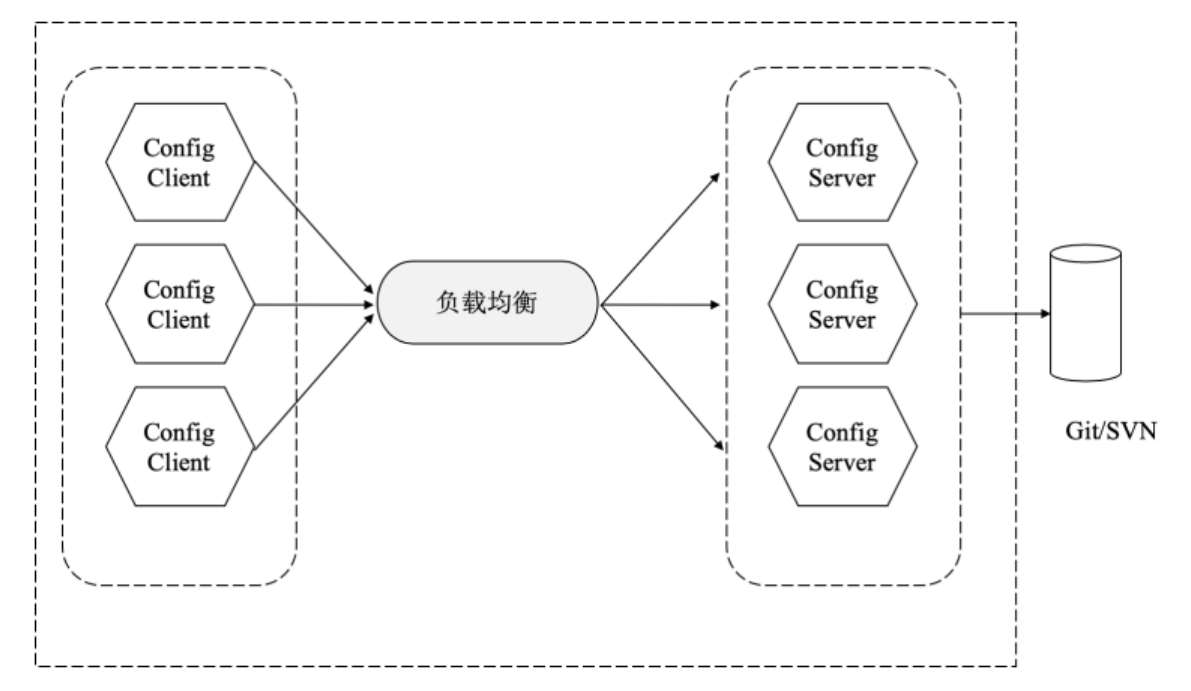
Spring Cloud Config支持将配置存储在配置中心的本地服务器、Git仓库或Subversion。在Spring Cloud Config的线上环境中,通常将配置文件集中放置在一个Git仓库里,然后通过配置中心服务端(Config Server)来管理所有的配置文件;当某个服务实例需要添加或更新配置时,只要在该服务实例的本地将配置文件进行修改,然后推送到Git仓库,其他服务实例通过配置中心从Git服务端获取最新的配置信息。对于配置中心来说,每个服务实例都相当于客户端(Config Client)。
为了保证系统的稳定,配置中心服务端可以进行多副本集群部署,前端使用负载均衡实现服务之间的请求转发。
Config Server的定义和使用
Spring Cloud Config服务为外部配置(键值对或YAML)提供了基于HTTP的远程资源访问接口。服务端可以使用@EnableConfigServer注释开启配置中心的功能,声明该应用程序是一个配置中心服务。
- pom.xml添加依赖
创建一个Config Server分为4步,首先在pom.xml中引入spring-cloud-config-server和spring-boot-starter-actuator依赖,然后通过@EnableConfigServer注解开启配置服务,接着配置application.properties配置文件,最后一步是访问和使用。
<dependencies>
<!-- starter-config-依赖-->
	<dependency>
		<groupId>org. springframework.cloud</groupId>
		<artifactId>springcloud-starter-cibfug</artifactId>
	</dependency>
	<!-- spring--starter--boot--web表示项目为web工程-->
	<dependency>
		<groupId>org. springframework.boot</groupId>
		<artifactId>spring-starter-boot-web</artifactId>
	</dependency>
	<!--系统运维监控组件-->
	<dependency>
		<groupId>org. springframework.boot</groupId>
		<artifactId>spring-startera-boot-actuator</artifactId>
	</dependency>
	<!-- config-server依赖-->
	<dependency>
		<groupId>org. springframework.cloud</groupId>
		<artifactId>spring-cloud-config-server</artifactId>
	</dependency>
</dependencies>
上述代码是Config Server需要添加的pom.xml依赖,其中,spring-cloudstarter-config为Spring Cloud的应用依赖,spring-cloud-configserver为Spring Cloud Config的服务端依赖。
- @EnableConfigServer添加
@EnableConfigServer开启Spring Boot项目对分布式配置中心的支持功能。
@SpringBootApplication
@EnableConfigServer
public class BootApplication {
	public static void main(String[] args) {
		SpringApplication.run(BootApplication.class, args);
	}
}
- application.properties配置
Spring Cloud Config将分布式配置文件的数据存放在Git仓库中,因此需要配置Git仓库的基本信息,具体配置如下。
#配置中心端口号
server.port=9000
#配置中心名称
spring.cloud.config.server.default-application-name=config-server
#配置Git仓库的地址
spring.cloud.config.server.git.uri=https://github.com/LOVEGISER/SpringCloud
#配置仓库的路径
spring.cloud.config.server.git.search-paths=SpringCloudConfig
#配置仓库的分支
spring.cloud.config.label=master
#访问git仓库的用户名
spring.cloud.config.server.git.username=username
#访问Git仓库的用户密码如果Git仓库为公开仓库,可以不填写用户名和密码
spring.cloud.config.server.git.password-password
- 访问服务地址
启动应用程序,在浏览器地址栏中输入http://localhost:9000/*/dev,返回以下配置信息。
{
    "name":"*",
    "profiles":[
        "dev"
    ],
    "label":null,
    "version":"0475f398ee0617a327749bald69e6alc0ao3abfd",
    "state":null,
    "propertySources":[
        {
            "name":"https://github. com/lovegis/Springcloud/SpringcloudConfig/application.properties",
            "source":{
                "spring. datasource.url":"idbc:mysql: //localhost/test",
                "spring. datasource, username":"dbuser",
                "spring. datasource. password":"dbpass",
                "spring. datasource. driver-class-name":"com.mysql.jdbc. Driver"
            }
        }
    ]
}
Config Client
配置中心的使用分为3步:首先在pom.xml中引入spring-boot-starter-actuator和spring-cloud-starter-config依赖,然后在bootstrap.properties中设置配置中心的地址,最后是配置中心的使用。
- pom.xml添加依赖
<dependency>
	<groupId>org.springframework.boot</groupId>
	<artifactId>spring-boot-starter-web</artifactId>
</dependency>
<dependency>
	<groupId>org.springframework.boot</groupId>
	<artifactId>spring-boot-starter-actuator</artifactId>
</dependency>
<!--配置-->
<dependency>
	<groupId>org.springframework.cloud</groupId>
	<artifactId>spring-cloud-starter-config</artifactId>
</dependency>
- bootstrap.properties配置
bootstrap.properties中的spring.cloud.config.uri参数用于设置应用程序从哪个服务地址上获取配置信息,并且可以通过spring.cloud.config.profile指定运行环境,例如,开发环境(dev)、测试环境(test)、正式运行环境(pro)等,具体配置如下。
#项目名称,一般与Git仓库中的文件名对应
spring.application.name=config-client
#远程仓库的分支
spring.cloud.config.label=master
#运行环境:dev开发环境,test测试环境,pro正式运行环境
spring.cloud.config.profile=master
#配置服务中心的地址
spring.cloud.config.uri= http://localhost:9000/
#服务端口号
server.port=9001
- 配置信息的使用
配置信息的使用简单方便,Spring Cloud Config将配置文件和PropertySource做了映射,对于应用程序来说,就像使用本地配置文件一样使用Config Server上的配置文件,具体使用如下。
//将Key为spring.datasource.url对应的值映射为springDatasourceURL,
//其中spring.datasource.url为Git配置文件中的Key
@Value("${spring.datasource.url}")
String springDatasourceURL;


 465
465


 被折叠的 条评论
为什么被折叠?
被折叠的 条评论
为什么被折叠?
 到【灌水乐园】发言


