


http://blog.csdn.net/u014486880/article/details/50491406?locationNum=14
其实写分析源码文章总会显得很复杂很乏味,但是梳理自己看源码时的一些总结也是一种提高。这篇博客分析下Activity启动过程源码,我会尽量说得简单点。个人的观点是看源码不能看得太细,否则就会花费很多时间并很难理清整个过程。所以本次分析重在理清activity的一个启动流程。
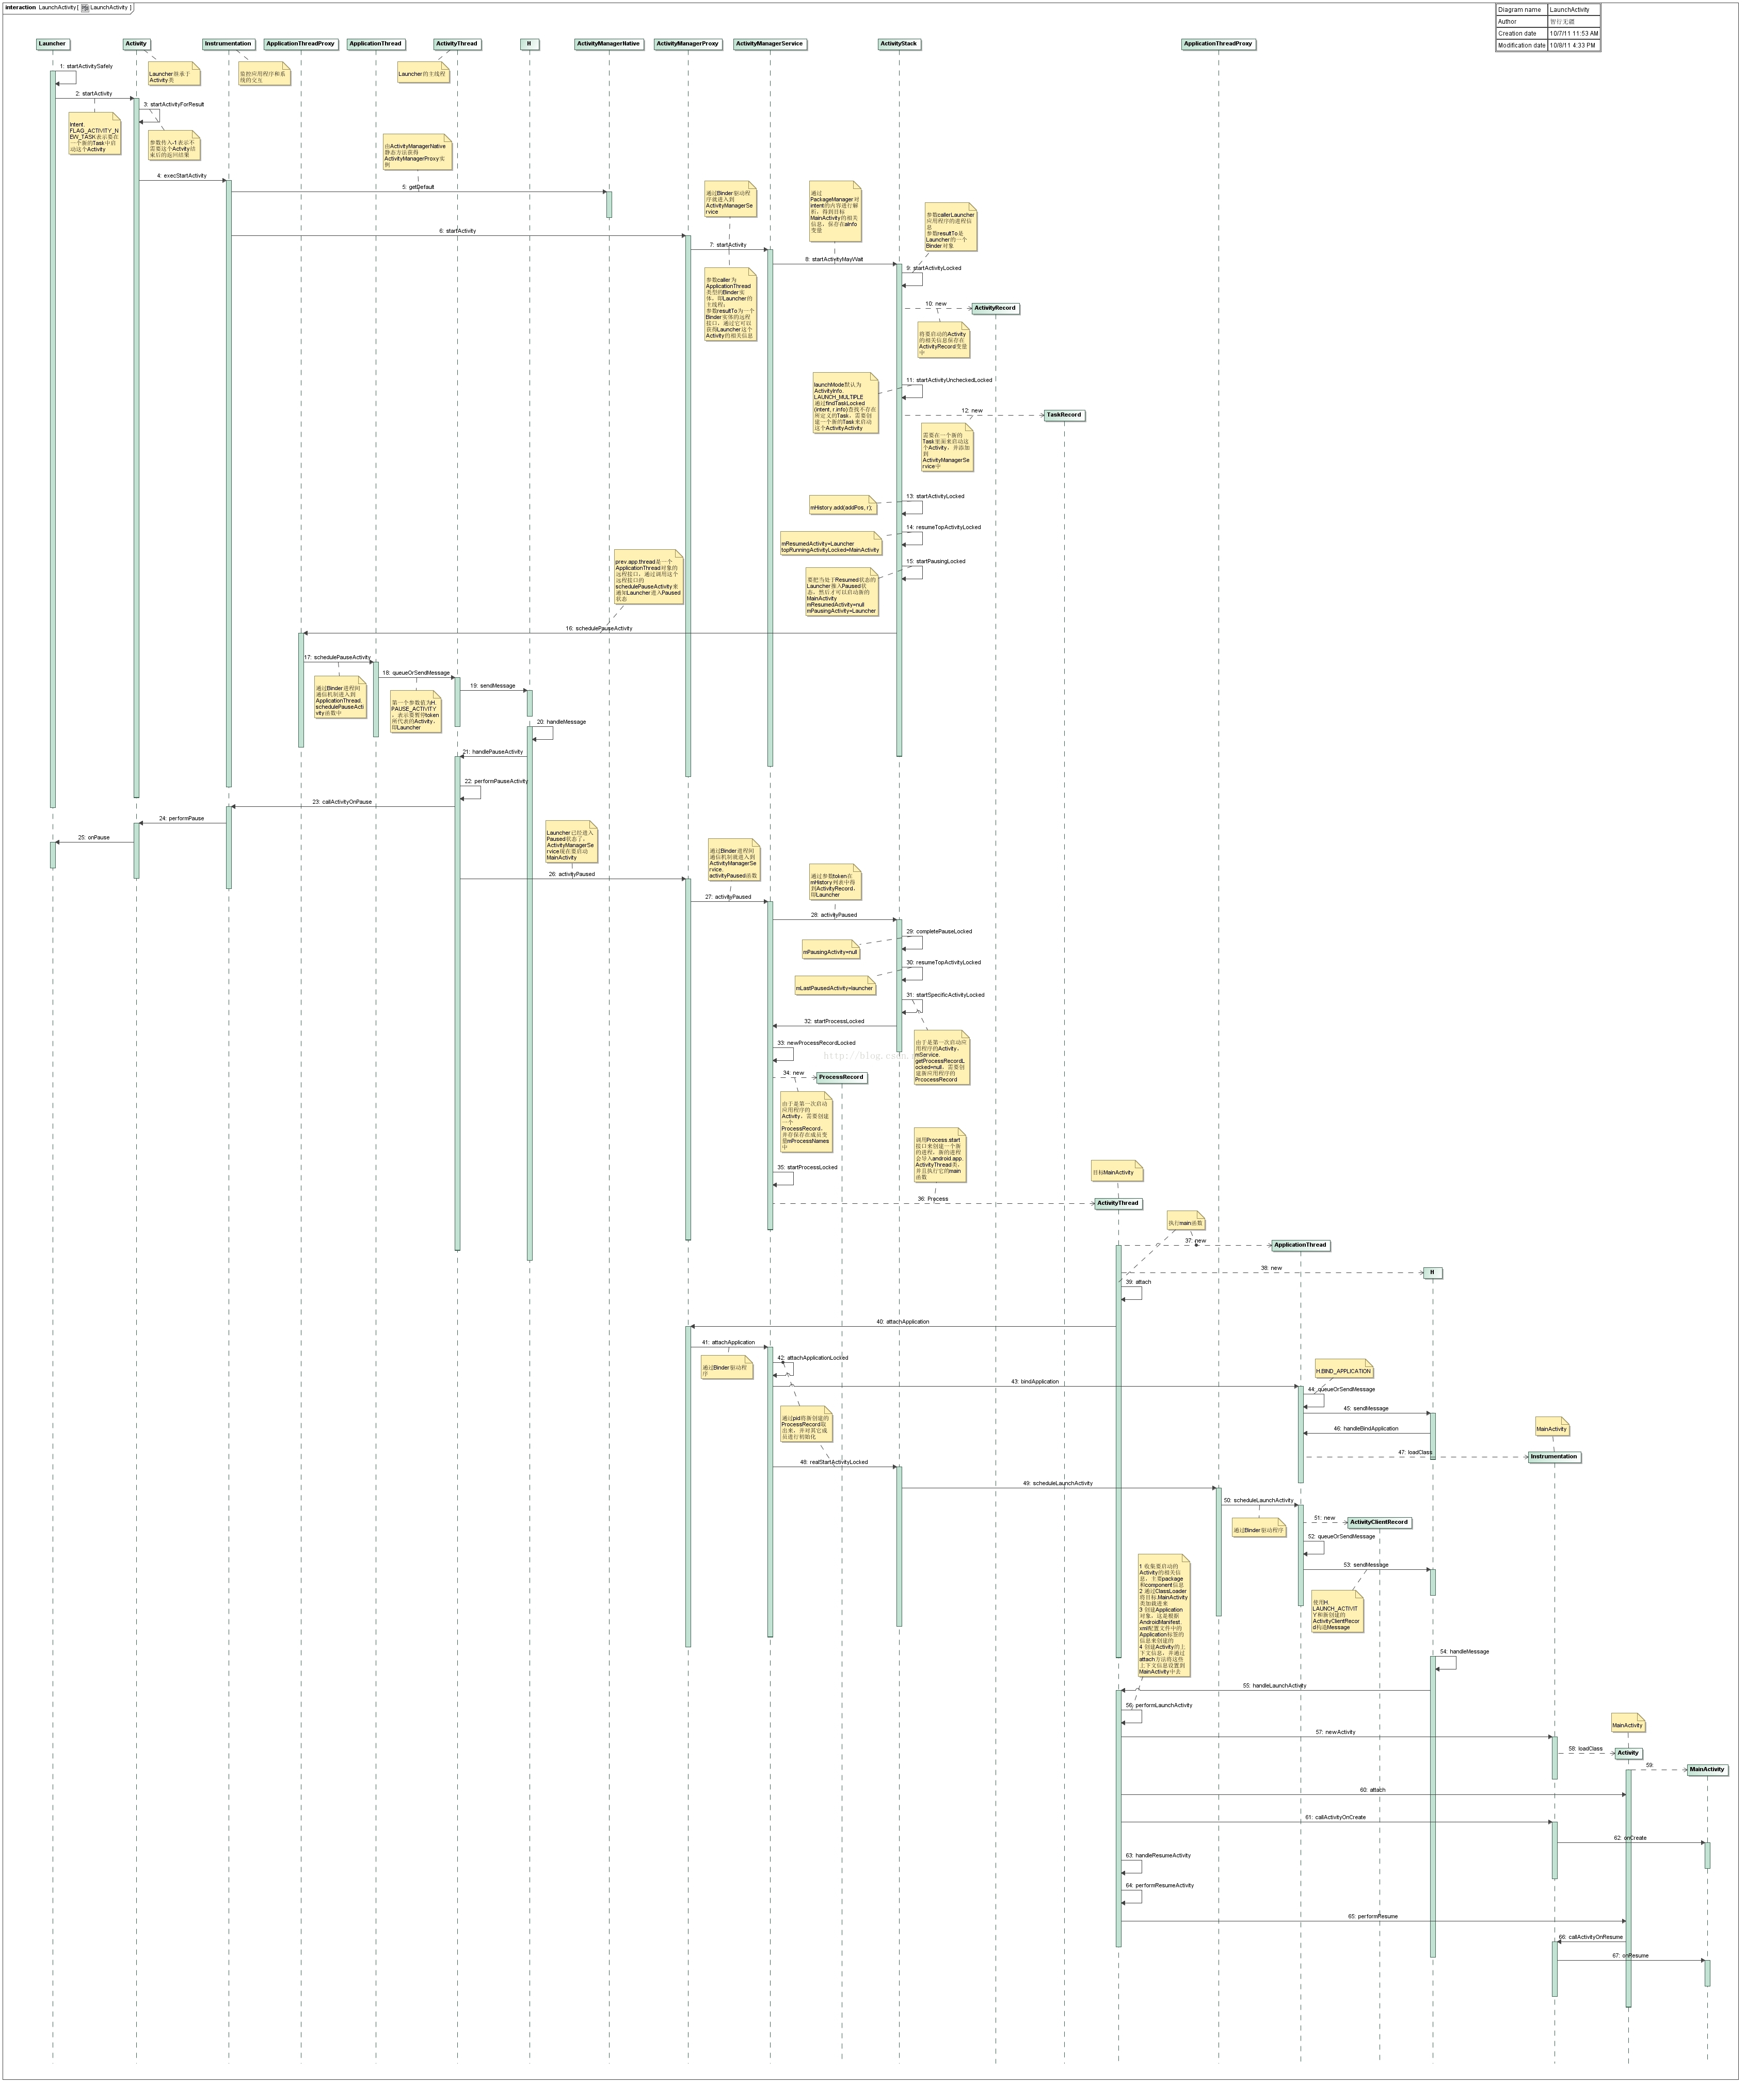
首先大概总结下activity启动的整个流程,这个过程涉及到Instrumentation,ActivityThread,和ActivityManagerService(AMS)。通过Binder向AMS发请求,AMS内部有一个ActivityStack,它负责栈内的Activity同步,AMS去通过ActivityThread去调用Activity的生命周期方法完成Activity的启动。如果对Binder进程间通信不了解可看下IPC——android进程间通信
先上一张总图,等看完博客可以再回头来看下这图:
一.启动预处理
启动一个activity最常用的方法就是startActivityForResult或者startActivity,而startActivity也是调用startActivityForResult,所以此次分析入口当然是startActivityForResult。
- public void startActivityForResult(Intent intent, int requestCode, @Nullable Bundle options) {
- if (mParent == null) {
- Instrumentation.ActivityResult ar =
- mInstrumentation .execStartActivity(
- this, mMainThread .getApplicationThread() , mToken, this,
- intent, requestCode, options) ;
- if (ar != null) {
- mMainThread .sendActivityResult(
- mToken, mEmbeddedID, requestCode , ar.getResultCode(),
- ar.getResultData());
- }
- if (requestCode >= 0) {
- // If this start is requesting a result, we can avoid making
- // the activity visible until the result is received. Setting
- // this code during onCreate(Bundle savedInstanceState) or onResume() will keep the
- // activity hidden during this time, to avoid flickering.
- // This can only be done when a result is requested because
- // that guarantees we will get information back when the
- // activity is finished, no matter what happens to it.
- mStartedActivity = true;
- }
- final View decor = mWindow != null ? mWindow .peekDecorView() : null;
- if (decor != null) {
- decor.cancelPendingInputEvents();
- }
- // TODO Consider clearing/flushing other event sources and events for child windows.
- } else {
- if (options != null) {
- mParent .startActivityFromChild( this, intent, requestCode, options) ;
- } else {
- // Note we want to go through this method for compatibility with
- // existing applications that may have overridden it.
- mParent .startActivityFromChild( this, intent, requestCode);
- }
- }
- if (options != null && !isTopOfTask()) {
- mActivityTransitionState .startExitOutTransition( this, options);
- }
- }
- public ActivityResult execStartActivity(
- Context who, IBinder contextThread, IBinder token , Activity target,
- Intent intent , int requestCode, Bundle options) {
- IApplicationThread whoThread = (IApplicationThread) contextThread;
- if ( mActivityMonitors != null ) {
- synchronized (mSync) {
- final int N = mActivityMonitors.size() ;
- for ( int i=0 ; i<N; i++) {
- final ActivityMonitor am = mActivityMonitors.get(i);
- if (am.match(who, null, intent)) {
- am. mHits++;
- if (am.isBlocking()) {
- return requestCode >= 0 ? am.getResult() : null;
- }
- break;
- }
- }
- }
- }
- try {
- intent.migrateExtraStreamToClipData();
- intent.prepareToLeaveProcess() ;
- int result = ActivityManagerNative. getDefault()
- .startActivity(whoThread, who.getBasePackageName() , intent,
- intent.resolveTypeIfNeeded(who.getContentResolver()),
- token, target != null ? target.mEmbeddedID : null,
- requestCode, 0, null, options) ;
- checkStartActivityResult(result, intent) ;
- } catch (RemoteException e) {
- }
- return null;
- }
- public abstract class ActivityManagerNative extends Binder implements IActivityManager{
- …………
- private static final Singleton<IActivityManager> gDefault = new Singleton<IActivityManager>() {
- protected IActivityManager create() {
- IBinder b = ServiceManager.getService("activity") ;
- if ( false) {
- Log.v ("ActivityManager" , "default service binder = " + b);
- }
- IActivityManager am = asInterface (b);
- if ( false) {
- Log.v ("ActivityManager" , "default service = " + am);
- }
- return am;
- }
- };
- }
- class ActivityManagerProxy implements IActivityManager
- {
- public ActivityManagerProxy(IBinder remote)
- {
- mRemote = remote;
- }
- public IBinder asBinder()
- {
- return mRemote;
- }
- public int startActivity(IApplicationThread caller, String callingPackage, Intent intent,
- String resolvedType, IBinder resultTo, String resultWho, int requestCode,
- int startFlags, ProfilerInfo profilerInfo, Bundle options) throws RemoteException {
- Parcel data = Parcel.obtain();
- Parcel reply = Parcel.obtain();
- data.writeInterfaceToken(IActivityManager.descriptor);
- data.writeStrongBinder(caller != null ? caller.asBinder() : null);
- data.writeString(callingPackage);
- intent.writeToParcel(data, 0);
- data.writeString(resolvedType);
- data.writeStrongBinder(resultTo);
- data.writeString(resultWho);
- data.writeInt(requestCode);
- data.writeInt(startFlags);
- if (profilerInfo != null) {
- data.writeInt(1);
- profilerInfo.writeToParcel(data, Parcelable.PARCELABLE_WRITE_RETURN_VALUE);
- } else {
- data.writeInt(0);
- }
- if (options != null) {
- data.writeInt(1);
- options.writeToParcel(data, 0);
- } else {
- data.writeInt(0);
- }
- mRemote.transact(START_ACTIVITY_TRANSACTION, data, reply, 0);
- reply.readException();
- int result = reply.readInt();
- reply.recycle();
- data.recycle();
- return result;
- }
- public int startActivityAsUser(IApplicationThread caller, String callingPackage, Intent intent,
- String resolvedType, IBinder resultTo, String resultWho, int requestCode,
- int startFlags, ProfilerInfo profilerInfo, Bundle options,
- int userId) throws RemoteException {
- Parcel data = Parcel.obtain();
- Parcel reply = Parcel.obtain();
- data.writeInterfaceToken(IActivityManager.descriptor);
- data.writeStrongBinder(caller != null ? caller.asBinder() : null);
- data.writeString(callingPackage);
- intent.writeToParcel(data, 0);
- data.writeString(resolvedType);
- data.writeStrongBinder(resultTo);
- data.writeString(resultWho);
- data.writeInt(requestCode);
- data.writeInt(startFlags);
- if (profilerInfo != null) {
- data.writeInt(1);
- profilerInfo.writeToParcel(data, Parcelable.PARCELABLE_WRITE_RETURN_VALUE);
- } else {
- data.writeInt(0);
- }
- if (options != null) {
- data.writeInt(1);
- options.writeToParcel(data, 0);
- } else {
- data.writeInt(0);
- }
- data.writeInt(userId);
- mRemote.transact(START_ACTIVITY_AS_USER_TRANSACTION, data, reply, 0);
- reply.readException();
- int result = reply.readInt();
- reply.recycle();
- data.recycle();
- return result;
- …………
- }
- public int startActivity(IBinder whoThread, String callingPackage,
- Intent intent, String resolvedType, Bundle options) {
- checkCaller();
- int callingUser = UserHandle.getCallingUserId();
- TaskRecord tr;
- IApplicationThread appThread;
- synchronized (ActivityManagerService.this) {
- tr = recentTaskForIdLocked(mTaskId);
- if (tr == null) {
- throw new IllegalArgumentException("Unable to find task ID " + mTaskId);
- }
- appThread = ApplicationThreadNative.asInterface(whoThread);
- if (appThread == null) {
- throw new IllegalArgumentException("Bad app thread " + appThread);
- }
- }
- return mStackSupervisor.startActivityMayWait(appThread, -1, callingPackage, intent,
- resolvedType, null, null, null, null, 0, 0, null, null,
- null, options, callingUser, null, tr);
- }
下面语句对参数intent的内容进行解析,得到MainActivity的相关信息,保存在aInfo变量中:
- ActivityInfo aInfo;
- try {
- ResolveInfo rInfo =
- AppGlobals.getPackageManager().resolveIntent(
- intent, resolvedType,
- PackageManager.MATCH_DEFAULT_ONLY
- | ActivityManagerService.STOCK_PM_FLAGS);
- aInfo = rInfo != null ? rInfo.activityInfo : null;
- } catch (RemoteException e) {
- ......
- }
- int res = startActivityLocked(caller, intent, resolvedType, aInfo,
- voiceSession, voiceInteractor, resultTo, resultWho,
- requestCode, callingPid, callingUid, callingPackage,
- realCallingPid, realCallingUid, startFlags, options,
- componentSpecified, null, container, inTask);
- final int startActivityLocked(IApplicationThread caller,
- Intent intent, String resolvedType, ActivityInfo aInfo,
- IVoiceInteractionSession voiceSession, IVoiceInteractor voiceInteractor,
- IBinder resultTo, String resultWho, int requestCode,
- int callingPid, int callingUid, String callingPackage,
- int realCallingPid, int realCallingUid, int startFlags, Bundle options,
- boolean componentSpecified, ActivityRecord[] outActivity, ActivityContainer container,
- TaskRecord inTask) {
- int err = ActivityManager.START_SUCCESS;
- ProcessRecord callerApp = null;
- if (caller != null) {
- callerApp = mService.getRecordForAppLocked(caller);
- if (callerApp != null) {
- callingPid = callerApp.pid;
- callingUid = callerApp.info.uid;
- } else {
- Slog.w(TAG, "Unable to find app for caller " + caller
- + " (pid=" + callingPid + ") when starting: "
- + intent.toString());
- err = ActivityManager.START_PERMISSION_DENIED;
- }
- }
- …………
- ActivityRecord sourceRecord = null;
- ActivityRecord resultRecord = null;
- if (resultTo != null) {
- sourceRecord = isInAnyStackLocked(resultTo);
- if (DEBUG_RESULTS) Slog.v(
- TAG, "Will send result to " + resultTo + " " + sourceRecord);
- if (sourceRecord != null) {
- if (requestCode >= 0 && !sourceRecord.finishing) {
- resultRecord = sourceRecord;
- }
- }
- }
- final int launchFlags = intent.getFlags();
- if ((launchFlags&Intent.FLAG_ACTIVITY_FORWARD_RESULT) != 0 && sourceRecord != null) {
- // Transfer the result target from the source activity to the new
- // one being started, including any failures.
- if (requestCode >= 0) {
- ActivityOptions.abort(options);
- return ActivityManager.START_FORWARD_AND_REQUEST_CONFLICT;
- }
- resultRecord = sourceRecord.resultTo;
- resultWho = sourceRecord.resultWho;
- requestCode = sourceRecord.requestCode;
- sourceRecord.resultTo = null;
- …………
- ActivityRecord r = new ActivityRecord(mService, callerApp, callingUid, callingPackage,
- intent, resolvedType, aInfo, mService.mConfiguration, resultRecord, resultWho,
- requestCode, componentSpecified, this, container, options);
- ^………………
- err = startActivityUncheckedLocked(r, sourceRecord, voiceSession, voiceInteractor,
- startFlags, true, options, inTask);
- final boolean launchSingleTop = r.launchMode == ActivityInfo.LAUNCH_SINGLE_TOP;
- final boolean launchSingleInstance = r.launchMode == ActivityInfo.LAUNCH_SINGLE_INSTANCE;
- final boolean launchSingleTask = r.launchMode == ActivityInfo.LAUNCH_SINGLE_TASK;
- int launchFlags = intent.getFlags();
- if ((launchFlags & Intent.FLAG_ACTIVITY_NEW_DOCUMENT) != 0 &&
- (launchSingleInstance || launchSingleTask)) {
- // We have a conflict between the Intent and the Activity manifest, manifest wins.
- Slog.i(TAG, "Ignoring FLAG_ACTIVITY_NEW_DOCUMENT, launchMode is " +
- "\"singleInstance\" or \"singleTask\"");
- launchFlags &=
- ~(Intent.FLAG_ACTIVITY_NEW_DOCUMENT | Intent.FLAG_ACTIVITY_MULTIPLE_TASK);
- …………
- if (doResume) {
- resumeTopActivitiesLocked();
- }
- ActivityOptions.abort(options);
- final boolean resumeTopActivityLocked(ActivityRecord prev, Bundle options) {
- if (mStackSupervisor.inResumeTopActivity) {
- // Don't even start recursing.
- return false;
- }
- boolean result = false;
- try {
- // Protect against recursion.
- mStackSupervisor.inResumeTopActivity = true;
- if (mService.mLockScreenShown == ActivityManagerService.LOCK_SCREEN_LEAVING) {
- mService.mLockScreenShown = ActivityManagerService.LOCK_SCREEN_HIDDEN;
- mService.updateSleepIfNeededLocked();
- }
- result = resumeTopActivityInnerLocked(prev, options);
- } finally {
- mStackSupervisor.inResumeTopActivity = false;
- }
- return result;
- }
- if ((mService.mSleeping || mService.mShuttingDown)
- <span style="white-space:pre"> </span> && mLastPausedActivity == next && next.state == ActivityState.PAUSED) {
- <span style="white-space:pre"> </span> ......
- <span style="white-space:pre"> </span> return false;
- <span style="white-space:pre"> </span> }
- .......
- <span style="white-space:pre"> </span> // We need to start pausing the current activity so the top one
- <span style="white-space:pre"> </span> // can be resumed...
- <span style="white-space:pre"> </span> if (mResumedActivity != null) {
- <span style="white-space:pre"> </span> if (mResumedActivity != null) {
- if (DEBUG_STATES) Slog.d(TAG, "resumeTopActivityLocked: Pausing " + mResumedActivity);
- pausing |= startPausingLocked(userLeaving, false, true, dontWaitForPause);
- }
- <span style="white-space:pre"> </span> return true;
- <span style="white-space:pre"> </span> }
- <span style="white-space:pre"> </span> ......
- <span style="white-space:pre"> </span> if (next.app != null && next.app.thread != null) {
- <span style="white-space:pre"> </span> ......
- <span style="white-space:pre"> </span> } else {
- <span style="white-space:pre"> </span> ......
- <span style="white-space:pre"> </span> startSpecificActivityLocked(next, true, true);
- <span style="white-space:pre"> </span> }
- <span style="white-space:pre"> </span> return true;
- <span style="white-space:pre"> </span> }
二.暂停当前Activity
- if (prev.app != null && prev.app.thread != null) {
- if (DEBUG_PAUSE) Slog.v(TAG, "Enqueueing pending pause: " + prev);
- try {
- EventLog.writeEvent(EventLogTags.AM_PAUSE_ACTIVITY,
- prev.userId, System.identityHashCode(prev),
- prev.shortComponentName);
- mService.updateUsageStats(prev, false);
- prev.app.thread.schedulePauseActivity(prev.appToken, prev.finishing,
- userLeaving, prev.configChangeFlags, dontWait);
- public interface IApplicationThread extends IInterface {
- void schedulePauseActivity(IBinder token, boolean finished, boolean userLeaving,
- int configChanges, boolean dontReport) throws RemoteException;
- void scheduleStopActivity(IBinder token, boolean showWindow,
- int configChanges) throws RemoteException;
- void scheduleWindowVisibility(IBinder token, boolean showWindow) throws RemoteException;
- void scheduleSleeping(IBinder token, boolean sleeping) throws RemoteException;
- void scheduleResumeActivity(IBinder token, int procState, boolean isForward, Bundle resumeArgs)
- throws RemoteException;
- void scheduleSendResult(IBinder token, List<ResultInfo> results) throws RemoteException;
- void scheduleLaunchActivity(Intent intent, IBinder token, int ident,
- ActivityInfo info, Configuration curConfig, CompatibilityInfo compatInfo,
- String referrer, IVoiceInteractor voiceInteractor, int procState, Bundle state,
- PersistableBundle persistentState, List<ResultInfo> pendingResults,
- List<ReferrerIntent> pendingNewIntents, boolean notResumed, boolean isForward,
- ProfilerInfo profilerInfo) throws RemoteException;
- void scheduleRelaunchActivity(IBinder token, List<ResultInfo> pendingResults,
- List<ReferrerIntent> pendingNewIntents, int configChanges,
- boolean notResumed, Configuration config) throws RemoteException;
- void scheduleNewIntent(List<ReferrerIntent> intent, IBinder token) throws RemoteException;
- void scheduleDestroyActivity(IBinder token, boolean finished,
- int configChanges) throws RemoteException;
- void scheduleReceiver(Intent intent, ActivityInfo info, CompatibilityInfo compatInfo,
- int resultCode, String data, Bundle extras, boolean sync,
- int sendingUser, int processState) throws RemoteException;
- static final int BACKUP_MODE_INCREMENTAL = 0;
- static final int BACKUP_MODE_FULL = 1;
- static final int BACKUP_MODE_RESTORE = 2;
- static final int BACKUP_MODE_RESTORE_FULL = 3;
- void scheduleCreateBackupAgent(ApplicationInfo app, CompatibilityInfo compatInfo,
- int backupMode) throws RemoteException;
- void scheduleDestroyBackupAgent(ApplicationInfo app, CompatibilityInfo compatInfo)
- throws RemoteException;
- void scheduleCreateService(IBinder token, ServiceInfo info,
- CompatibilityInfo compatInfo, int processState) throws RemoteException;
- void scheduleBindService(IBinder token,
- Intent intent, boolean rebind, int processState) throws RemoteException;
- void scheduleUnbindService(IBinder token,
- Intent intent) throws RemoteException;
- void scheduleServiceArgs(IBinder token, boolean taskRemoved, int startId,
- int flags, Intent args) throws RemoteException;
- void scheduleStopService(IBinder token) throws RemoteException;
- static final int DEBUG_OFF = 0;
- static final int DEBUG_ON = 1;
- static final int DEBUG_WAIT = 2;
- void bindApplication(String packageName, ApplicationInfo info, List<ProviderInfo> providers,
- ComponentName testName, ProfilerInfo profilerInfo, Bundle testArguments,
- IInstrumentationWatcher testWatcher, IUiAutomationConnection uiAutomationConnection,
- int debugMode, boolean openGlTrace, boolean restrictedBackupMode, boolean persistent,
- Configuration config, CompatibilityInfo compatInfo, Map<String, IBinder> services,
- Bundle coreSettings) throws RemoteException;
- void scheduleExit() throws RemoteException;
- void scheduleSuicide() throws RemoteException;
- void scheduleConfigurationChanged(Configuration config) throws RemoteException;
- void updateTimeZone() throws RemoteException;
- void clearDnsCache() throws RemoteException;
- void setHttpProxy(String proxy, String port, String exclList,
- Uri pacFileUrl) throws RemoteException;
- void processInBackground() throws RemoteException;
- void dumpService(FileDescriptor fd, IBinder servicetoken, String[] args)
- throws RemoteException;
- void dumpProvider(FileDescriptor fd, IBinder servicetoken, String[] args)
- throws RemoteException;
- void scheduleRegisteredReceiver(IIntentReceiver receiver, Intent intent,
- int resultCode, String data, Bundle extras, boolean ordered,
- boolean sticky, int sendingUser, int processState) throws RemoteException;
- void scheduleLowMemory() throws RemoteException;
- void scheduleActivityConfigurationChanged(IBinder token) throws RemoteException;
- void profilerControl(boolean start, ProfilerInfo profilerInfo, int profileType)
- throws RemoteException;
- void dumpHeap(boolean managed, String path, ParcelFileDescriptor fd)
- throws RemoteException;
- public abstract class ApplicationThreadNative extends Binder
- implements IApplicationThread {
- /**
- * Cast a Binder object into an application thread interface, generating
- * a proxy if needed.
- */
- static public IApplicationThread asInterface(IBinder obj) {
- if (obj == null) {
- return null;
- }
- IApplicationThread in =
- (IApplicationThread)obj.queryLocalInterface(descriptor);
- if (in != null) {
- return in;
- }
- return new ApplicationThreadProxy(obj);
- }
- public ApplicationThreadNative() {
- attachInterface(this, descriptor);
- }
- @Override
- public boolean onTransact(int code, Parcel data, Parcel reply, int flags)
- throws RemoteException {
- switch (code) {
- case SCHEDULE_PAUSE_ACTIVITY_TRANSACTION:
- {
- data.enforceInterface(IApplicationThread.descriptor);
- IBinder b = data.readStrongBinder();
- boolean finished = data.readInt() != 0;
- boolean userLeaving = data.readInt() != 0;
- int configChanges = data.readInt();
- boolean dontReport = data.readInt() != 0;
- schedulePauseActivity(b, finished, userLeaving, configChanges, dontReport);
- return true;
- }
- <pre name="code" class="java" style="color: rgb(51, 51, 51); line-height: 26px; orphans: 2; widows: 2;">public final void schedulePauseActivity(IBinder token, boolean finished,
- boolean userLeaving, int configChanges, boolean dontReport) throws RemoteException {
- Parcel data = Parcel.obtain();
- data.writeInterfaceToken(IApplicationThread.descriptor);
- data.writeStrongBinder(token);
- data.writeInt(finished ? 1 : 0);
- data.writeInt(userLeaving ? 1 :0);
- data.writeInt(configChanges);
- data.writeInt(dontReport ? 1 : 0);
- mRemote.transact(SCHEDULE_PAUSE_ACTIVITY_TRANSACTION, data, null,
- IBinder.FLAG_ONEWAY);
- data.recycle();
- }
- public final void schedulePauseActivity(IBinder token, boolean finished,
- boolean userLeaving, int configChanges, boolean dontReport) {
- sendMessage(
- finished ? H.PAUSE_ACTIVITY_FINISHING : H.PAUSE_ACTIVITY,
- token,
- (userLeaving ? 1 : 0) | (dontReport ? 2 : 0),
- configChanges);
- }
- private void sendMessage(int what, Object obj, int arg1, int arg2, boolean async) {
- if (DEBUG_MESSAGES) Slog.v(
- TAG, "SCHEDULE " + what + " " + mH.codeToString(what)
- + ": " + arg1 + " / " + obj);
- Message msg = Message.obtain();
- msg.what = what;
- msg.obj = obj;
- msg.arg1 = arg1;
- msg.arg2 = arg2;
- if (async) {
- msg.setAsynchronous(true);
- }
- mH.sendMessage(msg);
- }
- public void handleMessage(Message msg) {
- switch (msg.what) {
- …………
- case PAUSE_ACTIVITY:
- Trace.traceBegin(Trace.TRACE_TAG_ACTIVITY_MANAGER, "activityPause");
- handlePauseActivity((IBinder)msg.obj, false, (msg.arg1&1) != 0, msg.arg2,
- (msg.arg1&2) != 0);
- maybeSnapshot();
- Trace.traceEnd(Trace.TRACE_TAG_ACTIVITY_MANAGER);
- break;
- …………
- }
- private void handlePauseActivity(IBinder token, boolean finished,
- boolean userLeaving, int configChanges, boolean dontReport) {
- ActivityClientRecord r = mActivities.get(token);
- if (r != null) {
- //Slog.v(TAG, "userLeaving=" + userLeaving + " handling pause of " + r);
- if (userLeaving) {
- performUserLeavingActivity(r);
- }
- r.activity.mConfigChangeFlags |= configChanges;
- performPauseActivity(token, finished, r.isPreHoneycomb());
- // Make sure any pending writes are now committed.
- if (r.isPreHoneycomb()) {
- QueuedWork.waitToFinish();
- }
- // Tell the activity manager we have paused.
- if (!dontReport) {
- try {
- ActivityManagerNative.getDefault().activityPaused(token);
- } catch (RemoteException ex) {
- }
- }
- mSomeActivitiesChanged = true;
- }
- public final void activityPaused(IBinder token) {
- final long origId = Binder.clearCallingIdentity();
- synchronized(this) {
- ActivityStack stack = ActivityRecord.getStackLocked(token);
- if (stack != null) {
- stack.activityPausedLocked(token, false);
- }
- }
- Binder.restoreCallingIdentity(origId);
- }
- final void activityPausedLocked(IBinder token, boolean timeout) {
- if (DEBUG_PAUSE) Slog.v(
- TAG, "Activity paused: token=" + token + ", timeout=" + timeout);
- final ActivityRecord r = isInStackLocked(token);
- if (r != null) {
- mHandler.removeMessages(PAUSE_TIMEOUT_MSG, r);
- if (mPausingActivity == r) {
- if (DEBUG_STATES) Slog.v(TAG, "Moving to PAUSED: " + r
- + (timeout ? " (due to timeout)" : " (pause complete)"));
- completePauseLocked(true);
- } else {
- EventLog.writeEvent(EventLogTags.AM_FAILED_TO_PAUSE,
- r.userId, System.identityHashCode(r), r.shortComponentName,
- mPausingActivity != null
- ? mPausingActivity.shortComponentName : "(none)");
- }
- }
- }
- private void completePauseLocked(boolean resumeNext) {
- …………
- if (resumeNext) {
- final ActivityStack topStack = mStackSupervisor.getFocusedStack();
- if (!mService.isSleepingOrShuttingDown()) {
- mStackSupervisor.resumeTopActivitiesLocked(topStack, prev, null);
- } else {
- mStackSupervisor.checkReadyForSleepLocked();
- ActivityRecord top = topStack.topRunningActivityLocked(null);
- if (top == null || (prev != null && top != prev)) {
- // If there are no more activities available to run,
- // do resume anyway to start something. Also if the top
- // activity on the stack is not the just paused activity,
- // we need to go ahead and resume it to ensure we complete
- // an in-flight app switch.
- mStackSupervisor.resumeTopActivitiesLocked(topStack, null, null);
- }
- }
- }
- …………
- }
三,启动Activity
- void startSpecificActivityLocked(ActivityRecord r,
- boolean andResume, boolean checkConfig) {
- // Is this activity's application already running?
- ProcessRecord app = mService.getProcessRecordLocked(r.processName,
- r.info.applicationInfo.uid, true);
- r.task.stack.setLaunchTime(r);
- if (app != null && app.thread != null) {
- try {
- if ((r.info.flags&ActivityInfo.FLAG_MULTIPROCESS) == 0
- || !"android".equals(r.info.packageName)) {
- // Don't add this if it is a platform component that is marked
- // to run in multiple processes, because this is actually
- // part of the framework so doesn't make sense to track as a
- // separate apk in the process.
- app.addPackage(r.info.packageName, r.info.applicationInfo.versionCode,
- mService.mProcessStats);
- }
- realStartActivityLocked(r, app, andResume, checkConfig);
- return;
- } catch (RemoteException e) {
- Slog.w(TAG, "Exception when starting activity "
- + r.intent.getComponent().flattenToShortString(), e);
- }
- // If a dead object exception was thrown -- fall through to
- // restart the application.
- }
- mService.startProcessLocked(r.processName, r.info.applicationInfo, true, 0,
- "activity", r.intent.getComponent(), false, false, true);
- }
- app.thread.scheduleLaunchActivity(new Intent(r.intent), r.appToken,
- System.identityHashCode(r), r.info, new Configuration(mService.mConfiguration),
- r.compat, r.launchedFromPackage, r.task.voiceInteractor, app.repProcState,
- r.icicle, r.persistentState, results, newIntents, !andResume,
- mService.isNextTransitionForward(), profilerInfo);
- public void handleMessage(Message msg) {
- if (DEBUG_MESSAGES) Slog.v(TAG, ">>> handling: " + codeToString(msg.what));
- switch (msg.what) {
- case LAUNCH_ACTIVITY: {
- Trace.traceBegin(Trace.TRACE_TAG_ACTIVITY_MANAGER, "activityStart");
- final ActivityClientRecord r = (ActivityClientRecord) msg.obj;
- r.packageInfo = getPackageInfoNoCheck(
- r.activityInfo.applicationInfo, r.compatInfo);
- handleLaunchActivity(r, null);
- Trace.traceEnd(Trace.TRACE_TAG_ACTIVITY_MANAGER);
- } break;
- ………………
- if (localLOGV) Slog.v(
- TAG, "Handling launch of " + r);
- // Initialize before creating the activity
- WindowManagerGlobal.initialize();
- Activity a = performLaunchActivity(r, customIntent);
- if (a != null) {
- r.createdConfig = new Configuration(mConfiguration);
- Bundle oldState = r.state;
- handleResumeActivity(r.token, false, r.isForward,
- !r.activity.mFinished && !r.startsNotResumed);
- ActivityInfo aInfo = r.activityInfo;
- if (r.packageInfo == null) {
- r.packageInfo = getPackageInfo(aInfo.applicationInfo, r.compatInfo,
- Context.CONTEXT_INCLUDE_CODE);
- }
- ComponentName component = r.intent.getComponent();
- if (component == null) {
- component = r.intent.resolveActivity(
- mInitialApplication.getPackageManager());
- r.intent.setComponent(component);
- }
- if (r.activityInfo.targetActivity != null) {
- component = new ComponentName(r.activityInfo.packageName,
- r.activityInfo.targetActivity);
- }
- Activity activity = null;
- try {
- java.lang.ClassLoader cl = r.packageInfo.getClassLoader();
- activity = mInstrumentation.newActivity(
- cl, component.getClassName(), r.intent);
- StrictMode.incrementExpectedActivityCount(activity.getClass());
- r.intent.setExtrasClassLoader(cl);
- r.intent.prepareToEnterProcess();
- if (r.state != null) {
- r.state.setClassLoader(cl);
- }
- } catch (Exception e) {
- if (!mInstrumentation.onException(activity, e)) {
- throw new RuntimeException(
- "Unable to instantiate activity " + component
- + ": " + e.toString(), e);
- }
- }
- public Activity newActivity(ClassLoader cl, String className,
- Intent intent)
- throws InstantiationException, IllegalAccessException,
- ClassNotFoundException {
- return (Activity)cl.loadClass(className).newInstance();
- }
- public Application makeApplication(boolean forceDefaultAppClass,
- Instrumentation instrumentation) {
- if (mApplication != null) {
- return mApplication;
- }
- Application app = null;
- String appClass = mApplicationInfo.className;
- if (forceDefaultAppClass || (appClass == null)) {
- appClass = "android.app.Application";
- }
- try {
- java.lang.ClassLoader cl = getClassLoader();
- if (!mPackageName.equals("android")) {
- initializeJavaContextClassLoader();
- }
- ContextImpl appContext = ContextImpl.createAppContext(mActivityThread, this);
- app = mActivityThread.mInstrumentation.newApplication(
- cl, appClass, appContext);
- appContext.setOuterContext(app);
- } catch (Exception e) {
- if (!mActivityThread.mInstrumentation.onException(app, e)) {
- throw new RuntimeException(
- "Unable to instantiate application " + appClass
- + ": " + e.toString(), e);
- }
- }
- mActivityThread.mAllApplications.add(app);
- mApplication = app;
- if (instrumentation != null) {
- try {
- instrumentation.callApplicationOnCreate(app);
- } catch (Exception e) {
- if (!instrumentation.onException(app, e)) {
- throw new RuntimeException(
- "Unable to create application " + app.getClass().getName()
- + ": " + e.toString(), e);
- }
- }
- }
- ………
- Context appContext = createBaseContextForActivity(r, activity);
- CharSequence title = r.activityInfo.loadLabel(appContext.getPackageManager());
- Configuration config = new Configuration(mCompatConfiguration);
- if (DEBUG_CONFIGURATION) Slog.v(TAG, "Launching activity "
- + r.activityInfo.name + " with config " + config);
- activity.attach(appContext, this, getInstrumentation(), r.token,
- r.ident, app, r.intent, r.activityInfo, title, r.parent,
- r.embeddedID, r.lastNonConfigurationInstances, config,
- r.referrer, r.voiceInteractor);
四,总结
1. 应用程序的MainActivity通过Binder进程间通信机制通知ActivityManagerService,它要启动一个新的Activity;
2. :ActivityManagerService通过Binder进程间通信机制通知MainActivity进入Paused状态;
3. MainActivity通过Binder进程间通信机制通知ActivityManagerService,它已经准备就绪进入Paused状态,于是ActivityManagerService就准备要在MainActivity所在的进程和任务中启动新的Activity了;
4. ActivityManagerService通过Binder进程间通信机制通知MainActivity所在的ActivityThread,现在一切准备就绪,它可以真正执行Activity的启动操作了。


 391
391

 被折叠的 条评论
为什么被折叠?
被折叠的 条评论
为什么被折叠?
 到【灌水乐园】发言


