


开发环境搭建
本章节将讲解如何在Ubuntu上搭建一个Tina5-SDK开发环境。
获取Tina5-SDK源码
首先,在Windows上访问下面的论坛地址,
-
打开Tina5-SDK基础包获取:
https://forums.100ask.net/t/topic/7393
- 通过百度网盘下载,大小约3.3G,名称为tina5sdk-bsp-50ae436fe556be2253856af283b1e094.tar.gz 下载完成后通过网络等方式拷贝到虚拟机目录下。
把基础包拷贝到虚拟机之后,解压:
ubuntu@ubuntu1804:~$ tar -xvf tina5sdk-bsp-50ae436fe556be2253856af283b1e094.tar.gz
解压后,基础包的命名是tina5sdk-bsp。
以上只是获取一个Tina5-SDK的一个基础包,并不是完整的SDK源码,还需要获取执行以下几步,才可以得到一个完整的Tina5-SDK源码包。
ubuntu@ubuntu1804:~$ cd tina5sdk-bsp
ubuntu@ubuntu1804:~/tina5sdk-bsp$ git clone https://e.coding.net/weidongshan/tina5/buildroot.git
ubuntu@ubuntu1804:~/tina5sdk-bsp$ git clone https://e.coding.net/weidongshan/tina5/openwrt.git
ubuntu@ubuntu1804:~/tina5sdk-bsp$ git clone https://e.coding.net/weidongshan/tina5/platform.git
ubuntu@ubuntu1804:~/tina5sdk-bsp$ ls
brandy  build  buildroot  build.sh  device  kernel  openwrt    platform  prebuilt    tools
ubuntu@ubuntu1804:~/tina5sdk-bsp$
看到以上文件,说明Tina5-SDK源码获取成功。
基于T113i-Industrial开发板,我们提供了一个扩展补丁包,获取地址:https://github.com/DongshanPI/T113i_DevKitF_Tina5SDK/
在虚拟机上,拉取扩展补丁:
ubuntu@ubuntu1804:~$ git clone https://github.com/DongshanPI/T113i_DevKitF_Tina5SDK.git
进入Tina-SDK5源码根目录tina5sdk-bsp/,拷贝扩展补丁:
ubuntu@ubuntu1804:~/tina5sdk-bsp$ cp ~/T113i_DevKitF_Tina5SDK/* -rfvd .
自此获取资源完成,接下来将讲解如何编译固件,和存在的问题。
编译固件
在Ubuntu上,进入源码根目录tina5sdk-bsp/。
①先执行 source build/envsetup.sh 初始化环境变量;
②接着执行 ./build.sh 选择开发板选项。
- platform : linux
- linux_dev : buildroot
- ic : t113_i
- board : evb1_auto
- flash : default
ubuntu@ubuntu1804:~/tina5sdk-bsp$ source build/envsetup.sh
NOTE: The SDK(/home/ubuntu/tina5sdk-bsp) was successfully loaded
load openwrt... ok
Please run lunch next for openwrt.
load buildroot,bsp...ok
Invoke . build/quick.sh from your shell to add the following functions to your environment:
    croot                          - Changes directory to the top of the tree
    cbsp                           - Changes directory to the bsp
    cbsptest                       - Changes directory to the bsptest
    ckernel                        - Changes directory to the kernel
    cbrandy                        - Changes directory to the brandy
    cboot                          - Changes directory to the uboot
    cbr                            - Changes directory to the buildroot
    cchips                         - Changes directory to the board
    cconfigs                       - Changes directory to the board's config
    cbin                           - Changes directory to the board's bin
    cdts                           - Changes directory to the kernel's dts
    ckernelout                     - Changes directory to the kernel output
    cout                           - Changes directory to the product's output
    copenssl                       - Changes directory to the product's openssl-1.0.0
Usage: build.sh [args]
    build.sh                       - default build all
    build.sh bootloader            - only build bootloader
    build.sh kernel                - only build kernel
    build.sh buildroot_rootfs      - only build buildroot
    build.sh menuconfig            - edit kernel menuconfig
    build.sh saveconfig            - save kernel menuconfig
    build.sh recovery_menuconfig   - edit recovery menuconfig
    build.sh recovery_saveconfig   - save recovery menuconfig
    build.sh buildroot_menuconfig  - edit buildroot menuconfig
    build.sh buildroot_saveconfig  - save buildroot menuconfig
    build.sh clean                 - clean all
    build.sh distclean             - distclean all
    build.sh pack                  - pack firmware
    build.sh pack_debug            - pack firmware with debug info output to card0
    build.sh pack_secure           - pack firmware with secureboot
Usage: pack [args]
    pack                           - pack firmware
    pack -d                        - pack firmware with debug info output to card0
    pack -s                        - pack firmware with secureboot
    pack -sd                       - pack firmware with secureboot and debug info output to card0
ubuntu@ubuntu1804:~/tina5sdk-bsp$
ubuntu@ubuntu1804:~/tina5sdk-bsp$ ./build.sh
All available platform:
   0. android
   1. linux
Choice [android]: 1
All available linux_dev:
   0. bsp
   1. buildroot
   2. openwrt
Choice [bsp]: 1
All available ic:
   0. t113_i
   1. t113_s4
Choice [t113_i]: 0
All available board:
   0. evb1
   1. evb1_auto
   2. evb1_auto_nand
   3. evb1_auto_nor
Choice [evb1]: 1
All available flash:
   0. default
   1. nor
Choice [default]: 0
选择完,按下Enter键之后,会出现报错。
Choice [default]: 0
INFO: kernel relative recovery defconfig: ../../../../../device/config/chips/t113_i/configs/evb1_auto/linux-5.4/config-5.4-recovery
INFO: kernel absolute recovery defconfig: /home/ubuntu/tina5sdk-bspdevice/config/chips/t113_i/configs/evb1_auto/linux-5.4/config-5.4-recovery
INFO: Prepare toolchain ...
INFO: kernel defconfig: generate /home/ubuntu/tina5sdk-bspout/t113_i/kernel/build/.config by /home/ubuntu/tina5sdk-bspdevice/config/chips/t113_i/configs/evb1_auto/linux-5.4/config-5.4
INFO: Prepare toolchain ...
make: Entering directory '/home/ubuntu/tina5sdk-bspkernel/linux-5.4'
make[1]: Entering directory '/home/ubuntu/tina5sdk-bspout/t113_i/kernel/build'
  GEN     Makefile
*** Default configuration is based on '../../../../../device/config/chips/t113_i/configs/evb1_auto/linux-5.4/config-5.4'
#
# No change to .config
#
make[1]: Leaving directory '/home/ubuntu/tina5sdk-bspout/t113_i/kernel/build'
make: Leaving directory '/home/ubuntu/tina5sdk-bspkernel/linux-5.4'
make: Entering directory '/home/ubuntu/tina5sdk-bspbuildroot/buildroot-201902'
  GEN     /home/ubuntu/tina5sdk-bspout/t113_i/evb1_auto/buildroot/buildroot/Makefile
Config.in.legacy:1769:warning: choice value used outside its choice group
#
# configuration written to /home/ubuntu/tina5sdk-bspout/t113_i/evb1_auto/buildroot/buildroot/.config
#
make: Leaving directory '/home/ubuntu/tina5sdk-bspbuildroot/buildroot-201902'
INFO: buildroot defconfig is sun8iw20p1_t113_defconfig
INFO: clean buildserver
INFO: prepare_buildserver
========ACTION List: build_linuxdev;========
options :
INFO: ----------------------------------------
INFO: build linuxdev ...
INFO: chip: sun8iw20p1
INFO: platform: linux
INFO: kernel: linux-5.4
INFO: board: evb1_auto
INFO: output: /home/ubuntu/tina5sdk-bspout/t113_i/evb1_auto/buildroot
INFO: ----------------------------------------
INFO: don't build dtbo ...
INFO: build arisc
find: '/home/ubuntu/tina5sdk-bspbrandy/brandy-2.0/spl': No such file or directory
find: '/home/ubuntu/tina5sdk-bspbrandy/dramlib': No such file or directory
INFO: build_bootloader: brandy_path=/home/ubuntu/tina5sdk-bspbrandy/brandy-2.0
INFO: skip build brandy.
INFO: build kernel ...
INFO: prepare_buildserver
INFO: Prepare toolchain ...
Makefile:681: arch//Makefile: No such file or directory
make: *** No rule to make target 'arch//Makefile'.  Stop.
ERROR: build  Failed
INFO: build kernel failed
ubuntu@ubuntu1804:~/tina5sdk-bsp$
加上 -d 参数,强行编译,就不会出现报错了(如果是别的错误,强制也无效,可以看看下面的常见问题里是否有答案)。
ubuntu@ubuntu1804:~/tina5sdk-bsp$ ./build.sh -d
========ACTION List: build_linuxdev;========
options :
INFO: ----------------------------------------
INFO: build linuxdev ...
INFO: chip: sun8iw20p1
INFO: platform: linux
INFO: kernel: linux-5.4
INFO: board: evb1_auto
INFO: output: /home/ubuntu/tina5sdk-bspout/t113_i/evb1_auto/buildroot
INFO: ----------------------------------------
INFO: don't build dtbo ...
INFO: build arisc
find: '/home/ubuntu/tina5sdk-bspbrandy/brandy-2.0/spl': No such file or directory
find: '/home/ubuntu/tina5sdk-bspbrandy/dramlib': No such file or directory
INFO: build_bootloader: brandy_path=/home/ubuntu/tina5sdk-bspbrandy/brandy-2.0
INFO: skip build brandy.
INFO: build kernel ...
INFO: prepare_buildserver
INFO: Prepare toolchain ...
Building kernel
make[1]: Entering directory '/home/ubuntu/tina5sdk-bspout/t113_i/kernel/build'
  GEN     Makefile
  DTC     arch/arm/boot/dts/board.dtb
  CALL    /home/ubuntu/tina5sdk-bspkernel/linux-5.4/scripts/atomic/check-atomics.sh
  CALL    /home/ubuntu/tina5sdk-bspkernel/linux-5.4/scripts/checksyscalls.sh
  CHK     include/generated/compile.h
  Kernel: arch/arm/boot/Image is ready
  Building modules, stage 2.
  MODPOST 6 modules
  Kernel: arch/arm/boot/zImage is ready
  Kernel: arch/arm/boot/uImage is ready
...

Exportable Squashfs 4.0 filesystem, xz compressed, data block size 131072
        compressed data, compressed metadata, compressed fragments, no xattrs
        duplicates are removed
Filesystem size 56902.63 Kbytes (55.57 Mbytes)
        38.88% of uncompressed filesystem size (146336.84 Kbytes)
Inode table size 54158 bytes (52.89 Kbytes)
        23.54% of uncompressed inode table size (230025 bytes)
Directory table size 70804 bytes (69.14 Kbytes)
        48.95% of uncompressed directory table size (144657 bytes)
Number of duplicate files found 37
Number of inodes 6686
Number of files 5571
Number of fragments 397
Number of symbolic links  813
Number of device nodes 0
Number of fifo nodes 0
Number of socket nodes 0
Number of directories 302
Number of ids (unique uids + gids) 1
Number of uids 1
        root (0)
Number of gids 1
        root (0)
INFO: pack rootfs ok ...
INFO: ----------------------------------------
INFO: build Tina OK.
INFO: ----------------------------------------
ubuntu@ubuntu1804:~/tina5sdk-bsp$
等待一段时间,编译成功后,执行 ./build.sh pack 进行打包。
ubuntu@ubuntu1804:~/tina5sdk-bsp$ ./build.sh pack
========ACTION List: mk_pack ;========
options :
INFO: packing firmware ...
INFO: /home/ubuntu/tina5sdk-bspout/t113_i/common/keys
copying tools file
copying configs file
copying product configs file
linux copying boardt&linux_kernel_version configs file
ls: cannot access '/home/ubuntu/tina5sdk-bspdevice/config/chips/t113_i/configs/evb1_auto/linux-5.4/env*': No such file or directory
Use u-boot env file:
Warning: u-boot env file '' not exist! use file in default directory other than 'evb1_auto' directory
/home/ubuntu/tina5sdk-bspout/t113_i/evb1_auto/pack_out/aultls32.fex
/home/ubuntu/tina5sdk-bspout/t113_i/evb1_auto/pack_out/aultools.fex
/home/ubuntu/tina5sdk-bspout/t113_i/evb1_auto/pack_out/boot_package.cfg
/home/ubuntu/tina5sdk-bspout/t113_i/evb1_auto/pack_out/boot_package.fex
/home/ubuntu/tina5sdk-bspout/t113_i/evb1_auto/pack_out/boot_package_nor.cfg
/home/ubuntu/tina5sdk-bspout/t113_i/evb1_auto/pack_out/cardscript.fex
/home/ubuntu/tina5sdk-bspout/t113_i/evb1_auto/pack_out/cardscript_secure.fex
/home/ubuntu/tina5sdk-bspout/t113_i/evb1_auto/pack_out/cardtool.fex
/home/ubuntu/tina5sdk-bspout/t113_i/evb1_auto/pack_out/diskfs.fex
/home/ubuntu/tina5sdk-bspout/t113_i/evb1_auto/pack_out/dragon_toc.cfg
/home/ubuntu/tina5sdk-bspout/t113_i/evb1_auto/pack_out/env-recovery.cfg
/home/ubuntu/tina5sdk-bspout/t113_i/evb1_auto/pack_out/env.cfg
/home/ubuntu/tina5sdk-bspout/t113_i/evb1_auto/pack_out/env_ab.cfg
/home/ubuntu/tina5sdk-bspout/t113_i/evb1_auto/pack_out/env_burn.cfg
/home/ubuntu/tina5sdk-bspout/t113_i/evb1_auto/pack_out/env_dragon.cfg
/home/ubuntu/tina5sdk-bspout/t113_i/evb1_auto/pack_out/env_nor.cfg
/home/ubuntu/tina5sdk-bspout/t113_i/evb1_auto/pack_out/esm.fex
/home/ubuntu/tina5sdk-bspout/t113_i/evb1_auto/pack_out/image.cfg
/home/ubuntu/tina5sdk-bspout/t113_i/evb1_auto/pack_out/image_crashdump.cfg
/home/ubuntu/tina5sdk-bspout/t113_i/evb1_auto/pack_out/image_linux.cfg
/home/ubuntu/tina5sdk-bspout/t113_i/evb1_auto/pack_out/image_nor.cfg
/home/ubuntu/tina5sdk-bspout/t113_i/evb1_auto/pack_out/parameter.fex
/home/ubuntu/tina5sdk-bspout/t113_i/evb1_auto/pack_out/split_xxxx.fex
/home/ubuntu/tina5sdk-bspout/t113_i/evb1_auto/pack_out/sunxi.fex
/home/ubuntu/tina5sdk-bspout/t113_i/evb1_auto/pack_out/sw-subimgs-ab-rdiff.cfg
/home/ubuntu/tina5sdk-bspout/t113_i/evb1_auto/pack_out/sw-subimgs-ab.cfg
/home/ubuntu/tina5sdk-bspout/t113_i/evb1_auto/pack_out/sw-subimgs-recovery.cfg
/home/ubuntu/tina5sdk-bspout/t113_i/evb1_auto/pack_out/sys_config.fex
/home/ubuntu/tina5sdk-bspout/t113_i/evb1_auto/pack_out/sys_partition-recovery.fex
/home/ubuntu/tina5sdk-bspout/t113_i/evb1_auto/pack_out/sys_partition.fex
/home/ubuntu/tina5sdk-bspout/t113_i/evb1_auto/pack_out/sys_partition_ab.fex
/home/ubuntu/tina5sdk-bspout/t113_i/evb1_auto/pack_out/sys_partition_dump.fex
/home/ubuntu/tina5sdk-bspout/t113_i/evb1_auto/pack_out/sys_partition_nor.fex
/home/ubuntu/tina5sdk-bspout/t113_i/evb1_auto/pack_out/sys_partition_private.fex
/home/ubuntu/tina5sdk-bspout/t113_i/evb1_auto/pack_out/sysrecovery.fex
/home/ubuntu/tina5sdk-bspout/t113_i/evb1_auto/pack_out/toc0.fex
/home/ubuntu/tina5sdk-bspout/t113_i/evb1_auto/pack_out/toc0_ft.fex
/home/ubuntu/tina5sdk-bspout/t113_i/evb1_auto/pack_out/toc0_nand.fex
/home/ubuntu/tina5sdk-bspout/t113_i/evb1_auto/pack_out/toc0_sdcard.fex
/home/ubuntu/tina5sdk-bspout/t113_i/evb1_auto/pack_out/toc0_ufs.fex
/home/ubuntu/tina5sdk-bspout/t113_i/evb1_auto/pack_out/toc1.fex
/home/ubuntu/tina5sdk-bspout/t113_i/evb1_auto/pack_out/usbtool.fex
/home/ubuntu/tina5sdk-bspout/t113_i/evb1_auto/pack_out/usbtool_crash.fex
/home/ubuntu/tina5sdk-bspout/t113_i/evb1_auto/pack_out/usbtool_test.fex
copying boot resource
copying boot file
'/home/ubuntu/tina5sdk-bspdevice/config/chips/t113_i/bin/boot0_nand_sun8iw20p1.bin' -> '/home/ubuntu/tina5sdk-bspout/t113_i/evb1_auto/pack_out/boot0_nand.fex'
'/home/ubuntu/tina5sdk-bspdevice/config/chips/t113_i/bin/boot0_sdcard_sun8iw20p1.bin' -> '/home/ubuntu/tina5sdk-bspout/t113_i/evb1_auto/pack_out/boot0_sdcard.fex'
'/home/ubuntu/tina5sdk-bspdevice/config/chips/t113_i/bin/boot0_spinor_sun8iw20p1.bin' -> '/home/ubuntu/tina5sdk-bspout/t113_i/evb1_auto/pack_out/boot0_spinor.fex'
'/home/ubuntu/tina5sdk-bspdevice/config/chips/t113_i/bin/fes1_sun8iw20p1.bin' -> '/home/ubuntu/tina5sdk-bspout/t113_i/evb1_auto/pack_out/fes1.fex'
'/home/ubuntu/tina5sdk-bspdevice/config/chips/t113_i/bin/u-boot-sun8iw20p1.bin' -> '/home/ubuntu/tina5sdk-bspout/t113_i/evb1_auto/pack_out/u-boot.fex'
'/home/ubuntu/tina5sdk-bspdevice/config/chips/t113_i/bin/optee_sun8iw20p1.bin' -> '/home/ubuntu/tina5sdk-bspout/t113_i/evb1_auto/pack_out/optee.fex'
'/home/ubuntu/tina5sdk-bspdevice/config/chips/t113_i//bin/boot0_nand_sun8iw20p1.bin' -> '/home/ubuntu/tina5sdk-bspout/t113_i/evb1_auto/pack_out/boot0_nand.fex'
'/home/ubuntu/tina5sdk-bspdevice/config/chips/t113_i//bin/boot0_sdcard_sun8iw20p1.bin' -> '/home/ubuntu/tina5sdk-bspout/t113_i/evb1_auto/pack_out/boot0_sdcard.fex'
'/home/ubuntu/tina5sdk-bspdevice/config/chips/t113_i//bin/boot0_spinor_sun8iw20p1.bin' -> '/home/ubuntu/tina5sdk-bspout/t113_i/evb1_auto/pack_out/boot0_spinor.fex'
'/home/ubuntu/tina5sdk-bspdevice/config/chips/t113_i//bin/fes1_sun8iw20p1.bin' -> '/home/ubuntu/tina5sdk-bspout/t113_i/evb1_auto/pack_out/fes1.fex'
'/home/ubuntu/tina5sdk-bspdevice/config/chips/t113_i//bin/u-boot-sun8iw20p1.bin' -> '/home/ubuntu/tina5sdk-bspout/t113_i/evb1_auto/pack_out/u-boot.fex'
'/home/ubuntu/tina5sdk-bspdevice/config/chips/t113_i//bin/optee_sun8iw20p1.bin' -> '/home/ubuntu/tina5sdk-bspout/t113_i/evb1_auto/pack_out/optee.fex'
'/home/ubuntu/tina5sdk-bspdevice/config/chips/t113_i/configs/evb1_auto/bin/amp_rv0.bin' -> '/home/ubuntu/tina5sdk-bspout/t113_i/evb1_auto/pack_out/amp_rv0.fex'
'/home/ubuntu/tina5sdk-bspdevice/config/chips/t113_i/configs/evb1_auto//bin/amp_rv0.bin' -> '/home/ubuntu/tina5sdk-bspout/t113_i/evb1_auto/pack_out/amp_rv0.fex'
copying boot file 2.0
'/home/ubuntu/tina5sdk-bspout/t113_i/evb1_auto/buildroot/arisc' -> '/home/ubuntu/tina5sdk-bspout/t113_i/evb1_auto/pack_out/arisc.fex'
'/home/ubuntu/tina5sdk-bspout/t113_i/evb1_auto/buildroot/sunxi.dtb' -> '/home/ubuntu/tina5sdk-bspout/t113_i/evb1_auto/pack_out/sunxi.fex'
'/home/ubuntu/tina5sdk-bspout/t113_i/evb1_auto/buildroot/boot0_nand_sun8iw20p1.bin' -> '/home/ubuntu/tina5sdk-bspout/t113_i/evb1_auto/pack_out/boot0_nand.fex'
'/home/ubuntu/tina5sdk-bspout/t113_i/evb1_auto/buildroot/boot0_sdcard_sun8iw20p1.bin' -> '/home/ubuntu/tina5sdk-bspout/t113_i/evb1_auto/pack_out/boot0_sdcard.fex'
'/home/ubuntu/tina5sdk-bspout/t113_i/evb1_auto/buildroot/boot0_spinor_sun8iw20p1.bin' -> '/home/ubuntu/tina5sdk-bspout/t113_i/evb1_auto/pack_out/boot0_spinor.fex'
'/home/ubuntu/tina5sdk-bspout/t113_i/evb1_auto/buildroot/fes1_sun8iw20p1.bin' -> '/home/ubuntu/tina5sdk-bspout/t113_i/evb1_auto/pack_out/fes1.fex'
'/home/ubuntu/tina5sdk-bspout/t113_i/evb1_auto/buildroot/sboot_sun8iw20p1.bin' -> '/home/ubuntu/tina5sdk-bspout/t113_i/evb1_auto/pack_out/sboot.bin'
'/home/ubuntu/tina5sdk-bspout/t113_i/evb1_auto/buildroot/u-boot-sun8iw20p1.bin' -> '/home/ubuntu/tina5sdk-bspout/t113_i/evb1_auto/pack_out/u-boot.fex'
'/home/ubuntu/tina5sdk-bspout/t113_i/evb1_auto/buildroot/vmlinux.tar.bz2' -> '/home/ubuntu/tina5sdk-bspout/t113_i/evb1_auto/pack_out/vmlinux.fex'
copying arm secure boot file
copying additional files
handle partition_size
/home/ubuntu/tina5sdk-bspout/t113_i/evb1_auto/pack_out/.uboot.dtb.dts.tmp: Warning (spi_bus_reg): /soc@29000000/spi@4025000/spi_board0: SPI bus unit address format error, expected "0"
/home/ubuntu/tina5sdk-bspout/t113_i/evb1_auto/pack_out/.uboot.dtb.dts.tmp:661.15-670.6: Warning (spi_bus_reg): /soc@29000000/spi@4025000/spi_board0: SPI bus unit address format error, expected "0"
'/home/ubuntu/tina5sdk-bspout/t113_i/evb1_auto/pack_out/temp_ubootnodtb.bin' -> '/home/ubuntu/tina5sdk-bspout/t113_i/evb1_auto/pack_out/u-boot.fex'
/home/ubuntu/tina5sdk-bspout/t113_i/evb1_auto/pack_out/.uboot.dts: Warning (spi_bus_reg): /soc@29000000/spi@4025000/spi_board0: SPI bus unit address format error, expected "0"
/home/ubuntu/tina5sdk-bspout/t113_i/evb1_auto/buildroot/.sunxi.dts: Warning (alias_paths): /aliases: aliases property name must include only lowercase and '-'
update optee
do not set LINUX_DTBO_FILE
pack boot package
content_count=3
2:LICHEE_REDUNDANT_ENV_SIZE:0x20000
--mkenvimage create redundant env data!--
--redundant env data size 0x20000---
verity not supported yet
packing for linux
normal
commit : f7388902e9-dirty
mbr count = 4

partitation file Path=/home/ubuntu/tina5sdk-bspout/t113_i/evb1_auto/pack_out/sys_partition.bin
mbr_name file Path=/home/ubuntu/tina5sdk-bspout/t113_i/evb1_auto/pack_out/sunxi_mbr.fex
download_name file Path=/home/ubuntu/tina5sdk-bspout/t113_i/evb1_auto/pack_out/dlinfo.fex

mbr size = 16384
mbr magic softw411
disk name=boot-resource
disk name=env
disk name=env-redund
disk name=boot
disk name=rootfs
disk name=riscv
disk name=private
disk name=UDISK
this is not a partition key
update_for_part_info 0
crc 0 = fd3908da
crc 1 = 68845987
crc 2 = d32ac21
crc 3 = 988ffd7c
MBR addr = 0x8000,logic_offset = 0xa000 GPT:boot-resource: 12000         1a685
MBR addr = 0x10686,logic_offset = 0xa000 GPT:env         : 1a686         1ae85
MBR addr = 0x10e86,logic_offset = 0xa000 GPT:env-redund  : 1ae86         1b685
MBR addr = 0x11686,logic_offset = 0xa000 GPT:boot        : 1b686         24005
MBR addr = 0x1a006,logic_offset = 0xa000 GPT:rootfs      : 24006         224005
MBR addr = 0x21a006,logic_offset = 0xa000 GPT:riscv       : 224006        224805
MBR addr = 0x21a806,logic_offset = 0xa000 GPT:private     : 224806        22c805
MBR addr = 0x222806,logic_offset = 0xa000 GPT:UDISK       : 22c806        ffffffde
gpt_head->header_crc32 = 0xc0b73d8e
GPT----part num 8---
gpt_entry: 128
gpt_header: 92
GPT:boot-resource: 12000         1a685
GPT:env         : 1a686         1ae85
GPT:env-redund  : 1ae86         1b685
GPT:boot        : 1b686         24005
GPT:rootfs      : 24006         224005
GPT:riscv       : 224006        224805
GPT:private     : 224806        22c805
GPT:UDISK       : 22c806        ffffffde
update gpt file ok
update mbr file ok
commit : f7388902e9-dirty
temp = 40960
mbr count = 4 total_sectors = 15269888 logic_offset = 40960 media = 0

partitation file Path=/home/ubuntu/tina5sdk-bspout/t113_i/evb1_auto/pack_out/sys_partition.bin
mbr_name file Path=/home/ubuntu/tina5sdk-bspout/t113_i/evb1_auto/pack_out/sunxi_mbr.fex
download_name file Path=/home/ubuntu/tina5sdk-bspout/t113_i/evb1_auto/pack_out/dlinfo.fex

mbr size = 16384
mbr magic softw411
disk name=boot-resource
disk name=env
disk name=env-redund
disk name=boot
disk name=rootfs
disk name=riscv
disk name=private
disk name=UDISK
this is not a partition key
update_for_part_info 0
crc 0 = fd3908da
crc 1 = 68845987
crc 2 = d32ac21
crc 3 = 988ffd7c
MBR addr = 0x8000,logic_offset = 0xa000 GPT:boot-resource: 12000         1a685
MBR addr = 0x10686,logic_offset = 0xa000 GPT:env         : 1a686         1ae85
MBR addr = 0x10e86,logic_offset = 0xa000 GPT:env-redund  : 1ae86         1b685
MBR addr = 0x11686,logic_offset = 0xa000 GPT:boot        : 1b686         24005
MBR addr = 0x1a006,logic_offset = 0xa000 GPT:rootfs      : 24006         224005
MBR addr = 0x21a006,logic_offset = 0xa000 GPT:riscv       : 224006        224805
MBR addr = 0x21a806,logic_offset = 0xa000 GPT:private     : 224806        22c805
MBR addr = 0x222806,logic_offset = 0xa000 GPT:UDISK       : 22c806        e8ffde
gpt_head->header_crc32 = 0x5ab3941c
GPT----part num 8---
gpt_entry: 128
gpt_header: 92
GPT:boot-resource: 12000         1a685
GPT:env         : 1a686         1ae85
GPT:env-redund  : 1ae86         1b685
GPT:boot        : 1b686         24005
GPT:rootfs      : 24006         224005
GPT:riscv       : 224006        224805
GPT:private     : 224806        22c805
GPT:UDISK       : 22c806        e8ffde
update gpt file ok
update mbr file ok
/home/ubuntu/tina5sdk-bsptools/pack/pctools/linux/eDragonEx/
/home/ubuntu/tina5sdk-bspout/t113_i/evb1_auto/pack_out
Begin Parse sys_partion.fex
Add partion boot-resource.fex BOOT-RESOURCE_FEX
Add partion very boot-resource.fex BOOT-RESOURCE_FEX
FilePath: boot-resource.fex
FileLength=dad400Add partion env.fex ENV_FEX000000000
Add partion very env.fex ENV_FEX000000000
FilePath: env.fex
FileLength=20000Add partion env.fex ENV_FEX000000000
Add partion very env.fex ENV_FEX000000000
FilePath: env.fex
FileLength=20000Add partion boot.fex BOOT_FEX00000000
Add partion very boot.fex BOOT_FEX00000000
FilePath: boot.fex
FileLength=912800Add partion rootfs.fex ROOTFS_FEX000000
Add partion very rootfs.fex ROOTFS_FEX000000
FilePath: rootfs.fex
FileLength=b20d850Add partion amp_rv0.fex AMP_RV0_FEX00000
Add partion very amp_rv0.fex AMP_RV0_FEX00000
FilePath: amp_rv0.fex
FileLength=29eb8BuildImg 0
Dragon execute image.cfg SUCCESS !
----------image is at----------

264M    /home/ubuntu/tina5sdk-bspout/t113_i_linux_evb1_auto_uart0.img

pack finish
ubuntu@ubuntu1804:~/tina5sdk-bsp$
打包成功后,镜像文件保存在 t113i_tinasdk5.0-v1/out/t113_i/evb1_auto/buildroot/t113_i_linux_evb1_auto_uart0.img
ubuntu@ubuntu1804:~/tina5sdk-bspout/t113_i/evb1_auto/buildroot$ ls -la
total 825068
drwxrwxr-x 4 ubuntu ubuntu      4096 7月  16 18:10 .
drwxrwxr-x 4 ubuntu ubuntu      4096 7月  16 18:10 ..
-rw-rw-r-- 1 ubuntu ubuntu         6 7月  16 18:07 arisc
-rwxrwxr-x 1 ubuntu ubuntu  12985488 7月  16 18:07 bImage
-rw-rw-r-- 1 ubuntu ubuntu        66 7月  16 18:07 .board.dtb.d.dtc.tmp
-rw-rw-r-- 1 ubuntu ubuntu     79218 7月  16 18:07 .board.dtb.dts.tmp
-rw-rw-r-- 1 ubuntu ubuntu     40960 7月  16 16:31 boot0_mmc_car_fastboot_sun8iw20p1.bin
-rw-rw-r-- 1 ubuntu ubuntu     45056 7月  16 16:31 boot0_mmcfastboot_sun8iw20p1.bin
-rw-rw-r-- 1 ubuntu ubuntu     49152 7月  16 16:31 boot0_nand_car_fastboot_sun8iw20p1.bin
-rw-rw-r-- 1 ubuntu ubuntu     53248 7月  16 16:31 boot0_nandfastboot_sun8iw20p1.bin
-rw-rw-r-- 1 ubuntu ubuntu     49152 7月  16 16:31 boot0_nand_sun8iw20p1.bin
-rw-rw-r-- 1 ubuntu ubuntu     40960 7月  16 16:31 boot0_sdcard_sun8iw20p1.bin
-rw-rw-r-- 1 ubuntu ubuntu     32768 7月  16 16:31 boot0_spinor_sun8iw20p1.bin
-rw-rw-r-- 1 ubuntu ubuntu   9512960 7月  16 18:07 boot.img
-rw-rw-r-- 1 ubuntu ubuntu      4924 7月  16 18:07 .buildconfig
drwxrwxr-x 7 ubuntu ubuntu      4096 7月  16 18:07 buildroot
-rw-rw-r-- 1 ubuntu ubuntu    127053 7月  16 18:07 .config
lrwxrwxrwx 1 ubuntu ubuntu        18 7月  16 18:07 dist -> lib/modules/5.4.61
-rwxrwxr-x 1 ubuntu ubuntu    168392 7月  16 18:07 dtc
-rw-rw-r-- 1 ubuntu ubuntu     21152 7月  16 16:31 fes1_sun8iw20p1.bin
drwxrwxr-x 3 ubuntu ubuntu      4096 7月  16 18:07 lib
-rw-rw-r-- 1 ubuntu ubuntu   4000287 7月  16 18:07 rootfs.cpio.gz
-rw-r--r-- 1 ubuntu ubuntu 186701904 7月  16 18:07 rootfs.ext4
-rw-r--r-- 1 ubuntu ubuntu  58269696 7月  16 18:08 rootfs.squashfs
-rw-rw-r-- 1 ubuntu ubuntu  86446080 7月  16 18:08 rootfs.ubifs
-rw-rw-r-- 1 ubuntu ubuntu     86016 7月  16 16:31 sboot_sun8iw20p1.bin
-rw-rw-r-- 1 ubuntu ubuntu     57824 7月  16 18:07 sunxi.dtb
-rw-rw-r-- 1 ubuntu ubuntu     67864 7月  16 18:10 .sunxi.dts
-rw-rw-r-- 1 ubuntu ubuntu   2351698 7月  16 18:07 System.map
-rwxrwxr-x 2 ubuntu ubuntu 276633600 7月  16 18:10 t113_i_linux_evb1_auto_uart0.img
-rw-rw-r-- 1 ubuntu ubuntu    981756 7月  16 16:31 u-boot-sun8iw20p1.bin
-rw-rw-r-- 1 ubuntu ubuntu   5162016 7月  16 18:07 uImage
-rwxrwxr-x 1 ubuntu ubuntu 136244496 7月  16 18:07 vmlinux
-rw-rw-r-- 1 ubuntu ubuntu  62033866 7月  16 18:07 vmlinux.tar.bz2
-rwxrwxr-x 1 ubuntu ubuntu   5161952 7月  16 18:07 zImage
ubuntu@ubuntu1804:~/tina5sdk-bspout/t113_i/evb1_auto/buildroot$
常见问题
编译报错:
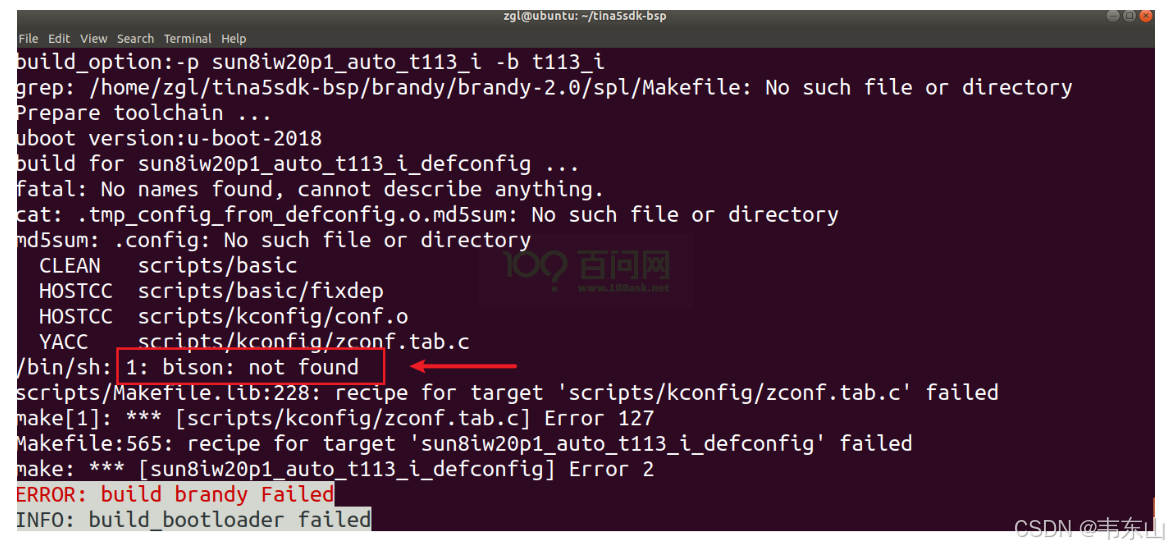
如果你是新弄的ubuntu,大概率会遇见上面的问题。这个是ubuntu里缺少了bison这个语法分析器。执行以下指令下载即可:
sudo apt update
sudo apt install bison
下次完成后,再次./build.sh -d重新编译。
烧写固件
编译完成后,如果不知道如何去烧写固件,可以参考《快速启动》里面的更新系统固件文档进行烧写。
文档地址:快速开始使用 | 东山Π (100ask.org)
等待烧写完成,串口打印信息如下:
[27]HELLO! BOOT0 is starting!
[30]BOOT0 commit : 069ed30b88
[33]set pll start
[38]periph0 has been enabled
[41]set pll end
[43][pmu]: bus read error
[45]board init ok
[47]enable_jtag
[49]get_pmu_exist() = -1
[51]DRAM BOOT DRIVE INFO: V0.34
[54]DRAM CLK = 792 MHz
[56]DRAM Type = 3 (2:DDR2,3:DDR3)
[60]DRAMC ZQ value: 0x7b7bfb
[62]DRAM ODT value: 0x42.
[65]ddr_efuse_type: 0x0
[68]DRAM SIZE = 512 MB
[75]DRAM simple test OK.
[77]rtc standby flag is 0x0, super standby flag is 0x0
[82]dram size =512
[85]card no is 2
[86]sdcard 2 line count 4
[89][mmc]: mmc driver ver 2021-05-21 14:47
[98][mmc]: Wrong media type 0x0, but host sdc2, try mmc first
[104][mmc]: ***Try MMC card 2***
[111][mmc]: mmc 2 cmd 1 timeout, err 100
[115][mmc]: mmc 2 cmd 1 err 100
[117][mmc]: mmc 2 send op cond failed
[121][mmc]: MMC card 2 Card did not respond to voltage select!
[127][mmc]: ***SD/MMC 2 init error!!!***
[134][mmc]: ***Try SD card 2***
[147][mmc]: HSSDR52/SDR25 4 bit
[150][mmc]: 50000000 Hz
[152][mmc]: 3696 MB
[154][mmc]: ***SD/MMC 2 init OK!!!***
[249]Loading boot-pkg Succeed(index=0).
[253]Entry_name        = u-boot
[260]Entry_name        = optee
[264]Entry_name        = dtb
[267]mmc not para
[269]Jump to second Boot.
M/TC: OP-TEE version: 2a99a16f (gcc version 5.3.1 20160412 (Linaro GCC 5.3-2016.05)) #1 Thu Aug 17 11:13:02 UTC 2023 arm
E/TC:0 0 platform_standby_fdt_parse:126 no pmu0 node
E/TC:0 0 sunxi_twi_parse_from_dt:121 no pmu node


U-Boot 2018.07-g6047f84-dirty (Jul 16 2024 - 16:30:57 +0800) Allwinner Technology

[00.340]CPU:   Allwinner Family
[00.342]Model: sun8iw20
[00.345]DRAM:  512 MiB
[00.348]Relocation Offset is: 1cebd000
[00.376]secure enable bit: 0
E/TC:0   fdt_getprop_u32:336 prop trace_level not found
[00.389]CPU=1008 MHz,PLL6=600 Mhz,AHB=200 Mhz, APB1=100Mhz  MBus=300Mhz
[00.396]gic: sec monitor mode
SPI ALL:   ready
[00.401]line:703 init_clocks
[00.404]flash init start
[00.406]workmode = 0,storage type = 2
[00.409][mmc]: mmc driver ver uboot2018:2023-07-4 16:18:00
[00.415][mmc]: get sdly from uboot header fail
[00.420][mmc]: Is not EXT_PARA0_ID or EXT_PARA0_TUNING_SUCCESS_FLAG!
[00.426][mmc]: SUNXI SDMMC Controller Version:0x50310
[00.447][mmc]: card_caps:0x3000000a
[00.450][mmc]: host_caps:0x3000003f
[00.457][mmc]: read mmc 2 info ok
[00.460]sunxi flash init ok
[00.462]drv_disp_init
partno erro : can't find partition bootloader
[00.509]drv_disp_init finish
[00.520]Loading Environment from SUNXI_FLASH... OK
[00.539]boot_gui_init:start
partno erro : can't find partition Reserve0
[00.548]LCD open finish
bad fb1_cfg[w=0,h=0,bpp=32,format=0]
[00.555]boot_gui_init:finish
partno erro : can't find partition bootloader
[00.564]bmp_name=bootlogo.bmp size 1152054
[00.626]Item0 (Map) magic is bad
[00.629]the secure storage item0 copy0 magic is bad
[00.634]Item0 (Map) magic is bad
[00.637]the secure storage item0 copy1 magic is bad
[00.641]Item0 (Map) magic is bad
secure storage read widevine fail
secure storage read ec_key fail
secure storage read ec_cert1 fail
secure storage read ec_cert2 fail
secure storage read ec_cert3 fail
secure storage read rsa_key fail
secure storage read rsa_cert1 fail
secure storage read rsa_cert2 fail
secure storage read rsa_cert3 fail
[00.672]usb burn from boot
delay time 0
weak:otg_phy_config
[00.683]usb prepare ok
[00.873]usb sof ok
[00.874]usb probe ok
[00.876]usb setup ok
set address 0x20
set address 0x20 ok
set address 0x27
set address 0x27 ok
try to update
[01.281]do_burn_from_boot usb : have no handshake
List file under ULI/factory
** Unrecognized filesystem type **
[01.292]update part info
[01.295]update bootcmd
[01.301]change working_fdt 0x5c87ce68 to 0x5c85ce68
[01.306][mmc]: can't find node "sunxi-mmc2" try "mmc"
[01.311][mmc]: no mmc-hs400-1_8v!
[01.314][mmc]: no mmc-hs200-1_8v!
[01.317][mmc]: no mmc-ddr-1_8v!
[01.320][mmc]: get sunxi-mmc2 string failed
[01.325]The storage not support sample function
[01.349]update dts
Hit any key to stop autoboot:  0
[01.758]no vendor_boot partition is found
Android's image name: sun8i_arm
The loading address of the kernel is not in the boot image
ERROR: reserving fdt memory region failed (addr=41b00000 size=100000)
ERROR: reserving fdt memory region failed (addr=5c907000 size=3e8000)
[01.806]Starting kernel ...

[01.809][mmc]: mmc exit start
[01.822][mmc]: mmc 2 exit ok
[    0.000000] Booting Linux on physical CPU 0x0
[    0.000000] Linux version 5.4.61 (ubuntu@dshanpi) (arm-linux-gnueabi-gcc (Linaro GCC 5.3-2016.05) 5.3.1 20160412, GNU ld (Linaro_Binutils-2016.05) 2.25.0 Linaro 2016_02) #1 SMP PREEMPT Tue Jul 16 16:31:37 CST 2024
[    0.000000] CPU: ARMv7 Processor [410fc075] revision 5 (ARMv7), cr=10c5387d
[    0.000000] CPU: div instructions available: patching division code
[    0.000000] CPU: PIPT / VIPT nonaliasing data cache, VIPT aliasing instruction cache
[    0.000000] OF: fdt: Machine model: sun8iw20
[    0.000000] Memory policy: Data cache writealloc
[    0.000000] Reserved memory: created DMA memory pool at 0x42200000, size 0 MiB
[    0.000000] OF: reserved mem: initialized node vdev0buffer@42200000, compatible id shared-dma-pool
[    0.000000] Reserved memory: created DMA memory pool at 0x42244000, size 0 MiB
[    0.000000] OF: reserved mem: initialized node dsp0_rpbuf@42244000, compatible id shared-dma-pool
[    0.000000] Reserved memory: created DMA memory pool at 0x42900000, size 0 MiB
[    0.000000] OF: reserved mem: initialized node vdev0buffer@42900000, compatible id shared-dma-pool
[    0.000000] cma: Reserved 16 MiB at 0x5f000000
[    0.000000] On node 0 totalpages: 129120
[    0.000000]   Normal zone: 1024 pages used for memmap
[    0.000000]   Normal zone: 0 pages reserved
[    0.000000]   Normal zone: 129120 pages, LIFO batch:31
[    0.000000] psci: probing for conduit method from DT.
[    0.000000] psci: PSCIv1.0 detected in firmware.
[    0.000000] psci: Using standard PSCI v0.2 function IDs
[    0.000000] psci: MIGRATE_INFO_TYPE not supported.
[    0.000000] psci: SMC Calling Convention v1.0
[    0.000000] percpu: Embedded 15 pages/cpu s30976 r8192 d22272 u61440
[    0.000000] pcpu-alloc: s30976 r8192 d22272 u61440 alloc=15*4096
[    0.000000] pcpu-alloc: [0] 0 [0] 1
[    0.000000] Built 1 zonelists, mobility grouping on.  Total pages: 128096
[    0.000000] Kernel command line: earlycon=uart8250,mmio32,0x02500000 clk_ignore_unused initcall_debug=0 console=ttyS0,115200 loglevel=8 root=/dev/mmcblk0p5 rootwait init=/init partitions=boot-resource@mmcblk0p1:env@mmcblk0p2:env-redund@mmcblk0p3:boot@mmcblk0p4:rootfs@mmcblk0p5:riscv@mmcblk0p6:private@mmcblk0p7:UDISK@mmcblk0p8 cma=16M snum= mac_addr= wifi_mac= bt_mac= specialstr= gpt=1 androidboot.mode=normal androidboot.hardware=sun8iw20p1 boot_type=2 androidboot.boot_type=2 gpt=1 uboot_message=2018.07-g6047f84-dirty(07/16/2024-16:30:57) mbr_offset=1032192 disp_reserve=4096000,0x5c907000 androidboot.dramfreq=792 androidboot.dramsize=512 mtdparts=<NULL> uboot_backup=ubootA
[    0.000000] Dentry cache hash table entries: 65536 (order: 6, 262144 bytes, linear)
[    0.000000] Inode-cache hash table entries: 32768 (order: 5, 131072 bytes, linear)
[    0.000000] mem auto-init: stack:off, heap alloc:off, heap free:off
[    0.000000] Memory: 467904K/516480K available (7168K kernel code, 425K rwdata, 2572K rodata, 1024K init, 195K bss, 32192K reserved, 16384K cma-reserved, 0K highmem)
[    0.000000] SLUB: HWalign=64, Order=0-3, MinObjects=0, CPUs=2, Nodes=1
[    0.000000] rcu: Preemptible hierarchical RCU implementation.
[    0.000000]  Tasks RCU enabled.
[    0.000000] rcu: RCU calculated value of scheduler-enlistment delay is 10 jiffies.
[    0.000000] NR_IRQS: 16, nr_irqs: 16, preallocated irqs: 16
[    0.000000] random: get_random_bytes called from start_kernel+0x250/0x3d0 with crng_init=0
[    0.000000] arch_timer: cp15 timer(s) running at 24.00MHz (phys).
[    0.000000] clocksource: arch_sys_counter: mask: 0xffffffffffffff max_cycles: 0x588fe9dc0, max_idle_ns: 440795202592 ns
[    0.000006] sched_clock: 56 bits at 24MHz, resolution 41ns, wraps every 4398046511097ns
[    0.000018] Switching to timer-based delay loop, resolution 41ns
[    0.000204] clocksource: timer: mask: 0xffffffff max_cycles: 0xffffffff, max_idle_ns: 79635851949 ns
[    0.000888] Console: colour dummy device 80x30
[    0.000928] Calibrating delay loop (skipped), value calculated using timer frequency.. 48.00 BogoMIPS (lpj=240000)
[    0.000942] pid_max: default: 32768 minimum: 301
[    0.001099] Mount-cache hash table entries: 1024 (order: 0, 4096 bytes, linear)
[    0.001113] Mountpoint-cache hash table entries: 1024 (order: 0, 4096 bytes, linear)
[    0.001760] CPU: Testing write buffer coherency: ok
[    0.002111] /cpus/cpu@0 missing clock-frequency property
[    0.002133] /cpus/cpu@1 missing clock-frequency property
[    0.002145] CPU0: thread -1, cpu 0, socket 0, mpidr 80000000
[    0.002755] Setting up static identity map for 0x40100000 - 0x40100060
[    0.002883] rcu: Hierarchical SRCU implementation.
[    0.003207] BOOTEVENT:         3.198416: ON
[    0.003409] smp: Bringing up secondary CPUs ...
[    0.004649] CPU1: thread -1, cpu 1, socket 0, mpidr 80000001
[    0.004807] smp: Brought up 1 node, 2 CPUs
[    0.004821] SMP: Total of 2 processors activated (96.00 BogoMIPS).
[    0.004828] CPU: All CPU(s) started in SVC mode.
[    0.005356] devtmpfs: initialized
[    0.019691] VFP support v0.3: implementor 41 architecture 2 part 30 variant 7 rev 5
[    0.020311] clocksource: jiffies: mask: 0xffffffff max_cycles: 0xffffffff, max_idle_ns: 19112604462750000 ns
[    0.020343] futex hash table entries: 512 (order: 3, 32768 bytes, linear)
[    0.021226] pinctrl core: initialized pinctrl subsystem
[    0.022699] NET: Registered protocol family 16
[    0.024867] DMA: preallocated 256 KiB pool for atomic coherent allocations
[    0.066145] rtc_ccu: sunxi ccu init OK
[    0.068603] ccu: sunxi ccu init OK
[    0.069134] r_ccu: sunxi ccu init OK
[    0.109032] sun6i-dma 3002000.dma-controller: sunxi dma probed
[    0.113709] iommu: Default domain type: Translated
[    0.113943] sunxi iommu: irq = 24
[    0.115106] SCSI subsystem initialized
[    0.115473] usbcore: registered new interface driver usbfs
[    0.115568] usbcore: registered new interface driver hub
[    0.116143] usbcore: registered new device driver usb
[    0.116341] mc: Linux media interface: v0.10
[    0.116400] videodev: Linux video capture interface: v2.00
[    0.117735] Advanced Linux Sound Architecture Driver Initialized.
[    0.118516] Bluetooth: Core ver 2.22
[    0.118617] NET: Registered protocol family 31
[    0.118629] Bluetooth: HCI device and connection manager initialized
[    0.118649] Bluetooth: HCI socket layer initialized
[    0.118663] Bluetooth: L2CAP socket layer initialized
[    0.118695] Bluetooth: SCO socket layer initialized
[    0.118970] pwm module init!
[    0.129846] g2d 5410000.g2d: Adding to iommu group 0
[    0.130640] G2D: rcq version initialized.major:250
[    0.131431] input: sunxi-keyboard as /devices/virtual/input/input0
[    0.133145] clocksource: Switched to clocksource arch_sys_counter
[    0.143019] sun8iw20-pinctrl pio: initialized sunXi PIO driver
[    0.157993] thermal_sys: Registered thermal governor 'step_wise'
[    0.158001] thermal_sys: Registered thermal governor 'user_space'
[    0.158018] thermal_sys: Registered thermal governor 'power_allocator'
[    0.158586] NET: Registered protocol family 2
[    0.159467] tcp_listen_portaddr_hash hash table entries: 512 (order: 0, 6144 bytes, linear)
[    0.159500] TCP established hash table entries: 4096 (order: 2, 16384 bytes, linear)
[    0.159553] TCP bind hash table entries: 4096 (order: 3, 32768 bytes, linear)
[    0.159615] TCP: Hash tables configured (established 4096 bind 4096)
[    0.159720] UDP hash table entries: 256 (order: 1, 8192 bytes, linear)
[    0.159756] UDP-Lite hash table entries: 256 (order: 1, 8192 bytes, linear)
[    0.159930] NET: Registered protocol family 1
[    0.162695] Initialise system trusted keyrings
[    0.162936] workingset: timestamp_bits=30 max_order=17 bucket_order=0
[    0.174068] squashfs: version 4.0 (2009/01/31) Phillip Lougher
[    0.174358] ntfs: driver 2.1.32 [Flags: R/W].
[    0.174686] fuse: init (API version 7.31)
[    0.204938] NET: Registered protocol family 38
[    0.204963] Key type asymmetric registered
[    0.204972] Asymmetric key parser 'x509' registered
[    0.205071] Block layer SCSI generic (bsg) driver version 0.4 loaded (major 248)
[    0.205087] io scheduler mq-deadline registered
[    0.205095] io scheduler kyber registered
[    0.205242] atomic64_test: passed
[    0.206836] [DISP]disp_module_init
[    0.207462] disp 5000000.disp: Adding to iommu group 0
[    0.208093] [DISP] disp_init,line:2372:
[    0.208098] smooth display screen:0 type:1 mode:4
[    0.225066] display_fb_request,fb_id:0
[    0.236835] disp_al_manager_apply ouput_type:1
[    0.237011] [DISP] lcd_clk_config,line:777:
[    0.237023] disp 0, clk: pll(420000000),clk(420000000),dclk(70000000) dsi_rate(70000000)
[    0.237023]      clk real:pll(420000000),clk(420000000),dclk(105000000) dsi_rate(150000000)
[    0.237330] sun8iw20-pinctrl pio: pio supply vcc-pb not found, using dummy regulator
[    0.238163] [DISP]disp_module_init finish
[    0.239563] sunxi_sid_init()783 - insmod ok
[    0.240322] pwm-regulator: supplied by regulator-dummy
[    0.242115] uart uart0: uart0 supply uart not found, using dummy regulator
[    0.242464] uart0: ttyS0 at MMIO 0x2500000 (irq = 34, base_baud = 1500000) is a SUNXI
[    0.242494] sw_console_setup()1831 - console setup baud 115200 parity n bits 8, flow n
[    1.164971] printk: console [ttyS0] enabled
[    1.170468] sun8iw20-pinctrl pio: pio supply vcc-pg not found, using dummy regulator
[    1.179614] uart uart1: uart1 supply uart not found, using dummy regulator
[    1.187704] uart1: ttyS1 at MMIO 0x2500400 (irq = 35, base_baud = 1500000) is a SUNXI
[    1.197333] uart uart2: uart2 supply uart not found, using dummy regulator
[    1.205441] uart2: ttyS2 at MMIO 0x2500800 (irq = 36, base_baud = 1500000) is a SUNXI
[    1.215051] uart uart3: uart3 supply uart not found, using dummy regulator
[    1.223084] uart3: ttyS3 at MMIO 0x2500c00 (irq = 37, base_baud = 1500000) is a SUNXI
[    1.233080] misc dump reg init
[    1.237157] deinterlace 5400000.deinterlace: Adding to iommu group 0
[    1.244909] deinterlace 5400000.deinterlace: version[1.0.0], ip=0x110
[    1.253914] sunxi-rfkill soc@3000000:rfkill@0: module version: v1.0.9
[    1.261163] sunxi-rfkill soc@3000000:rfkill@0: get gpio chip_en failed
[    1.268536] sunxi-rfkill soc@3000000:rfkill@0: get gpio power_en failed
[    1.275987] sunxi-rfkill soc@3000000:rfkill@0: wlan_busnum (1)
[    1.282535] sunxi-rfkill soc@3000000:rfkill@0: Missing wlan_power.
[    1.289499] sunxi-rfkill soc@3000000:rfkill@0: wlan clock[0] (32k-fanout1)
[    1.297255] sunxi-rfkill soc@3000000:rfkill@0: wlan_regon gpio=44 assert=1
[    1.305023] sunxi-rfkill soc@3000000:rfkill@0: wlan_hostwake gpio=202 assert=1
[    1.313159] sunxi-rfkill soc@3000000:rfkill@0: wakeup source is enabled
[    1.320896] sunxi-rfkill soc@3000000:rfkill@0: Missing bt_power.
[    1.327683] sunxi-rfkill soc@3000000:rfkill@0: bt clock[0] (32k-fanout1)
[    1.335243] sunxi-rfkill soc@3000000:rfkill@0: bt_rst gpio=210 assert=0
[    1.343717] [ADDR_MGT] addr_mgt_probe: module version: v1.0.11
[    1.350959] [ADDR_MGT] addr_init: Failed to get type_def_bt, use default: 0
[    1.358848] [ADDR_MGT] addr_mgt_probe: success.
[    1.365825] libphy: Fixed MDIO Bus: probed
[    1.370431] CAN device driver interface
[    1.375603] sun8iw20-pinctrl pio: pio supply vcc-pe not found, using dummy regulator
[    1.384772] gmac-power0: NULL
[    1.388104] gmac-power1: NULL
[    1.391429] gmac-power2: NULL
[    1.395982] Failed to alloc md5
[    1.399518] eth0: Use random mac address
[    1.404424] usbcore: registered new interface driver asix
[    1.410581] usbcore: registered new interface driver ax88179_178a
[    1.417528] usbcore: registered new interface driver cdc_ether
[    1.424158] usbcore: registered new interface driver net1080
[    1.430568] usbcore: registered new interface driver cdc_subset
[    1.437292] usbcore: registered new interface driver zaurus
[    1.443647] usbcore: registered new interface driver cdc_ncm
[    1.449998] ehci_hcd: USB 2.0 'Enhanced' Host Controller (EHCI) Driver
[    1.457335] sunxi-ehci: EHCI SUNXI driver
[    1.462284] ohci_hcd: USB 1.1 'Open' Host Controller (OHCI) Driver
[    1.469266] sunxi-ohci: OHCI SUNXI driver
[    1.474436] usbcore: registered new interface driver uas
[    1.480485] usbcore: registered new interface driver usb-storage
[    1.487321] usbcore: registered new interface driver ums-alauda
[    1.494082] usbcore: registered new interface driver ums-cypress
[    1.500875] usbcore: registered new interface driver ums-datafab
[    1.507692] usbcore: registered new interface driver ums_eneub6250
[    1.514700] usbcore: registered new interface driver ums-freecom
[    1.521491] usbcore: registered new interface driver ums-isd200
[    1.528217] usbcore: registered new interface driver ums-jumpshot
[    1.535136] usbcore: registered new interface driver ums-karma
[    1.541736] usbcore: registered new interface driver ums-onetouch
[    1.548665] usbcore: registered new interface driver ums-realtek
[    1.555477] usbcore: registered new interface driver ums-sddr09
[    1.562173] usbcore: registered new interface driver ums-sddr55
[    1.568893] usbcore: registered new interface driver ums-usbat
[    1.576554] input: sunxi-ts as /devices/platform/soc@3000000/2009c00.rtp/input/input1
[    1.587610] sunxi-rtc 7090000.rtc: registered as rtc0
[    1.593463] sunxi-rtc 7090000.rtc: setting system clock to 1970-01-01T00:06:05 UTC (365)
[    1.602551] sunxi-rtc 7090000.rtc: Fail to read dts property 'gpr_bootcount_pos'
[    1.610884] reasonbase NULL
[    1.614028] reason large than max, fix to hot reboot, save boot reason
[    1.621348] invalid reason or reasonbase NULL
[    1.626256] sunxi-rtc 7090000.rtc: sunxi rtc probed
[    1.632285] i2c /dev entries driver
[    1.636455] IR NEC protocol handler initialized
[    1.641540] IR RC5(x/sz) protocol handler initialized
[    1.649745] usbcore: registered new interface driver uvcvideo
[    1.656239] USB Video Class driver (1.1.1)
[    1.660833] gspca_main: v2.14.0 registered
[    1.665446] sunxi cedar version 1.1
[    1.669590] sunxi-cedar 1c0e000.ve: Adding to iommu group 0
[    1.675945] VE: sunxi_cedar_probe power-domain init!!!
[    1.681714] VE: install start!!!
[    1.681714]
[    1.687305] VE: cedar-ve the get irq is 45
[    1.687305]
[    1.693817] VE: ve_debug_proc_info:(ptrval), data:(ptrval), lock:(ptrval)
[    1.693817]
[    1.703090] VE: install end!!!
[    1.703090]
[    1.708195] VE: sunxi_cedar_probe
[    1.713464] sunxi-wdt 20500a0.watchdog: Watchdog enabled (timeout=16 sec, nowayout=0)
[    1.722673] Bluetooth: HCI UART driver ver 2.3
[    1.727702] Bluetooth: HCI UART protocol H4 registered
[    1.733772] Bluetooth: XRadio Bluetooth LPM Mode Driver Ver 1.0.10
[    1.741035] [XR_BT_LPM] bluesleep_probe: bt_wake polarity: 1
[    1.747493] [XR_BT_LPM] bluesleep_probe: host_wake polarity: 1
[    1.754075] [XR_BT_LPM] bluesleep_probe: wakeup source is disabled!
[    1.754075]
[    1.762764] [XR_BT_LPM] bluesleep_probe: uart_index(1)
[    1.771263] sun8iw20-pinctrl pio: pio supply vcc-pc not found, using dummy regulator
[    1.780222] sunxi-mmc 4022000.sdmmc: SD/MMC/SDIO Host Controller Driver(v4.25 2022-6-21 13:40)
[    1.790139] sunxi-mmc 4022000.sdmmc: ***ctl-spec-caps*** 8
[    1.796381] sunxi-mmc 4022000.sdmmc: No vmmc regulator found
[    1.802731] sunxi-mmc 4022000.sdmmc: No vqmmc regulator found
[    1.809201] sunxi-mmc 4022000.sdmmc: No vdmmc regulator found
[    1.815666] sunxi-mmc 4022000.sdmmc: No vd33sw regulator found
[    1.822209] sunxi-mmc 4022000.sdmmc: No vd18sw regulator found
[    1.828767] sunxi-mmc 4022000.sdmmc: No vq33sw regulator found
[    1.835324] sunxi-mmc 4022000.sdmmc: No vq18sw regulator found
[    1.841887] sunxi-mmc 4022000.sdmmc: Cann't get pin bias hs pinstate,check if needed
[    1.851555] sunxi-mmc 4022000.sdmmc: sdc set ios:clk 0Hz bm PP pm UP vdd 21 width 1 timing LEGACY(SDR12) dt B
[    1.862783] sunxi-mmc 4022000.sdmmc: no vqmmc,Check if there is regulator
[    1.882970] sunxi-mmc 4022000.sdmmc: sdc set ios:clk 400000Hz bm PP pm ON vdd 21 width 1 timing LEGACY(SDR12) dt B
[    1.907238] sunxi-mmc 4022000.sdmmc: detmode:alway in(non removable)
[    1.914414] sunxi-mmc 4022000.sdmmc: sdc set ios:clk 400000Hz bm PP pm ON vdd 21 width 1 timing LEGACY(SDR12) dt B
[    1.924771] sunxi-mmc 4020000.sdmmc: SD/MMC/SDIO Host Controller Driver(v4.25 2022-6-21 13:40)
[    1.929105] sunxi-mmc 4022000.sdmmc: sdc set ios:clk 400000Hz bm PP pm ON vdd 21 width 1 timing LEGACY(SDR12) dt B
[    1.935972] sunxi-mmc 4020000.sdmmc: ***ctl-spec-caps*** 8
[    1.949742] sunxi-mmc 4022000.sdmmc: sdc set ios:clk 400000Hz bm PP pm ON vdd 21 width 1 timing LEGACY(SDR12) dt B
[    1.953586] sunxi-mmc 4020000.sdmmc: No vmmc regulator found
[    1.968198] sunxi-mmc 4022000.sdmmc: sdc set ios:clk 400000Hz bm PP pm ON vdd 21 width 1 timing LEGACY(SDR12) dt B
[    1.971534] sunxi-mmc 4020000.sdmmc: No vqmmc regulator found
[    1.989596] sunxi-mmc 4020000.sdmmc: No vdmmc regulator found
[    1.996063] sunxi-mmc 4020000.sdmmc: No vd33sw regulator found
[    2.002606] sunxi-mmc 4020000.sdmmc: No vd18sw regulator found
[    2.009167] sunxi-mmc 4020000.sdmmc: No vq33sw regulator found
[    2.015727] sunxi-mmc 4020000.sdmmc: No vq18sw regulator found
[    2.021189] mmc0: host does not support reading read-only switch, assuming write-enable
[    2.022737] sunxi-mmc 4020000.sdmmc: Got CD GPIO
[    2.031329] sunxi-mmc 4022000.sdmmc: sdc set ios:clk 25000000Hz bm PP pm ON vdd 21 width 1 timing LEGACY(SDR12) dt B
[    2.048518] sunxi-mmc 4022000.sdmmc: sdc set ios:clk 25000000Hz bm PP pm ON vdd 21 width 4 timing LEGACY(SDR12) dt B
[    2.048859] sunxi-mmc 4020000.sdmmc: sdc set ios:clk 0Hz bm PP pm UP vdd 21 width 1 timing LEGACY(SDR12) dt B
[    2.060434] mmc0: new SDHC card at address 1388
[    2.071681] sunxi-mmc 4020000.sdmmc: no vqmmc,Check if there is regulator
[    2.077907] mmcblk0: mmc0:1388 MK    3.61 GiB
[    2.094611]  mmcblk0: p1 p2 p3 p4 p5 p6 p7 p8
[    2.096877] sunxi-mmc 4020000.sdmmc: sdc set ios:clk 400000Hz bm PP pm ON vdd 21 width 1 timing LEGACY(SDR12) dt B
[    2.123191] sunxi-mmc 4020000.sdmmc: detmode:gpio polling
[    2.129280] sunxi-mmc 4020000.sdmmc: sdc set ios:clk 0Hz bm PP pm OFF vdd 0 width 1 timing LEGACY(SDR12) dt B
[    2.133832] sunxi-mmc 4021000.sdmmc: SD/MMC/SDIO Host Controller Driver(v4.25 2022-6-21 13:40)
[    2.150354] sunxi-mmc 4021000.sdmmc: ***ctl-spec-caps*** 8
[    2.156619] sunxi-mmc 4021000.sdmmc: No vmmc regulator found
[    2.162970] sunxi-mmc 4021000.sdmmc: No vqmmc regulator found
[    2.169437] sunxi-mmc 4021000.sdmmc: No vdmmc regulator found
[    2.175898] sunxi-mmc 4021000.sdmmc: No vd33sw regulator found
[    2.182441] sunxi-mmc 4021000.sdmmc: No vd18sw regulator found
[    2.188998] sunxi-mmc 4021000.sdmmc: No vq33sw regulator found
[    2.195554] sunxi-mmc 4021000.sdmmc: No vq18sw regulator found
[    2.202117] sunxi-mmc 4021000.sdmmc: Cann't get pin bias hs pinstate,check if needed
[    2.211710] sunxi-mmc 4021000.sdmmc: sdc set ios:clk 0Hz bm PP pm UP vdd 21 width 1 timing LEGACY(SDR12) dt B
[    2.222898] sunxi-mmc 4021000.sdmmc: no vqmmc,Check if there is regulator
[    2.243062] sunxi-mmc 4021000.sdmmc: sdc set ios:clk 400000Hz bm PP pm ON vdd 21 width 1 timing LEGACY(SDR12) dt B
[    2.267312] sunxi-mmc 4021000.sdmmc: detmode:manually by software
[    2.275008] sunxi-mmc 4021000.sdmmc: smc 2 p1 err, cmd 52, RTO !!
[    2.282184] usbcore: registered new interface driver usbhid
[    2.288470] sunxi-mmc 4021000.sdmmc: smc 2 p1 err, cmd 52, RTO !!
[    2.295369] sunxi-mmc 4021000.sdmmc: sdc set ios:clk 400000Hz bm PP pm ON vdd 21 width 1 timing LEGACY(SDR12) dt B
[    2.303168] usbhid: USB HID core driver
[    2.310044] sunxi-mmc 4021000.sdmmc: sdc set ios:clk 400000Hz bm PP pm ON vdd 21 width 1 timing LEGACY(SDR12) dt B
[    2.311290] exFAT: Version 1.3.0
[    2.325044] sunxi-mmc 4021000.sdmmc: smc 2 p1 err, cmd 5, RTO !!
[    2.327100] sunxi-msgbox 3003000.msgbox: sunxi_msgbox_probe(): sunxi msgbox start probe
[    2.334267] sunxi-mmc 4021000.sdmmc: smc 2 p1 err, cmd 5, RTO !!
[    2.342636] sunxi-msgbox 3003000.msgbox: sunxi_msgbox_probe(): sunxi msgbox probe success
[    2.349892] sunxi-mmc 4021000.sdmmc: smc 2 p1 err, cmd 5, RTO !!
[    2.358877] sunxi-rproc 3000008.dsp_rproc: sunxi rproc driver 2.2.1
[    2.366017] sunxi-mmc 4021000.sdmmc: smc 2 p1 err, cmd 5, RTO !!
[    2.372035] sunxi-rproc 3000008.dsp_rproc: failed to get firmware-name
[    2.378809] sunxi-mmc 4021000.sdmmc: sdc set ios:clk 0Hz bm PP pm OFF vdd 0 width 1 timing LEGACY(SDR12) dt B
[    2.386648] remoteproc remoteproc0: dsp_rproc is available
[    2.403551] sunxi-rproc 3000008.dsp_rproc: sunxi rproc driver probe ok
[    2.411065] sunxi-rproc 6010000.c906_rproc: sunxi rproc driver 2.2.1
[    2.418676] remoteproc remoteproc1: c906_rproc is available
[    2.425112] sunxi-rproc 6010000.c906_rproc: sunxi rproc driver probe ok
[    2.433658] sunxi-rpbuf-controller rpbuf_controller@0: assigned reserved memory node dsp0_rpbuf@42244000
[    2.449273] NET: Registered protocol family 10
[    2.455565] Segment Routing with IPv6
[    2.459756] sit: IPv6, IPv4 and MPLS over IPv4 tunneling driver
[    2.468062] NET: Registered protocol family 17
[    2.473077] NET: Registered protocol family 15
[    2.478102] can: controller area network core (rev 20170425 abi 9)
[    2.485148] NET: Registered protocol family 29
[    2.490138] can: raw protocol (rev 20170425)
[    2.494944] can: broadcast manager protocol (rev 20170425 t)
[    2.501298] can: netlink gateway (rev 20190810) max_hops=1
[    2.507811] Bluetooth: RFCOMM TTY layer initialized
[    2.513335] Bluetooth: RFCOMM socket layer initialized
[    2.519123] Bluetooth: RFCOMM ver 1.11
[    2.524211] Registering SWP/SWPB emulation handler
[    2.529978] Loading compiled-in X.509 certificates
[    2.554633] sunxi-twi 2502800.twi: 2502800.twi supply twi not found, using dummy regulator
[    2.565135] sunxi:i2c_sunxi@2502800.twi[INFO]: v2.6.5 probe success
[    2.573933] sunxi-thermal 2009400.ths: sun8iw20 cp version:15
[    2.581340] sun8iw20-pinctrl pio: pio supply vcc-pd not found, using dummy regulator
[    2.624206] get drvvbus-en is fail, 22
[    2.628414] get ehci0-controller wakeup-source is fail.
[    2.634445] sunxi ehci0-controller don't init wakeup source
[    2.640696] [sunxi-ehci0]: probe, pdev->name: 4101000.ehci0-controller, sunxi_ehci: 0xc0c911a0, 0x:e08e1000, irq_no:3a
[    2.652702] [sunxi-ehci0]: Not init ehci0
[    2.657613] get drvvbus-en is fail, 22
[    2.661819] get ohci0-controller wakeup-source is fail.
[    2.667793] sunxi ohci0-controller don't init wakeup source
[    2.674059] [sunxi-ohci0]: probe, pdev->name: 4101400.ohci0-controller, sunxi_ohci: 0xc0c91450
[    2.683720] [sunxi-ohci0]: Not init ohci0
[    2.688615] get drvvbus-en is fail, 22
[    2.692820] get ehci1-controller wakeup-source is fail.
[    2.698792] sunxi ehci1-controller don't init wakeup source
[    2.705057] [sunxi-ehci1]: probe, pdev->name: 4200000.ehci1-controller, sunxi_ehci: 0xc0c91700, 0x:e08f5000, irq_no:3c
[    2.717318] sunxi-ehci 4200000.ehci1-controller: 4200000.ehci1-controller supply hci not found, using dummy regulator
[    2.730776] sunxi-ehci 4200000.ehci1-controller: EHCI Host Controller
[    2.738056] sunxi-ehci 4200000.ehci1-controller: new USB bus registered, assigned bus number 1
[    2.748037] sunxi-ehci 4200000.ehci1-controller: irq 60, io mem 0x04200000
[    2.783164] sunxi-ehci 4200000.ehci1-controller: USB 2.0 started, EHCI 1.00
[    2.790975] sunxi-ehci 4200000.ehci1-controller: ehci_irq: highspeed device connect
[    2.800467] hub 1-0:1.0: USB hub found
[    2.804737] hub 1-0:1.0: 1 port detected
[    2.810002] get drvvbus-en is fail, 22
[    2.814243] get ohci1-controller wakeup-source is fail.
[    2.820236] sunxi ohci1-controller don't init wakeup source
[    2.826503] [sunxi-ohci1]: probe, pdev->name: 4200400.ohci1-controller, sunxi_ohci: 0xc0c919b0
[    2.836416] sunxi-ohci 4200400.ohci1-controller: 4200400.ohci1-controller supply hci not found, using dummy regulator
[    2.848750] sunxi-ohci 4200400.ohci1-controller: OHCI Host Controller
[    2.856034] sunxi-ohci 4200400.ohci1-controller: new USB bus registered, assigned bus number 2
[    2.865947] sunxi-ohci 4200400.ohci1-controller: irq 61, io mem 0x04200400
[    2.948017] hub 2-0:1.0: USB hub found
[    2.952265] hub 2-0:1.0: 1 port detected
[    2.958190] otg manager soc@3000000:usbc0@0: soc@3000000:usbc0@0 supply usbc not found, using dummy regulator
[    2.972234] cfg80211: Loading compiled-in X.509 certificates for regulatory database
[    2.983438] cfg80211: Loaded X.509 cert 'sforshee: 00b28ddf47aef9cea7'
[    2.990786] clk: Not disabling unused clocks
[    2.995721] platform regulatory.0: Direct firmware load for regulatory.db failed with error -2
[    3.003180] ALSA device list:
[    3.005536] cfg80211: failed to load regulatory.db
[    3.008694]   No soundcards found.
[    3.017919] alloc_fd: slot 0 not NULL!
[    3.026778] EXT4-fs (mmcblk0p5): INFO: recovery required on readonly filesystem
[    3.035062] EXT4-fs (mmcblk0p5): write access will be enabled during recovery
[    3.144876] EXT4-fs (mmcblk0p5): recovery complete
[    3.152655] EXT4-fs (mmcblk0p5): mounted filesystem with ordered data mode. Opts: (null)
[    3.161856] VFS: Mounted root (ext4 filesystem) readonly on device 179:5.
[    3.169652] devtmpfs: mounted
[    3.173193] usb 1-1: new high-speed USB device number 2 using sunxi-ehci
[    3.174658] Freeing unused kernel memory: 1024K
[    3.203304] Kernel init done
[    3.206532] Run /init as init process
[    3.273168] [DISP] fb_free_reserve_mem,line:2316:
[    3.273174] [DISP] fb_free_reserve_mem wait for sync timeout
[    3.287007] Freeing logo buffer memory: 4000K
[    3.374687] hub 1-1:1.0: USB hub found
[    3.379072] hub 1-1:1.0: 4 ports detected
can't run '/etc/preinit': No such file or directory
[    3.447981] EXT4-fs (mmcblk0p5): re-mounted. Opts: (null)
Starting syslogd: OK
Starting klogd: OK
Populating /dev using udev: [    3.743916] udevd[1162]: starting version 3.2.7
[    3.771610] random: udevd: uninitialized urandom read (16 bytes read)
[    3.781043] random: udevd: uninitialized urandom read (16 bytes read)
[    3.788442] random: udevd: uninitialized urandom read (16 bytes read)
[    3.805652] udevd[1162]: specified group 'input' unknown
[    3.812380] udevd[1162]: specified group 'kvm' unknown
[    3.849785] udevd[1163]: starting eudev-3.2.7
[    4.429043] random: fast init done
done
Initializing random number generator... done.
Starting system message bus: [    4.836615] urandom_read: 3 callbacks suppressed
[    4.836626] random: dbus-uuidgen: uninitialized urandom read (12 bytes read)
[    4.849986] random: dbus-uuidgen: uninitialized urandom read (8 bytes read)
[    4.900173] random: dbus-daemon: uninitialized urandom read (12 bytes read)
done
Starting network: OK
usb0 current mode: null
Starting switch usb0 to device mode.
[    6.153157]
[    6.153157] insmod_device_driver
[    6.153157]
[    6.160368] sunxi_usb_udc 4100000.udc-controller: 4100000.udc-controller supply udc not found, using dummy regulator
device_chose finished!
Starting adb: [    6.231496] file system registered
OK
init adb main
[    6.284384] read descriptors
Handling main()
[    6.288091] read strings
Initializing postgresql data base...
su: unknown user postgres
done
Starting postgresql: su: unknown user postgres
OK
/etc/init.d/S50powerkey_display: line 12: powerkey_display: command not found
/etc/init.d/S50powerkey_suspend: line 12: powerkey_suspend: command not found
[    6.432894] FAT-fs (mmcblk0p8): Volume was not properly unmounted. Some data may be corrupt. Please run fsck.
/dev/by-name/UDISK already format
[    6.475666] sunxi_set_cur_vol_work()422 WARN: get power supply failed
[    6.488543] FAT-fs (mmcblk0p8): Volume was not properly unmounted. Some data may be corrupt. Please run fsck.
[    6.522283] android_work: sent uevent USB_STATE=CONNECTED
Starting dnsmasq: OK
[    6.678764] sunxi_set_cur_vol_work()422 WARN: get power supply failed
Trying to connect to SWUpdate...
[    6.739147] configfs-gadget gadget: high-speed config #1: c
[    6.745614] android_work: sent uevent USB_STATE=CONFIGURED
[    6.773181] sunxi_vbus_det_work()3439 WARN: get power supply failed
[    6.780440] android_work: sent uevent USB_STATE=DISCONNECTED
swu_param: ####
swu_software: ####
swu_mode: ####
no swupdate_cmd to run, wait for next swupdate
# [    7.115243] android_work: sent uevent USB_STATE=CONNECTED
GPADC按键
本章节将讲解如何测试 T113i-Industrial 开发板的GPADC按键功能。
GPADC按键概述
GPADC(General Purpose ADC Keys)是一种通用的模拟数字转换按键,它通常用于将模拟信号转换为数字信号,从而实现对按键的检测。
- GPADC可以被想象成一个能够把按压按键的动作转换成开发板能懂的数字信号的“翻译官”。
- 当你按下一个按键时,按键之间会形成一个电路连接,这个连接会产生一个模拟信号
- GPADC的作用就是把这个连续变化的模拟电压信号转换成离散的数字信号
- GPADC按键广泛应用于遥控器、游戏手柄、家用电器等设备,提供用户输入接口。
- GPADC按键相比传统的机械开关,具有更低的磨损、更长的使用寿命和更精确的信号识别能力。
登录串口终端
看到这里,如果不知道如何上电,如何打开串口终端,请参考前面《快速启动》章节里的启动开发板文章。
测试按键
进入串口终端后,执行cat /proc/bus/input/devices,查看对应的设备节点。
# cat /proc/bus/input/devices
I: Bus=0019 Vendor=0001 Product=0001 Version=0100
N: Name="sunxi-keyboard"
P: Phys=sunxikbd/input0
S: Sysfs=/devices/virtual/input/input0
U: Uniq=
H: Handlers=kbd event0
B: PROP=0
B: EV=3
B: KEY=1000 800 c0000 0 0 10000000

I: Bus=0019 Vendor=0001 Product=0001 Version=0100
N: Name="sunxi-ts"
P: Phys=sunxi_ts/input0
S: Sysfs=/devices/platform/soc@3000000/2009c00.rtp/input/input1
U: Uniq=
H: Handlers=event1
B: PROP=0
B: EV=b
B: KEY=400 0 0 0 0 0 0 0 0 0 0
B: ABS=3

I: Bus=0019 Vendor=0001 Product=0001 Version=0100
N: Name="sunxi-gpadc0"
P: Phys=sunxigpadc0/input0
S: Sysfs=/devices/virtual/input/input2
U: Uniq=
H: Handlers=kbd event2
B: PROP=0
B: EV=100003
B: KEY=200000 0 0 0 0 0 0 0 8c0000 0 0 10000000

#
可以看到sunxi-gpadc0对应的设备节点是/dev/input/event2。
hexdump测试
在串口终端上,执行/dev/input/event2,检测按键按下状态:
# hexdump /dev/input/event2
0000000 1dcd 0000 b22e 0004 0001 0073 0001 0000
0000010 1dcd 0000 b22e 0004 0000 0000 0000 0000
0000020 1dcd 0000 5e10 0007 0001 0073 0000 0000
0000030 1dcd 0000 5e10 0007 0000 0000 0000 0000
0000040 1dce 0000 5bbf 0007 0001 0072 0001 0000
0000050 1dce 0000 5bbf 0007 0000 0000 0000 0000
0000060 1dce 0000 6374 0009 0001 0072 0000 0000
0000070 1dce 0000 6374 0009 0000 0000 0000 0000
0000080 1dcf 0000 4dc5 0005 0001 0077 0001 0000
0000090 1dcf 0000 4dc5 0005 0000 0000 0000 0000
00000a0 1dcf 0000 f5bb 0007 0001 0077 0000 0000
00000b0 1dcf 0000 f5bb 0007 0000 0000 0000 0000
0073 、0072 和 0077 分别是对应不同按键按下后返回的值。
C程序测试(可选)
为了更加直观分辨哪个按键按下和松开,编写一个c文件用于读取按键。
在Ubuntu上,创建一个.c文件。
ubuntu@dshanpi:~/meihao/gpadc_test$ ls -la
total 24
drwxrwxr-x 2 ubuntu ubuntu  4096 7月  17 10:48 .
drwxrwxr-x 4 ubuntu ubuntu  4096 7月  17 10:21 ..
-rw-rw-r-- 1 ubuntu ubuntu  1181 7月  17 10:48 gpadc_test.c
ubuntu@dshanpi:~/meihao/gpadc_test$
写入以下内容:
#include <stdio.h>
#include <linux/input.h>
#include <stdlib.h>
#include <sys/types.h>
#include <sys/stat.h>
#include <fcntl.h>
#include <sys/time.h>
#include <limits.h>
#include <unistd.h>
#include <signal.h>

#define DEV_PATH "/dev/input/event2"

static int g_igpadc_fd = 0;

static int test_gpadc(const char *event_file)
{
        int code = 0;
        int i = 0;

        struct input_event data;

        g_igpadc_fd = open(DEV_PATH,O_RDONLY);
        if(g_igpadc_fd <= 0)
        {
                printf("open %s error!\n",DEV_PATH);
                return -1;
        }

        for(i = 0;i < 20;i++)
        {
                read(g_igpadc_fd,&data,sizeof(data));

                /*如果按下按键*/
                if(data.type == EV_KEY && data.value == 1)
                {
                        if(data.code == 115)
                        {
                                code = 1;
                        }else if(data.code == 114)
                        {
                                code = 2;
                        }else if(data.code == 119)
                        {
                                code = 3;
                        }
                        printf("k%d pressed\n",code);
                        code = 0;
                }
                else if(data.type == EV_KEY && data.value == 0)
                {
                        if(data.code == 115)
                        {
                                code = 1;
                        }else if(data.code == 114)
                        {
                                code = 2;
                        }else if(data.code == 119)
                        {
                                code = 3;
                        }
                        printf("k%d releaseed\n",code);
                        code = 0;
                }
        }

        close(g_igpadc_fd);
        return 0;
}

int main()
{
        return test_gpadc(DEV_PATH);
}
写完程序当然就需要去编译,但是编译之前,先找到相应的交叉编译工具,在源码根目录t113i_tinasdk5.0-v1/上,查看.buildconfig。
ubuntu@dshanpi:~/meihao/t113i_tinasdk5.0-v1$ vim .buildconfig
...
export LICHEE_TOOLCHAIN_PATH=/home/ubuntu/meihao/t113i_tinasdk5.0-v1/out/toolchain/gcc-linaro-5.3.1-2016.05-x86_64_arm-linux-gnueabi
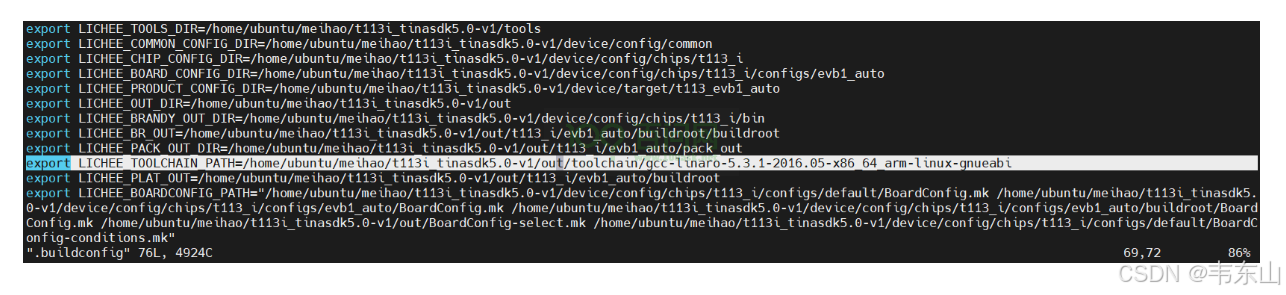
可以看到交叉编译工具是t113i_tinasdk5.0-v1/out/toolchain/gcc-linaro-5.3.1-2016.05-x86_64_arm-linux-gnueabi/bin/arm-linux-gnueabi-gcc。

执行t113i_tinasdk5.0-v1/out/toolchain/gcc-linaro-5.3.1-2016.05-x86_64_arm-linux-gnueabi/bin/arm-linux-gnueabi-gcc gpadc_test.c -o gpadc_test编译应用程序,这里的交叉编译工具路径需要改为实际的路径。
ubuntu@dshanpi:~/meihao/gpadc_test$ /home/ubuntu/meihao/t113i_tinasdk5.0-v1/out/toolchain/gcc-linaro-5.3.1-2016.05-x86_64_arm-linux-gnueabi/bin/arm-linux-gnueabi-gcc gpadc_test.c -o gpadc_test
ubuntu@dshanpi:~/meihao/gpadc_test$
ubuntu@dshanpi:~/meihao/gpadc_test$ ls -la
total 24
drwxrwxr-x 2 ubuntu ubuntu  4096 7月  17 12:07 .
drwxrwxr-x 4 ubuntu ubuntu  4096 7月  17 10:21 ..
-rwxrwxr-x 1 ubuntu ubuntu 10652 7月  17 12:07 gpadc_test
-rw-rw-r-- 1 ubuntu ubuntu  1181 7月  17 10:48 gpadc_test.c
ubuntu@dshanpi:~/meihao/gpadc_test$ file gpadc_test
gpadc_test: ELF 32-bit LSB executable, ARM, EABI5 version 1 (SYSV), dynamically linked, interpreter /lib/ld-linux.so.3, for GNU/Linux 2.6.32, BuildID[sha1]=b8a92558e4a8aa4ea8ef04018054c8d4e55de7ff, with debug_info, not stripped
ubuntu@dshanpi:~/meihao/gpadc_test$
编译成功后,把可执行程序 gpadc_test 通过ADB上传到开发板。
ubuntu@dshanpi:~/meihao/gpadc_test$ adb push gpadc_test /mnt/UDISK/
执行程序:
# cd /mnt/UDISK/
# ls
gpadc_test
## cd gpadc_test/
# ls
gpadc_test    gpadc_test.c
# ./gpadc_test
k1 pressed
k1 releaseed
k2 pressed
k2 releaseed
k3 pressed
k3 releaseed
k1 pressed
k1 releaseed
k2 pressed
k2 releaseed
#
RS485通信
本章节将讲解如何测试T113i-Industrial开发板的RS485通信功能。
RS485通信协议概述
RS485,全称为"Recommended Standard 485",是一种由电子工业联盟(EIA)定义的电气特性标准,广泛用于实现可靠的串行数据通信。它支持多点通信,允许多个设备共享同一通信总线,通过差分信号传输方式来提高数据传输的抗干扰能力,适用于长距离和噪声环境下的数据通信。具备以下特性:
- 支持多点通信,允许多个设备在同一总线上进行数据交换。
- 采用半双工模式,确保在同一时间内设备只能进行发送或接收操作,但不能同时进行。
- 使用**两根导线(A线和B线)**传输差分信号,增强了抗干扰能力。
- 接收器依据A线和B线间的电压差来识别二进制数据(逻辑"1"或"0")。
- 通过终端电阻减少信号反射,确保信号在长距离传输中的完整性。
- 利用奇偶校验位进行错误检测,保障数据传输的准确性。
- 传输速率最高可达10Mbps,传输距离可达1200米。
- 长距离和高数据速率的特性使其在多种环境下均能保持稳定的通信能力。
硬件连接
在进行RS485功能测试前,需要使用两根接线端子(杜邦线)连接开发板的RS485接口,RS485_A1 连接 RS485_A2,RS485_B1 连接 RS485_B2。硬件连接如下图:

RS485 是半双工,连接设备的时候一般接 A/B/GND,即源端的 A 连接目标设备的 A,源端的 B 连接目标设备的 B。
登录串口终端
连接成功后,看到这里,如果不知道如何上电,如何打开串口终端,请参考前面《快速启动》章节里的启动开发板文章。
设置波特率
由原理图可知:
uart2 ==> 端口1(RS485_A1,RS485_B1)
uart3 ==> 端口2(RS485_A2,RS485_B2)
进入串口终端后,想要两个rs485互相通信,首先就得设置相同的波特率,在开发板上执行以下几步:
配置uart2、uart3的波特率
- 设置uart2波特率。
# stty -F /dev/ttyS2 speed 115200
9600
# stty -F /dev/ttyS2 speed 115200
115200
#
执行两次,才可以成功设置波特率为115200。
- 设置uart3波特率。
# stty -F /dev/ttyS3 speed 115200
9600
# stty -F /dev/ttyS3 speed 115200
115200
测试RS485通信
波特率设置好后,即可进行通信测试。下面将进行端口2发送数据,端口1负责接收。
后台监测端口1
# cat /dev/ttyS2 &
[1] 1372
#
控制端口2发送数据
# echo 100ask > /dev/ttyS3
100ask
可以看到有100ask打印出来。
同样可以控制端口1发送数据给端口2,因为上面已经设置过一次波特率了,不用再次设置。
后台监测端口2
在这之前先杀掉之前后台监测的端口1
# ps
...
1372 root     cat /dev/ttyS2
...
# kill -9 1372
#
[1]+  Killed                  cat /dev/ttyS2
#
再执行以下指令:
# cat /dev/ttyS3 &
[1] 1374
#
控制端口1发送数据
# echo 123456 > /dev/ttyS2
123456

#
也有数据出来,自此测试完成。
CAN通信
本章节将讲解如何测试 T113i-Industrial 开发板的CAN通信功能。
CAN通信协议概述
CAN通信协议,全称为Controller Area Network,是一种支持实时控制的串行通信协议,它专为满足汽车和工业环境中的高可靠性和网络灵活性而设计。以下是简要的概述:
- CAN协议由Bosch公司在1980年代开发,主要用于汽车电子系统中的电子控制单元(ECUs)之间的通信。
- CAN使用多主站模式,网络上的任何节点都可以在任何时间点开始发送数据。
- 它采用非破坏性仲裁机制,确保高优先级的消息能够优先传输。
- CAN协议的数据帧结构紧凑,包括帧起始、仲裁场、控制场、数据场、CRC校验、帧结束等部分。
- 支持最高8个字节的数据载荷,适用于传输控制命令和传感器数据。
- 集成了强大的错误检测机制,包括循环冗余校验(CRC)和位填充。
- 在检测到错误时,网络可以自动重传损坏的消息,提高了数据传输的可靠性。
- CAN网络支持不同的波特率,从最低的10kbps到最高的1Mbps,根据不同的应用需求进行配置。
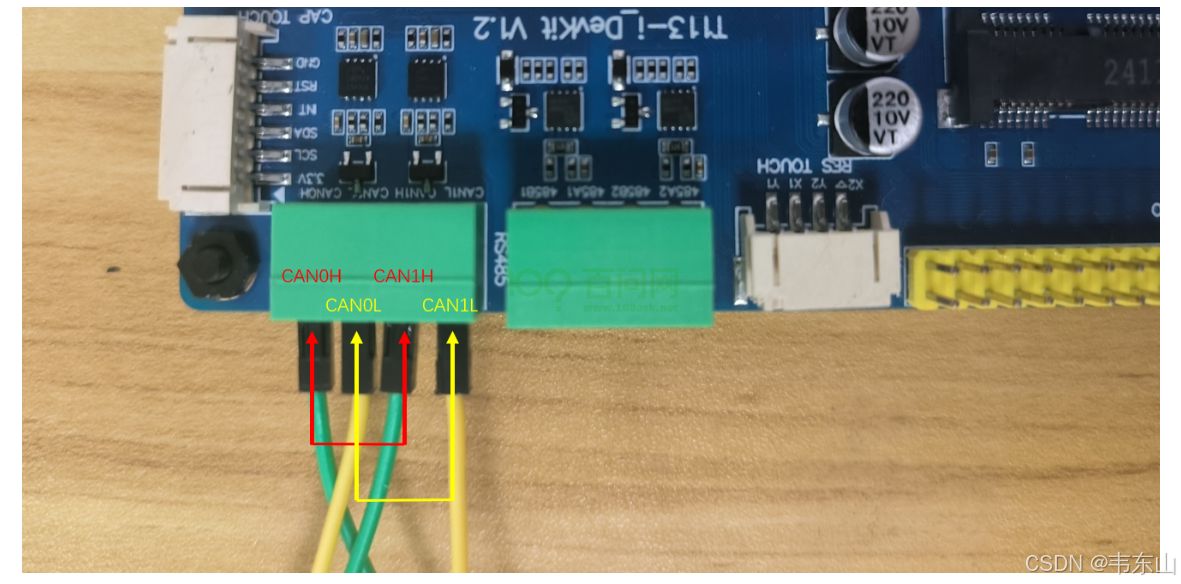
硬件连接
测试之前,先使用两根杜邦线,一根将 CAN0 L 连接至 CAN1 L,另一根将 CAN0 H连接 CAN1 H。
连接如下图:
登录串口终端
看到这里,如果不知道如何上电,如何打开串口终端,请参考前面《快速启动》章节里的启动开发板文章。
测试CAN通信
烧录完成后,进入开发板。
在开发板上,执行ifconfig -a,查看是否存在awlink0和awlink1。
# ifconfig  -a
awlink0   Link encap:UNSPEC  HWaddr 00-00-00-00-00-00-00-00-00-00-00-00-00-00-00-00
          NOARP  MTU:16  Metric:1
          RX packets:0 errors:0 dropped:0 overruns:0 frame:0
          TX packets:0 errors:0 dropped:0 overruns:0 carrier:0
          collisions:0 txqueuelen:10
          RX bytes:0 (0.0 B)  TX bytes:0 (0.0 B)

awlink1   Link encap:UNSPEC  HWaddr 00-00-00-00-00-00-00-00-00-00-00-00-00-00-00-00
          NOARP  MTU:16  Metric:1
          RX packets:0 errors:0 dropped:0 overruns:0 frame:0
          TX packets:0 errors:0 dropped:0 overruns:0 carrier:0
          collisions:0 txqueuelen:10
          RX bytes:0 (0.0 B)  TX bytes:0 (0.0 B)
          Interrupt:1

eth0      Link encap:Ethernet  HWaddr 42:5A:1A:01:32:43
          BROADCAST MULTICAST  MTU:1500  Metric:1
          RX packets:0 errors:0 dropped:0 overruns:0 frame:0
          TX packets:0 errors:0 dropped:0 overruns:0 carrier:0
          collisions:0 txqueuelen:1000
          RX bytes:0 (0.0 B)  TX bytes:0 (0.0 B)
          Interrupt:40

ip6tnl0   Link encap:UNSPEC  HWaddr 00-00-00-00-00-00-00-00-00-00-00-00-00-00-00-00
          NOARP  MTU:1452  Metric:1
          RX packets:0 errors:0 dropped:0 overruns:0 frame:0
          TX packets:0 errors:0 dropped:0 overruns:0 carrier:0
          collisions:0 txqueuelen:1000
          RX bytes:0 (0.0 B)  TX bytes:0 (0.0 B)

lo        Link encap:Local Loopback
          inet addr:127.0.0.1  Mask:255.0.0.0
          inet6 addr: ::1/128 Scope:Host
          UP LOOPBACK RUNNING  MTU:65536  Metric:1
          RX packets:0 errors:0 dropped:0 overruns:0 frame:0
          TX packets:0 errors:0 dropped:0 overruns:0 carrier:0
          collisions:0 txqueuelen:1000
          RX bytes:0 (0.0 B)  TX bytes:0 (0.0 B)

sit0      Link encap:IPv6-in-IPv4
          NOARP  MTU:1480  Metric:1
          RX packets:0 errors:0 dropped:0 overruns:0 frame:0
          TX packets:0 errors:0 dropped:0 overruns:0 carrier:0
          collisions:0 txqueuelen:1000
          RX bytes:0 (0.0 B)  TX bytes:0 (0.0 B)

#
可以看到,通过ifconfig命令查看CAN接口功能为正常,下面进行CAN功能的收发测试。
连接好线后,做以下几个步骤进行测试。
①使用ip命令设置awlink接口的速度为500Kb/s
注意:需要设置完成awlink接口速度才能使能awlink接口!!!
# ip link set awlink0 type can bitrate 500000
# ip link set awlink1 type can bitrate 500000
②打开awlink网卡
# ifconfig awlink0 up
[ 1105.138598] IPv6: ADDRCONF(NETDEV_CHANGE): awlink0: link becomes ready
# ifconfig awlink1 up
[ 1106.368692] IPv6: ADDRCONF(NETDEV_CHANGE): awlink1: link becomes ready
#
③设置awlink0接收数据
# candump awlink0 &
[1] 1386
④向awlink0发送数据
# cansend awlink0 5A1#11.22.33.44.55.66.77.88
  awlink0  5A1   [8]  11 22 33 44 55 66 77 88
上述cansend命令中,“5A1”是帧ID,“#”后面的“11.22.33.44.55.66.77.88”是要发送的数据,十六进制。CAN2.0一次最多发送8个字节的数据,8字节数据之间用英文点号“.”隔开,can-utils会对数据进行解析。
MIPI屏适配
本章节主要介绍如何在T113-i开发板中适配4寸MIPI屏,MIPI屏购买地址
下面操作步骤需要相对应的uboot屏驱动、kernel屏驱动。这里有相应的下载链接 ==> 资源包
1.显示部分适配
1.1 配置内核屏驱动
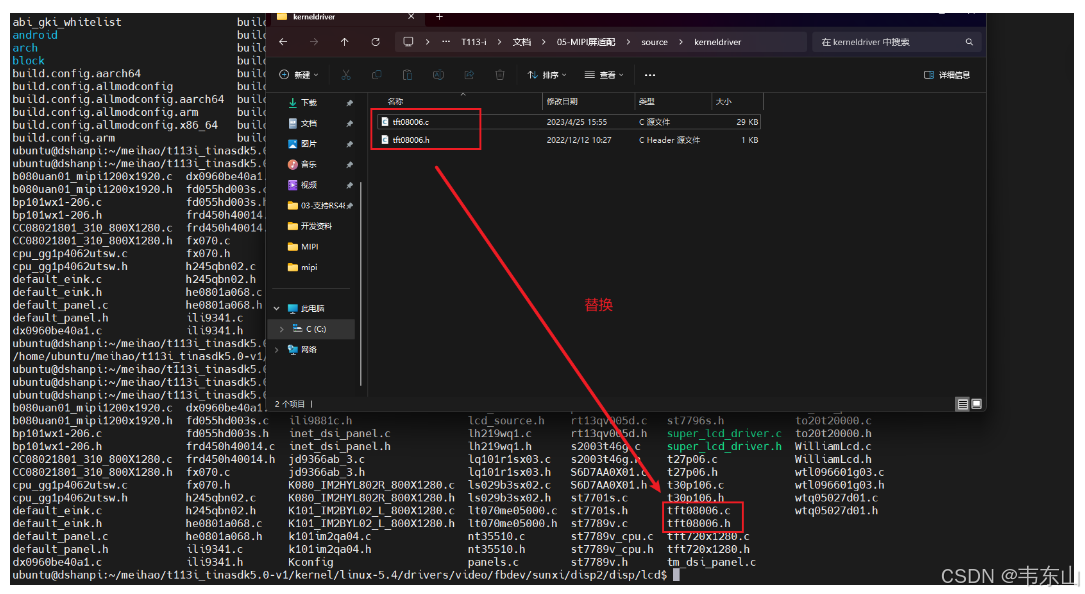
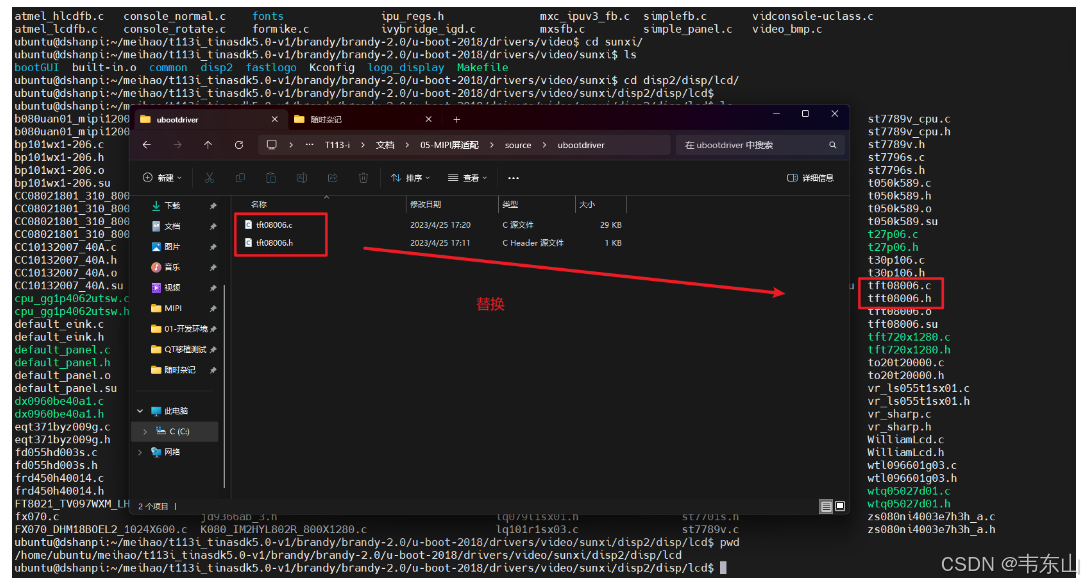
在Ubuntu上,进入目录t113i_tinasdk5.0-v1/kernel/linux-5.4/drivers/video/fbdev/sunxi/disp2/disp/lcd/
需要使用上面资源包kerneldriver文件夹里面的tft08006.c和tft08006.h,替换掉当前目录下的tft08006.c和tft08006.h
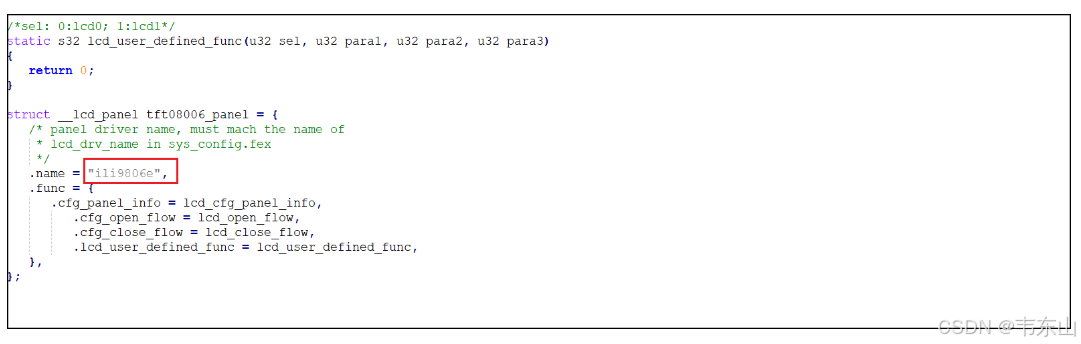
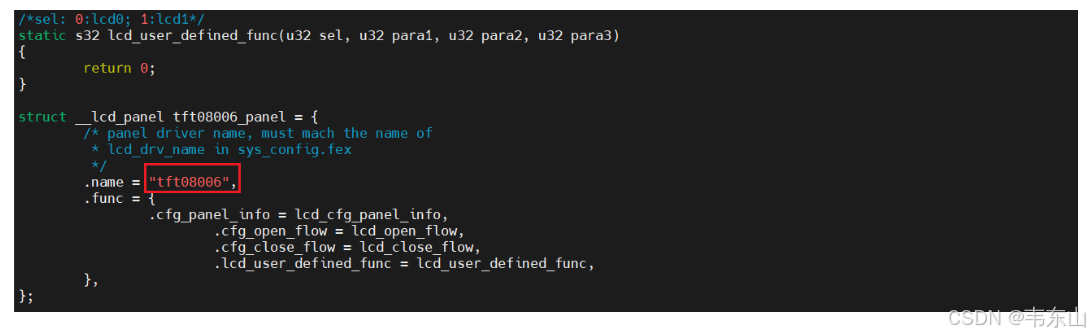
还需要修改tft08006.c,执行vim tft08006.c ,点击键盘上的大写G,跳到文件的最后,对比原来的tft08006.c文件,如下:
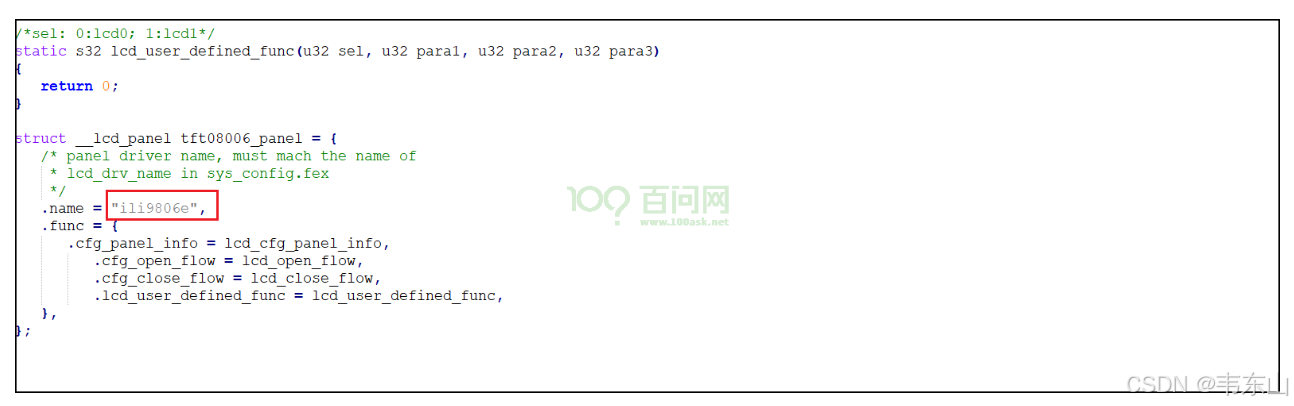
把ili9806e改为tft08006,当然也可以不改,只要设备树上的名字和这里的对应就可以。这里选择修改。
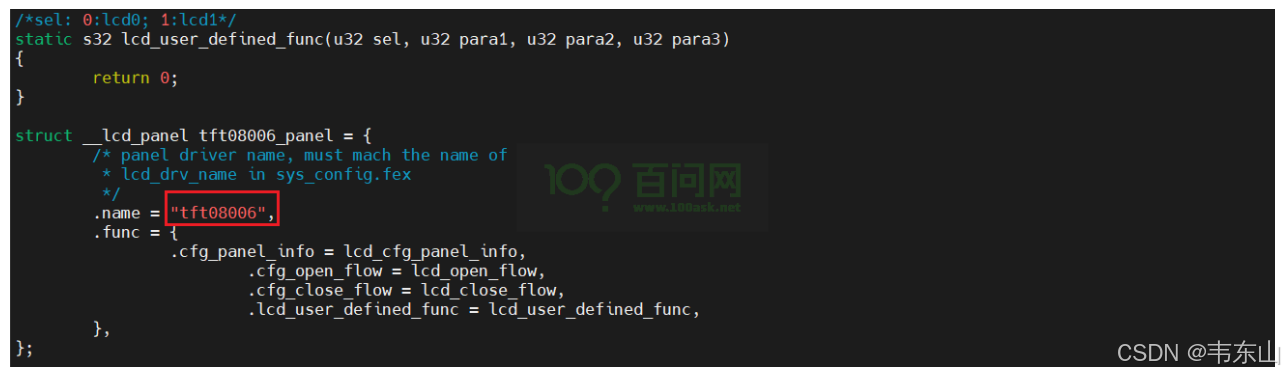
按esc,然后:wq退出保存。
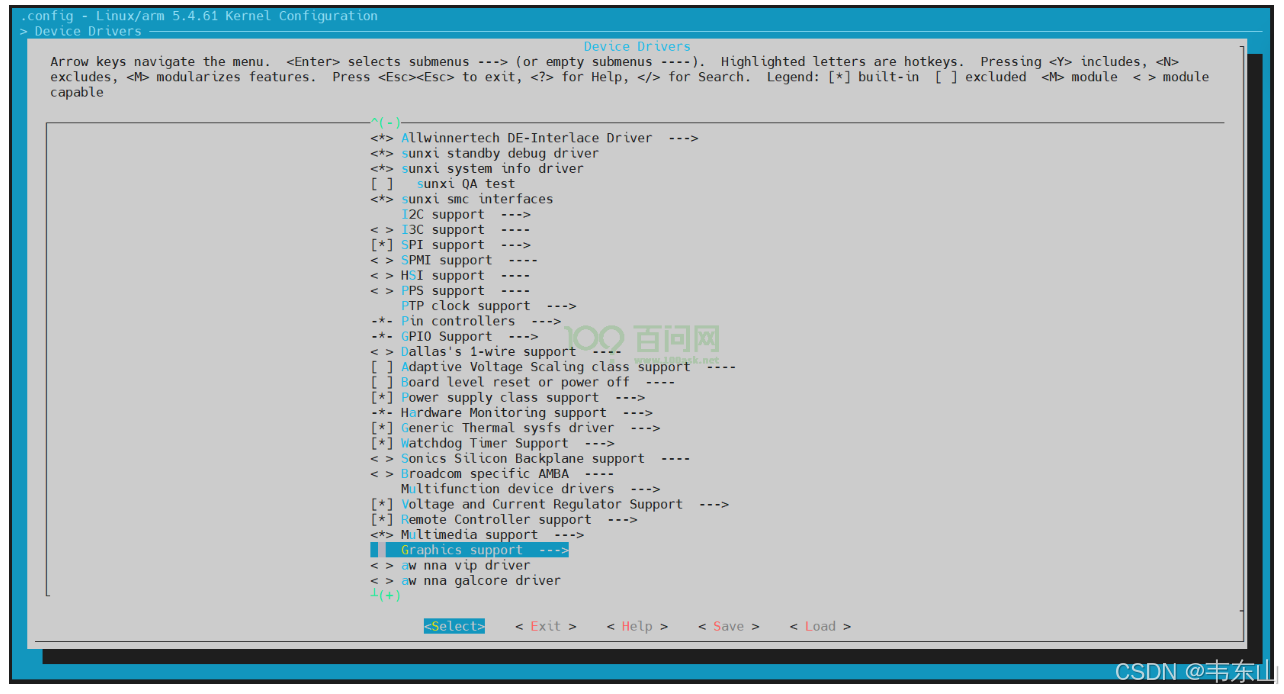
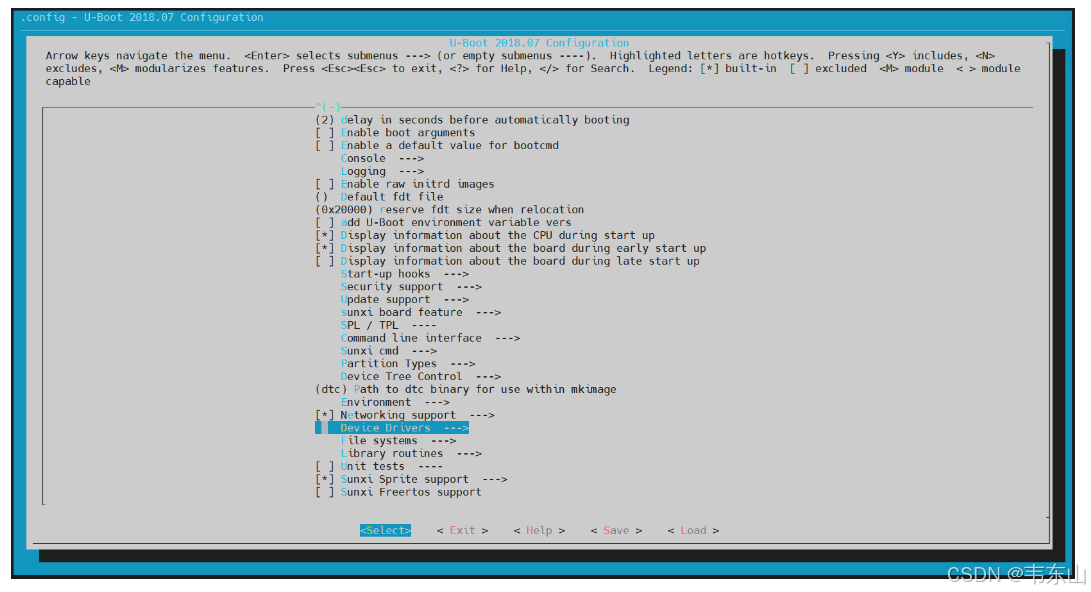
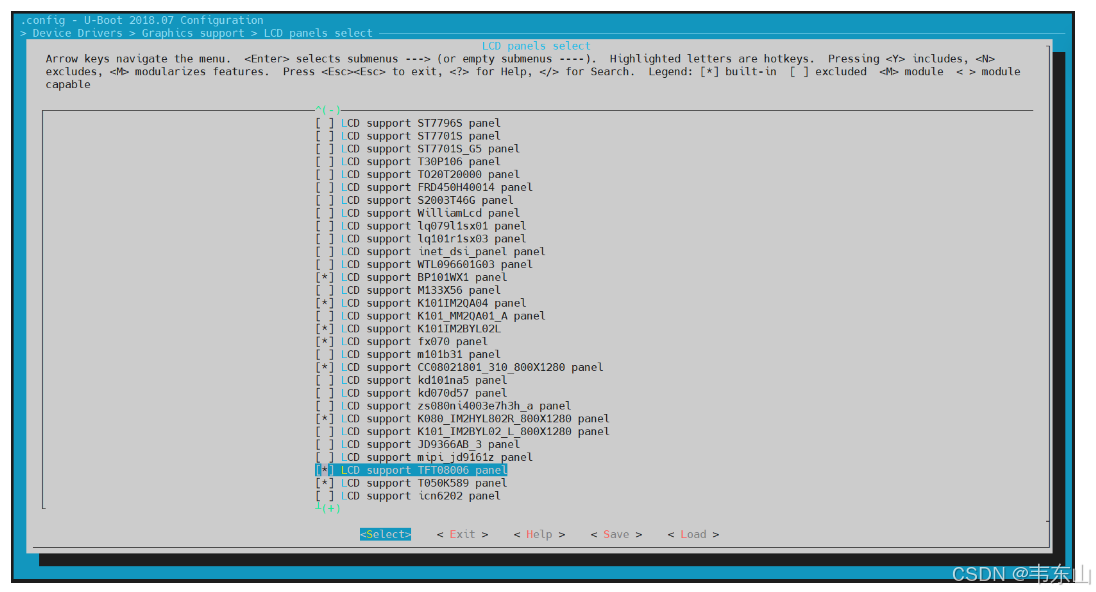
回到SDK源码根目录t113i_tinasdk5.0-v1/,执行./build.sh menuconfig进入内核配置界面。
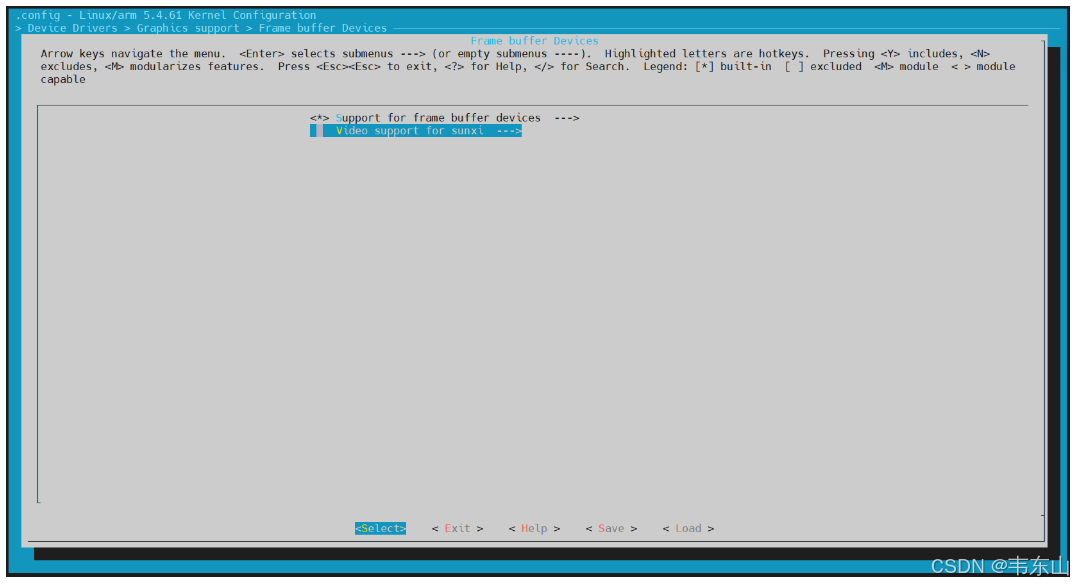
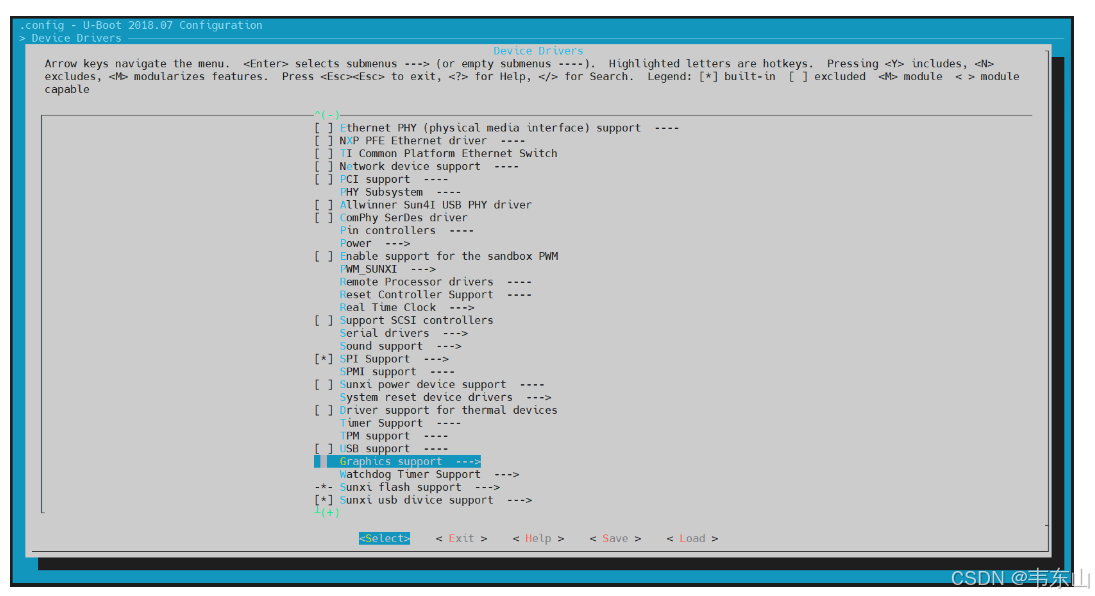
找到 Device Drivers,进入。

找到Graphics support,进入。
找到Frame buffer Devices,进入。
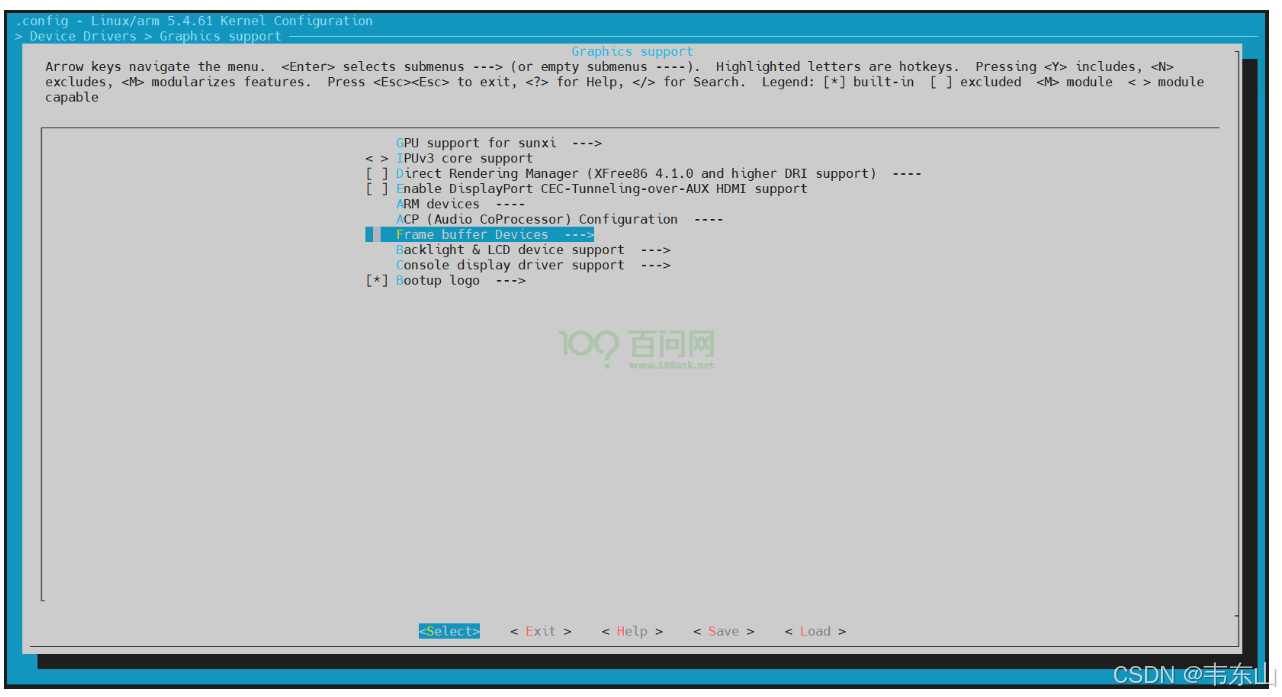
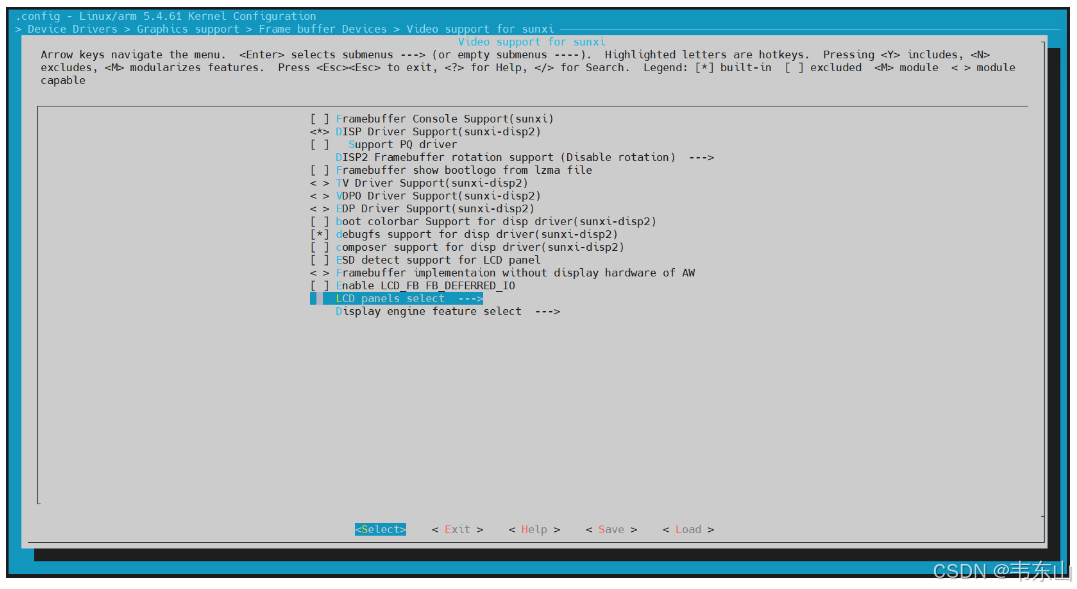
找到Video support for sunxi,进入。
找到 LCD panels select,进入。
找到LCD support TFT08006 panel,点击键盘y,选上。
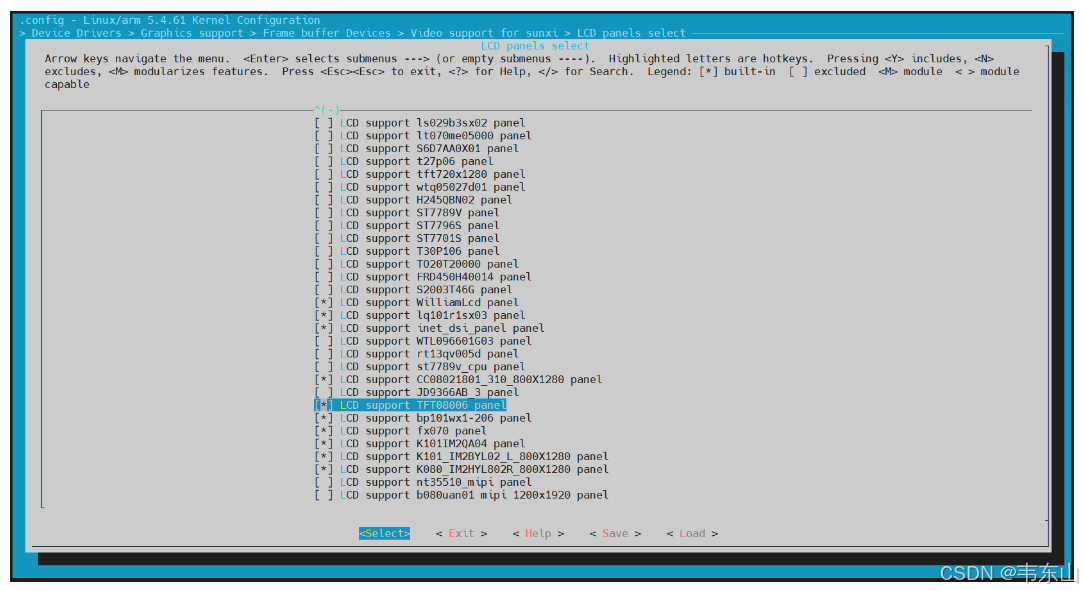
保存退出。
回到SDK源码根目录t113i_tinasdk5.0-v1/,执行./build.sh kernel,单独编译内核。
ubuntu@dshanpi:~/meihao/t113i_tinasdk5.0-v1$ ./build.sh kernel
========ACTION List: build_kernel ;========
options :
INFO: build kernel ...
INFO: prepare_buildserver
INFO: Prepare toolchain ...
Building kernel
...
Copy boot.img to output directory ...

sun8iw20p1 compile all(Kernel+modules+boot.img) successful


INFO: build dts ...
INFO: Prepare toolchain ...
removed '/home/ubuntu/meihao/t113i_tinasdk5.0-v1/out/t113_i/evb1_auto/buildroot/.board.dtb.d.dtc.tmp'
removed '/home/ubuntu/meihao/t113i_tinasdk5.0-v1/out/t113_i/evb1_auto/buildroot/.board.dtb.dts.tmp'
'/home/ubuntu/meihao/t113i_tinasdk5.0-v1/out/t113_i/kernel/build/arch/arm/boot/dts/.board.dtb.d.dtc.tmp' -> '/home/ubuntu/meihao/t113i_tinasdk5.0-v1/out/t113_i/evb1_auto/buildroot/.board.dtb.d.dtc.tmp'
'/home/ubuntu/meihao/t113i_tinasdk5.0-v1/out/t113_i/kernel/build/arch/arm/boot/dts/.board.dtb.dts.tmp' -> '/home/ubuntu/meihao/t113i_tinasdk5.0-v1/out/t113_i/evb1_auto/buildroot/.board.dtb.dts.tmp'
'/home/ubuntu/meihao/t113i_tinasdk5.0-v1/out/t113_i/kernel/staging/sunxi.dtb' -> '/home/ubuntu/meihao/t113i_tinasdk5.0-v1/out/t113_i/evb1_auto/buildroot/sunxi.dtb'
ubuntu@dshanpi:~/meihao/t113i_tinasdk5.0-v1$
这样内核里就支持了MIPI屏幕的驱动,想要该MIPI屏幕的驱动程序工作,还需要在设备树上添加相应的设备树节点。
1.2 修改内核设备树
进入目录t113i_tinasdk5.0-v1/device/config/chips/t113_i/configs/evb1_auto/linux-5.4。
可以看到目录下有一个board.dts设备树文件。

输入vim board.dts
在普通模式下执行/lcd0,找到原本已存在的lcd0设备树节点,复制以下内容,在附近点击键盘p粘贴,:
&lcd0 {
        lcd_used            = <1>;

        lcd_driver_name     = "tft08006";
        lcd_backlight       = <100>;
        lcd_if              = <4>;

        lcd_x               = <480>;
        lcd_y               = <800>;
        lcd_width           = <52>;
        lcd_height          = <52>;
        lcd_dclk_freq       = <25>;

        lcd_pwm_used        = <1>;
        lcd_pwm_ch          = <2>;
        lcd_pwm_freq        = <1000>;
        lcd_pwm_pol         = <0>;
        lcd_pwm_max_limit   = <255>;

        lcd_hbp             = <10>;
        lcd_ht              = <515>;
        lcd_hspw            = <5>;
        lcd_vbp             = <20>;
        lcd_vt              = <830>;
        lcd_vspw            = <5>;

        lcd_dsi_if          = <0>;
        lcd_dsi_lane        = <2>;
        lcd_lvds_if         = <0>;
        lcd_lvds_colordepth = <0>;
        lcd_lvds_mode       = <0>;
        lcd_frm             = <0>;
        lcd_hv_clk_phase    = <0>;
        lcd_hv_sync_polarity= <0>;
        lcd_io_phase        = <0x0000>;
        lcd_gamma_en        = <0>;
        lcd_bright_curve_en = <0>;
        lcd_cmap_en         = <0>;
        lcd_fsync_en        = <0>;
        lcd_fsync_act_time  = <1000>;
        lcd_fsync_dis_time  = <1000>;
        lcd_fsync_pol       = <0>;

        deu_mode            = <0>;
        lcdgamma4iep        = <22>;
        smart_color         = <90>;

        lcd_gpio_0 =  <&pio PD 19 GPIO_ACTIVE_HIGH>;
        pinctrl-0 = <&dsi4lane_pins_a>;
        pinctrl-1 = <&dsi4lane_pins_b>;
};
原本的设备树文件中,还有lcd0设备树节点存在,需要把多余的lcd0设备树节点注释或者删除。
通过查看原理图:
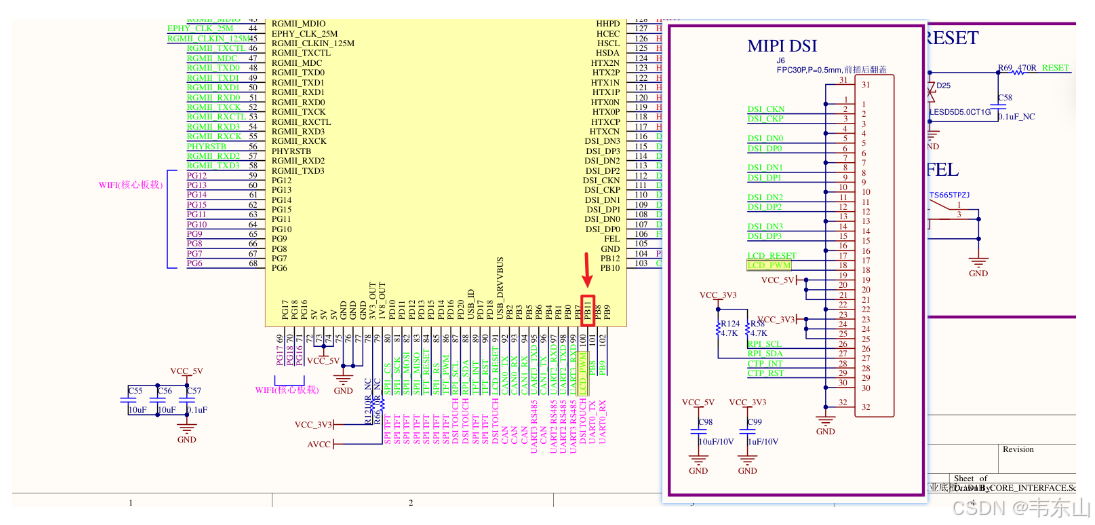
MIPI屏的pwm引脚是PB11,需要确保PB11引脚没有被其他设备树节点使用。
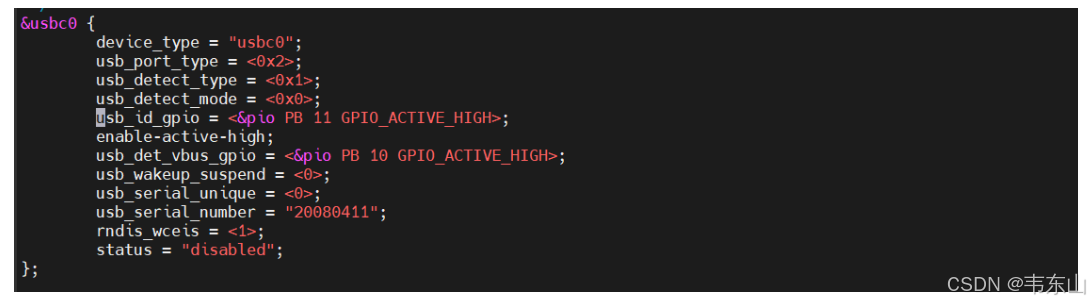
在设备树里可以看到,usbc0设备树节点占用了PB11引脚,而该设备树节点对应的是OTG的接口,不过只作为usb device使用,所以只需要把usb_id_gpio和usb_det_vbus_gpio注释或者删除即可。
这里选择删除。

继续查看原理图:
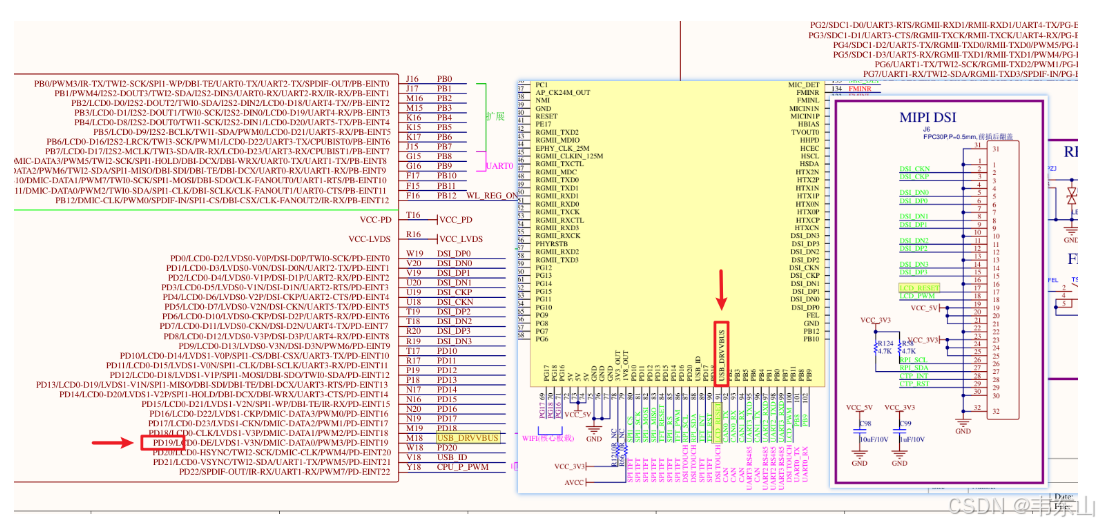
MIPI屏的reset引脚是PD19,需要确保PD19引脚没有被其他设备树节点使用。
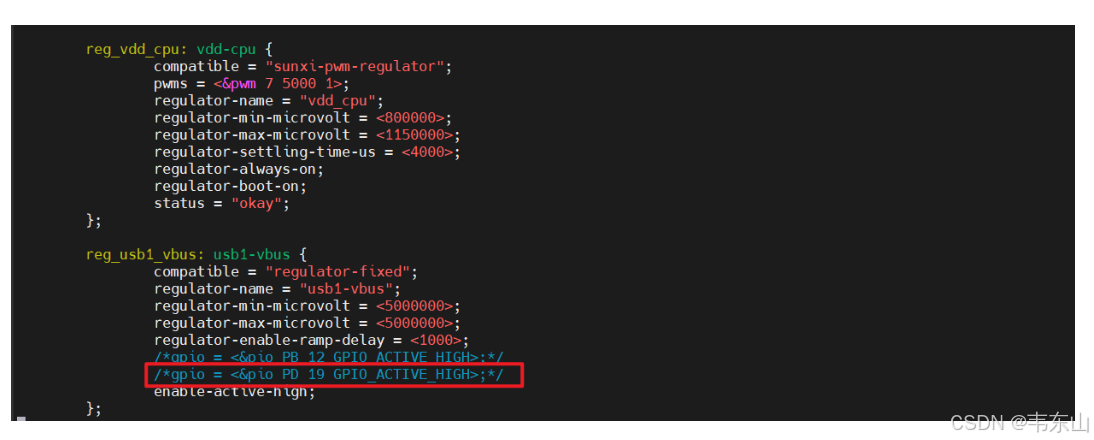
在设备树里可以看到,被reg_usb1_vbus占用了PD19,选择注释。
执行:wq,退出保存。
1.3 配置uboot屏驱动
想要开机进入系统后,屏幕能直接支持显示,不用执行重置屏幕操作,就需要在uboot阶段添加相应的屏驱动,这样也能在uboot阶段显示LOGO图。
在Ubuntu上,进入目录t113i_tinasdk5.0-v1/brandy/brandy-2.0/u-boot-2018/drivers/video/sunxi/disp2/disp/lcd
需要使用上面资源包ubootdriver文件夹里面的tft08006.c和tft08006.h,替换掉当前目录下的tft08006.c和tft08006.h
还需要修改tft08006.c,执行vim tft08006.c ,点击键盘上的大写G,跳到文件的最后,对比原来的tft08006.c文件,如下:
把ili9806e改为tft08006,当然也可以不改,只要设备树上的名字和这里的对应就可以。这里选择修改。
按esc,然后:wq退出保存。
执行cboot,进入uboot源码目录t113i_tinasdk5.0-v1/brandy/brandy-2.0/u-boot-2018。
输入make menuconfig,进入uboot配置界面。
找到 Device Drivers,进入。
找到Graphics support,进入。
找到 LCD panels select,进入。

找到LCD support TFT08006 panel,点击键盘y,选上。
保存退出。
在当前目录上t113i_tinasdk5.0-v1/brandy/brandy-2.0/u-boot-2018,执行mboot编译uboot源码
ubuntu@dshanpi:~/meihao/t113i_tinasdk5.0-v1/brandy/brandy-2.0/u-boot-2018$ mboot
========ACTION List: build_bootloader all force;========
options :
find: '/home/ubuntu/meihao/t113i_tinasdk5.0-v1/brandy/brandy-2.0/spl': No such file or directory
find: '/home/ubuntu/meihao/t113i_tinasdk5.0-v1/brandy/dramlib': No such file or directory
INFO: build_bootloader: brandy_path=/home/ubuntu/meihao/t113i_tinasdk5.0-v1/brandy/brandy-2.0
INFO: uboot-board.dts updated.
build_option:-p sun8iw20p1_auto_t113_i -b t113_i -o all
grep: /home/ubuntu/meihao/t113i_tinasdk5.0-v1/brandy/brandy-2.0/spl/Makefile: No such file or directory
Prepare toolchain ...
Prepare toolchain ...
uboot version:u-boot-2018
build for sun8iw20p1_auto_t113_i_defconfig ...
...
bootaddr is 0x20480
/home/ubuntu/meihao/t113i_tinasdk5.0-v1/brandy/brandy-2.0/spl-pub/../tools/toolchain/gcc-linaro-7.2.1-2017.11-x86_64_arm-linux-gnueabi/bin/arm-linux-gnueabi-ld /home/ubuntu/meihao/t113i_tinasdk5.0-v1/brandy/brandy-2.0/spl-pub/board/t113_i/libsun8iw20p1_sboot.a /home/ubuntu/meihao/t113i_tinasdk5.0-v1/brandy/brandy-2.0/spl-pub/sboot/main/sboot_main.o  -L /home/ubuntu/meihao/t113i_tinasdk5.0-v1/brandy/brandy-2.0/tools/toolchain/gcc-linaro-7.2.1-2017.11-x86_64_arm-linux-gnueabi/bin/../lib/gcc/arm-linux-gnueabi/7.2.1 -lgcc  --gc-sections --gc-sections -Tsboot.lds -o sboot.elf -Map sboot.map
/home/ubuntu/meihao/t113i_tinasdk5.0-v1/brandy/brandy-2.0/spl-pub/../tools/toolchain/gcc-linaro-7.2.1-2017.11-x86_64_arm-linux-gnueabi/bin/arm-linux-gnueabi-objcopy  -O binary  sboot.elf sboot.bin
'sboot_sun8iw20p1.bin' -> '/home/ubuntu/meihao/t113i_tinasdk5.0-v1/brandy/brandy-2.0/spl-pub/out/sun8iw20p1/bin/sboot_sun8iw20p1.bin'
'sboot_sun8iw20p1.bin' -> '/home/ubuntu/meihao/t113i_tinasdk5.0-v1/device/config/chips/t113_i/bin/sboot_sun8iw20p1.bin'
'sboot_sun8iw20p1.bin' -> '/home/ubuntu/meihao/t113i_tinasdk5.0-v1/out/t113_i/evb1_auto/buildroot/sboot_sun8iw20p1.bin'
INFO: build brandy OK.
ubuntu@dshanpi:~/meihao/t113i_tinasdk5.0-v1/brandy/brandy-2.0/u-boot-2018$
1.4 修改uboot设备树
同样的,uboot的设备树也需要添加相应的设备树节点。
进入目录t113i_tinasdk5.0-v1/device/config/chips/t113_i/configs/evb1_auto
可以看到当前目录有一个uboot-board.dts设备树文件。
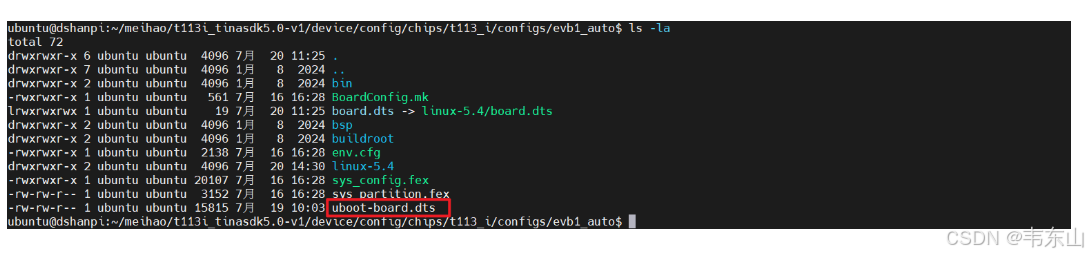
输入vim uboot-board.dts
在普通模式下执行/lcd0,找到原本已存在的lcd0设备树节点,复制以下内容,在附近点击键盘p粘贴,:
&lcd0 {
        lcd_used            = <1>;

        lcd_driver_name     = "tft08006";
        lcd_backlight       = <100>;
        lcd_if              = <4>;

        lcd_x               = <480>;
        lcd_y               = <800>;
        lcd_width           = <52>;
        lcd_height          = <52>;
        lcd_dclk_freq       = <25>;

        lcd_pwm_used        = <1>;
        lcd_pwm_ch          = <2>;
        lcd_pwm_freq        = <1000>;
        lcd_pwm_pol         = <0>;
        lcd_pwm_max_limit   = <255>;

        lcd_hbp             = <10>;
        lcd_ht              = <515>;
        lcd_hspw            = <5>;
        lcd_vbp             = <20>;
        lcd_vt              = <830>;
        lcd_vspw            = <5>;

        lcd_dsi_if          = <0>;
        lcd_dsi_lane        = <2>;
        lcd_lvds_if         = <0>;
        lcd_lvds_colordepth = <0>;
        lcd_lvds_mode       = <0>;
        lcd_frm             = <0>;
        lcd_hv_clk_phase    = <0>;
        lcd_hv_sync_polarity= <0>;
        lcd_io_phase        = <0x0000>;
        lcd_gamma_en        = <0>;
        lcd_bright_curve_en = <0>;
        lcd_cmap_en         = <0>;
        lcd_fsync_en        = <0>;
        lcd_fsync_act_time  = <1000>;
        lcd_fsync_dis_time  = <1000>;
        lcd_fsync_pol       = <0>;

        deu_mode            = <0>;
        lcdgamma4iep        = <22>;
        smart_color         = <90>;

        lcd_gpio_0 =  <&pio PD 19 GPIO_ACTIVE_HIGH>;
        pinctrl-0 = <&dsi4lane_pins_a>;
        pinctrl-1 = <&dsi4lane_pins_b>;
};
执行:wq,退出保存。
1.5 添加LOGO图
MIPI的分辨率大小是480*800,所以需要准备一张类似大小的logo图。
制作一张分辨率为480*800大小的logo图,保存格式是.bmp格式,并且命名为bootlogo
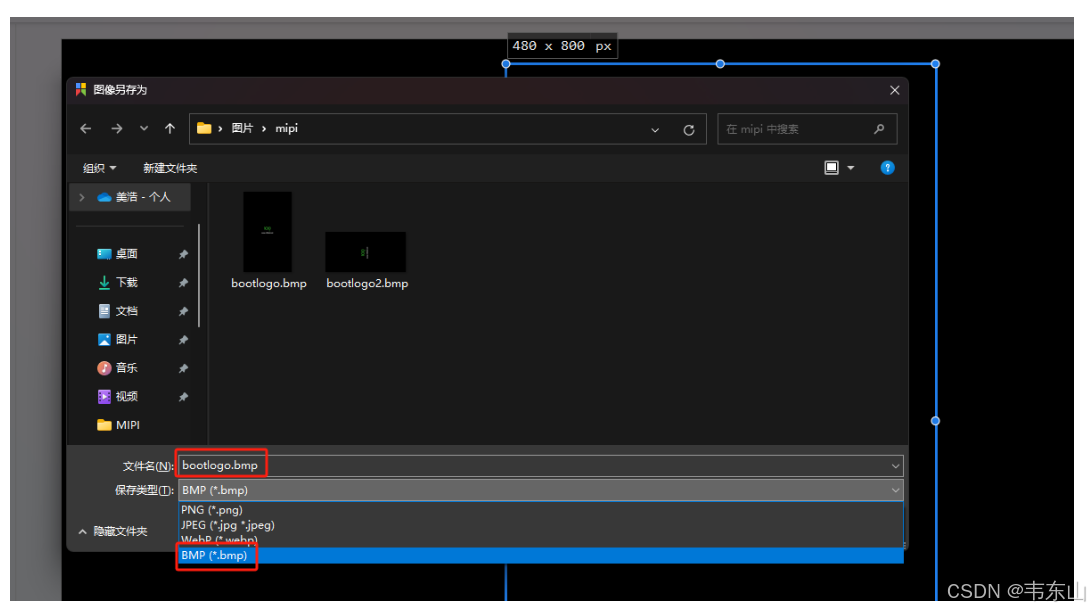
制作好图片后,把图片拉取到目录t113i_tinasdk5.0-v1/device/config/chips/t113_i/boot-resource/boot-resource下。
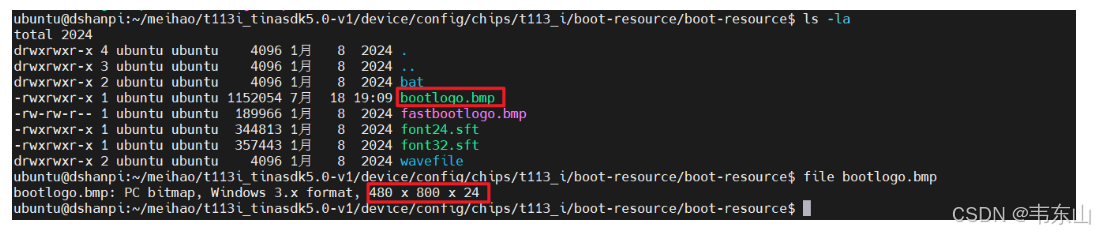
还需要确保t113i_tinasdk5.0-v1/brandy/brandy-2.0/u-boot-2018/configs/sun8iw20p1_auto_t113_i_defconfig文件中,以下选项是否打开:
CONFIG_CMD_SUNXI_BMP=y
CONFIG_LZMA=y
CONFIG_DISP2_SUNXI=y
CONFIG_AW_PHY=y
CONFIG_BOOT_GUI=y
进入SDK源码目录t113i_tinasdk5.0-v1/,输入./build.sh,编译固件。
ubuntu@dshanpi:~/meihao/t113i_tinasdk5.0-v1$ ./build.sh
========ACTION List: build_linuxdev;========
options :
INFO: ----------------------------------------
INFO: build linuxdev ...
INFO: chip: sun8iw20p1
INFO: platform: linux
INFO: kernel: linux-5.4
INFO: board: evb1_auto
INFO: output: /home/ubuntu/meihao/t113i_tinasdk5.0-v1/out/t113_i/evb1_auto/buildroot
INFO: ----------------------------------------
INFO: don't build dtbo ...
INFO: build arisc
find: '/home/ubuntu/meihao/t113i_tinasdk5.0-v1/brandy/brandy-2.0/spl': No such file or directory
find: '/home/ubuntu/meihao/t113i_tinasdk5.0-v1/brandy/dramlib': No such file or directory
INFO: build_bootloader: brandy_path=/home/ubuntu/meihao/t113i_tinasdk5.0-v1/brandy/brandy-2.0
INFO: skip build brandy.
INFO: build kernel ...
INFO: prepare_buildserver
INFO: Prepare toolchain ...
Building kernel
...
Number of duplicate files found 37
Number of inodes 6686
Number of files 5571
Number of fragments 397
Number of symbolic links  813
Number of device nodes 0
Number of fifo nodes 0
Number of socket nodes 0
Number of directories 302
Number of ids (unique uids + gids) 1
Number of uids 1
        root (0)
Number of gids 1
        root (0)
INFO: pack rootfs ok ...
INFO: ----------------------------------------
INFO: build Tina OK.
INFO: ----------------------------------------
ubuntu@dshanpi:~/meihao/t113i_tinasdk5.0-v1$
编译完成后,进行打包./build.sh pack,最后根据之前的烧录方式烧录到开发板。
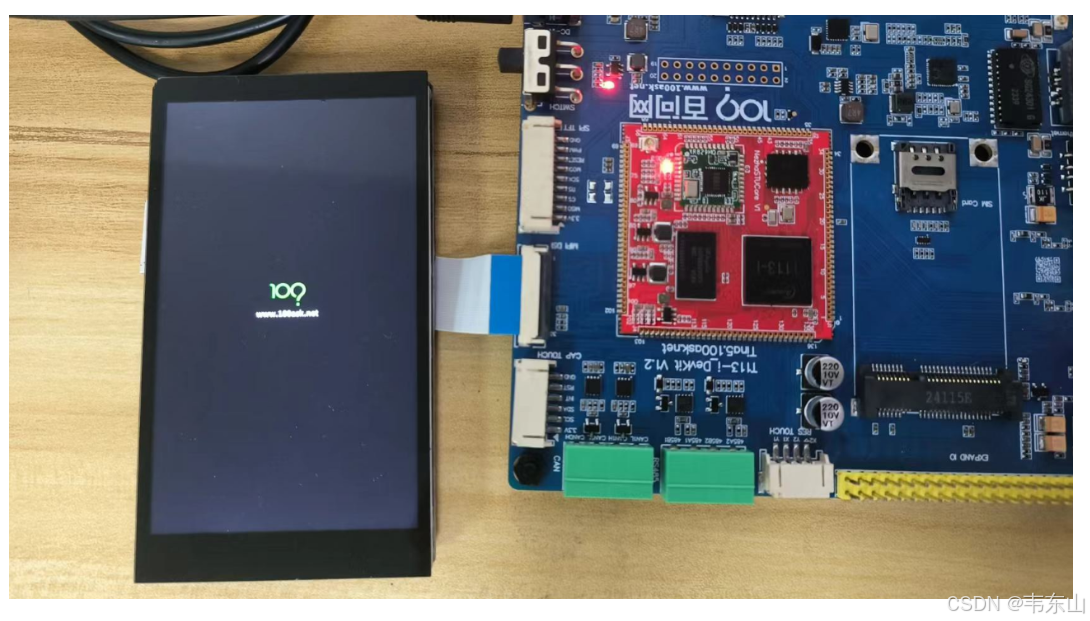
如果进入内核阶段没有logo图显示,可以执行重置屏幕操作:
mount -t debugfs none /sys/kernel/debug
cd /sys/kernel/debug/dispdbg
echo suspend> command
echo disp0 > name
echo 1 > start

echo resume > command
echo disp0 > name
echo 1 > start

echo 8 > /sys/class/disp/disp/attr/colorbar
2.触摸部分适配
2.1 修改内核设备树
查看原理图:
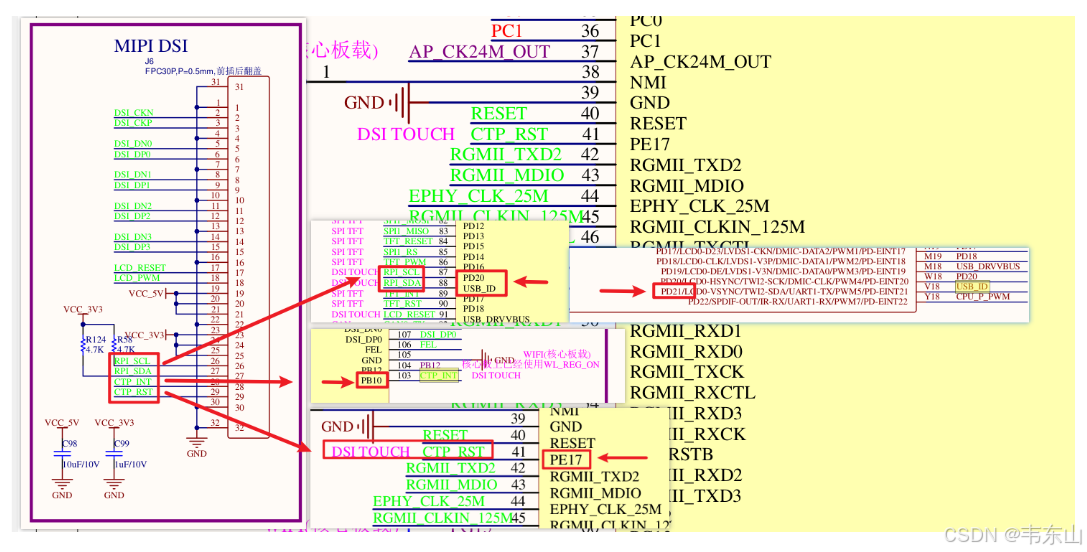
由原理图可以看出:
RPI_SCL 对应的引脚是 PD20;
RPI_SDA 对应的引脚是 PD21;
CTP_INT 对应的引脚是 PB10;
CTP_RST 对应的引脚是 PE17;
在Ubuntu上,进入目录t113i_tinasdk5.0-v1/device/config/chips/t113_i/configs/evb1_auto/linux-5.4
可以看到目录下有一个board.dts设备树文件。

输入vim board.dts
PD20 和 PD21 对应的是IIC适配器2。修改twi2_pins_a和twi2_pins_b里面的引脚为PD20 、PD21。
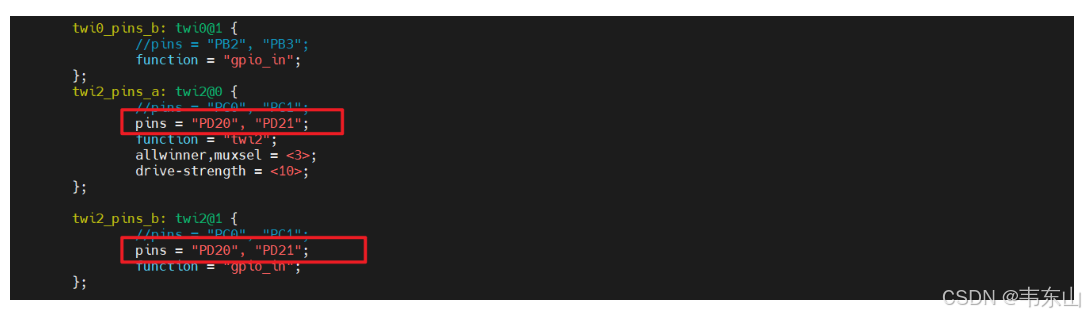
在twi2设备树节点内添加触摸设备树节点,写入以下内容:
ctp@38 {
compatible = "focaltech,fts";
reg = <0x38>;
status = "okay";
interrupt-parent = <&pio>;
interrupts = <PB 10 IRQ_TYPE_LEVEL_LOW>;
focaltech,reset-gpio = <&pio PE 17 GPIO_ACTIVE_HIGH>;
focaltech,irq-gpio = <&pio PB 10 IRQ_TYPE_LEVEL_LOW>;
focaltech,max-touch-number = <5>;
//focaltech,display-coords = <0 0 800 480>;
focaltech,display-coords = <0 0 480 800>;
//focaltech,reg_vdd = <0x0000001f>;
//focaltech,reg_avdd = <0x0000001f>;
focaltech,reg_vdd = <®_3v3>;
focaltech,reg_avdd = <®_3v3>;
};
CTP_INT 对应的引脚是 PB10;CTP_RST 对应的引脚是 PE17。
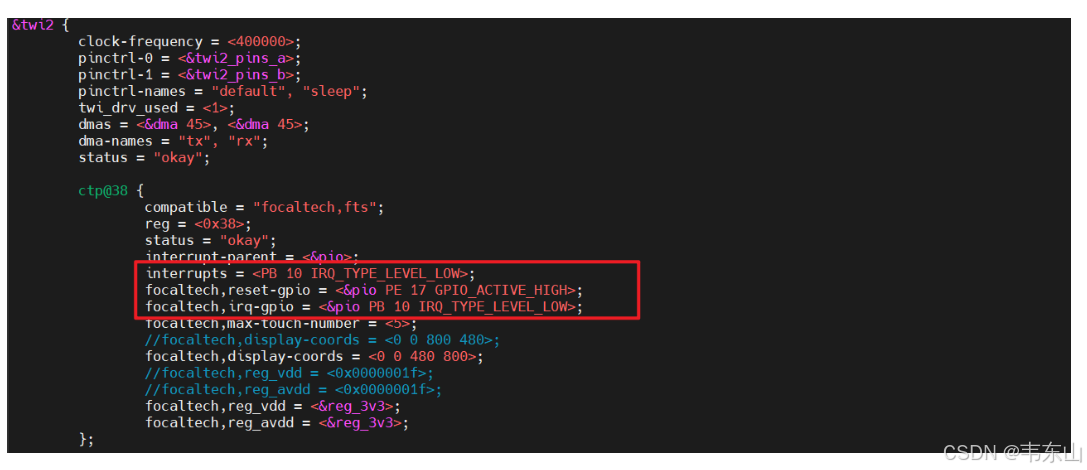
执行:wq,退出保存。
2.2 修改触摸驱动
在测试过程中,发现触摸点(x,y)不对,需要修改驱动程序。
进入目录t113i_tinasdk5.0-v1/kernel/linux-5.4/drivers/input/touchscreen/focaltech_touch
执行vim focaltech_core.c,修改文件focaltech_core.c
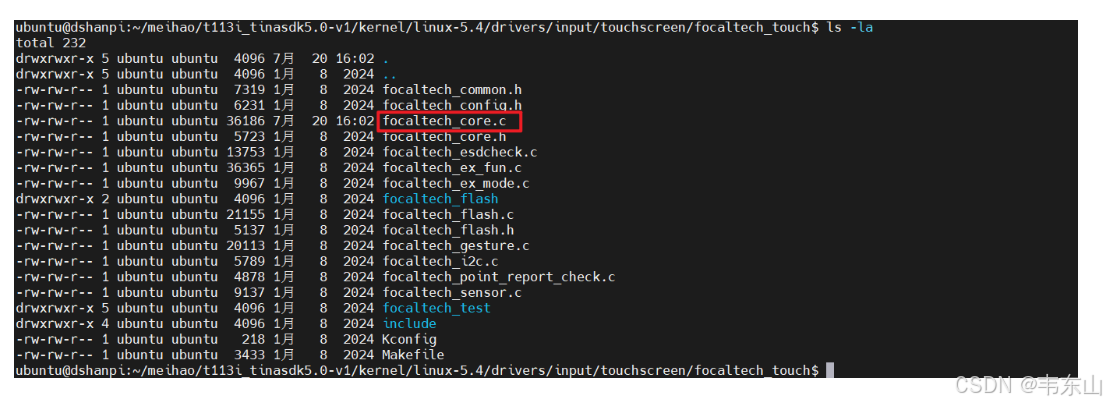
两处修改:
-
在
fts_input_dev_report_a函数中修改,找到相应的位置:#原来的 input_report_abs(data->input_dev, ABS_MT_POSITION_X, event->au16_x[i]); input_report_abs(data->input_dev, ABS_MT_POSITION_Y, event->au16_y[i]); #修改的 input_report_abs(data->input_dev, ABS_MT_POSITION_X, -(event->au16_x[i] - 480)); input_report_abs(data->input_dev, ABS_MT_POSITION_Y, -(event->au16_y[i] - 800)); -
在
fts_input_dev_report_b函数中修改,找到相应的位置:#原来的 input_report_abs(data->input_dev, ABS_MT_POSITION_X, event->au16_x[i]); input_report_abs(data->input_dev, ABS_MT_POSITION_Y, event->au16_y[i]); #修改的 input_report_abs(data->input_dev, ABS_MT_POSITION_X, -(event->au16_x[i] - 480)); input_report_abs(data->input_dev, ABS_MT_POSITION_Y, -(event->au16_y[i] - 800));
2.3 添加触摸驱动
回到SDK源码根目录t113i_tinasdk5.0-v1/,输入./build.sh menuconfig,进入内核配置界面
找到 Device Drivers,进入。

找到Input device support,进入。
找到Touchscreens,进入。
找到Focaltech Touchscreen,点击键盘y,选上。
保存退出。
执行./build.sh kernel编译内核,再输入./build.sh,最后打包./build.sh pack。
ubuntu@dshanpi:~/meihao/t113i_tinasdk5.0-v1$ ./build.sh pack
...
/home/ubuntu/meihao/t113i_tinasdk5.0-v1/tools/pack/pctools/linux/eDragonEx/
/home/ubuntu/meihao/t113i_tinasdk5.0-v1/out/t113_i/evb1_auto/pack_out
Begin Parse sys_partion.fex
Add partion boot-resource.fex BOOT-RESOURCE_FEX
Add partion very boot-resource.fex BOOT-RESOURCE_FEX
FilePath: boot-resource.fex
FileLength=dad400Add partion env.fex ENV_FEX000000000
Add partion very env.fex ENV_FEX000000000
FilePath: env.fex
FileLength=20000Add partion env.fex ENV_FEX000000000
Add partion very env.fex ENV_FEX000000000
FilePath: env.fex
FileLength=20000Add partion boot.fex BOOT_FEX00000000
Add partion very boot.fex BOOT_FEX00000000
FilePath: boot.fex
FileLength=920800Add partion rootfs.fex ROOTFS_FEX000000
Add partion very rootfs.fex ROOTFS_FEX000000
FilePath: rootfs.fex
FileLength=b20d850Add partion amp_rv0.fex AMP_RV0_FEX00000
Add partion very amp_rv0.fex AMP_RV0_FEX00000
FilePath: amp_rv0.fex
FileLength=29eb8BuildImg 0
Dragon execute image.cfg SUCCESS !
----------image is at----------

265M    /home/ubuntu/meihao/t113i_tinasdk5.0-v1/out/t113_i_linux_evb1_auto_uart0.img

pack finish
ubuntu@dshanpi:~/meihao/t113i_tinasdk5.0-v1$
最后根据之前的烧录方式烧录到开发板。
烧录完成后,在开发板上,输入cat /proc/bus/input/devices
# cat /proc/bus/input/devices
I: Bus=0019 Vendor=0001 Product=0001 Version=0100
N: Name="sunxi-keyboard"
P: Phys=sunxikbd/input0
S: Sysfs=/devices/virtual/input/input0
U: Uniq=
H: Handlers=kbd event0
B: PROP=0
B: EV=3
B: KEY=1000 800 c0000 0 0 10000000

I: Bus=0019 Vendor=0001 Product=0001 Version=0100
N: Name="sunxi-ts"
P: Phys=sunxi_ts/input0
S: Sysfs=/devices/platform/soc@3000000/2009c00.rtp/input/input1
U: Uniq=
H: Handlers=event1
B: PROP=0
B: EV=b
B: KEY=400 0 0 0 0 0 0 0 0 0 0
B: ABS=3

I: Bus=0019 Vendor=0001 Product=0001 Version=0100
N: Name="sunxi-gpadc0"
P: Phys=sunxigpadc0/input0
S: Sysfs=/devices/virtual/input/input2
U: Uniq=
H: Handlers=kbd event2
B: PROP=0
B: EV=100003
B: KEY=200000 0 0 0 0 0 0 0 8c0000 0 0 10000000

I: Bus=0018 Vendor=0000 Product=0000 Version=0000
N: Name="fts_ts"
P: Phys=
S: Sysfs=/devices/platform/soc@3000000/2502800.twi/i2c-2/2-0038/input/input3
U: Uniq=
H: Handlers=event3
B: PROP=2
B: EV=b
B: KEY=400 0 0 0 0 0 0 0 0 0 0
B: ABS=6618000 0

#
可以看到/dev/input/event3对应的是MIPI屏上的触摸设备节点。
执行hexdump /dev/input/event3,用手指在MIPI屏点击几下,会有如下信息出现:
# hexdump /dev/input/event3
0000000 5896 0000 f76d 0003 0003 0039 0006 0000
0000010 5896 0000 f76d 0003 0003 003a 007f 0000
0000020 5896 0000 f76d 0003 0003 0030 0004 0000
0000030 5896 0000 f76d 0003 0003 0035 0143 0000
0000040 5896 0000 f76d 0003 0003 0036 0246 0000
0000050 5896 0000 f76d 0003 0001 014a 0001 0000
0000060 5896 0000 f76d 0003 0000 0000 0000 0000
0000070 5896 0000 1ff9 0004 0003 0039 ffff ffff
0000080 5896 0000 1ff9 0004 0001 014a 0000 0000
0000090 5896 0000 1ff9 0004 0000 0000 0000 0000
XR829模组适配
本章节将讲解如何在 TinaSDK5 适配 xr829 模组,并生成镜像。
获取环境变量
在ubuntu上,新建一个终端,进入TinaSDK5根目录,执行以下指令:
source build/envsetup.sh
其中:
- source build/envsetup.sh :获取环境变量。
ubuntu@ubuntu1804:~/T113-i/tina5sdk-bsp$ source build/envsetup.sh
NOTE: The SDK(/home/ubuntu/T113-i/tina5sdk-bsp) was successfully loaded
load openwrt... ok
Please run lunch next for openwrt.
load buildroot,bsp...ok
Invoke . build/quick.sh from your shell to add the following functions to your environment:
    croot                          - Changes directory to the top of the tree
    cbsp                           - Changes directory to the bsp
    cbsptest                       - Changes directory to the bsptest
    ckernel                        - Changes directory to the kernel
    cbrandy                        - Changes directory to the brandy
    cboot                          - Changes directory to the uboot
    cbr                            - Changes directory to the buildroot
    cchips                         - Changes directory to the board
    cconfigs                       - Changes directory to the board's config
    cbin                           - Changes directory to the board's bin
    cdts                           - Changes directory to the kernel's dts
    ckernelout                     - Changes directory to the kernel output
    cout                           - Changes directory to the product's output
    copenssl                       - Changes directory to the product's openssl-1.0.0
Usage: build.sh [args]
    build.sh                       - default build all
    build.sh bootloader            - only build bootloader
    build.sh kernel                - only build kernel
    build.sh buildroot_rootfs      - only build buildroot
    build.sh menuconfig            - edit kernel menuconfig
    build.sh saveconfig            - save kernel menuconfig
    build.sh recovery_menuconfig   - edit recovery menuconfig
    build.sh recovery_saveconfig   - save recovery menuconfig
    build.sh buildroot_menuconfig  - edit buildroot menuconfig
    build.sh buildroot_saveconfig  - save buildroot menuconfig
    build.sh clean                 - clean all
    build.sh distclean             - distclean all
    build.sh pack                  - pack firmware
    build.sh pack_debug            - pack firmware with debug info output to card0
    build.sh pack_secure           - pack firmware with secureboot
Usage: pack [args]
    pack                           - pack firmware
    pack -d                        - pack firmware with debug info output to card0
    pack -s                        - pack firmware with secureboot
    pack -sd                       - pack firmware with secureboot and debug info output to card0
ubuntu@ubuntu1804:~/T113-i/tina5sdk-bsp$
这样,就可以使用相应的指令来配置xr829模组。
内核设备树修改
查看原理图
对于wifi功能需要查看的引脚:

由图可知,
WL_REG_ON 对应的引脚是 ==> PB12
WL_WAKE_AP 对应的引脚是 ==> PG10
对于蓝牙功能需要查看的引脚:
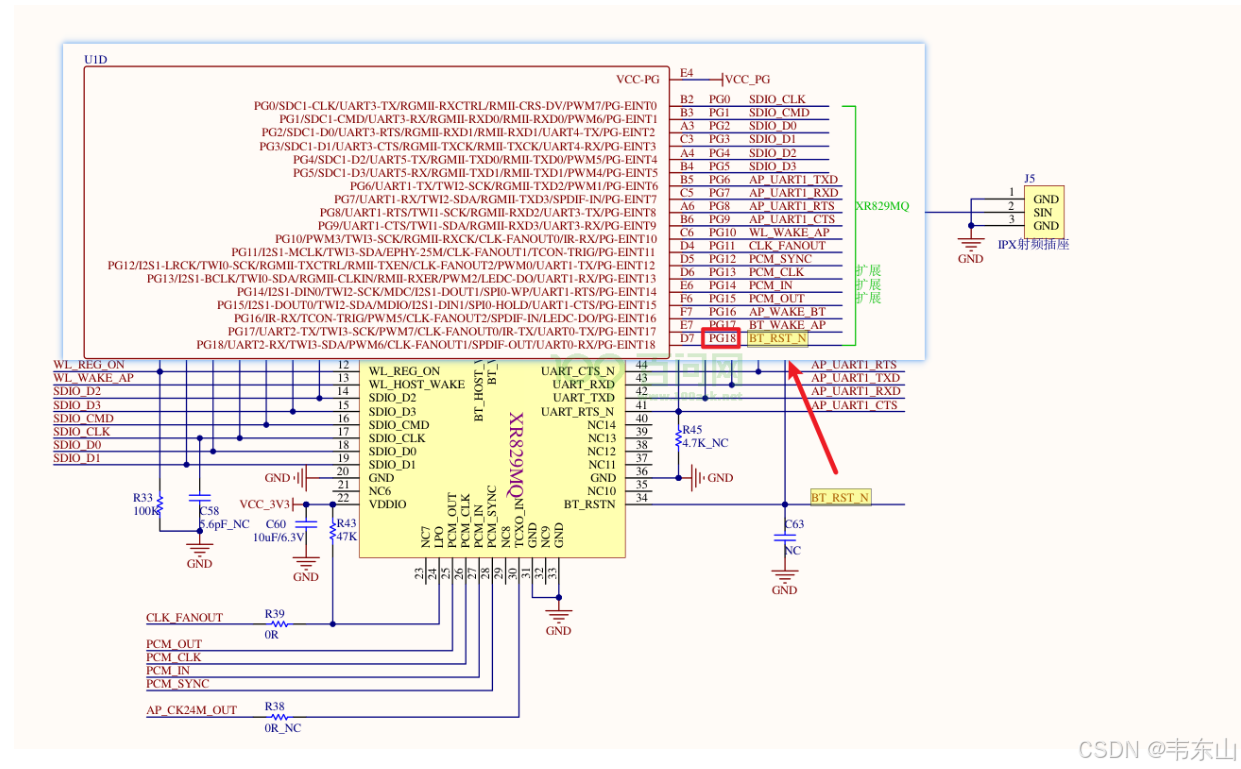
由图可知,
BT_RST_N 对应的引脚是 ==> PG18
修改内核设备树
在TinaSDK源码中,进入目录/device/config/chips/t113_i/configs/evb1_auto/linux-5.4
修改目录下的内核设备树文件board.dts
vim board.dts
对于wifi设备树节点修改对应的引脚:
在普通模式下,键盘输入/wlan,找到wlan设备树节点,点击键盘上的i键,进入编辑模式,修改如下:
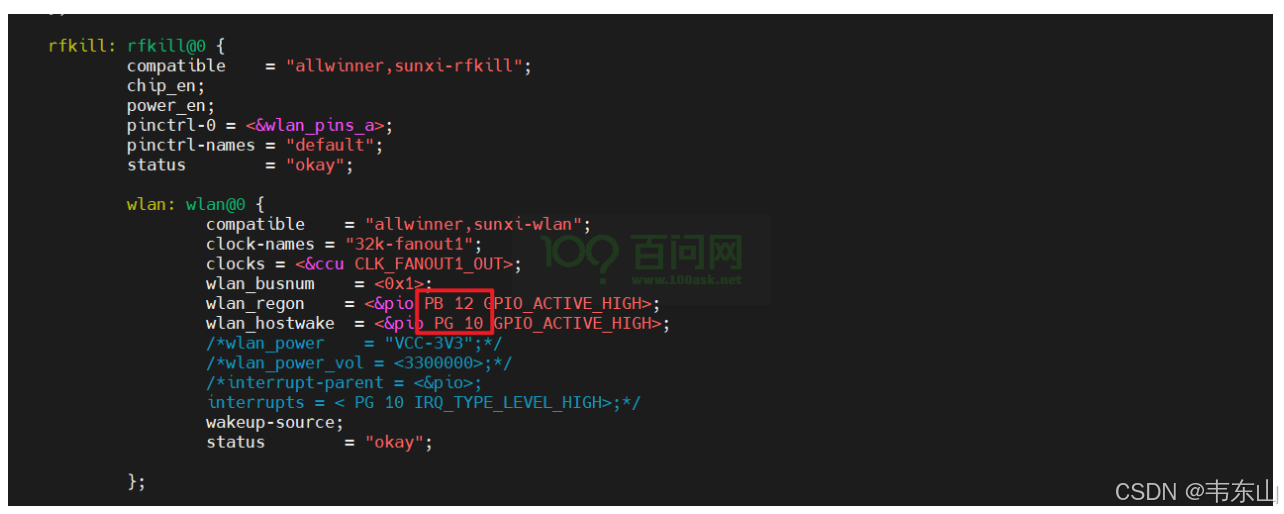
对于蓝牙设备树节点修改对应的引脚:
点击键盘的esc键进入普通模式,输入/bt,找到蓝牙设备树节点,点击键盘上的i键,进入编辑模式,修改如下:
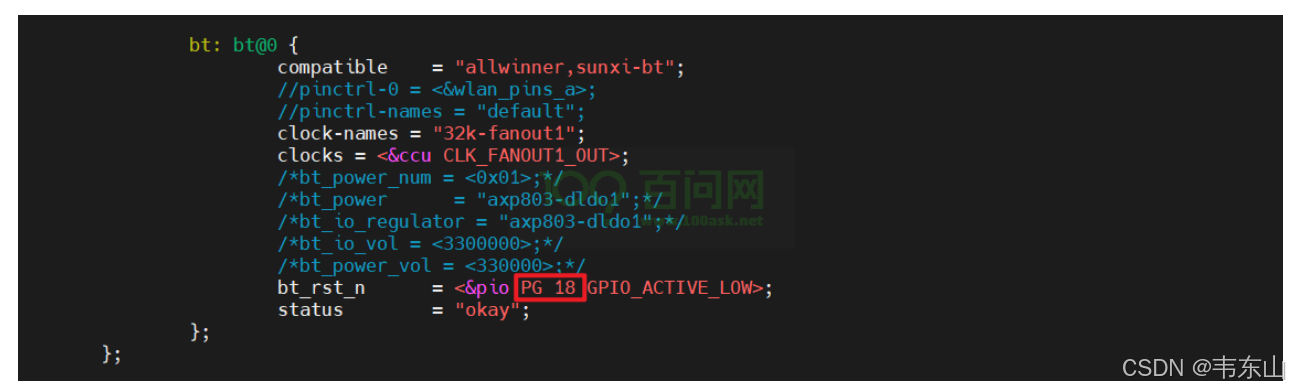
修改完成后,普通模式下,输入:wq,回车之后,即可保存退出。
内核配置选择
进入TinaSDK源码目录,
执行./build.sh menuconfig进入内核配置界面。
找到Device Drivers,回车进入。

找到 Network device support,回车进入。
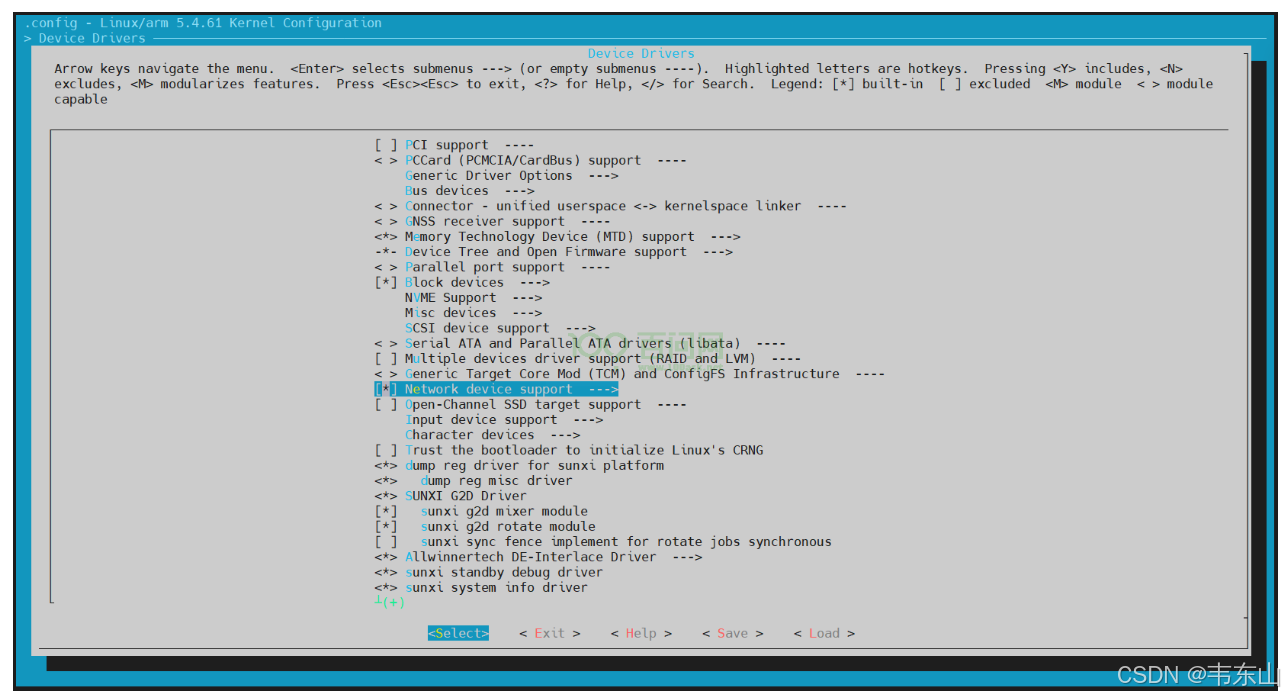
找到 Wireless LAN,回车进入。
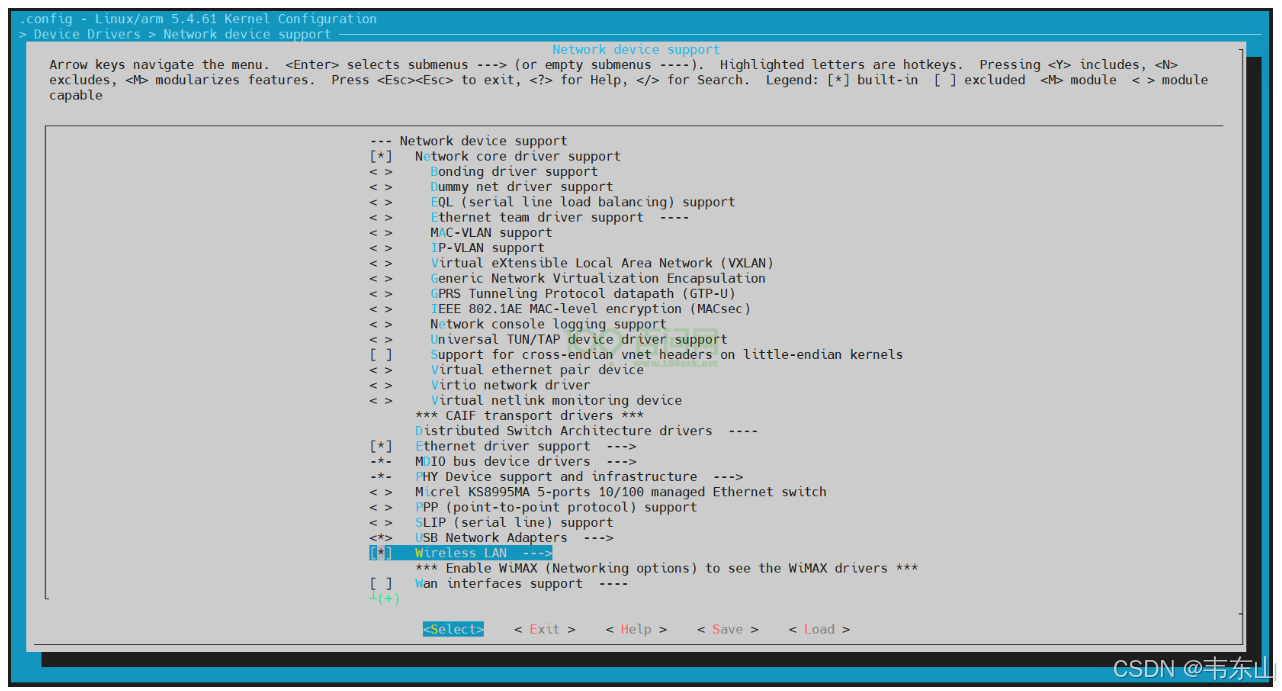
找到XR829 WLAN support,按住键盘M,选为编译成内核模块。
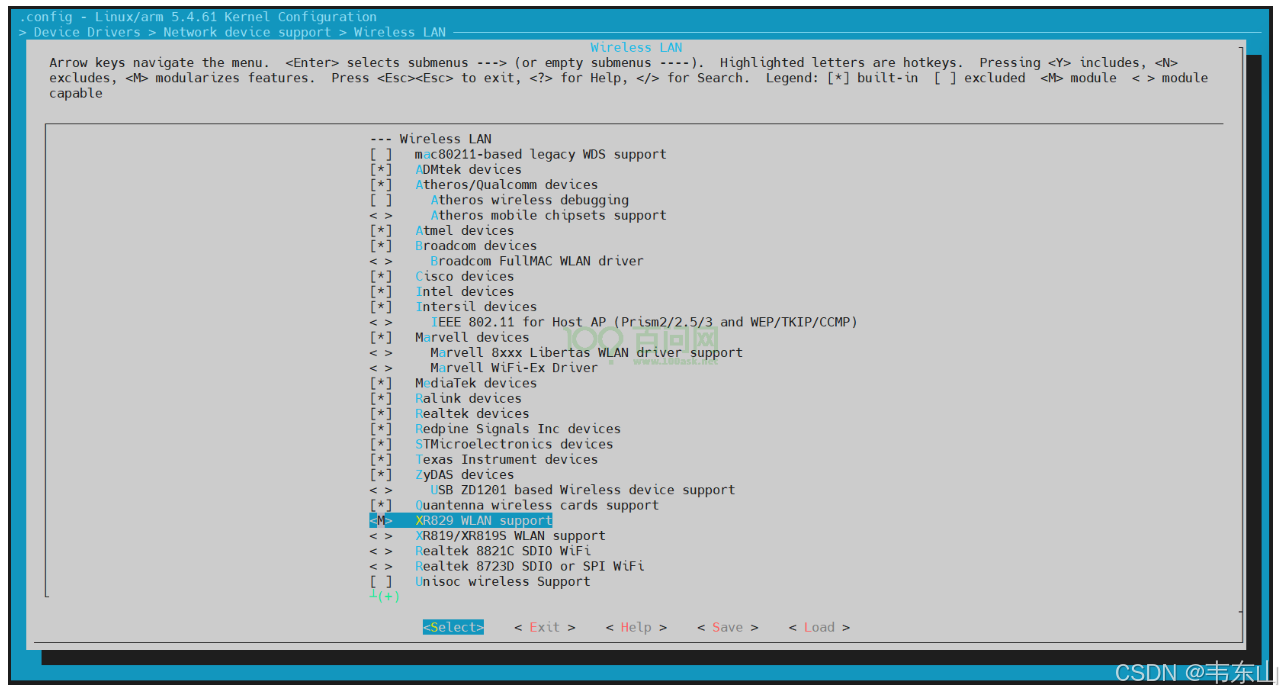
控制键盘上的方向键,选择Save,一路回车,保存完毕后,最后选择Exit,直到退出为止退出。
在TinaSDK源码目录下,执行./build.sh kernel
ubuntu@dshanpi:~/meihao/t113i_tinasdk5.0-v1$ ./build.sh kernel
========ACTION List: build_kernel ;========
options :
INFO: build kernel ...
INFO: prepare_buildserver
INFO: Prepare toolchain ...
Building kernel
...
Copy boot.img to output directory ...

sun8iw20p1 compile all(Kernel+modules+boot.img) successful


INFO: build dts ...
INFO: Prepare toolchain ...
removed '/home/ubuntu/meihao/t113i_tinasdk5.0-v1/out/t113_i/evb1_auto/buildroot/.board.dtb.d.dtc.tmp'
removed '/home/ubuntu/meihao/t113i_tinasdk5.0-v1/out/t113_i/evb1_auto/buildroot/.board.dtb.dts.tmp'
'/home/ubuntu/meihao/t113i_tinasdk5.0-v1/out/t113_i/kernel/build/arch/arm/boot/dts/.board.dtb.d.dtc.tmp' -> '/home/ubuntu/meihao/t113i_tinasdk5.0-v1/out/t113_i/evb1_auto/buildroot/.board.dtb.d.dtc.tmp'
'/home/ubuntu/meihao/t113i_tinasdk5.0-v1/out/t113_i/kernel/build/arch/arm/boot/dts/.board.dtb.dts.tmp' -> '/home/ubuntu/meihao/t113i_tinasdk5.0-v1/out/t113_i/evb1_auto/buildroot/.board.dtb.dts.tmp'
'/home/ubuntu/meihao/t113i_tinasdk5.0-v1/out/t113_i/kernel/staging/sunxi.dtb' -> '/home/ubuntu/meihao/t113i_tinasdk5.0-v1/out/t113_i/evb1_auto/buildroot/sunxi.dtb'
ubuntu@dshanpi:~/meihao/t113i_tinasdk5.0-v1$
Tina配置选择
1.添加xr829固件
在TinaSDK源码目录下,执行./build.sh buildroot_menuconfig,进入Tina配置界面。
找到Target packages,回车进入。
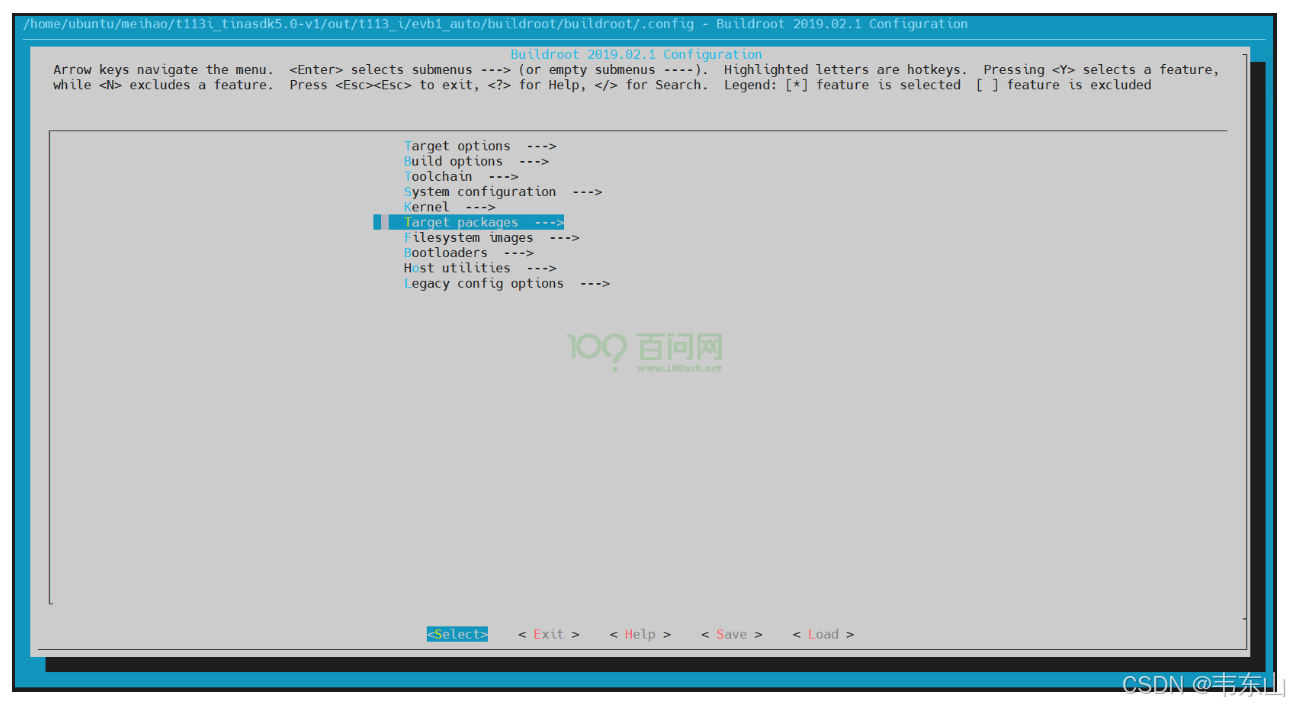
找到allwinner platform private package select,回车进入。
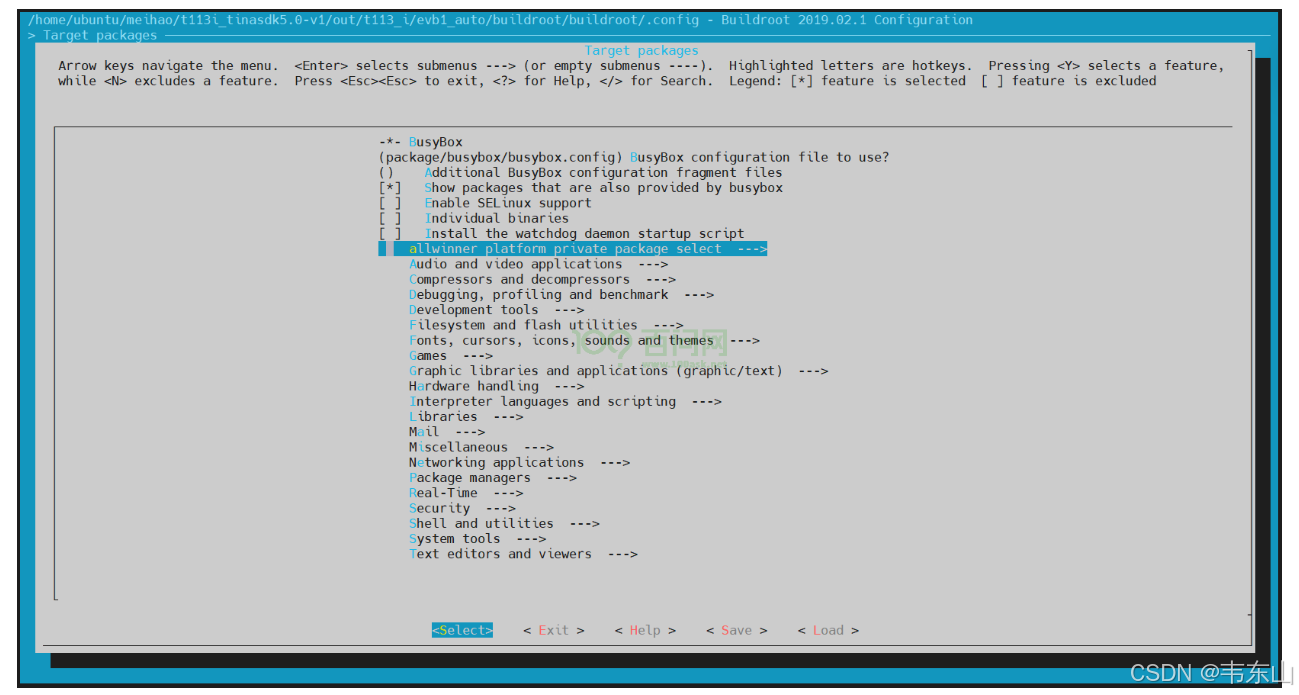
找到wireless,回车进入。
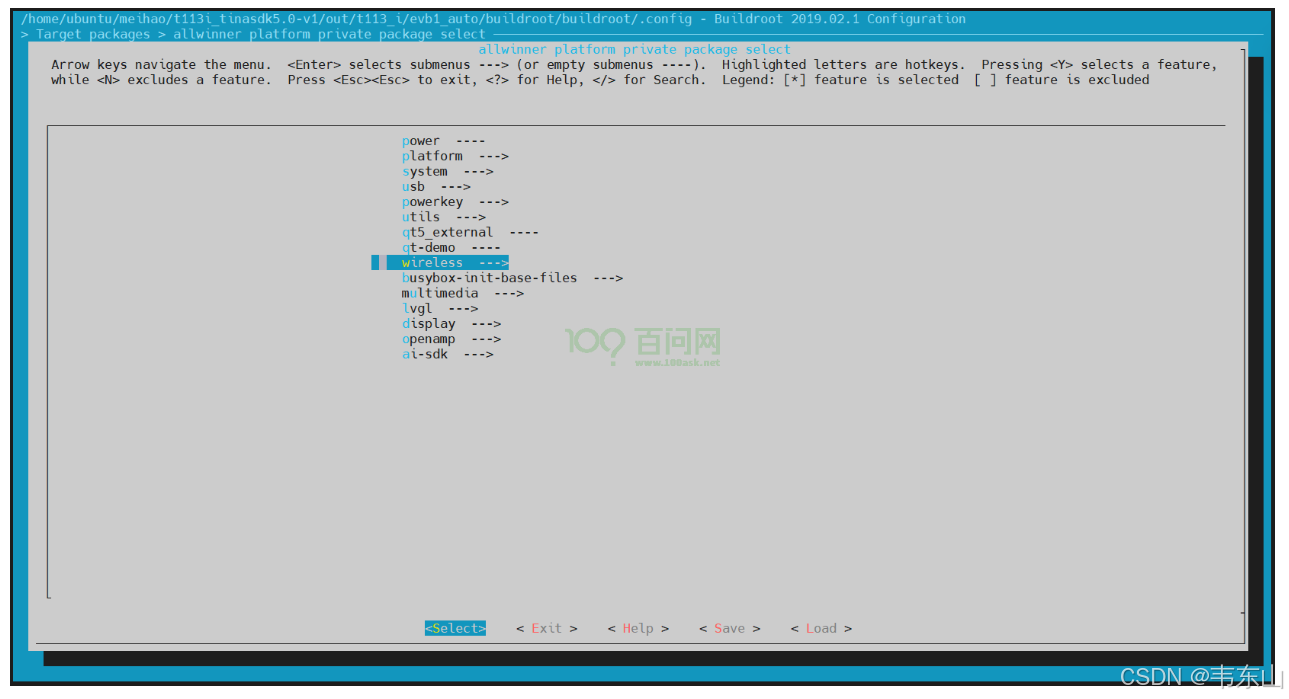
找到firmware,回车进入。
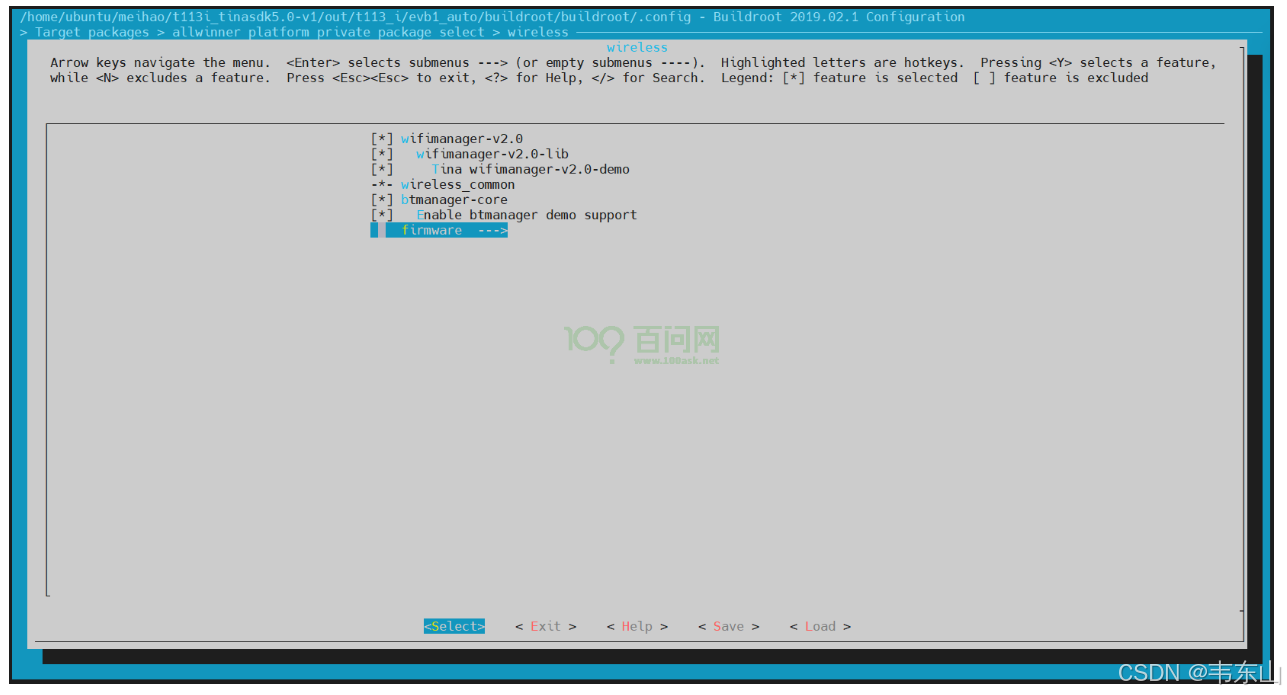
先点击键盘y,选择xr829-firmware,然后选择xr829_24M,因为板子上xr829芯片旁边用的晶振是24M的。
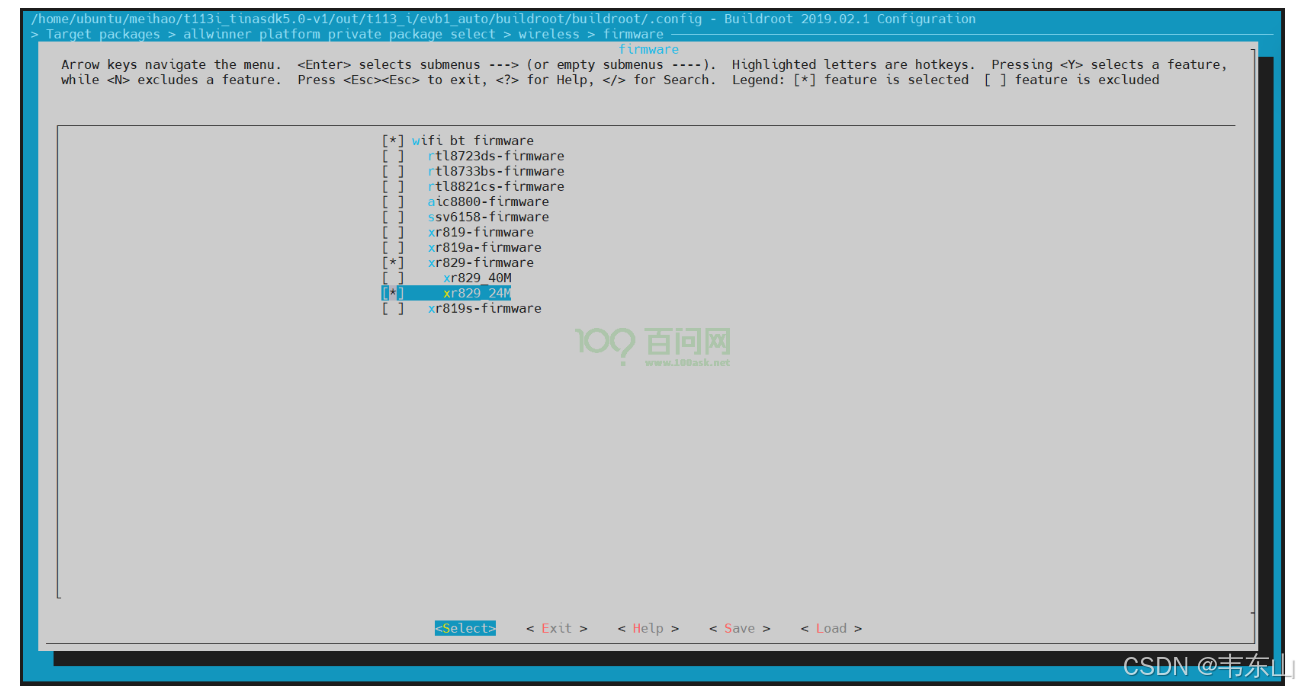
2.开启odhcp6c
odhcp6c的核心作用在于简化并自动化IPv6网络环境下的地址配置过程,确保设备能够顺利接入并通信。
接着上面的操作,退出到Target packages下,找到Networking applications,进入。
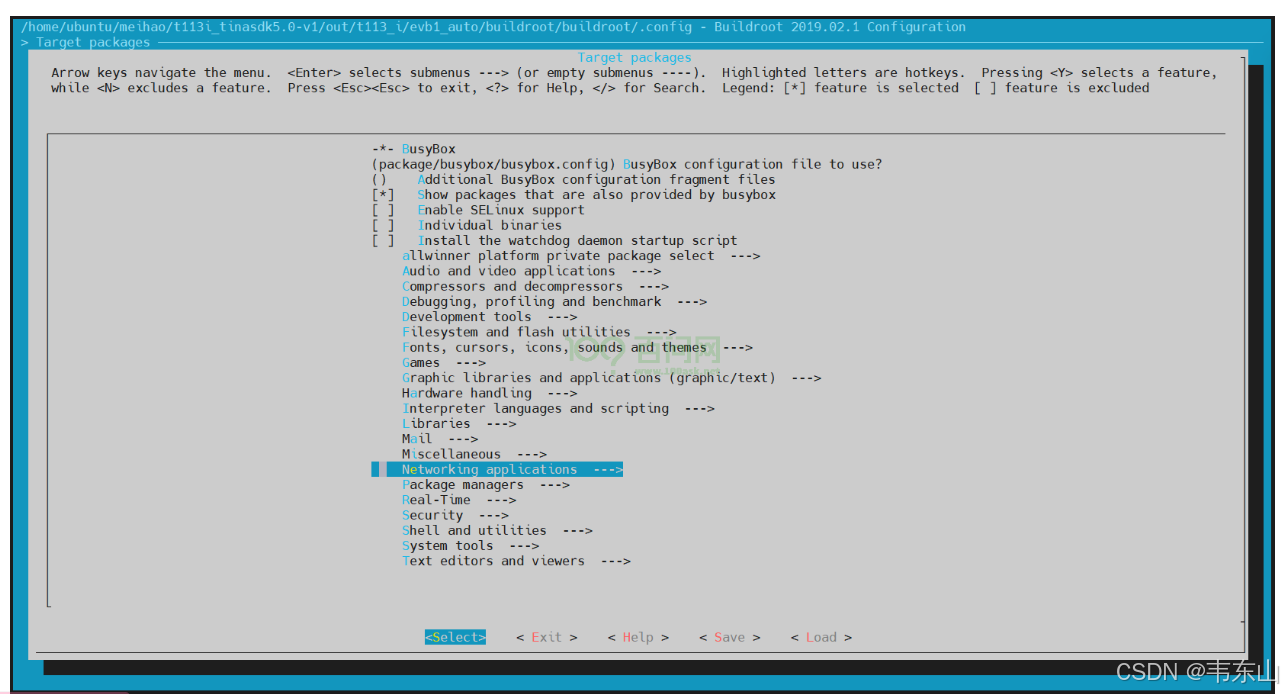
找到odhcp6c,点击键盘y,选上。
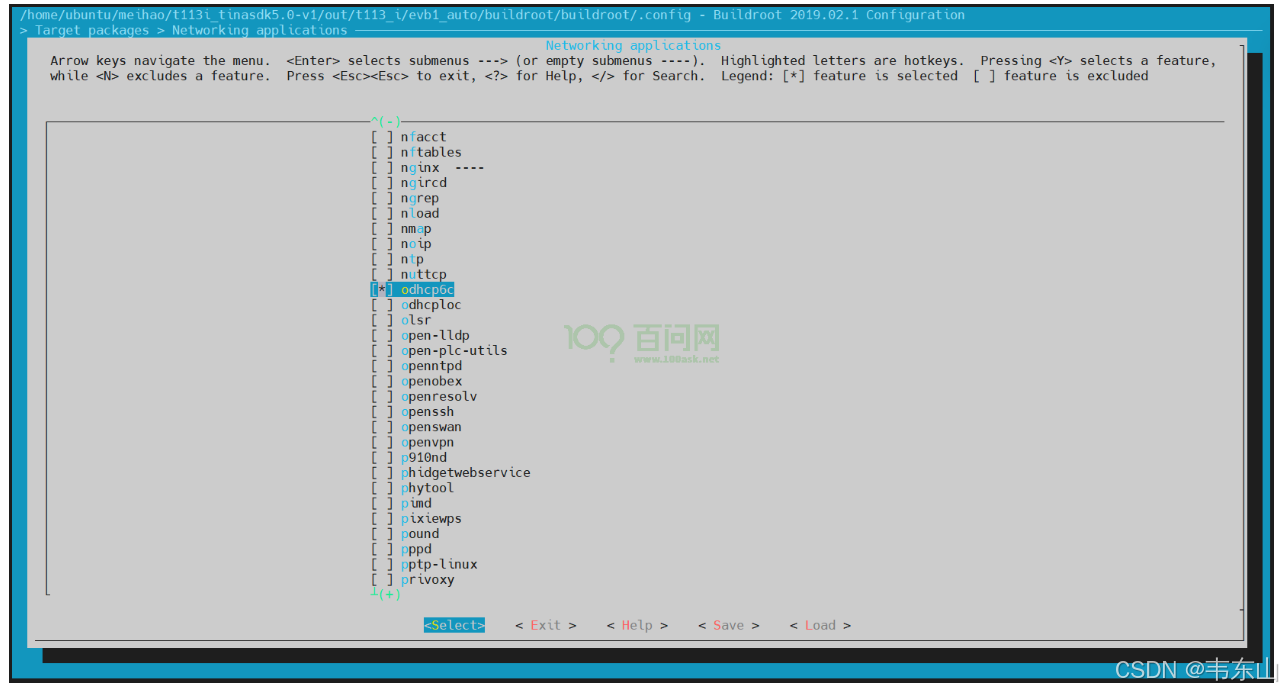
控制键盘的方向键,选择Save,一路回车,保存完毕后,最后选择Exit,直到退出为止。
编译打包更新
在TinaSDK源码目录下,执行./build.sh编译。
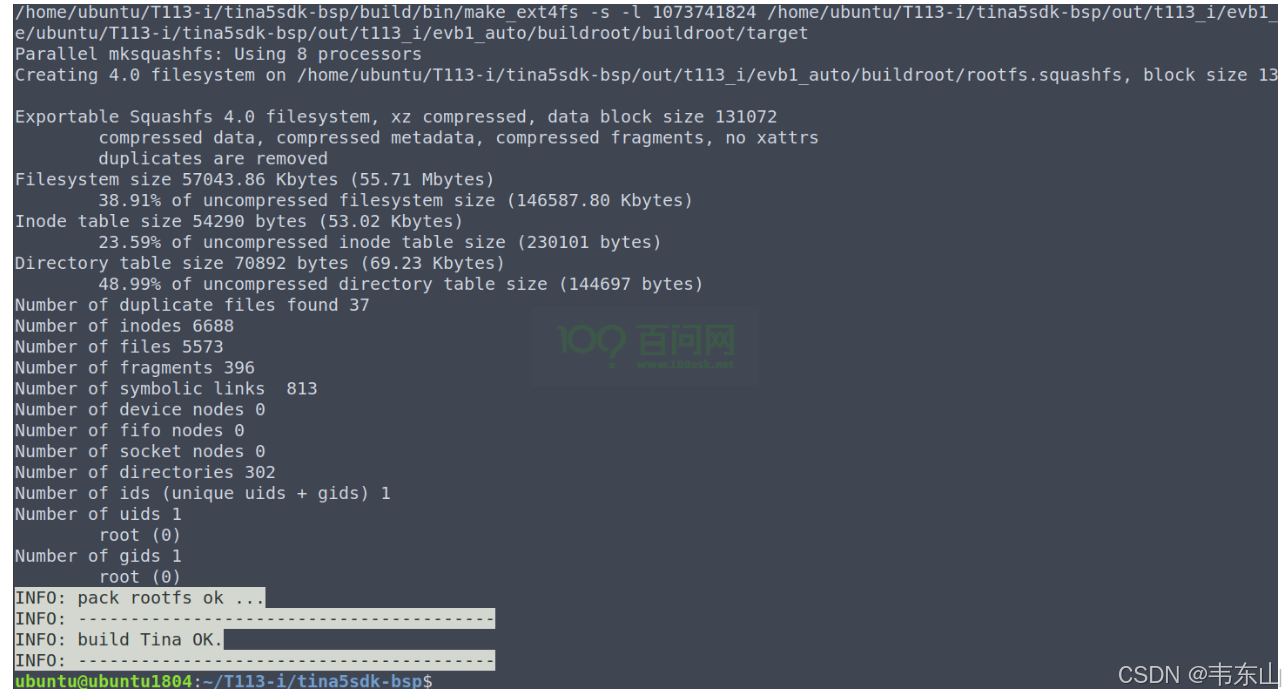
编译完成后,输入./build.sh pack
ubuntu@dshanpi:~/meihao/t113i_tinasdk5.0-v1$ ./build.sh pack
========ACTION List: mk_pack ;========
options :
INFO: packing firmware ...
INFO: /home/ubuntu/meihao/t113i_tinasdk5.0-v1/out/t113_i/common/keys
copying tools file
copying configs file
copying product configs file
linux copying boardt&linux_kernel_version configs file
...
update gpt file ok
update mbr file ok
/home/ubuntu/meihao/t113i_tinasdk5.0-v1/tools/pack/pctools/linux/eDragonEx/
/home/ubuntu/meihao/t113i_tinasdk5.0-v1/out/t113_i/evb1_auto/pack_out
Begin Parse sys_partion.fex
Add partion boot-resource.fex BOOT-RESOURCE_FEX
Add partion very boot-resource.fex BOOT-RESOURCE_FEX
FilePath: boot-resource.fex
FileLength=dad400Add partion env.fex ENV_FEX000000000
Add partion very env.fex ENV_FEX000000000
FilePath: env.fex
FileLength=20000Add partion env.fex ENV_FEX000000000
Add partion very env.fex ENV_FEX000000000
FilePath: env.fex
FileLength=20000Add partion boot.fex BOOT_FEX00000000
Add partion very boot.fex BOOT_FEX00000000
FilePath: boot.fex
FileLength=920800Add partion rootfs.fex ROOTFS_FEX000000
Add partion very rootfs.fex ROOTFS_FEX000000
FilePath: rootfs.fex
FileLength=b260880Add partion amp_rv0.fex AMP_RV0_FEX00000
Add partion very amp_rv0.fex AMP_RV0_FEX00000
FilePath: amp_rv0.fex
FileLength=29eb8BuildImg 0
Dragon execute image.cfg SUCCESS !
----------image is at----------

266M    /home/ubuntu/meihao/t113i_tinasdk5.0-v1/out/t113_i_linux_evb1_auto_uart0.img

pack finish
ubuntu@dshanpi:~/meihao/t113i_tinasdk5.0-v1$
打包完成后,根据前面开发环境搭建章节的烧写方式把镜像 t113_i_linux_evb1_auto_uart0.img 烧写到开发板上。
千兆网口通信
本章节将讲解如何测试千兆网口。源码Tina5-SDK编译出的镜像中默认支持千兆网口通信功能。
准备工作
在进入本章节实验之前,请做好以下准备。
- 硬件:T113i-Industrial开发板
- 硬件: typeC线 X2
- 硬件:一根能用来上网的网线
- 软件: 全志线刷工具:AllwinnertechPhoeniSuit
- 软件: 全志USB烧录驱动:AllwinnerUSBFlashDeviceDriver
- 软件: 镜像:t113_i_linux_evb1_auto_uart0.img
登录开发板终端
看到这里,如果不知道怎么连接硬件,怎么打开串口终端,请参考前面《快速启动》章节里的启动开发板文章。
联网测试
在进行千兆网卡功能测试前,查看网卡的位置如下图所示:
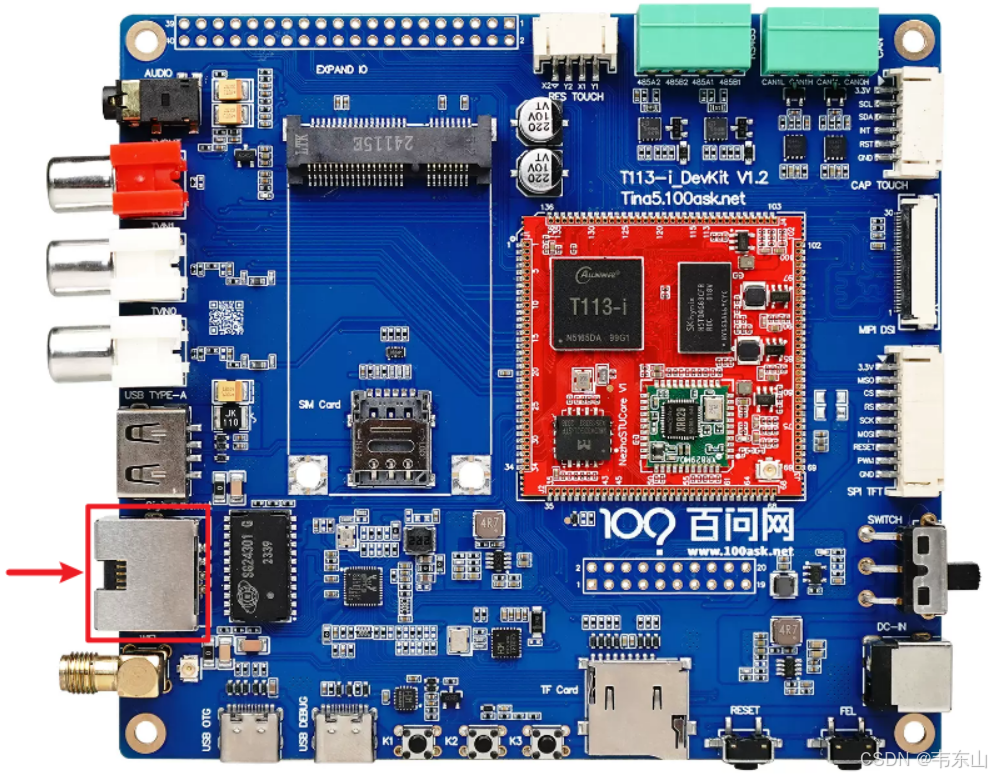
注意:请确保网线可以正常通过路由器进行联网
1.网线安装完成后,上电启动系统,进入串口终端,查看eth0节点是否存在,输入:
ifconfig -a
输入完成之后。即可看到eth0节点,如下图所示:
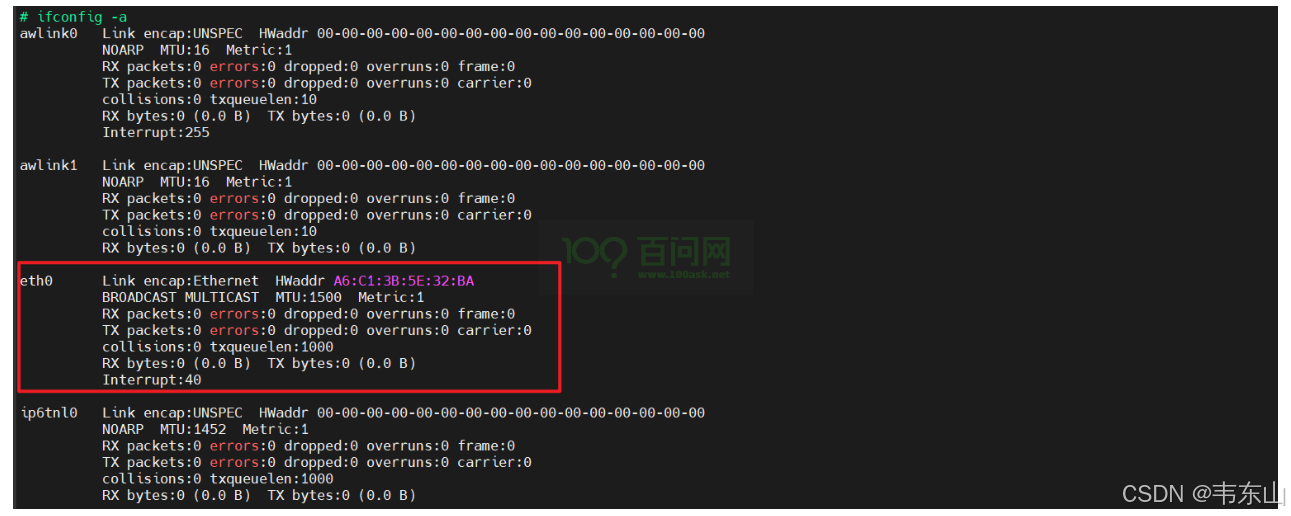
2.使能eth0网络设备节点,输入:
ifconfig eth0 up
输入完成后,即可通过ifconfig查看到使能后的网络设备节点,如下图所示:
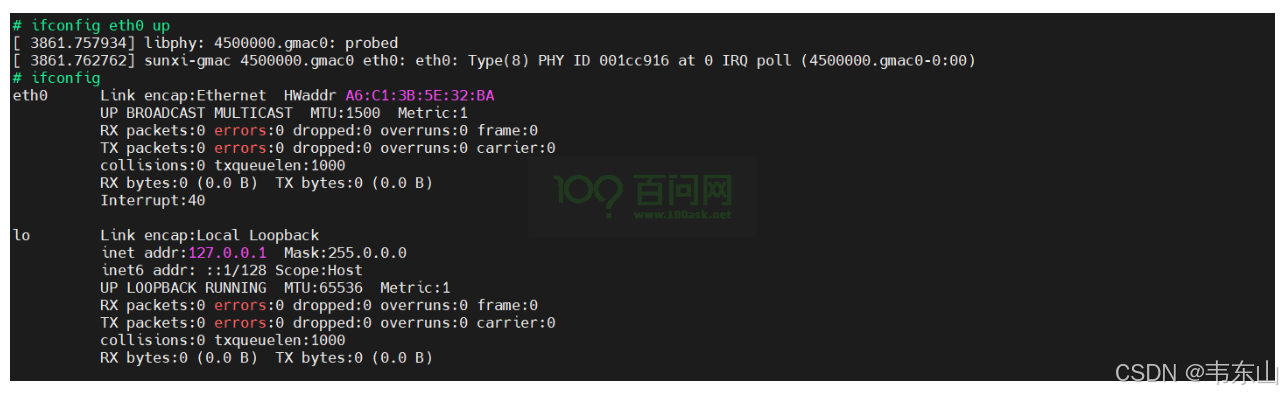
3.将网线插入网卡之后,可以看到网卡座子处的绿色灯亮起,此时可以去获取eth0的IP地址,输入:
udhcpc -i eth0
输入完成后即可获取到路由器分配的ip地址,如下图所示:
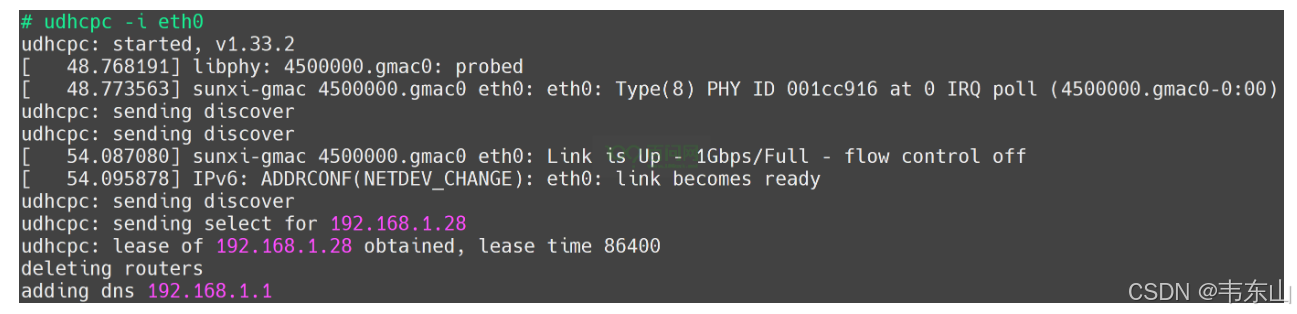
可以看到1Gbps/Full。
WiFi联网
本章节来讲解如何连接wifi进行上网,T113i-Industrial开发板板载的是 XradioTech 所设计的 XR829 Wi-Fi 模组。
前提条件
在进入本章节学习之前,请做好以下准备。
当前版本xr829 Wi-Fi模组和天线接口硬件位置图,如下:
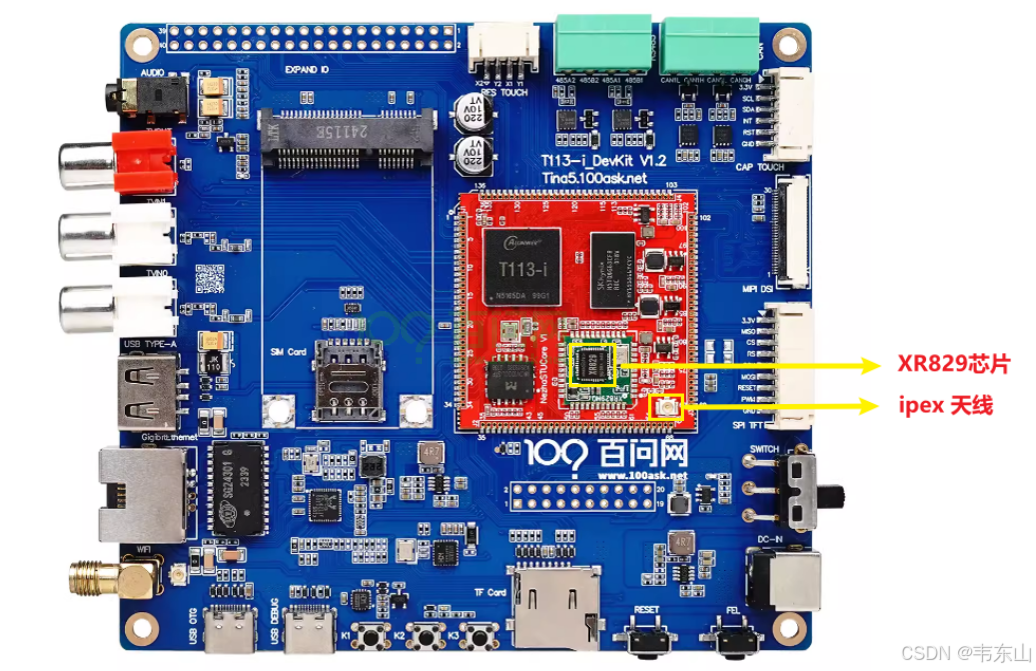
准备工作:
- 硬件: T113i-Industrial开发板
- 硬件: typeC线 X2
- 硬件: ipex 2.4G天线 X1
- 软件: 全志线刷工具:AllwinnertechPhoeniSuit
- 软件: 全志USB烧录驱动:AllwinnerUSBFlashDeviceDriver
- 软件: 镜像(已适配xr829):t113_i_linux_evb1_auto_uart0.img
硬件介绍
Wi-Fi功能特性
XR829 Wi-Fi模组是一款集成了2.4G IEEE 802.11b/g/n标准的无线连接解决方案,并且支持蓝牙2.1/4.0/4.1协议标准。它主要应用于短距离无线连接,如平板电脑、智能电视等设备。以下是XR829 Wi-Fi模组的一些功能特性:
- STA模式管理:支持STA(Station)模式,允许设备连接到无线网络。
- AP模式管理:支持AP(Access Point)模式,允许设备作为无线热点供其他设备连接。
- Monitor模式管理:提供Monitor模式,用于监听无线网络的流量。
- 配网管理:支持多种配网方式,如softap、soundwave、xconfig等,方便用户连接到无线网络。
- P2P模式管理:正在考虑支持P2P(Peer to Peer)模式,用于设备间的直接连接。
- 软件结构:wifimanger2.0支持AP模式和monitor模式,集成了多种配网模式,方便用户使用。
- 硬件资源适配:需要根据硬件原理图进行配置,包括时钟、电源、SDIO等资源的适配。
- 内核驱动适配:需要在内核中添加Kconfig和Makefile配置,并通过menuconfig启用XR829 WLAN支持。
- Firmware支持:根据不同晶振(24M或40M)提供相应的固件支持。
- 应用工具适配:提供了wifimanager、smartlinkd、softap等应用工具的适配,以方便进行Wi-Fi功能测试和使用。
Wi-Fi软件结构
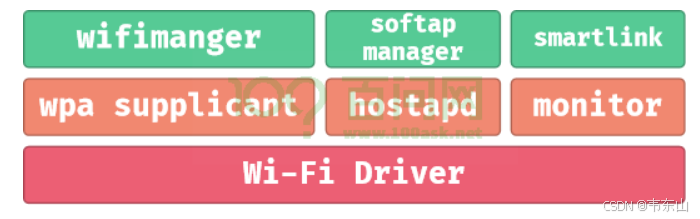
- wifimanger:主要用于STATION模式,提供Wi-Fi连接扫描等功能。
- softap manager:提供启动AP的功能。
- smartlink:对于
NoInput的设备,通过借助第三方设备(如手机)实现透传配网的功能,包括softap/soundwave/xconfig/airkiss/等多种配网方式。 - wpa_supplicant:开源的无线网络配置工具,主要用来支持WEP,WPA/WPA2和WAPI无线协议和加密认证的,实际上的工作内容是通过
socket与驱动交互上报数据给用户。 - hostapd:是一个用户态用于AP和认证服务器的守护进程。
- monitor:Wi-Fi处于混杂设备监听模式的处理应用。
Wi-Fi天线安装
要使用Wi-Fi,需要连接一根ipex 2.4G天线,下面是将天线连接到T113i-Industrial开发板的指南图。
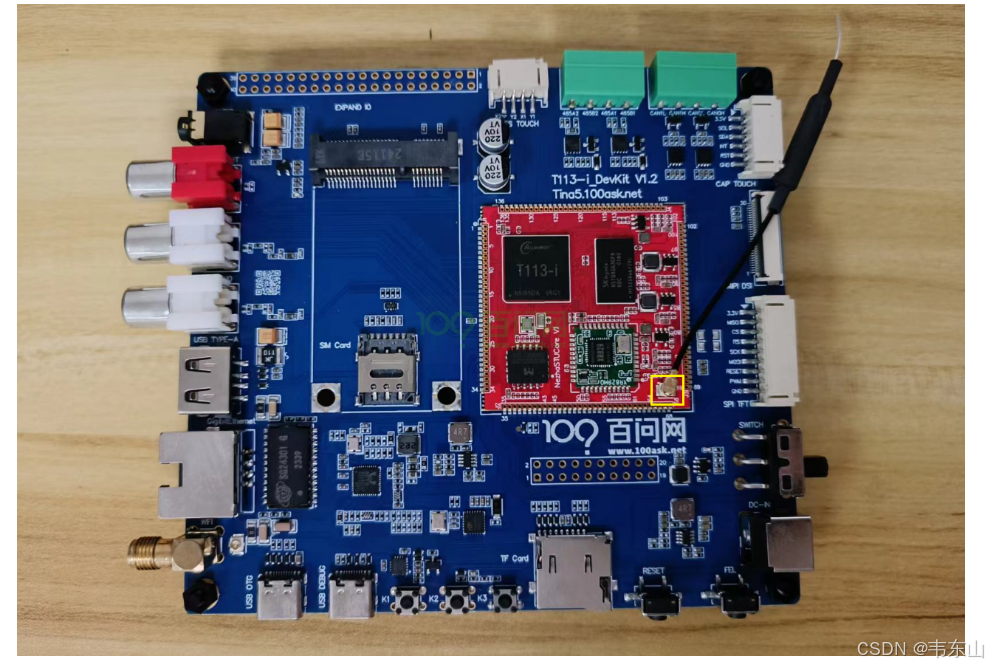
参考上图,拿到一根天线,对准天线接口,稍微用点力摁下去,听到咔擦一声,即可安装完毕。
装载驱动模块
登录开发板终端
看到这里,如果不知道怎么连接硬件,怎么打开串口终端,请参考前面《快速启动》章节里的启动开发板文章。
加载Wi-Fi驱动模块
本章节提供的镜像已经移植好了 XR829 Wi-Fi 模组和 Wi-Fi 的使用工具。所以只需要在开发板上进行wifi连接即可。
进入开发板串口终端,执行ifconfig -a,查看节点信息,想使用wifi,就需要有 wlan0节点。
# ifconfig -a
awlink0   Link encap:UNSPEC  HWaddr 00-00-00-00-00-00-00-00-00-00-00-00-00-00-00-00
          NOARP  MTU:16  Metric:1
          RX packets:0 errors:0 dropped:0 overruns:0 frame:0
          TX packets:0 errors:0 dropped:0 overruns:0 carrier:0
          collisions:0 txqueuelen:10
          RX bytes:0 (0.0 B)  TX bytes:0 (0.0 B)
          Interrupt:255

awlink1   Link encap:UNSPEC  HWaddr 00-00-00-00-00-00-00-00-00-00-00-00-00-00-00-00
          NOARP  MTU:16  Metric:1
          RX packets:0 errors:0 dropped:0 overruns:0 frame:0
          TX packets:0 errors:0 dropped:0 overruns:0 carrier:0
          collisions:0 txqueuelen:10
          RX bytes:0 (0.0 B)  TX bytes:0 (0.0 B)

eth0      Link encap:Ethernet  HWaddr 9A:47:64:F5:A8:4E
          BROADCAST MULTICAST  MTU:1500  Metric:1
          RX packets:0 errors:0 dropped:0 overruns:0 frame:0
          TX packets:0 errors:0 dropped:0 overruns:0 carrier:0
          collisions:0 txqueuelen:1000
          RX bytes:0 (0.0 B)  TX bytes:0 (0.0 B)
          Interrupt:40

ip6tnl0   Link encap:UNSPEC  HWaddr 00-00-00-00-00-00-00-00-00-00-00-00-00-00-00-00
          NOARP  MTU:1452  Metric:1
          RX packets:0 errors:0 dropped:0 overruns:0 frame:0
          TX packets:0 errors:0 dropped:0 overruns:0 carrier:0
          collisions:0 txqueuelen:1000
          RX bytes:0 (0.0 B)  TX bytes:0 (0.0 B)

lo        Link encap:Local Loopback
          inet addr:127.0.0.1  Mask:255.0.0.0
          inet6 addr: ::1/128 Scope:Host
          UP LOOPBACK RUNNING  MTU:65536  Metric:1
          RX packets:0 errors:0 dropped:0 overruns:0 frame:0
          TX packets:0 errors:0 dropped:0 overruns:0 carrier:0
          collisions:0 txqueuelen:1000
          RX bytes:0 (0.0 B)  TX bytes:0 (0.0 B)

sit0      Link encap:IPv6-in-IPv4
          NOARP  MTU:1480  Metric:1
          RX packets:0 errors:0 dropped:0 overruns:0 frame:0
          TX packets:0 errors:0 dropped:0 overruns:0 carrier:0
          collisions:0 txqueuelen:1000
          RX bytes:0 (0.0 B)  TX bytes:0 (0.0 B)

#
上面并没有看到 wlan0 节点,因为驱动没有被加载,需要手动执行 insmod /lib/modules/5.4.61/xr829.ko 装载驱动。
# insmod /lib/modules/5.4.61/xr829.ko
[  173.496018] ======== XRADIO WIFI OPEN ========
[  173.501856] [XRADIO] Driver Label:XR_V02.16.88_P2P_HT40_01.31
[  173.508696] [XRADIO] Allocated hw_priv @ (ptrval)
[  173.514978] sunxi-rfkill soc@3000000:rfkill@0: bus_index: 1
[  173.531312] sunxi-rfkill soc@3000000:rfkill@0: wlan power on success
[  173.738498] sunxi-mmc 4021000.sdmmc: sdc set ios:clk 0Hz bm PP pm UP vdd 21 width 1 timing LEGACY(SDR12) dt B
[  173.746231] [XRADIO] Detect SDIO card 1
[  173.749727] sunxi-mmc 4021000.sdmmc: no vqmmc,Check if there is regulator
[  173.774101] sunxi-mmc 4021000.sdmmc: sdc set ios:clk 400000Hz bm PP pm ON vdd 21 width 1 timing LEGACY(SDR12) dt B
[  173.797213] sunxi-mmc 4021000.sdmmc: sdc set ios:clk 400000Hz bm PP pm ON vdd 21 width 1 timing LEGACY(SDR12) dt B
[  173.811824] sunxi-mmc 4021000.sdmmc: sdc set ios:clk 400000Hz bm PP pm ON vdd 21 width 1 timing LEGACY(SDR12) dt B
[  173.834060] sunxi-mmc 4021000.sdmmc: sdc set ios:clk 400000Hz bm PP pm ON vdd 21 width 1 timing SD-HS(SDR25) dt B
[  173.845657] sunxi-mmc 4021000.sdmmc: sdc set ios:clk 50000000Hz bm PP pm ON vdd 21 width 1 timing SD-HS(SDR25) dt B
[  173.857505] sunxi-mmc 4021000.sdmmc: sdc set ios:clk 50000000Hz bm PP pm ON vdd 21 width 4 timing SD-HS(SDR25) dt B
[  173.870081] mmc1: new high speed SDIO card at address 0001
[  173.877097] [SBUS] XRadio Device:sdio clk=50000000
[  173.890482] [XRADIO] XRADIO_HW_REV 1.0 detected.
[  173.947031] [XRADIO] xradio_update_dpllctrl: DPLL_CTRL Sync=0x01400000.
[  173.980161] [XRADIO] Bootloader complete
[  174.002859] random: crng init done
[  174.006676] random: 2 urandom warning(s) missed due to ratelimiting
[  174.094363] [XRADIO] Firmware completed.
[  174.100603] [WSM] Firmware Label:XR_C09.08.52.64_DBG_02.100 2GHZ HT40 Jan  3 2020 13:14:37
[  174.109975] [XRADIO] Firmware Startup Done.
[  174.114975] [XRADIO_WRN] enable Multi-Rx!
[  174.122681] ieee80211 phy0: Selected rate control algorithm 'minstrel_ht'
#
如上所示,驱动模块已经安装成功。
连接Wi-Fi网络
开启Wi-Fi功能
加载驱动没有出现问题之后,执行ifconfig -a,即可看到 wlan0 节点。
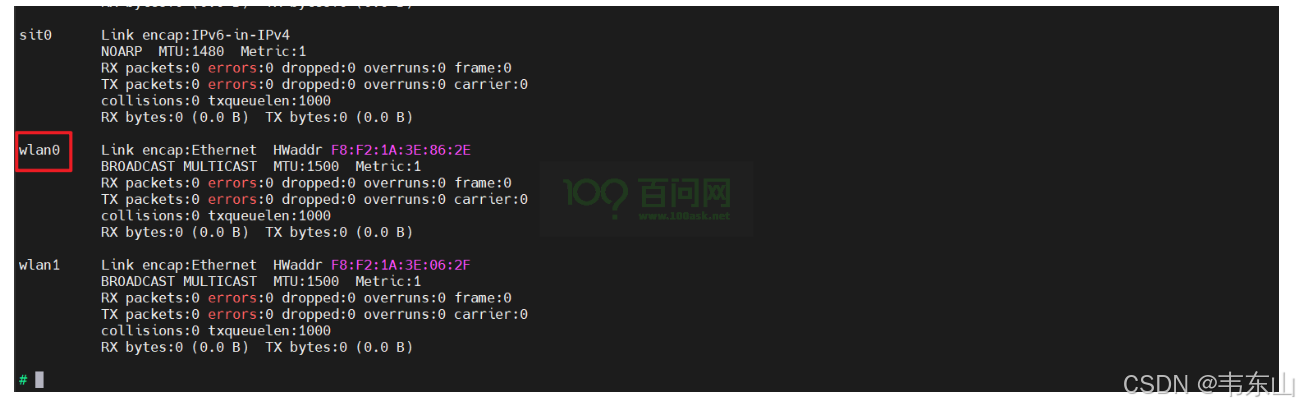
使用wifi功能还需要执行指令ifconfig wlan0 up,来打开 wlan0 节点。
# ifconfig wlan0 up
[  324.579646] ieee80211_do_open: vif_type=2, p2p=0, ch=3, addr=f8:f2:1a:3e:86:2e
[  324.587897] [STA] !!!xradio_vif_setup: id=0, type=2, p2p=0, addr=f8:f2:1a:3e:86:2e
[  324.603169] [AP_WRN] BSS_CHANGED_ASSOC but driver is unjoined.

          RX bytes:0 (0.0 B)  TX bytes:0 (0.0 B)
打开完成后,执行ifconfig,即可看到 wlan0 节点。
# ifconfig
lo        Link encap:Local Loopback
          inet addr:127.0.0.1  Mask:255.0.0.0
          inet6 addr: ::1/128 Scope:Host
          UP LOOPBACK RUNNING  MTU:65536  Metric:1
          RX packets:0 errors:0 dropped:0 overruns:0 frame:0
          TX packets:0 errors:0 dropped:0 overruns:0 carrier:0
          collisions:0 txqueuelen:1000
          RX bytes:0 (0.0 B)  TX bytes:0 (0.0 B)

wlan0     Link encap:Ethernet  HWaddr F8:F2:1A:3E:86:2E
          UP BROADCAST MULTICAST  MTU:1500  Metric:1
          RX packets:0 errors:0 dropped:0 overruns:0 frame:0
          TX packets:0 errors:0 dropped:0 overruns:0 carrier:0
          collisions:0 txqueuelen:1000
扫描附近Wi-Fi
打开 wlan0 节点后,就可以在开发板上使用已经适配上的 iw 工具来扫描附近的Wi-Fi。
执行指令如下:
iw dev wlan0 scan | grep SSID
扫描到附近的wifi节点,结果显示:
# iw dev wlan0 scan | grep SSID
        SSID: Programmers
                 * SSID List
        SSID: ChinaNet-kRAH
        SSID: \xe9\xa1\xba\xe6\x88\x90\xe5\x8a\xb3\xe5\x8a\xa1
        SSID: Voform
        SSID: Guest_An
        SSID: Redmi_83D1
        SSID: pobo
                 * SSID List
        SSID: ChinaNet-ec7h
        SSID: ChinaNet-ccXn
        SSID: MERCURY_62A2
        SSID:
        SSID: ChinaNet-sqJr
        SSID: VANTEN
                 * SSID List
        SSID: HUAWEI-1619
        SSID: HUAWEI-yuanyuan
        SSID:
        SSID:
        SSID: WiFi
能扫描到附近的Wi-Fi节点,即可证明 XR829 Wi-Fi 模组可以正常使用。接下来就可以开始连接Wi-Fi节点了。
连接Wi-Fi
连接Wi-Fi节点,需要使用 wpa_supplican,该工具也已适配上。
wpa_supplicant 连接Wi-Fi节点的时候会从配置文件中读取账号和密码,以及加密方式等, 所以我们在运行wpa_supplicant工具的时候要提前写好配置文件。 配置文件名称自定,但是要以 .conf 为后缀,并保存在 /etc/ 目录下,这边给出一个配置文件的例子。
执行以下指令,进入配置文件:
vim /etc/wpa_supplicant.conf
添加如下内容:
ctrl_interface=/var/run/wpa_supplicant
update_config=1

network={
        ssid="Programmers"
        psk="100askxxx"
}
- ctrl_interface:这是
wpa_supplicant的配置选项,用于定义一个 Unix 域套接字的路径,通过这个套接字,其他程序可以与wpa_supplicant进行通信,发送命令和查询状态。/var/run/wpa_supplicant是wpa_supplicant配置文件中的一个参数,用于指定控制接口的路径。 - update_config : 这个配置项指示
wpa_supplicant在网络连接成功或失败时更新配置文件。当设置为1时,任何通过控制接口添加或修改的网络配置都会被永久保存到配置文件中,这样在下次启动wpa_supplicant时,这些更改仍然有效。 - ssid : 这里指定了要连接的无线网络的 SSID(服务集标识符),即网络名称。(需要根据实际情况填写)
- psk :
psk(预共享密钥)是用于 WPA/WPA2 加密的密码。(需要根据实际情况填写)
在开发板上,执行以下指令,创建一个socket通信的目录,命名需要和上面配置文件里ctrl_interface的路径一样。
mkdir -p /var/log/wpa_supplicant
完成以上操作,执行以下指令,连接Wi-Fi节点:
wpa_supplicant -B -c /etc/wpa_supplicant.conf -i wlan0
获取IP地址
有以上这一些log信息打印,表明连接成功,但是还需要使用udhcpc工具来分配ip地址,否则无法连接外网。
执行以下指令,分配ip地址:
udhcpc -i wlan0

ip地址分配成功,即可连接外网,测试如下:
# ping www.baidu.com
PING www.baidu.com (183.2.172.185): 56 data bytes
64 bytes from 183.2.172.185: seq=0 ttl=52 time=10.186 ms
64 bytes from 183.2.172.185: seq=1 ttl=52 time=11.189 ms
64 bytes from 183.2.172.185: seq=2 ttl=52 time=78.292 ms
64 bytes from 183.2.172.185: seq=3 ttl=52 time=105.430 ms
64 bytes from 183.2.172.185: seq=4 ttl=52 time=15.267 ms
^C
--- www.baidu.com ping statistics ---
5 packets transmitted, 5 packets received, 0% packet loss
round-trip min/avg/max = 10.186/44.072/105.430 ms
#
分配的ip地址,也成功显示,如下。
蓝牙配对
本章节来讲解如何配对蓝牙,T113i-Industrial开发板板载的是 XradioTech 所设计的 XR829 蓝牙 模组。
前提条件
在进入本章节学习之前,请做好以下准备。
准备工作:
- 硬件: T113i-Industrial开发板
- 硬件: typeC线 X2
- 软件: 全志线刷工具:AllwinnertechPhoeniSuit
- 软件: 全志USB烧录驱动:AllwinnerUSBFlashDeviceDriver
- 软件: 镜像(已适配xr829):t113_i_linux_evb1_auto_uart0.img
硬件介绍
蓝牙功能特性
XR829 模组是一款集成了2.4G IEEE 802.11b/g/n标准的无线连接解决方案,并且支持蓝牙2.1/4.0/4.1协议标准。它主要应用于短距离无线连接,如平板电脑、智能电视等设备。以下是 XR829 模组蓝牙的一些功能特性:
- 兼容IEEE 802.11b/g/n标准,最高速率可达150Mbps,同时支持蓝牙V2.1/4.0/4.1双模模式 。
- 具有2.7-5.5V的宽电压输入范围,集成了高效的SMPS和LDO电源系统 。
- 领先的功耗水平和高集成度,外围设备精简 。
- 内置PTA电路,有效增强BT共存场景的性能 。
- 支持多种时钟输入,包括XTAL时钟输入和32768低频时钟 。
- 蓝牙功能支持包括Class1、2、3,高速UART接口,最大波特率达到4Mbps,自适应跳频技术,以及SCO和eSCO支持 。
- 支持A-law,μ-law和CVSD语音的转码器,以及sniff / hold / sniff-sub-rating低功耗模式 。
- 提供SDIO2.0接口,适用于多种应用场景,如平板电脑、便携式多媒体播放器、智能电视及电视盒等 。
登录开发板终端
看到这里,如果不知道怎么连接硬件,怎么打开串口终端,请参考前面《快速启动》章节里的启动开发板文章。
配对蓝牙
打开串口终端后,开机进入开发板,执行bt_test -i,发现蓝牙起不来,报错。
查看/etc/bluetooth/bt_init.sh
start_hci_attach()
{
        h=`ps | grep "$bt_hciattach" | grep -v grep`
        [ -n "$h" ] && {
                killall "$bt_hciattach"
        }

        # reset_bluetooth_power

        "$bt_hciattach" -n ttyAS1 xradio >/dev/null 2>&1 &

        wait_hci0_count=0
        while true
        do
                [ -d /sys/class/bluetooth/hci0 ] && break
                usleep 100000
                let wait_hci0_count++
                [ $wait_hci0_count -eq 70 ] && {
                        echo "bring up hci0 failed"
                        exit 1
                }
        done
}
发现脚本有错:"$bt_hciattach" -n ttyAS1 xradio >/dev/null 2>&1 &
串口1的设备节点是/dev/ttyS1:
# ls /dev/tty
tty    tty14  tty20  tty27  tty33  tty4   tty46  tty52  tty59  tty8
tty0   tty15  tty21  tty28  tty34  tty40  tty47  tty53  tty6   tty9
tty1   tty16  tty22  tty29  tty35  tty41  tty48  tty54  tty60  ttyS0
tty10  tty17  tty23  tty3   tty36  tty42  tty49  tty55  tty61  ttyS1
tty11  tty18  tty24  tty30  tty37  tty43  tty5   tty56  tty62  ttyS2
tty12  tty19  tty25  tty31  tty38  tty44  tty50  tty57  tty63  ttyS3
tty13  tty2   tty26  tty32  tty39  tty45  tty51  tty58  tty7
# ls /dev/tty
修改如下:
start_hci_attach()
{
        h=`ps | grep "$bt_hciattach" | grep -v grep`
        [ -n "$h" ] && {
                killall "$bt_hciattach"
        }

        # reset_bluetooth_power

        "$bt_hciattach" -n ttyS1 xradio >/dev/null 2>&1 &

        wait_hci0_count=0
        while true
        do
                [ -d /sys/class/bluetooth/hci0 ] && break
                usleep 100000
                let wait_hci0_count++
                [ $wait_hci0_count -eq 70 ] && {
                        echo "bring up hci0 failed"
                        exit 1
                }
        done
}
重启开发板。
再次执行bt_test -i
# bt_test -i
[ACT D][ring_buff_init,27]enter

[ACT D][ring_buff_start,173]ring buffer start enter

[ACT D][ring_buff_start,187]ring buffer start quit

[ACT D][ring_buff_init,27]enter

[ACT D][ring_buff_start,173]ring buffer start enter

[ACT D][ring_buff_start,187]ring buffer start quit

1970-01-01 09:55:24:756: BTMG[_bt_manager_set_default_profile:374]:  enable default profile from bt config
1970-01-01 09:55:24:756: BTMG[_bt_manager_enable:258]:  btmanager version: Version:4.0.4.20231208, builed time: Jul 16 2024-16:53:44
1970-01-01 09:55:24:756: BTMG[_bt_manager_enable:259]:  enable state: 1, now bt adapter state : 0
197[  286.262531] sunxi-rfkill soc@3000000:rfkill@0: block state already is 1
0-01-01 09:55:24:757: BTMG[bt_test_adapter_status_cb:74]:  bt is turnning on.
[  286.471759] sunxi-rfkill soc@3000000:rfkill@0: set block: 0
[  286.488049] sunxi-rfkill soc@3000000:rfkill@0: bt power on success
[  286.515417] [XR_BT_LPM] bluedroid_write_proc_btwake: bluedroid_write_proc_btwake 1
[  286.523960] [XR_BT_LPM] bluedroid_write_proc_btwake: wakeup bt device
[  286.531339] [XR_BT_LPM] bluedroid_write_proc_lpm: disable lpm mode
Starting bluetoothd: OK
1970-01-01 09:55:29:953: BTMG[bt_routine:102]:  bt adapter info:
             address:6E:D6:22:1F:82:27
             Name: BlueZ 5.54
             Alias: aw-bt-test-82-27
             Discoverable: 1
             DiscoverableTimeout: 180

[ACT D][ring_buff_init,27]enter

1970-01-01 09:55:30:199: BTMG[bt_test_adapter_status_cb:59]:  BT is ON
1970-01-01 09:55:30:202: BTMG[bt_agent_register:226]:  set io capability: KeyboardDisplay
1970-01-01 09:55:30:208: BTMG[bt_manager_set_scan_mode:208]:  enter
1970-01-01 09:55:30:209: BTMG[pfd1_thread_process:1008]:  enter
[BT]:
成功启动蓝牙,这样就可以打开手机配对蓝牙aw-bt-test-82-27了。
配对成功后,串口终端打印信息如下:
[BT]:1970-01-01 09:56:01:896: BTMG[bt_test_agent_authorize_service_cb:192]:  AGENT: 04:10:6B:F9:43:23 Authorize Service 0000110d-0000-1000-8000-00805f9b34fb
1970-01-01 09:56:02:183: BTMG[supervise_pcm_worker_start:131]:  transport A2DP:AAC
1970-01-01 09:56:02:184: BTMG[a2dp_pcm_worker_routine:115]:  codec:AAC, sampling:44100, channels:2, format_size:2
1970-01-01 09:56:02:191: BTMG[a2dp_pcm_worker_routine:149]:  Starting PCM loop
1970-01-01 09:56:02:545: BTMG[bt_test_agent_authorize_service_cb:192]:  AGENT: 04:10:6B:F9:43:23 Authorize Service 0000110e-0000-1000-8000-00805f9b34fb
1970-01-01 09:56:02:590: BTMG[bt_test_a2dp_sink_connection_state_cb:205]:  A2DP sink connected with device: 04:10:6B:F9:43:23
1970-01-01 09:56:02:626: BTMG[bluez_signal_mediatransport_properties_changed:506]:  Volume is :59
1970-01-01 09:56:02:626: BTMG[bt_test_avrcp_audio_volume_cb:287]:  AVRCP audio volume:04:10:6B:F9:43:23 : 59
1970-01-01 09:56:03:058: BTMG[bt_test_avrcp_play_state_cb:260]:  BT palying music paused with device: 04:10:6B:F9:43:23
1970-01-01 09:56:03:061: BTMG[bt_test_avrcp_track_changed_cb:276]:  BT playing music title: Not Provided
1970-01-01 09:56:03:061: BTMG[bt_test_avrcp_track_changed_cb:277]:  BT playing music artist:
1970-01-01 09:56:03:061: BTMG[bt_test_avrcp_track_changed_cb:278]:  BT playing music album:

[BT]:


 4253
4253

 被折叠的 条评论
为什么被折叠?
被折叠的 条评论
为什么被折叠?
 到【灌水乐园】发言


