


下面,我们来说一下如何美化按钮?
第1步,我们先在对话框上放置两个按钮,一个是关闭按钮,另一个是最小化按钮,它们对应的ID分别是IDC_BUTTON_CLOSE和IDC_BUTTON_MIN,然后将我们的按钮设置为自绘制模式,方法如下:
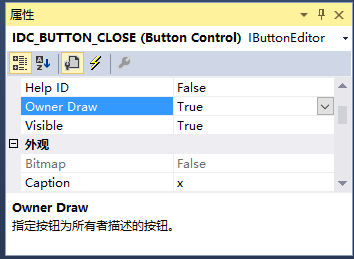
选择按钮,右键属性,在属性列表中找到Owner Draw选项,将其设置为True,效果图如下:
再为它们添加两个成员变量,具体如下:
- CButton m_btnClose;
- CButton m_btnMin;
-
BOOL m_bTracked;
- afx_msg void OnMouseMove(UINT nFlags, CPoint point);
- class CMyBitmapButton : public CBitmapButton
{
public:
CMyBitmapButton();
virtual ~CMyBitmapButton();
private:
BOOL m_bTracked;
protected:
DECLARE_MESSAGE_MAP()
public:
afx_msg void OnMouseMove(UINT nFlags, CPoint point);
afx_msg LRESULT OnMouseLeave(WPARAM, LPARAM);
virtual void DrawItem(LPDRAWITEMSTRUCT /*lpDrawItemStruct*/);
};
- void CMyButton::OnMouseMove(UINT nFlags, CPoint point)
- {
- if (!m_bTracked)
TRACKMOUSEEVENT tme;
tme.cbSize = sizeof(tme);
tme.dwFlags = TME_LEAVE;
tme.dwHoverTime = 0;
tme.hwndTrack = m_hWnd;
TrackMouseEvent(&tme);
m_bTracked = TRUE;
Invalidate(FALSE);
}
CBitmapButton::OnMouseMove(nFlags, point); }
- LRESULT CMyButton::OnMouseLeave(WPARAM wParam, LPARAM lParam)
- {
- m_bTracked = FALSE;
CBitmapButton::OnMouseLeave();
return 0; }
第6步,我们实现DrawItem函数,它是美化Button的核心函数,当我们将Button设置为自绘制后,每次按钮需要刷新,重新绘制的时候,MFC框架会调用它的DrawItem函数,在这个函数中,我们可以根据按钮当前的状态为其贴上相应的背景图。当我们按钮按钮的时候,为其贴上被按下的背景图;当我们的按钮获取焦点的时候,为其贴上获取焦点的背景图;当我们的按钮没有焦点,我们为其贴上默认的背景图片,它们对应的位置前面已经说过。为了避免闪烁,我们采用双缓冲的方式,具体代码如下:
- void CMyButton::DrawItem(LPDRAWITEMSTRUCT lpDrawItemStruct)
- {
- ASSERT(lpDrawItemStruct != NULL);
ASSERT(m_bitmap.m_hObject != NULL); // required
// use the main bitmap for up, the selected bitmap for down
CBitmap* pBitmap = &m_bitmap;
UINT state = lpDrawItemStruct->itemState;
if ((state & ODS_SELECTED) && m_bitmapSel.m_hObject != NULL)
pBitmap = &m_bitmapSel;
//else if ((state & ODS_FOCUS) && m_bitmapFocus.m_hObject != NULL)
//pBitmap = &m_bitmapFocus; // third image for focused
else if ((state & ODS_DISABLED) && m_bitmapDisabled.m_hObject != NULL)
pBitmap = &m_bitmapDisabled; // last image for disabled
else if (m_bTracked && m_bitmapFocus.m_hObject != NULL)
pBitmap = &m_bitmapFocus; // third image for focused
// draw the whole button
CDC* pDC = CDC::FromHandle(lpDrawItemStruct->hDC);
CDC memDC;
memDC.CreateCompatibleDC(pDC);
CBitmap* pOld = memDC.SelectObject(pBitmap);
if (pOld == NULL)
return; // destructors will clean up
CRect rect;
rect.CopyRect(&lpDrawItemStruct->rcItem);
pDC->BitBlt(rect.left, rect.top, rect.Width(), rect.Height(),
&memDC, 0, 0, SRCCOPY);
memDC.SelectObject(pOld); return; }
第7步,用CMyButton替代对话框头文件中的CButton。
第8步,在对话框的InitDialog中,对两个按钮进行初始化,具体如下:
- m_btnClose.LoadBitmaps(IDB_BITMAP_CLOSE_B, IDB_BITMAP_CLOSE_B, IDB_BITMAP_CLOSE_A, 0);
第9步,编译程序结束


 1423
1423

 被折叠的 条评论
为什么被折叠?
被折叠的 条评论
为什么被折叠?
 到【灌水乐园】发言


