


本文代码接着第一天的内容进行更新。(OAuth2.0基础配置信息,OAuth2.0学习第一天地址-https://blog.csdn.net/tianlong1569/article/details/108366395)
在前文中我们已经获得了access_token,但是当通过access_token调用相关的接口的时候报出下面异常
{
    "timestamp": "2020-09-03T06:57:33.443+0000",
    "status": 401,
    "error": "Unauthorized",
    "message": "Unauthorized",
    "path": "/api/test"
}
这时我们就需要配置资源的访问权限问题。
第一步:由于access_token默认为redis存储,因此需要加入以下依赖。
		<dependency>
			<groupId>org.springframework.boot</groupId>
			<artifactId>spring-boot-starter-data-redis</artifactId>
		</dependency>
		<dependency>
			<groupId>org.springframework.security.oauth</groupId>
			<artifactId>spring-security-oauth2</artifactId>
			<version>2.3.3.RELEASE</version>
</dependency>注意:我这里除了增加了redis依赖之外,另外还加了spring-security-oauth2依赖的2.3.3版本。在这里也许有些朋友会问是不是有冲突,其实在这里加入这个依赖就是为了处理oauth老版的异常问题。我这里的spring-cloud-starter-oauth2依赖的OAuth2.0的版本是2.2.1版本。而这个版本在往redis中存储信息中会报一个java.lang.NoSuchMethodError: org.springframework.data.redis.connection.RedisConnection.set([B[B)V 的异常。因此为了处理这个异常,我这里增加了2.3.3这个版本。
第二步:配置资源服务
创建一个资源类继承org.springframework.security.oauth2.config.annotation.web.configuration.ResourceServerConfigurerAdapter类。代码如下:
package com.client;

import org.springframework.context.annotation.Configuration;
import org.springframework.security.config.annotation.web.builders.HttpSecurity;
import org.springframework.security.config.http.SessionCreationPolicy;
import org.springframework.security.oauth2.config.annotation.web.configuration.EnableResourceServer;
import org.springframework.security.oauth2.config.annotation.web.configuration.ResourceServerConfigurerAdapter;
import org.springframework.security.oauth2.config.annotation.web.configurers.ResourceServerSecurityConfigurer;

@Configuration
@EnableResourceServer
public class ResourceConfigService extends ResourceServerConfigurerAdapter {

	@Override
	public void configure(ResourceServerSecurityConfigurer resources) {
		resources.resourceId("test").stateless(true);

	}

	@Override
	public void configure(HttpSecurity http) throws Exception {
		http.sessionManagement().sessionCreationPolicy(SessionCreationPolicy.IF_REQUIRED).and().requestMatchers()
		.anyRequest().and().anonymous().and().authorizeRequests().antMatchers("/api/**").authenticated();// 配置order访问控制,必须认证过后才可以访
	}

}
在上面的代码中resources.resourceId("test")用于指定配置服务的ID为test,stateless设置为true,这个属性可以不设置,系统默认就是true。
在第二个configure方法中http.sessionManagement().sessionCreationPolicy(SessionCreationPolicy.IF_REQUIRED)为设置会话策略。如果不设置,则会尝试使用公共对象中设置的SessionCreationPolicy。如果公共对象中也没有设置会话创建策略,则使用缺省的会话创建策略SessionCreationPolicy.IF_REQUIRED。
http.sessionManagement()是取得一个SessionManagementConfigurer对象,这个对象是做安全方面的配置。主要有以下几个方法:
invalidSessionUrl:设置session id无效时的跳转URL。如果设置了该属性,浏览器端提供了无效的session id时,服务器端会将其跳转到所设置的URL。
invalidSessionStrategy:设置session id无效时要应用的策略InvalidSessionStrategy。如果设置了该属性,浏览器端提供了无效的session id时,服务器端会调用该策略对象。通常情况下,这里也会是一个跳转策略对象SimpleRedirectInvalidSessionStrategy。因为InvalidSessionStrategy是一个接口,而Spring Security内置地对该接口仅提供了一个实现就是SimpleRedirectInvalidSessionStrategy。
#invalidSessionStrategy和#invalidSessionUrl都被调用时,#invalidSessionStrategy会生效。
sessionAuthenticationErrorUrl:定义SessionAuthenticationStrategy抛出异常时要跳转的URL。如果未设置该属性,SessionAuthenticationStrategy抛出异常时,会返回402给客户端。注意在基于表单的登录失败时,该属性并不应用。因为此时表单认证失败URL会先被跳转。
sessionAuthenticationFailureHandler:定义SessionAuthenticationStrategy抛出异常时要应用的认证失败处理器AuthenticationFailureHandler。如果未设置该属性,SessionAuthenticationStrategy抛出异常时,会返回402给客户端。注意在基于表单的登录失败时,该属性并不应用。因为此时表单认证失败URL会先被跳转。如果sessionAuthenticationErrorUrl和sessionAuthenticationFailureHandler都被调用,#sessionAuthenticationFailureHandler会生效。
enableSessionUrlRewriting:调用该方法设置属性enableSessionUrlRewriting.如果enableSessionUrlRewriting属性被设置为true,使用HttpServletResponse#encodeRedirectURL(String)/HttpServletResponse#encodeURL(String)时,允许将HTTP session信息重写到URL中。该方法对应的属性enableSessionUrlRewriting缺省为false,不允许Http session重写到URL。
sessionCreationPolicy:设置会话创建策略SessionCreationPolicy。如果不设置,则会尝试使用公共对象中设置的SessionCreationPolicy。如果公共对象中也没有设置会话创建策略,则使用缺省的会话创建策略SessionCreationPolicy.IF_REQUIRED。
sessionAuthenticationStrategy:允许设置一个会话认证策略。如果不设置,会使用缺省值。缺省值是SessionFixationProtectionStrategy(针对Servlet 3.1)/ChangeSessionIdAuthenticationStrategy(针对Servlet 3.1+)。
maximumSessions:设置每个用户的最大并发会话数量。此方法返回一个ConcurrencyControlConfigurer,这也是一个安全配置器,设置每个用户会话数量超出单用户最大会话并发数时如何处理。ConcurrencyControlConfigurer : expiredUrl 设置一个URL。如果某用户达到单用户最大会话并发数后再次请求新会话,则将最老的会话超时并将其跳转到该URL; expiredSessionStrategy 设置一个会话信息超时策略对象SessionInformationExpiredStrategy。如果某用户达到单用户最大会话并发数后再次请求新会话,则调用该策略超时哪个会话以及进行什么样的超时处理。
如果#expiredUrl 和#expiredSessionStrategy都被调用,#expiredSessionStrategy生效;maxSessionsPreventsLogin 设置属性maxSessionsPreventsLogin.如果设置为true,则某用户达到单用户最大会话并发数后再次请求登录时会被拒绝登录。
缺省情况下maxSessionsPreventsLogin为false。则某用户达到单用户最大会话并发数后再次请求登录时,其最老会话会被超时并被重定向到#expiredUrl所设置的URL(或者被#expiredSessionStrategy所设置策略处理); sessionRegistry 设置所要使用的SessionRegistry,不设置时的缺省值为一个SessionRegistryImpl.
sessionFixation:此方法返回一个SessionFixationConfigurer,这也是一个安全配置器,专门对Session Fixcation保护机制做出设置; SessionFixationConfigurer的配置信息 newSession 设置固定会话攻击保护策略为SessionFixationProtectionStrategy,该策略会在用户会话认证成功时创建新的会话,但不会复制旧会话的属性;migrateSession 设置固定会话攻击保护策略为SessionFixationProtectionStrategy,该策略会在用户会话认证成功时创建新的会话,并且复制旧会话的属性。changeSessionId 设置固定会话攻击保护策略为ChangeSessionIdAuthenticationStrategy,仅针对Servlet 3.1+,在用户会话认证成功时调用Servlet 3.1方法HttpServletRequest#changeSessionId()变更会话ID并保留所有会话属性。在Servlet 3.0或者更早版本中使用该策略会触发异常IllegalStateException。none 设置固定会话攻击保护策略为NullAuthenticatedSessionStrategy。这种策略其实是关闭Spring Security的固定会话攻击保护策略。该方案多用在应用已经启用了其他的固定会话攻击保护策略的情况下,比如使用了应用服务器端固定会话攻击保护策略。如果没有采用其他固定会话攻击保护策略,建议不要使用此选项。
第三步:创建org.springframework.security.core.userdetails.UserDetailsService的实现类
这个类用于根据第三方传入的用户名信息,调用数据库或从其他位置取得对应的用户信息形成用户对象,提供给Security进行用户验证。
由于是测试所以我这里直接将用户密码固定为123456。保证不论是哪个用户只要是密码123456就可以登录。
package com.client;
import java.util.List;
import org.springframework.security.core.GrantedAuthority;
import org.springframework.security.core.authority.AuthorityUtils;
import org.springframework.security.core.userdetails.User;
import org.springframework.security.core.userdetails.UserDetails;
import org.springframework.security.core.userdetails.UserDetailsService;
import org.springframework.security.core.userdetails.UsernameNotFoundException;
import org.springframework.security.crypto.bcrypt.BCryptPasswordEncoder;
import org.springframework.stereotype.Service;
@Service
public class UserDetailsServiceImpl implements UserDetailsService {

	@Override
	public UserDetails loadUserByUsername(String username) throws UsernameNotFoundException {
		List<? extends GrantedAuthority> authorities = AuthorityUtils
                .commaSeparatedStringToAuthorityList("ROLE_admin");
        return new User(username,new BCryptPasswordEncoder().encode("123456"),authorities);
	}

}
第四步:配置org.springframework.security.config.annotation.web.configuration.WebSecurityConfigurerAdapter的实现类
修改原有的SecurityConfigService,设置密码的加密方式及开放的接口信息,修改后的代码如下:
package com.client;

import org.springframework.beans.factory.annotation.Autowired;
import org.springframework.context.annotation.Bean;
import org.springframework.context.annotation.Configuration;
import org.springframework.security.authentication.AuthenticationManager;
import org.springframework.security.config.annotation.web.builders.HttpSecurity;
import org.springframework.security.config.annotation.web.configuration.WebSecurityConfigurerAdapter;
import org.springframework.security.core.userdetails.UserDetailsService;
import org.springframework.security.crypto.bcrypt.BCryptPasswordEncoder;
import org.springframework.security.crypto.password.PasswordEncoder;

@Configuration
public class SecurityConfigService extends WebSecurityConfigurerAdapter {

	@Autowired
	private UserDetailsService service;

	@Bean
	public PasswordEncoder passwordEncoder() {
		return new BCryptPasswordEncoder();
	}

	@Bean
	@Override
	public AuthenticationManager authenticationManagerBean() throws Exception {
		AuthenticationManager manager = super.authenticationManagerBean();
		return manager;
	}

	@Override
	protected UserDetailsService userDetailsService() {
		return this.service;
	}

	@Override
	protected void configure(HttpSecurity http) throws Exception {
		http.requestMatchers().anyRequest().and().authorizeRequests().antMatchers("/oauth/**").permitAll().and()
				.userDetailsService(this.service);

	}
}
第五步:配置认证服务端,org.springframework.security.oauth2.config.annotation.web.configuration.AuthorizationServerConfigurerAdapter的实现类
修改原有的OAuthSecurityService类,增加资源配置信息,代码如下:
package com.client;

import org.springframework.beans.factory.annotation.Autowired;
import org.springframework.context.annotation.Bean;
import org.springframework.context.annotation.Configuration;
import org.springframework.data.redis.connection.RedisConnectionFactory;
import org.springframework.security.authentication.AuthenticationManager;
import org.springframework.security.core.userdetails.UserDetailsService;
import org.springframework.security.crypto.bcrypt.BCryptPasswordEncoder;
import org.springframework.security.crypto.password.PasswordEncoder;
import org.springframework.security.oauth2.config.annotation.configurers.ClientDetailsServiceConfigurer;
import org.springframework.security.oauth2.config.annotation.web.configuration.AuthorizationServerConfigurerAdapter;
import org.springframework.security.oauth2.config.annotation.web.configuration.EnableAuthorizationServer;
import org.springframework.security.oauth2.config.annotation.web.configurers.AuthorizationServerEndpointsConfigurer;
import org.springframework.security.oauth2.config.annotation.web.configurers.AuthorizationServerSecurityConfigurer;
import org.springframework.security.oauth2.provider.token.TokenStore;
import org.springframework.security.oauth2.provider.token.store.redis.RedisTokenStore;

@Configuration
@EnableAuthorizationServer
public class OAuthSecurityService extends AuthorizationServerConfigurerAdapter{


	@Autowired
	RedisConnectionFactory redisConnectionFactory;
	@Autowired
    AuthenticationManager authenticationManager;

    @Autowired
    UserDetailsService userDetailsService;

    @Autowired
    PasswordEncoder password;

    @Bean
	public TokenStore redisTokenStore() {
		return new RedisTokenStore(redisConnectionFactory);
	}

	@Override
	public void configure(ClientDetailsServiceConfigurer clients) throws Exception {
		clients
        // 使用内存设置
        .inMemory()
        //指定clientId和资源访问ID
        .withClient("client").resourceIds("test")
        .secret(new BCryptPasswordEncoder().encode("123456"))
        //开放四种授权方案
        .authorizedGrantTypes("authorization_code","implicit","password","client_credentials","refresh_token")
        .scopes("read","app")
        .redirectUris("http://www.baidu.com");
	}


    @Override
    public void configure(AuthorizationServerEndpointsConfigurer endpoints) throws Exception {
        endpoints
                .tokenStore(new RedisTokenStore(redisConnectionFactory))
                .authenticationManager(authenticationManager)
                .userDetailsService(this.userDetailsService);
    }

	 @Override
	    public void configure(AuthorizationServerSecurityConfigurer oauthServer) throws Exception {
	        //允许表单认证
	        oauthServer.allowFormAuthenticationForClients();
	        oauthServer.passwordEncoder(this.password);

	    }
}
第六步:修改配置文件,增加redis配置信息
server:
  port: 8080


spring:
  redis:
    port: 6379
    host: 127.0.0.1
    database: 9
    password: 123456
    jedis:
      pool:
        max-idle: 20
        max-active: 20
        max-wait: -1
        min-idle: 0
    timeout: 1000


logging:
  level:
    root: debug
配置完成后启动服务,通过postman调用http://localhost:8080/oauth/token?grant_type=password&scope=read&username=user&password=123456接口取得access_token信息。需要在Authorization里设置client_id和密码
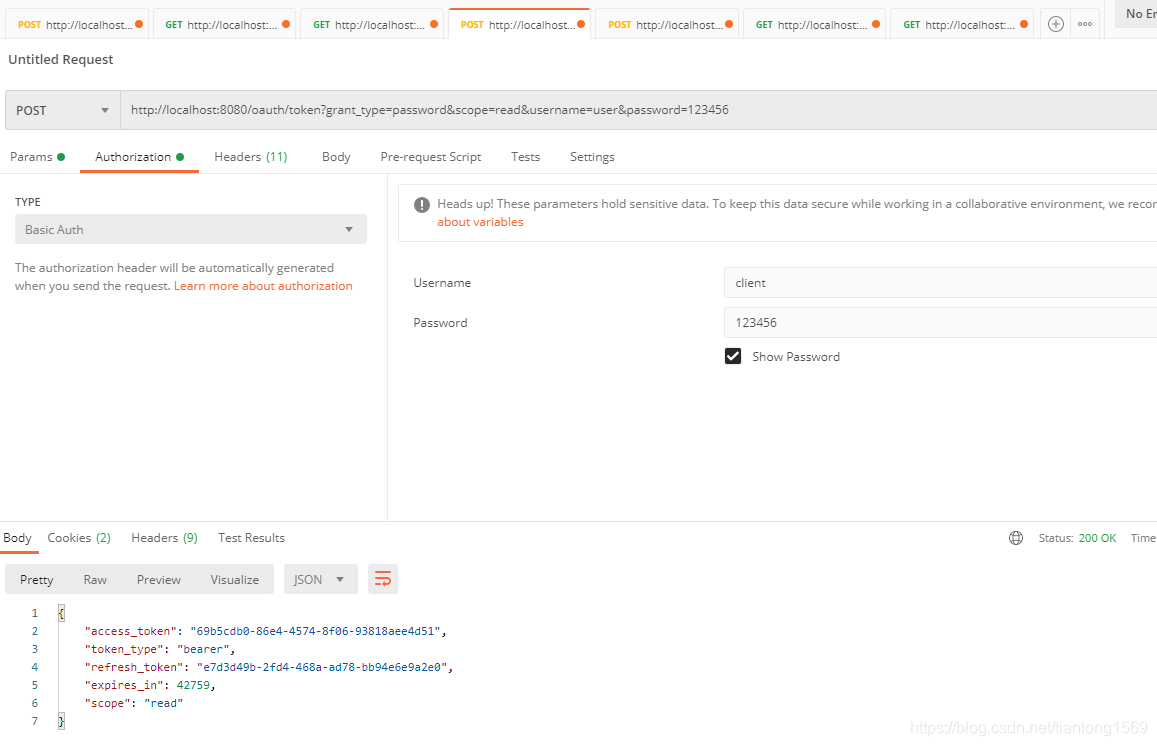
通过得到得到的access_token来调用相关的接口;如:
http://localhost:8080/api/test?access_token=69b5cdb0-86e4-4574-8f06-93818aee4d51


 被折叠的 条评论
为什么被折叠?
被折叠的 条评论
为什么被折叠?
 到【灌水乐园】发言


