


1.获取xhprof
2.编译前预处理
3.编译安装
4.配置php.ini
5.查看运行结果
1.获取xhprof
Clone github上的xhprof项目:git clone https://github.com/longxinH/xhprof.git
2.编译前预处理
在编译xhprof之前,先做一下预处理,生成configure文件;
[root@10 vagrant]# ls
xhprof
[root@10 vagrant]# cd xhprof/
[root@10 xhprof]# ls
bin CREDITS extension package.xml scripts xhprof_html
CHANGELOG examples LICENSE README support xhprof_lib
[root@10 xhprof]# cd extension/
[root@10 extension]# phpize
Can't find PHP headers in /usr/include/php
The php-devel package is required for use of this command.
[root@10 extension]#
phpize 没有这个命令
用来扩展php扩展模块
phpize是属于php-devel的内容,所以只要运行
yum install php-devel就行
安装好后再运行
[root@10 extension]# phpize
Configuring for:
PHP Api Version: 20131106
Zend Module Api No: 20131226
Zend Extension Api No: 220131226
[root@10 extension]# ls
acinclude.m4 config.guess configure Makefile.global php_xhprof.h
aclocal.m4 config.h.in configure.in Makefile.local run-tests.php
autom4te.cache config.m4 install-sh missing tests
build config.sub ltmain.sh mkinstalldirs xhprof.c
[root@10 extension]#
3.编译安装
[root@10 extension]# ./configure -with-php-config=/usr/bin/php-config
[root@10 extension]# make && make install
4.配置php.ini
在php的配置文件后面追加,xhprof扩展,php.ini
[xhprof]
extension=xhprof.so;
xhprof.output_dir=/vagrant/xhprof
nginx配置
server {
listen 80;
server_name xhprof.com;
root /vagrant/xhprof;
access_log /var/log/nginx/access.log main;
error_log /var/log/nginx/error.log;
autoindex on;
autoindex_exact_size off;
autoindex_localtime on;
index index.php index.html index.htm;
location / {
try_files $uri $uri/ /index.php?$query_string;
}
location ~ .*\.php$
{
fastcgi_pass 127.0.0.1:9000;
fastcgi_index index.php;
fastcgi_param SCRIPT_FILENAME $document_root$fastcgi_script_name;
include fastcgi_params;
}
}
注:如果是64位系统需要将xhprof.so文件拷贝 /lib64的目录下,记得重启php-fpm
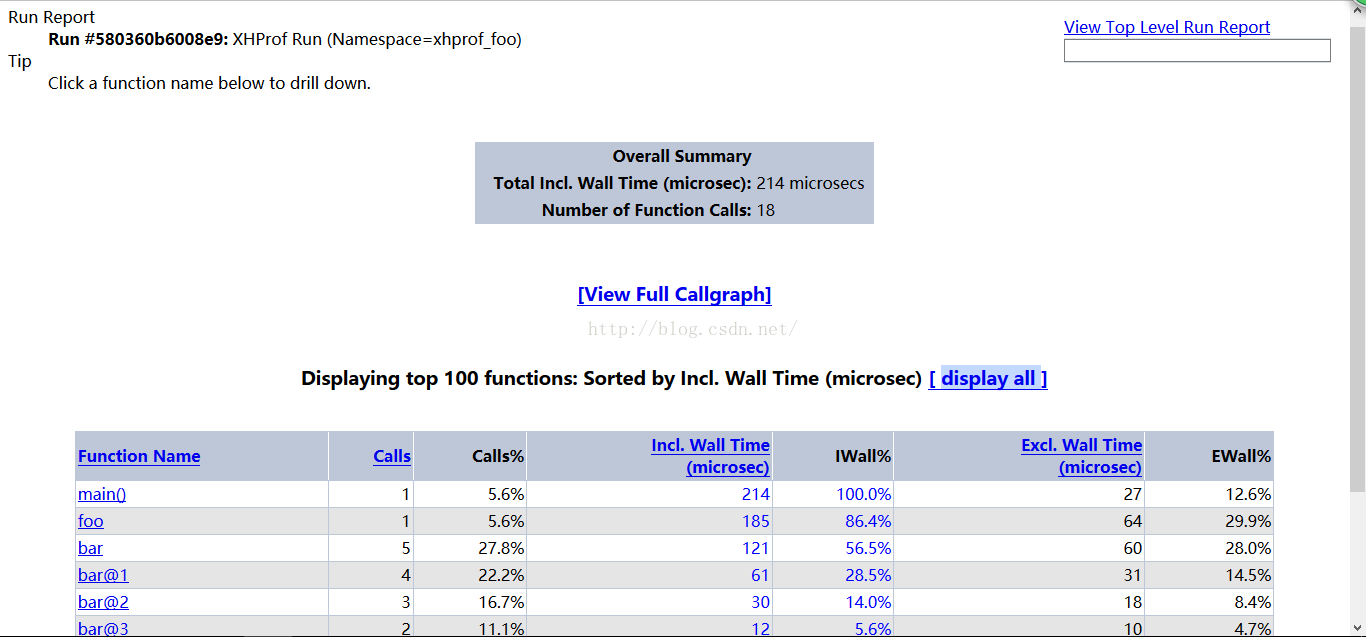
5.查看运行结果
在浏览器里面输入http://xhprof.com/examples/sample.php查看效果

复制上面到运行到结果(红框内的内容),再次放入浏览器,填好前面对应的域名:
http://xhprof.com/xhprof_html/index.php?run=580360b6008e9&source=xhprof_foo
如果输入浏览器没有数据
这种情况:Run #580360b6008e8: Invalid Run Id = 580360b6008e8
错误结果:

可能是你的配置权限不足,请给个权限,可以直接777,然后重新运行走后这个步骤看看效果。
点击[View Full Callgraph]时报错:failed to execute cmd: " dot -Tpng". stderr: `sh: dot: command not found ',是因为xhprof绘制的是png图,yum install -y graphviz,解决掉。


 8905
8905

 被折叠的 条评论
为什么被折叠?
被折叠的 条评论
为什么被折叠?
 到【灌水乐园】发言


