


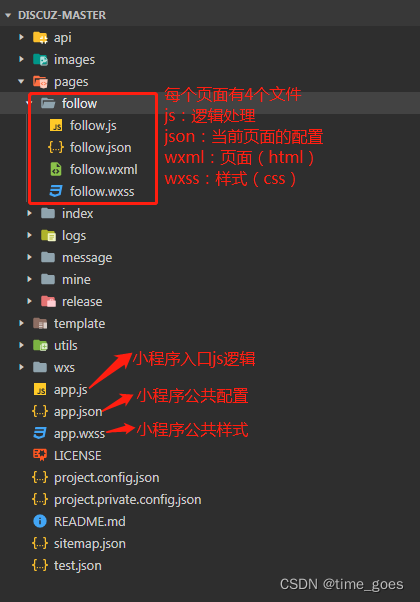
1、目录结构
app.json
小程序根目录下的 app.json 文件用来对微信小程序进行全局配置,决定页面文件的路径、窗口表现、设置网络超时时间、设置多 tab 等
{
  "pages": [ // 页面路径列表:指定小程序由哪些页面组成,每一项都对应一个页面的 路径(含文件名) 信息。文件名不需要写文件后缀,框架会自动去寻找对应位置的 .json, .js, .wxml, .wxss 四个文件进行处理
    "pages/index/index",
    "pages/index/detail/detail",
  ],
  "window": { // 全局的默认窗口表现:设置小程序的状态栏、导航条、标题、窗口背景色
    "backgroundTextStyle": "light",
    "backgroundColor": "#F0F0F0",
    "navigationBarBackgroundColor": "#FFFFFF",
    "navigationBarTitleText": "社区",
    "navigationBarTextStyle": "black"
  },
  "tabBar": { // 设置底部tab页
    "color": "#979797",
    "selectedColor": "#000000",
    "backgroundColor": "#FFFFFF",
    "borderStyle": "white",
    "list": [  //  list 只能配置最少 2 个、最多 5 个 tab
      {
        "iconPath": "/images/tab/home_noS.png",
        "selectedIconPath": "/images/tab/home_S.png",
        "pagePath": "pages/index/index",
        "text": "推荐"
      },
      {
        "iconPath": "/images/tab/mine_noS.png",
        "selectedIconPath": "/images/tab/mine_S.png",
        "pagePath": "pages/mine/mine",
        "text": "我的"
      }
    ]
  },
  "networkTimeout": { // 各类网络请求的超时时间,单位均为毫秒
    "request": 10000,
    "connectSocket": 10000,
    "uploadFile": 10000,
    "downloadFile": 10000
  },
  "debug": true, // 可以在开发者工具中开启 debug 模式
  "permission": { // 权限声明
    "scope.userLocation": {
      "desc": "你的位置将用于展示同城的数据"
    }
  },
  "plugins": { // 声明小程序需要使用的插件
    "tencentVideo": {
      "version": "1.3.13",
      "provider": "wxa75efa648b60994b"
    }
},
  "sitemapLocation": "sitemap.json" // 指明 sitemap.json 的位置;默认为 'sitemap.json' 即在 app.json 同级目录下
}
app.js
每个小程序都需要在 app.js 中调用 App 方法注册小程序实例,绑定生命周期回调函数、错误监听和页面不存在监听函数等
整个小程序只有一个 App 实例,是全部页面共享的。在每个页面中可以通过 getApp 方法获取到全局唯一的 App 实例,获取 App 上的数据或调用开发者注册在 App 上的函数。
// app.js
App({
  onLaunch (options) {
    // Do something initial when launch.
    // 执行登陆业务...
      this.login()
  },
   // 登录
   login: function(){
     var that = this
      if(this.globalData.isLogin){ //已经登录
        return
      }else{
        wx.login({  // 调用接口获取登录凭证(code)
          success: res => {
            var code = res.code
            wx.request({ // 调服务器后端接口,发送 code 到后台换取 openId, sessionKey, unionId
              url:"http://xxx.xxxxx" , // 后端提供的登陆接口
              method: "GET",
              success: function (res) {
                if (res.statusCode == 200) {
                  that.globalData.openid = res.data.openid
                  wx.showModal({ // 提示授权
                    title: '温馨提醒',
                    content: '请先授权微信登录',
                    success (res) {
                      if(res.confirm){ // 点击确定
                        that.getUserInfo()
                      }else if(res.cancel) { //点击取消
                        wx.showToast({
                          title: '取消授权请求',
                          icon: 'error'
                        });
                      }
                    }
                  })

                } else {
                  wx.showModal({
                    title: '登录失败',
                    content: '出现错误,请联系管理员',
                  })
                  return
                }
              },
              fail: function() {
                wx.showToast({
                  title: '网络异常!',
                })
              }
            })
          }
        })

      }
   },

 // 获取用户信息
 getUserInfo: function(){
    wx.getUserProfile({ // 调用小程序提供的接口:获取用户信息
      desc: '获取您的昵称、头像信息', // 声明获取用户个人信息后的用途,后续会展示在弹窗中,请谨慎填写
      success: (res) => {
        console.log("获取您的昵称、头像信息", res)
        this.globalData.userInfo = res.userInfo
        this.globalData.isLogin = true
      },
      fail: (res) => {
        wx.showToast({
          title: '获取信息失败',
          icon: 'error'
        });
      }
    })
  },

  onShow (options) {
    // Do something when show.
  },
  onHide () {
    // Do something when hide.
  },
  onError (msg) {
    console.log(msg)
  },
  globalData: { // 全局数据
    userInfo: null,
    isLogin: false,
    openid: ''
  }
})
app.wxss
定义在 app.wxss 中的样式为全局样式,作用于每一个页面。在 page 的 wxss 文件中定义的样式为局部样式,只作用在对应的页面,并会覆盖 app.wxss 中相同的选择器。
- 尺寸单位
rpx(responsive pixel): 可以根据屏幕宽度进行自适应。 - 样式导入
使用@import导入,@import后跟需要导入的外联样式表的相对路径
@import "/template/template.wxss";
pages中的js文件
对于小程序中的每个页面,都需要在页面对应的 js 文件中进行注册,指定页面的初始数据、生命周期回调、事件处理函数等。
使用 Page 构造器注册页面
//index.js

//获取应用实例
var app = getApp();

Page({
  data: {
    text: "This is page data."
  },
  onLoad: function(options) {
    // 页面创建时执行
    //获取全局数据 app.globalData.xxx
    var userInfo = app.globalData.userInfo
  },
  onShow: function() {
    // 页面出现在前台时执行
  },
  onReady: function() {
    // 页面首次渲染完毕时执行
  },
  onHide: function() {
    // 页面从前台变为后台时执行
  },
  onUnload: function() {
    // 页面销毁时执行
  },
  onPullDownRefresh: function() {
    // 触发下拉刷新时执行
  },
  onReachBottom: function() {
    // 页面触底时执行
  },
  onShareAppMessage: function () {
    // 页面被用户分享时执行
  },
  onPageScroll: function() {
    // 页面滚动时执行
  },
  onResize: function() {
    // 页面尺寸变化时执行
  },
  onTabItemTap(item) {
    // tab 点击时执行
    console.log(item.index)
    console.log(item.pagePath)
    console.log(item.text)
  }
})
2. 页面跳转(路由)
常用的wx.navigateTo
// 使用api
wx.navigateTo({
  url: '/pages/mine/mineCollection/mineCollection',
})

 // 使用组件
 <view class="btn-area">
  <navigator url="/page/navigate/navigate?title=navigate" hover-class="navigator-hover">跳转到新页面</navigator>
</view>
3.事件
绑定点击函数使用:bindtap,当用户点击该组件的时候会在该页面对应的 Page 中找到相应的事件处理函数。
<button id="tapTest" bindtap="tapName"> Click me! </button >
除 bind 外,也可以用 catch 来绑定事件。与 bind 不同, catch 会阻止事件向上冒泡。
<button id="tapTest" catchtap="tapName"> Click me! </button >
Page({
  tapName: function(event) { // event:事件对象
    console.log(event)
  }
})


 5465
5465


 被折叠的 条评论
为什么被折叠?
被折叠的 条评论
为什么被折叠?
 到【灌水乐园】发言


