


MidMaps is a tiny Google Maps library for Java ME applications.
With MidMaps you can integrate Google Maps into your J2ME applications in few, easy steps!
How to use it?
MidMaps is designed to be simple. You don’t need to deal with threads, connections or other boring stuff like that: all you have to do is to create a map and display it on in your application.
Creating a simple map
To get a map object, you have to perform two steps:
- First, instantiate a new GoogleMaps object:
GoogleMaps gMaps = new GoogleMaps(); - Then, create a new GoogleStaticMap instance by using the createMap() method:
GoogleStaticMap map = gMaps.createMap(mapWidth, mapHeight, GoogleStaticMap.FORMAT_PNG);
Once you have created a map, it is necessary to define its handler. The handler has an important role: it gets automatically called each time the map object is updated, or when an error occurs: this way, you can know when you need to repaint the map, or how to notify the user about what’s going on. The handler has to implement theGoogleStaticMapHandler interface, that defines two methods:
public void GoogleStaticMapUpdated(GoogleStaticMap map);
public void GoogleStaticMapUpdateError(GoogleStaticMap map, int errorCode, String errorMessage);
The first one is called when a map is updated, so that your MIDlet knows that it must be repainted. The second one gets called when an error occurs (e.g.: when there is a network issue and the map image cannot be downloaded).
Once you’ve created your handler, you have to pass it to the GoogleStaticMap instance with the setHandler() method:
map.setHandler(mapHandler);Now, how to actually load a map? First, it is necessary to define a location for the map:
- create a GoogleMapsCoordinates instance with the preferred latitude and longitude values
- use the GoogleStaticMap setCenter() method
map.setCenter(new GoogleMapsCoordinates(41.8954656, 12.4823243));and then, you have to update() the map:
map.update();After you’ve called update, the map image will be loaded and, when finished (or when an error occurs) the GoogleStaticMapHandler will be called. If the map is correctly loaded, you can actually draw it by using itsdraw(Graphics g, int left, int top, int attach) method.
Complete example
Below you can see a full example on how MidMaps can be used to display a map on a Canvas.

import javax.microedition.lcdui.Canvas;
import javax.microedition.lcdui.Graphics;

import com.jappit.midmaps.googlemaps.GoogleMaps;
import com.jappit.midmaps.googlemaps.GoogleMapsCoordinates;
import com.jappit.midmaps.googlemaps.GoogleStaticMapHandler;
import com.jappit.midmaps.googlemaps.GoogleStaticMap;

public class GoogleMapsSimpleCanvas extends Canvas implements GoogleStaticMapHandler
{
	GoogleMaps gMaps = null;
	GoogleStaticMap map = null;

	public GoogleMapsSimpleCanvas()
	{
		gMaps = new GoogleMaps();

		map = gMaps.createMap(getWidth(), getHeight(), GoogleStaticMap.FORMAT_PNG);

		map.setHandler(this);

		map.setCenter(new GoogleMapsCoordinates(41.8954656, 12.4823243));

		map.setZoom(15);

		map.update();
	}

	protected void paint(Graphics g)
	{
		map.draw(g, 0, 0, Graphics.TOP | Graphics.LEFT);
	}
	public void GoogleStaticMapUpdateError(GoogleStaticMap map, int errorCode, String errorMessage)
	{
		System.out.println("map error: " + errorCode + ", " + errorMessage);
	}
	public void GoogleStaticMapUpdated(GoogleStaticMap map)
	{
		repaint();
	}
}
Markers
You can add markers to a map by using the GoogleMapsMarker class. You create a marker by specifying its location:
GoogleMapsMarker marker = new GoogleMapsMarker(new GoogleMapsCoordinates(41.8954656, 12.4823243));Optionally, you can customize the marker by setting its color, size and and label (must be a single character):
marker.setColor(GoogleStaticMap.COLOR_GREEN);
marker.setColor(GoogleMapsMarker.SIZE_TINY);
marker.setLabel('P');
Then, you add the marker to your GoogleStaticMap instance with the addMarker() method:
map.addMarker(marker);Here’s an example of 2 different markers added to the previous map.
GoogleMapsMarker redMarker = new GoogleMapsMarker(new GoogleMapsCoordinates(41.8954656, 12.4823243));
redMarker.setColor(GoogleStaticMap.COLOR_RED);
redMarker.setSize(GoogleMapsMarker.SIZE_MID);

GoogleMapsMarker blueMarker = new GoogleMapsMarker(new GoogleMapsCoordinates(41.8964656, 12.4843243));
blueMarker.setColor(GoogleStaticMap.COLOR_BLUE);
blueMarker.setSize(GoogleMapsMarker.SIZE_SMALL);
blueMarker.setLabel('R');

map.addMarker(redMarker);
map.addMarker(blueMarker);
Paths
Paths can be easily defined by using the GoogleMapsPath class. To create a new Path, just istantiate a new GoogleMapsPath object:
GoogleMapsPath path = new GoogleMapsPath();And then add the path points with the addPoint() method:
path.addPoint(new GoogleMapsCoordinates(41.8954656, 12.4823243));
path.addPoint(new GoogleMapsCoordinates(41.8934656, 12.4833243));
Path weight, color and fill color can be customized with the following methods:
bluePath.setColor(GoogleStaticMap.COLOR_BLUE);
bluePath.setWeight(5);
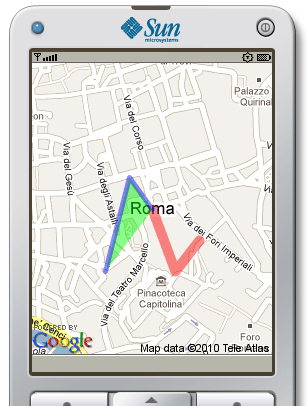
bluePath.setFillColor(GoogleStaticMap.COLOR_GREEN);Below you can see an example of 2 different paths added to the map defined above.

GoogleMapsPath path = new GoogleMapsPath();
path.addPoint(new GoogleMapsCoordinates(41.8954656, 12.4823243));
path.addPoint(new GoogleMapsCoordinates(41.8934656, 12.4833243));
path.addPoint(new GoogleMapsCoordinates(41.8944656, 12.4843243));
path.setColor(GoogleStaticMap.COLOR_RED);
path.setWeight(10);
map.addPath(path);

GoogleMapsPath bluePath = new GoogleMapsPath();
bluePath.addPoint(new GoogleMapsCoordinates(41.8954656, 12.4823243));
bluePath.addPoint(new GoogleMapsCoordinates(41.8964656, 12.4813243));
bluePath.addPoint(new GoogleMapsCoordinates(41.8934656, 12.4803243));
bluePath.setColor(GoogleStaticMap.COLOR_BLUE);
bluePath.setFillColor(GoogleStaticMap.COLOR_GREEN);
bluePath.setWeight(5);
map.addPath(bluePath);
Geocoding
Geocoding requires a Google Maps API key, so you have to get your own key to use this feature.
To start, you have to instantiate a Google Maps object by using your own API key:
GoogleMaps gMaps = new GoogleMaps("<your_api_key>");Then, you have to get a GoogleMapsGeocoder instance by using the createGeocoder() method:
GoogleMapsGeocoder geocoder = gMaps.createGeocoder();Then, as done for the GoogleStaticMap objects, also the GoogleMapsGeocoder objects require an handler to be defined. The GoogleMapsGeocoderHandler interface defines 2 methods:
public void GoogleMapsGeocodeSuccess(String address, GoogleMapsCoordinates coordinates, int accuracy);
public void GoogleMapsGeocodeError(String address, int errorCode, String errorDescription);
These 2 methods are called when a geocoding request successes or fails, respectively. Once you have implemented your GoogleMapsGeocoderHandler, you have to pass it to the GoogleMapsGeocoder instance created above:
geocoder.setHandler(geocoderHandler);Done this, all is ready to geocode an address: to do this, just call the geocodeAddress() method:
geocoder.geocodeAddress("Rome, Italy");When the geocoding ends, your handler will be notified via the GoogleMapsGeocodeSuccess() method. A possible implementation of such method is visible below:
public void GoogleMapsGeocodeSuccess(String address, GoogleMapsCoordinates coordinates, int accuracy)
{
	map.setCenter(coordinates);

	map.addMarker(new GoogleMapsMarker(coordinates));

	map.setZoom(GoogleMaps.getZoomForAccuracy(accuracy));

	map.update();
}
Since the geocoding operation returns an “accuracy” value, you can use this value to get a default zoom value for your map. To do this, you can use the GoogleMaps.getZoomForAccuracy() method, as shown above.
Below you can see the map generated by the previous code:


 被折叠的 条评论
为什么被折叠?
被折叠的 条评论
为什么被折叠?
 到【灌水乐园】发言


