


今天来介绍下怎么用mybatis-gennerator插件自动生成mybatis所需要的dao、bean、mapper xml文件,这样我们可以节省一部分精力,把精力放在业务逻辑上。
之前看过很多文章,都是借助eclipse或者IDEA等其他工具,今天讲的这个方法是,直接在命令提示符下运行。
程序打包上传:http://download.csdn.net/detail/tolcf/9456659
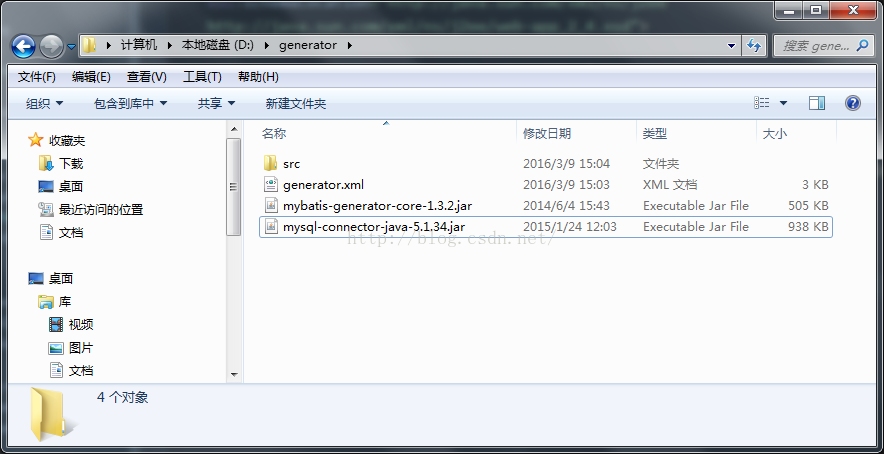
1、在D盘新建一个文件夹,命名:generator(或者其他盘其他名字也可以,之所以用这个,是为了copy下面代码后,不用再做修改路径)
2、准备需要的jar包:mybatis-generator-core-1.3.2.jar、mysql-connector-java-5.1.34.jar(忽略版本号,这只是我用的jar 版本)
3、新建一个文件,命名:generator.xml
复制以下代码,并修改对应内容
<?xml version="1.0" encoding="UTF-8"?>
<!DOCTYPE generatorConfiguration PUBLIC "-//mybatis.org//DTD MyBatis Generator Configuration 1.0//EN" "http://mybatis.org/dtd/mybatis-generator-config_1_0.dtd">
<generatorConfiguration>
<!-- 数据库驱动包位置 -->
<classPathEntry location="D:\generator\mysql-connector-java-5.1.34.jar" />
<!-- <classPathEntry location="C:\oracle\product\10.2.0\db_1\jdbc\lib\ojdbc14.jar" />-->
<context id="DB2Tables" targetRuntime="MyBatis3">
<commentGenerator>
<property name="suppressAllComments" value="true" />
</commentGenerator>
<!-- 数据库链接URL、用户名、密码 -->
<jdbcConnection driverClass="com.mysql.jdbc.Driver" connectionURL="jdbc:mysql://localhost:3306/my_db?characterEncoding=utf8" userId="root" password="123456">
<!--<jdbcConnection driverClass="oracle.jdbc.driver.OracleDriver" connectionURL="jdbc:oracle:thin:@localhost:1521:orcl" userId="msa" password="msa">-->
</jdbcConnection>
<javaTypeResolver>
<property name="forceBigDecimals" value="false" />
</javaTypeResolver>
<!-- 生成模型的包名和位置 -->
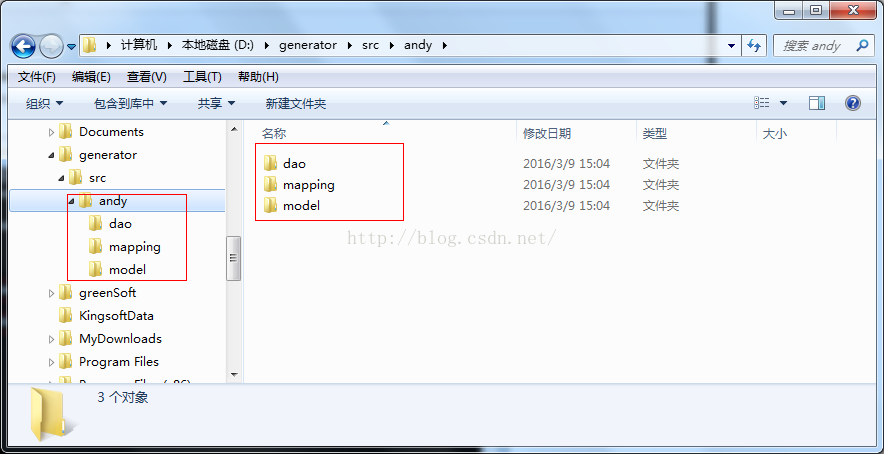
<javaModelGenerator targetPackage="andy.model" targetProject="D:\generator\src">
<property name="enableSubPackages" value="true" />
<property name="trimStrings" value="true" />
</javaModelGenerator>
<!-- 生成的映射文件包名和位置 -->
<sqlMapGenerator targetPackage="andy.mapping" targetProject="D:\generator\src">
<property name="enableSubPackages" value="true" />
</sqlMapGenerator>
<!-- 生成DAO的包名和位置 -->
<javaClientGenerator type="XMLMAPPER" targetPackage="andy.dao" targetProject="D:\generator\src">
<property name="enableSubPackages" value="true" />
</javaClientGenerator>
<!-- 要生成那些表(更改tableName和domainObjectName就可以) -->
<table tableName="kb_city" domainObjectName="KbCity" enableCountByExample="false" enableUpdateByExample="false" enableDeleteByExample="false" enableSelectByExample="false" selectByExampleQueryId="false" />
<!-- <table tableName="course_info" domainObjectName="CourseInfo" enableCountByExample="false" enableUpdateByExample="false" enableDeleteByExample="false" enableSelectByExample="false" selectByExampleQueryId="false" />
<table tableName="course_user_info" domainObjectName="CourseUserInfo" enableCountByExample="false" enableUpdateByExample="false" enableDeleteByExample="false" enableSelectByExample="false" selectByExampleQueryId="false" /> -->
</context>
</generatorConfiguration>修改代码中D:\generator 自己所放jar包路径、数据库链接地址,用户名、密码,以及需要生成文件对应的表名,保存即可
文件目录如下:
4、打开命令提示符,进入D:\generator,输入命令:java -jar mybatis-generator-core-1.3.2.jar -configfile generator.xml -overwrite
如图:

5、这时,你可以看到,dao、model、mapper xml文件已经生成了


 4606
4606


 被折叠的 条评论
为什么被折叠?
被折叠的 条评论
为什么被折叠?
 到【灌水乐园】发言


