


转载博客原址: 史上最详细最全的Linux上安装Oracle的教程-centos7-humf
一、安装Oracle前准备
1.创建运行oracle数据库的系统用户和用户组
-
[
humf@localhost ~]$ su root
#切换到root
-
Password:
-
[
root@localhost sonny]
# groupadd oinstall #创建用户组oinstall
-
[
root@localhost sonny]
# groupadd dba #创建用户组dba
-
[
root@localhost sonny]
# useradd -g oinstall -g dba -m oracle #创建oracle用户,并加入到oinstall和dba用户组
-
[
root@localhost sonny]
# passwd oracle #设置用户oracle的登陆密码,不设置密码,在CentOS的图形登陆界面没法登陆
-
Changing password
for user oracle.
-
New password:
# 密码
-
BAD PASSWORD: The password
is shorter than
8 characters
-
Retype
new password:
# 确认密码
-
passwd: all authentication tokens updated successfully.
-
[
root@localhost sonny]
# id oracle # 查看新建的oracle用户
-
uid=
1001(oracle) gid=
1002(dba) groups=
1002(dba)
-
[
root@localhost sonny]
#
理论上单例按照需要3种用户组,实际只建两个oinstall和dba,后面再安装oracle数据库的时候把OSOPER组也设置是dba组。
a.oracle 清单组(一般为oinstall):
OINSTALL 组的成员被视为 Oracle 软件的“所有者”,拥有对 Oracle 中央清单 (oraInventory) 的写入权限。在一个 Linux 系统上首次安装 Oracle 软件时,
OUI 会创建 /etc/oraInst.loc 文件。该文件指定 Oracle 清单组的名称(默认为 oinstall)以及 Oracle 中央清单目录的路径。
b.数据库管理员(OSDBA,一般为 dba):
OSDBA 组的成员可通过操作系统身份验证使用 SQL 以 SYSDBA 身份连接到一个 Oracle 实例。该组的成员可执行关键的数据库管理任务,如创建数据库、启动和关
闭实例。该组的默认名称为dba。SYSDBA 系统权限甚至在数据库未打开时也允许访问数据库实例。对此权限的控制完全超出了数据库本身的范围。不要混淆 SYSDBA
系统权限与数据库角色 DBA。DBA 角色不包括 SYSDBA 或 SYSOPER 系统权限。
c.数据库操作员组(OSOPER,一般为 oper):
OSOPER 组的成员可通过操作系统身份验证使用 SQL 以 SYSOPER 身份连接到一个 Oracle 实例。这个可选组的成员拥有一组有限的数据库管理权限,如管理和运行备份。
该组的默认名称为oper。SYSOPER 系统权限甚至在数据库未打开时也允许访问数据库实例。对此权限的控制完全超出了数据库本身的范围。要使用该组,选择 Advanced 安装类型来安装 Oracle 数据库软件。
2.修改操作系统核心参数
在Root用户下执行以下步骤:
1)修改用户的SHELL的限制,修改/etc/security/limits.conf文件
输入命令:vi /etc/security/limits.conf,按i键进入编辑模式,将下列内容加入该文件。
oracle soft nproc 2047oracle hard nproc 16384
oracle soft nofile 1024
oracle hard nofile 65536
编辑完成后按Esc键,输入“:wq”存盘退出
2)修改/etc/pam.d/login 文件,输入命令:vi /etc/pam.d/login,按i键进入编辑模式,将下列内容加入该文件。
-
session
required /lib/security/pam_limits.so
-
session
required pam_limits.so
编辑完成后按Esc键,输入“:wq”存盘退出
3)修改linux内核,修改/etc/sysctl.conf文件,输入命令: vi /etc/sysctl.conf ,按i键进入编辑模式,将下列内容加入该文件
-
fs.file-
max =
6815744
-
-
fs.aio-
max-nr =
1048576
-
-
kernel.shmall =
2097152
-
-
kernel.shmmax =
2147483648
-
-
kernel.shmmni =
4096
-
-
kernel.sem =
250
32000
100
128
-
-
net.ipv4.ip_local_port_range =
9000
65500
-
-
net.core.rmem_default =
4194304
-
-
net.core.rmem_max =
4194304
-
-
net.core.wmem_default =
262144
-
-
net.core.wmem_max =
1048576
编辑完成后按Esc键,输入“:wq”存盘退出
4)要使 /etc/sysctl.conf 更改立即生效,执行以下命令。 输入:sysctl -p 显示如下:
-
linux:~ # sysctl -p
-
-
net.ipv4.icmp_echo_ignore_broadcasts =
1
-
-
net.ipv4.conf.all.rp_filter =
1
-
-
fs.file-
max =
6815744
-
-
fs.aio-
max-nr =
1048576
-
-
kernel.shmall =
2097152
-
-
kernel.shmmax =
2147483648
-
-
kernel.shmmni =
4096
-
-
kernel.sem =
250
32000
100
128
-
-
net.ipv4.ip_local_port_range =
9000
65500
-
-
net.core.rmem_default =
4194304
-
-
net.core.rmem_max =
4194304
-
-
net.core.wmem_default =
262144
-
-
net.core.wmem_max =
1048576
5)编辑 /etc/profile ,输入命令:vi /etc/profile,按i键进入编辑模式,将下列内容加入该文件。
-
if [
U
S
E
R
<
/
s
p
a
n
>
<
/
s
p
a
n
>
=
<
s
p
a
n
c
l
a
s
s
=
"
h
l
j
s
−
s
t
r
i
n
g
"
>
<
s
p
a
n
c
l
a
s
s
=
"
h
l
j
s
−
s
t
r
i
n
g
"
>
"
o
r
a
c
l
e
"
<
/
s
p
a
n
>
<
/
s
p
a
n
>
]
;
<
s
p
a
n
c
l
a
s
s
=
"
h
l
j
s
−
k
e
y
w
o
r
d
"
>
<
s
p
a
n
c
l
a
s
s
=
"
h
l
j
s
−
k
e
y
w
o
r
d
"
>
t
h
e
n
<
/
s
p
a
n
>
<
/
s
p
a
n
>
<
/
d
i
v
>
<
/
d
i
v
>
<
/
l
i
>
<
l
i
>
<
d
i
v
c
l
a
s
s
=
"
h
l
j
s
−
l
n
−
n
u
m
b
e
r
s
"
>
<
d
i
v
c
l
a
s
s
=
"
h
l
j
s
−
l
n
−
l
i
n
e
h
l
j
s
−
l
n
−
n
"
d
a
t
a
−
l
i
n
e
−
n
u
m
b
e
r
=
"
2
"
>
<
/
d
i
v
>
<
/
d
i
v
>
<
d
i
v
c
l
a
s
s
=
"
h
l
j
s
−
l
n
−
c
o
d
e
"
>
<
d
i
v
c
l
a
s
s
=
"
h
l
j
s
−
l
n
−
l
i
n
e
"
>
<
/
d
i
v
>
<
/
d
i
v
>
<
/
l
i
>
<
l
i
>
<
d
i
v
c
l
a
s
s
=
"
h
l
j
s
−
l
n
−
n
u
m
b
e
r
s
"
>
<
d
i
v
c
l
a
s
s
=
"
h
l
j
s
−
l
n
−
l
i
n
e
h
l
j
s
−
l
n
−
n
"
d
a
t
a
−
l
i
n
e
−
n
u
m
b
e
r
=
"
3
"
>
<
/
d
i
v
>
<
/
d
i
v
>
<
d
i
v
c
l
a
s
s
=
"
h
l
j
s
−
l
n
−
c
o
d
e
"
>
<
d
i
v
c
l
a
s
s
=
"
h
l
j
s
−
l
n
−
l
i
n
e
"
>
<
s
p
a
n
c
l
a
s
s
=
"
h
l
j
s
−
k
e
y
w
o
r
d
"
>
<
s
p
a
n
c
l
a
s
s
=
"
h
l
j
s
−
k
e
y
w
o
r
d
"
>
i
f
<
/
s
p
a
n
>
<
/
s
p
a
n
>
[
<
s
p
a
n
c
l
a
s
s
=
"
h
l
j
s
−
v
a
r
i
a
b
l
e
"
>
<
s
p
a
n
c
l
a
s
s
=
"
h
l
j
s
−
v
a
r
i
a
b
l
e
"
>
USER</span></span> = <span class="hljs-string"><span class="hljs-string">"oracle"</span></span> ]; <span class="hljs-keyword"><span class="hljs-keyword">then</span></span></div></div></li><li><div class="hljs-ln-numbers"><div class="hljs-ln-line hljs-ln-n" data-line-number="2"></div></div><div class="hljs-ln-code"><div class="hljs-ln-line"> </div></div></li><li><div class="hljs-ln-numbers"><div class="hljs-ln-line hljs-ln-n" data-line-number="3"></div></div><div class="hljs-ln-code"><div class="hljs-ln-line"><span class="hljs-keyword"><span class="hljs-keyword">if</span></span> [ <span class="hljs-variable"><span class="hljs-variable">
USER</span></span>=<spanclass="hljs−string"><spanclass="hljs−string">"oracle"</span></span>];<spanclass="hljs−keyword"><spanclass="hljs−keyword">then</span></span></div></div></li><li><divclass="hljs−ln−numbers"><divclass="hljs−ln−linehljs−ln−n"data−line−number="2"></div></div><divclass="hljs−ln−code"><divclass="hljs−ln−line"></div></div></li><li><divclass="hljs−ln−numbers"><divclass="hljs−ln−linehljs−ln−n"data−line−number="3"></div></div><divclass="hljs−ln−code"><divclass="hljs−ln−line"><spanclass="hljs−keyword"><spanclass="hljs−keyword">if</span></span>[<spanclass="hljs−variable"><spanclass="hljs−variable">SHELL =
“/bin/ksh” ];
then
-
-
ulimit -p 16384
-
-
ulimit -n 65536
-
-
else
-
-
ulimit -u 16384 -n 65536
-
-
fi
-
-
fi
编辑完成后按Esc键,输入“:wq”存盘退出
6)创建数据库软件目录和数据文件存放目录,目录的位置,根据自己的情况来定,注意磁盘空间即可,这里我把其放到oracle用户下,例如:
输入命令:
-
mkdir /home/oracle/app
-
-
mkdir /home/oracle/app/oracle
-
-
mkdir /home/oracle/app/oradata
-
-
mkdir /home/oracle/app/oracle/product
7)更改目录属主为Oracle用户所有,输入命令:
chown -R oracle:oinstall /home/oracle/app
8)配置oracle用户的环境变量,首先,切换到新创建的oracle用户下,
输入:su – oracle ,然后直接在输入 : vi .bash_profile
按i编辑 .bash_profile,进入编辑模式,增加以下内容:
-
export ORACLE_BASE=/home/oracle/app
-
-
export ORACLE_HOME=
O
R
A
C
L
E
B
A
S
E
<
/
s
p
a
n
>
<
/
s
p
a
n
>
/
o
r
a
c
l
e
/
p
r
o
d
u
c
t
/
11.2.0
/
d
b
h
o
m
e
1
<
/
d
i
v
>
<
/
d
i
v
>
<
/
l
i
>
<
l
i
>
<
d
i
v
c
l
a
s
s
=
"
h
l
j
s
−
l
n
−
n
u
m
b
e
r
s
"
>
<
d
i
v
c
l
a
s
s
=
"
h
l
j
s
−
l
n
−
l
i
n
e
h
l
j
s
−
l
n
−
n
"
d
a
t
a
−
l
i
n
e
−
n
u
m
b
e
r
=
"
4
"
>
<
/
d
i
v
>
<
/
d
i
v
>
<
d
i
v
c
l
a
s
s
=
"
h
l
j
s
−
l
n
−
c
o
d
e
"
>
<
d
i
v
c
l
a
s
s
=
"
h
l
j
s
−
l
n
−
l
i
n
e
"
>
<
/
d
i
v
>
<
/
d
i
v
>
<
/
l
i
>
<
l
i
>
<
d
i
v
c
l
a
s
s
=
"
h
l
j
s
−
l
n
−
n
u
m
b
e
r
s
"
>
<
d
i
v
c
l
a
s
s
=
"
h
l
j
s
−
l
n
−
l
i
n
e
h
l
j
s
−
l
n
−
n
"
d
a
t
a
−
l
i
n
e
−
n
u
m
b
e
r
=
"
5
"
>
<
/
d
i
v
>
<
/
d
i
v
>
<
d
i
v
c
l
a
s
s
=
"
h
l
j
s
−
l
n
−
c
o
d
e
"
>
<
d
i
v
c
l
a
s
s
=
"
h
l
j
s
−
l
n
−
l
i
n
e
"
>
<
s
p
a
n
c
l
a
s
s
=
"
h
l
j
s
−
b
u
i
l
t
i
n
"
>
<
s
p
a
n
c
l
a
s
s
=
"
h
l
j
s
−
b
u
i
l
t
i
n
"
>
e
x
p
o
r
t
<
/
s
p
a
n
>
<
/
s
p
a
n
>
O
R
A
C
L
E
S
I
D
=
o
r
c
l
<
/
d
i
v
>
<
/
d
i
v
>
<
/
l
i
>
<
l
i
>
<
d
i
v
c
l
a
s
s
=
"
h
l
j
s
−
l
n
−
n
u
m
b
e
r
s
"
>
<
d
i
v
c
l
a
s
s
=
"
h
l
j
s
−
l
n
−
l
i
n
e
h
l
j
s
−
l
n
−
n
"
d
a
t
a
−
l
i
n
e
−
n
u
m
b
e
r
=
"
6
"
>
<
/
d
i
v
>
<
/
d
i
v
>
<
d
i
v
c
l
a
s
s
=
"
h
l
j
s
−
l
n
−
c
o
d
e
"
>
<
d
i
v
c
l
a
s
s
=
"
h
l
j
s
−
l
n
−
l
i
n
e
"
>
<
/
d
i
v
>
<
/
d
i
v
>
<
/
l
i
>
<
l
i
>
<
d
i
v
c
l
a
s
s
=
"
h
l
j
s
−
l
n
−
n
u
m
b
e
r
s
"
>
<
d
i
v
c
l
a
s
s
=
"
h
l
j
s
−
l
n
−
l
i
n
e
h
l
j
s
−
l
n
−
n
"
d
a
t
a
−
l
i
n
e
−
n
u
m
b
e
r
=
"
7
"
>
<
/
d
i
v
>
<
/
d
i
v
>
<
d
i
v
c
l
a
s
s
=
"
h
l
j
s
−
l
n
−
c
o
d
e
"
>
<
d
i
v
c
l
a
s
s
=
"
h
l
j
s
−
l
n
−
l
i
n
e
"
>
<
s
p
a
n
c
l
a
s
s
=
"
h
l
j
s
−
b
u
i
l
t
i
n
"
>
<
s
p
a
n
c
l
a
s
s
=
"
h
l
j
s
−
b
u
i
l
t
i
n
"
>
e
x
p
o
r
t
<
/
s
p
a
n
>
<
/
s
p
a
n
>
P
A
T
H
=
<
s
p
a
n
c
l
a
s
s
=
"
h
l
j
s
−
v
a
r
i
a
b
l
e
"
>
<
s
p
a
n
c
l
a
s
s
=
"
h
l
j
s
−
v
a
r
i
a
b
l
e
"
>
ORACLE_BASE</span></span>/oracle/product/11.2.0/dbhome_1</div></div></li><li><div class="hljs-ln-numbers"><div class="hljs-ln-line hljs-ln-n" data-line-number="4"></div></div><div class="hljs-ln-code"><div class="hljs-ln-line"> </div></div></li><li><div class="hljs-ln-numbers"><div class="hljs-ln-line hljs-ln-n" data-line-number="5"></div></div><div class="hljs-ln-code"><div class="hljs-ln-line"><span class="hljs-built_in"><span class="hljs-built_in">export</span></span> ORACLE_SID=orcl</div></div></li><li><div class="hljs-ln-numbers"><div class="hljs-ln-line hljs-ln-n" data-line-number="6"></div></div><div class="hljs-ln-code"><div class="hljs-ln-line"> </div></div></li><li><div class="hljs-ln-numbers"><div class="hljs-ln-line hljs-ln-n" data-line-number="7"></div></div><div class="hljs-ln-code"><div class="hljs-ln-line"><span class="hljs-built_in"><span class="hljs-built_in">export</span></span> PATH=<span class="hljs-variable"><span class="hljs-variable">
ORACLEBASE</span></span>/oracle/product/11.2.0/dbhome1</div></div></li><li><divclass="hljs−ln−numbers"><divclass="hljs−ln−linehljs−ln−n"data−line−number="4"></div></div><divclass="hljs−ln−code"><divclass="hljs−ln−line"></div></div></li><li><divclass="hljs−ln−numbers"><divclass="hljs−ln−linehljs−ln−n"data−line−number="5"></div></div><divclass="hljs−ln−code"><divclass="hljs−ln−line"><spanclass="hljs−builtin"><spanclass="hljs−builtin">export</span></span>ORACLESID=orcl</div></div></li><li><divclass="hljs−ln−numbers"><divclass="hljs−ln−linehljs−ln−n"data−line−number="6"></div></div><divclass="hljs−ln−code"><divclass="hljs−ln−line"></div></div></li><li><divclass="hljs−ln−numbers"><divclass="hljs−ln−linehljs−ln−n"data−line−number="7"></div></div><divclass="hljs−ln−code"><divclass="hljs−ln−line"><spanclass="hljs−builtin"><spanclass="hljs−builtin">export</span></span>PATH=<spanclass="hljs−variable"><spanclass="hljs−variable">PATH:
H
O
M
E
<
/
s
p
a
n
>
<
/
s
p
a
n
>
/
b
i
n
:
<
s
p
a
n
c
l
a
s
s
=
"
h
l
j
s
−
v
a
r
i
a
b
l
e
"
>
<
s
p
a
n
c
l
a
s
s
=
"
h
l
j
s
−
v
a
r
i
a
b
l
e
"
>
HOME</span></span>/bin:<span class="hljs-variable"><span class="hljs-variable">
HOME</span></span>/bin:<spanclass="hljs−variable"><spanclass="hljs−variable">ORACLE_HOME/bin
-
-
export LD_LIBRARY_PATH=
O
R
A
C
L
E
H
O
M
E
<
/
s
p
a
n
>
<
/
s
p
a
n
>
/
l
i
b
:
/
u
s
r
/
l
i
b
<
/
d
i
v
>
<
/
d
i
v
>
<
/
l
i
>
<
/
o
l
>
<
/
c
o
d
e
>
<
d
i
v
c
l
a
s
s
=
"
h
l
j
s
−
b
u
t
t
o
n
"
d
a
t
a
−
t
i
t
l
e
=
"
复
制
"
>
<
/
d
i
v
>
<
/
p
r
e
>
<
b
r
>
编
辑
完
成
后
按
E
s
c
键
,
输
入
“
:
w
q
”
存
盘
退
出
<
b
r
>
<
b
r
>
p
s
:
我
的
云
服
务
器
没
有
防
火
墙
,
如
果
你
们
有
,
可
以
关
闭
<
b
r
>
−
−
关
闭
防
火
墙
C
e
n
t
O
S
7.2
默
认
使
用
的
是
f
i
r
e
w
a
l
l
作
为
防
火
墙
<
b
r
>
<
b
r
>
<
p
r
e
o
n
c
l
i
c
k
=
"
h
l
j
s
.
c
o
p
y
C
o
d
e
(
e
v
e
n
t
)
"
>
<
c
o
d
e
c
l
a
s
s
=
"
l
a
n
g
u
a
g
e
−
c
s
h
l
j
s
"
>
<
o
l
c
l
a
s
s
=
"
h
l
j
s
−
l
n
"
>
<
l
i
>
<
d
i
v
c
l
a
s
s
=
"
h
l
j
s
−
l
n
−
n
u
m
b
e
r
s
"
>
<
d
i
v
c
l
a
s
s
=
"
h
l
j
s
−
l
n
−
l
i
n
e
h
l
j
s
−
l
n
−
n
"
d
a
t
a
−
l
i
n
e
−
n
u
m
b
e
r
=
"
1
"
>
<
/
d
i
v
>
<
/
d
i
v
>
<
d
i
v
c
l
a
s
s
=
"
h
l
j
s
−
l
n
−
c
o
d
e
"
>
<
d
i
v
c
l
a
s
s
=
"
h
l
j
s
−
l
n
−
l
i
n
e
"
>
[
<
s
p
a
n
c
l
a
s
s
=
"
h
l
j
s
−
m
e
t
a
"
>
<
s
p
a
n
c
l
a
s
s
=
"
h
l
j
s
−
m
e
t
a
"
>
h
u
m
f
@
l
o
c
a
l
h
o
s
t
/
<
/
s
p
a
n
>
<
/
s
p
a
n
>
]
ORACLE_HOME</span></span>/lib:/usr/lib</div></div></li></ol></code><div class="hljs-button" data-title="复制"></div></pre><br> 编辑完成后按Esc键,输入“:wq”存盘退出<br><br> ps:我的云服务器没有防火墙,如果你们有,可以关闭<br> --关闭防火墙 CentOS 7.2默认使用的是firewall作为防火墙<br><br><pre onclick="hljs.copyCode(event)"><code class="language-cs hljs"><ol class="hljs-ln"><li><div class="hljs-ln-numbers"><div class="hljs-ln-line hljs-ln-n" data-line-number="1"></div></div><div class="hljs-ln-code"><div class="hljs-ln-line">[<span class="hljs-meta"><span class="hljs-meta">humf@localhost /</span></span>]
ORACLEHOME</span></span>/lib:/usr/lib</div></div></li></ol></code><divclass="hljs−button"data−title="复制"></div></pre><br>编辑完成后按Esc键,输入“:wq”存盘退出<br><br>ps:我的云服务器没有防火墙,如果你们有,可以关闭<br>−−关闭防火墙CentOS7.2默认使用的是firewall作为防火墙<br><br><preonclick="hljs.copyCode(event)"><codeclass="language−cshljs"><olclass="hljs−ln"><li><divclass="hljs−ln−numbers"><divclass="hljs−ln−linehljs−ln−n"data−line−number="1"></div></div><divclass="hljs−ln−code"><divclass="hljs−ln−line">[<spanclass="hljs−meta"><spanclass="hljs−meta">humf@localhost/</span></span>] su root
-
Password:
-
[
root@localhost /]
# systemctl status firewalld.service #查看防火墙状态,运行中
-
● firewalld.service - firewalld -
dynamic firewall daemon
-
Loaded: loaded (/usr/lib/systemd/system/firewalld.service; enabled; vendor preset: enabled)
-
Active: active (running) since Thu
2016
-04
-07
18:
54:
29 PDT;
2h
20min ago
-
Main PID:
802 (firewalld)
-
CGroup: /system.slice/firewalld.service
-
└─
802 /usr/bin/python -Es /usr/sbin/firewalld --nofork --nopid
-
-
-
Apr
07
18:
54:
25 localhost.localdomain systemd[
1]: Starting firewalld -
dynamic firewall daemon…
-
Apr
07
18:
54:
29 localhost.localdomain systemd[
1]: Started firewalld -
dynamic firewall daemon.
-
[
root@localhost /]
# systemctl stop firewalld.service #关闭防火墙
-
[
root@localhost /]
# systemctl status firewalld.service #再次查看防火墙状态,发现已关闭
-
● firewalld.service - firewalld -
dynamic firewall daemon
-
Loaded: loaded (/usr/lib/systemd/system/firewalld.service; enabled; vendor preset: enabled)
-
Active: inactive (dead) since Thu
2016
-04
-07
21:
15:
34 PDT;
9s ago
-
Main PID:
802 (code=exited, status=
0/SUCCESS)
-
-
-
Apr
07
18:
54:
25 localhost.localdomain systemd[
1]: Starting firewalld -
dynamic firewall daemon…
-
Apr
07
18:
54:
29 localhost.localdomain systemd[
1]: Started firewalld -
dynamic firewall daemon.
-
Apr
07
21:
15:
33 localhost systemd[
1]: Stopping firewalld -
dynamic firewall daemon…
-
Apr
07
21:
15:
34 localhost systemd[
1]: Stopped firewalld -
dynamic firewall daemon.
-
[
root@localhost /]
# systemctl disable firewalld.service #禁止使用防火墙(重启也是禁止的)
-
Removed symlink /etc/systemd/system/dbus-org.Fedoraproject.FirewallD1.service.
-
Removed symlink /etc/systemd/system/basic.target.wants/firewalld.service.
-
[
root@localhost /]
#
防火墙先禁用,搞好之后再配置,个人虚拟机,要毛线防火墙~~
6.关闭selinux(需重启生效)
-
[root@localhost /]
# vi /etc/selinux/config
-
[root@localhost /]
# cat /etc/selinux/config
-
-
-
# This file controls the state of SELinux on the system.
-
# SELINUX= can take one of these three values:
-
# enforcing - SELinux security policy is enforced.
-
# permissive - SELinux prints warnings instead of enforcing.
-
# disabled - No SELinux policy is loaded.
-
SELINUX=disabled
#此处修改为disabled
-
# SELINUXTYPE= can take one of three two values:
-
# targeted - Targeted processes are protected,
-
# minimum - Modification of targeted policy. Only selected processes are protected.
-
# mls - Multi Level Security protection.
-
SELINUXTYPE=targeted
-
-
-
[root@localhost /]
#
为啥要关闭selinux?因为selinux太高深,非专业人士搞不懂~~
二、正式Oracle的安装过程
1)当上述系统要求操作全部完成后,注销系统,在图形界面以Oracle用户登陆。
PS:对于不会用图形界面的这边教你怎么用Windows远程连接Oracle图形界面
前提:
2.1.1 CentOS已经安装桌面,如果无桌面,请执行 (yum不会的可以百度,这边不赘述了)
-
# yum -y groups install “GNOME Desktop”
-
# startx
<span> </span># yum install epel* -y
<span><span> </span> </span># yum --enablerepo=epel -y install xrdp
-
<span> </span>
# systemctl start xrdp
-
# systemctl enable xrdp
2.1.5 打开Windows的远程工具Mobaxterm输入服务器IP用Oracle账户登陆就行
一定要使用ssh -X 服务器IP进行登陆,-X参数使得图形指令也能够传输,这样远程通过将图形绘制指令传输到本地执行绘制以在本地显示远程图形化界面。首先将下载的Oracle安装包复制到linux中,建议使用现阶段使用最多的11gR2版本,遇到问题在网上也很好找到对应版本的解决办法,下载地址: linux-oracle-11gR2下载,用scp命令进行拷贝。
打开一个终端,运行unzip命令解压oracle安装文件,如:
输入命令:
-
unzip
linux
.x64_11gR2_database_1of2
.zip
-
-
unzip
linux
.x64_11gR2_database_2of2
.zip
解压完成后 cd 进入其解压后的目录database
输入命令:
cd database
使用ls命令可以查看解压后database所包含的文件,如下图:

2)执行安装,输入命令:./runInstaller


装到这一步,可以看到,可以查看到有很多的rpm包没有,这里可以通过yum安装
我这边的是操作系统:Oracle Linux 7 centos
The following packages (or later versions) must be installed:
binutils-2.23.52.0.1-12.el7.x86_64
compat-libcap1-1.10-3.el7.x86_64
gcc-4.8.2-3.el7.x86_64
gcc-c++-4.8.2-3.el7.x86_64
glibc-2.17-36.el7.i686
glibc-2.17-36.el7.x86_64
glibc-devel-2.17-36.el7.i686
glibc-devel-2.17-36.el7.x86_64
ksh
libaio-0.3.109-9.el7.i686
libaio-0.3.109-9.el7.x86_64
libaio-devel-0.3.109-9.el7.i686
libaio-devel-0.3.109-9.el7.x86_64
libgcc-4.8.2-3.el7.i686
libgcc-4.8.2-3.el7.x86_64
libstdc++-4.8.2-3.el7.i686
libstdc++-4.8.2-3.el7.x86_64
libstdc++-devel-4.8.2-3.el7.i686
libstdc++-devel-4.8.2-3.el7.x86_64
libXi-1.7.2-1.el7.i686
libXi-1.7.2-1.el7.x86_64
libXtst-1.2.2-1.el7.i686
libXtst-1.2.2-1.el7.x86_64
make-3.82-19.el7.x86_64
sysstat-10.1.5-1.el7.x86_64
一个一个的安装,命令也很简单,反正文档要求高版本也可以:
-
[
humf@localhost
data]$ su root
-
Password:
-
[
root@localhost
data]# yum install binutils
省略...
一个一个检查package,在准备阶段中漏掉的,此处再安装,有些系统报错是因为现有的包的版本比检测要高,最后右上角忽略即可
若出现yum源中没有的包,可以去镜像链接: http://mirrors.163.com/centos/下载缺少的rpm包,然后使用rpm -ivh进行安装
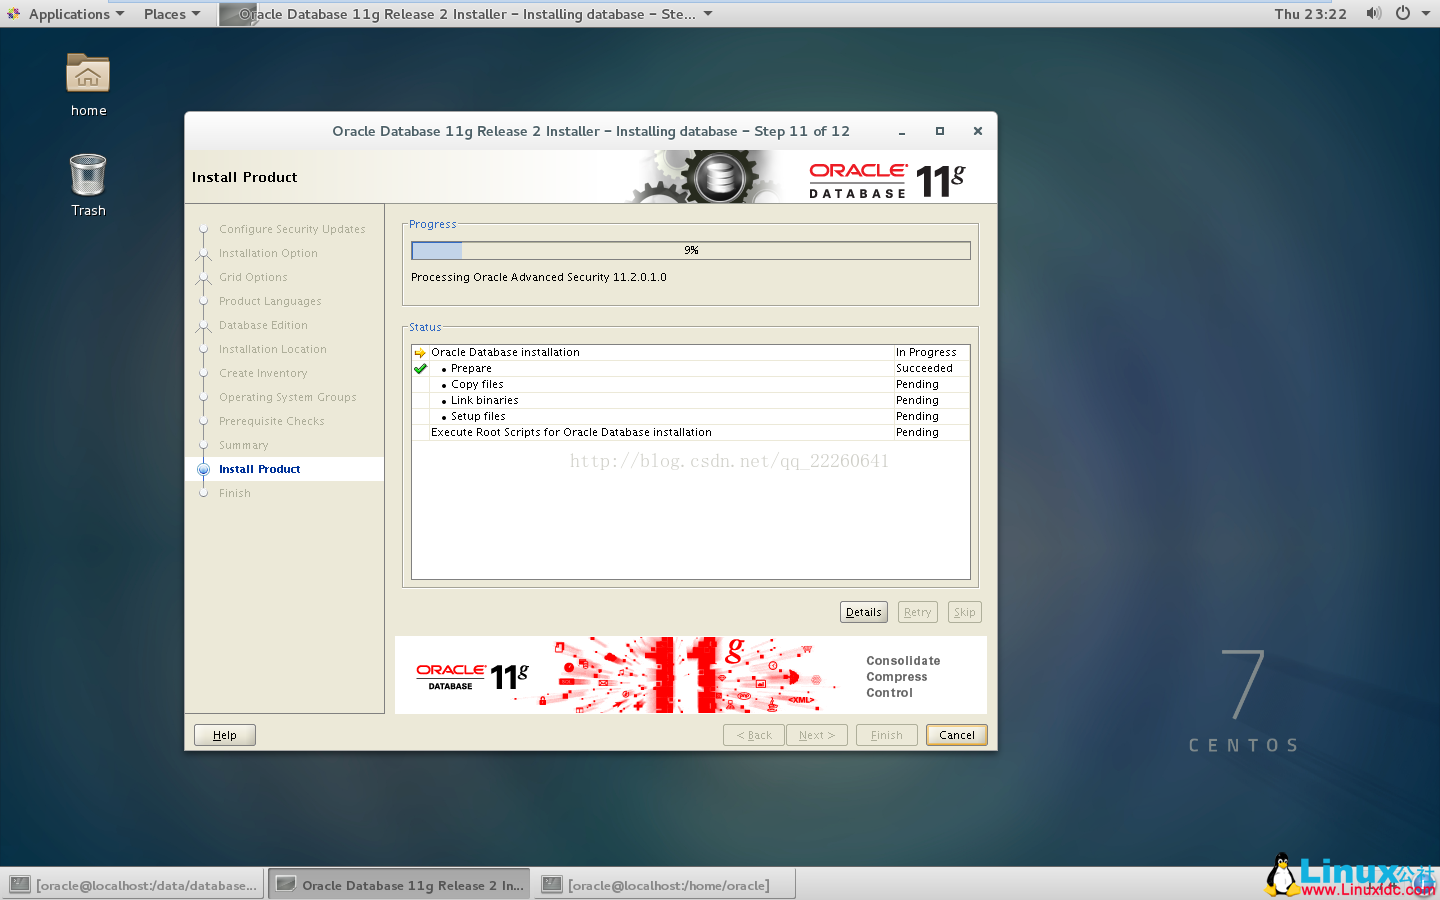
3)安装过程是一个漫长的过程,中间有几次卡住,没有出现任何画面,屏幕中间有条小线,尝试多次,发现光标在该线上,右键点击Closed,不知道关闭了啥,又能继续安装了。先装吧,到时有问题看日志
4)配置监听listener
1)执行netca 报错
-
[Oracle@localhost ~]$ netca
-
-
-
Oracle Net Services
Configuration:
-
#
-
# An unexpected error has been detected by HotSpot Virtual Machine:
-
#
-
# SIGSEGV (0xb) at pc=0x00007f69a69fcb9d, pid=8033, tid=140092892297024
-
#
-
# Java VM: Java HotSpot(TM) 64-Bit Server VM (1.5.0_17-b03 mixed mode)
-
# Problematic frame:
-
# C [libclntsh.so.11.1+0x62ab9d] snlinGetAddrInfo+0x1b1
-
#
-
# An error report file with more information is saved as hs_err_pid8033.log
-
#
-
# If you would like to submit a bug report, please visit:
-
# http://java.sun.com/webapps/bugreport/crash.jsp
-
#
-
/data/oracle/product/
11.2.
0/db_1/bin/
netca: line
178:
8033 Aborted (core dumped) $JRE $JRE_OPTIONS -classpath $CLASSPATH oracle.net.ca.NetCA $*
-
[oracle@localhost ~]$
错误原因:安装操作系统是默认主机名localhost造成错误
解决办法:
-
racle]
# cat /etc/sysconfig/network
-
# Created by anaconda
-
-
-
[root@localhost oracle]
# vi /etc/sysconfig/network #增加HOSTNAME
-
[root@localhost oracle]
# cat /etc/sysconfig/network
-
# Created by anaconda
-
HOSTNAME=odb-sonny
-
[root@localhost oracle]
# cat /etc/hosts
-
127.0.
0.
1 localhost localhost.localdomain localhost4 localhost4.localdomain4
-
::
1 localhost localhost.localdomain localhost6 localhost6.localdomain6
-
[root@localhost oracle]
# vi /etc/hosts #增加HOSTNAME
-
[root@localhost oracle]
# cat /etc/hosts
-
127.0.
0.
1 localhost localhost.localdomain localhost4 localhost4.localdomain4 odb-sonny
-
::
1 localhost localhost.localdomain localhost6 localhost6.localdomain6
-
[root@localhost oracle]
# hostname odb-sonny #执行
-
[root@localhost oracle]
#
最后注销当前oracle用户,重新登陆即可!!这次发现打开配置界面正常

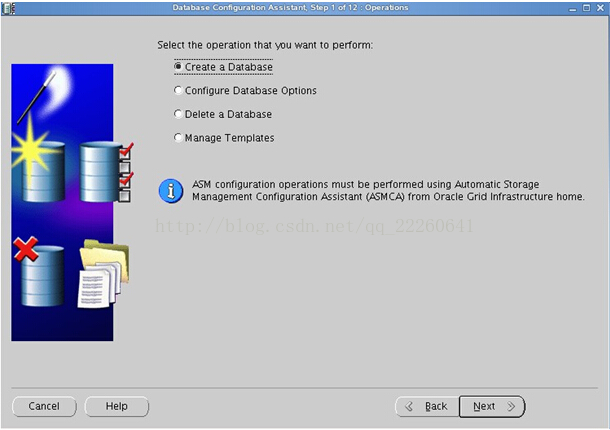
5)创建Oracle数据实例Orcl
执行dbca命令,启动oracle实例安装界面,剩下的与Windows上安装一样,不废话了:
注意:必须先创建监听,并且监听是启动中,否则报错。


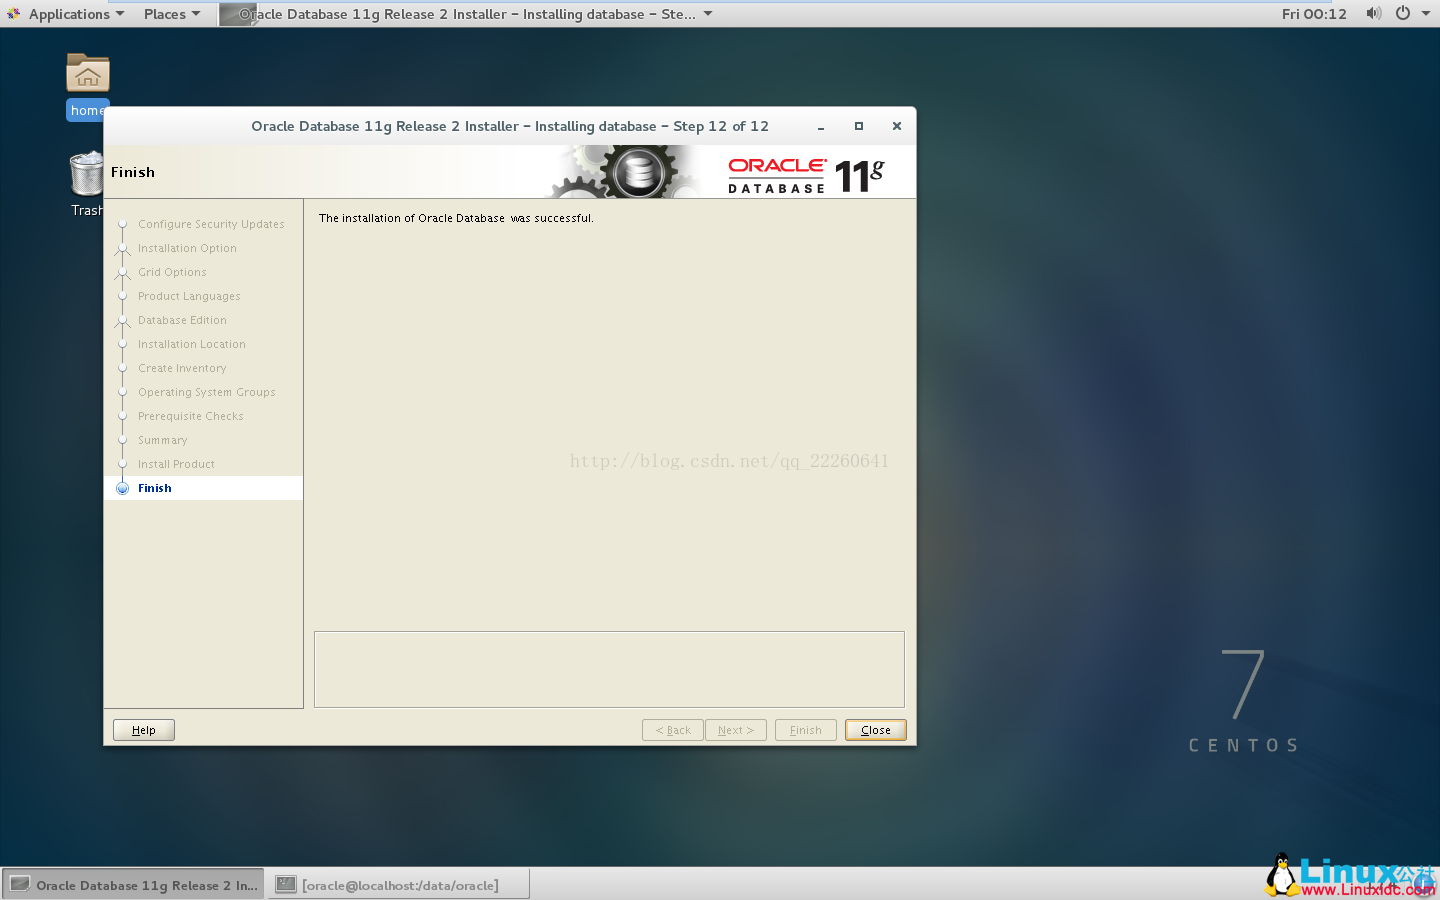
经过漫长的等待,当看到此界面,说明oracle建库完成
这样oracle服务器安装配置基本就完成了
接下来就是在~/.bashrc对oracle服务端相关环境变量进行配置:

注意:
1、Linux oracle数据库listener.ora存放路径
cd /home/oracle/app/oracle/product/11.2.0/dbhome_1/network/admin/listener.ora
2、Linux oracle数据库tnsnames.ora存放路径
cd /home/oracle/app/oracle/product/11.2.0/dbhome_1/network/admin/tnsnames.ora
3、ORACLE启动监听器
(1)切换至oracle安装用户(一般为oracle)
su - oracle lsnrctl start
lsnrctl stop
-
[
oracle@oracle ~]$ sqlplus /nolog
-
SQL*Plus: Release
11.2
.0
.1
.0 Production
on Fri Jul
27
02:
12:
12
2012
-
Copyright (c)
1982,
2009, Oracle. All rights reserved.
-
SQL> quit
测试的另一种方法:找一台windows平台电脑,telnet oracle主机IP地址:1521,通的话,会出现一个黑屏,光标一闪一闪。
5、Linux开放1521端口允许网络连接Oracle Listener
症状:
(1)TCP/IP连接是通的。可以用ping 命令测试。
(2)服务器上Oracle Listener已经启动。
lsnrctl status 查看listener状态
lsnrctl start 启动Oracle listener
(3)客户端得到的错误信息通常是:ORA-12170: TNS:连接超时
这时,我们基本可以肯定是服务器没有开放1521端口(假设你用默认设置)
解决方法:
(1)假如你是在一个局域网环境,配置了防火墙。那么可以关闭Linux的防火墙。
sudo service iptables stop
-
sudo vi /etc/sysconfig/iptables
-
-A INPUT -p tcp -
m
state --
state NEW -
m tcp --dport
1521 -j ACCEPT
-
:wq
sudo service iptables restartsudo service iptables save sudo iptables -L –nPS:如果你是云服务器,请看看自己的安全策略组有没有给1521添加
6、linux下创建oracle用户表空间
就是在已有的数据库实例上创建一个新的帐号,访问一些新的表
操作步骤如下:
(1)登录linux,以oracle用户登录(如果是root用户登录的,登录后用 su - oracle命令切换成oracle用户)
(2)以sysdba方式来打开sqlplus,命令如下: sqlplus "/as sysdba"
(3)查看我们常规将用户表空间放置位置:执行如下sql:
select name from v$datafile
CREATE TABLESPACE NOTIFYDB DATAFILE '/home/oracle/app/oradata/orcl/scsdb.dbf' SIZE 200M AUTOEXTEND ON EXTENT MANAGEMENT LOCAL SEGMENT SPACE MANAGEMENT AUTO;
CREATE USER scs IDENTIFIED BY scs DEFAULT TABLESPACE NOTIFYDB;
-
grant
connect,
resource
to scs;
-
grant
unlimited
tablespace
to scs;
-
grant
create
database
link
to scs;
-
grant
select
any
sequence,
create
materialized
view
to scs;
--经过以上操作,我们就可以使用scs/scs登录指定的实例,创建我们自己的表了


 986
986

 被折叠的 条评论
为什么被折叠?
被折叠的 条评论
为什么被折叠?
 到【灌水乐园】发言


