


安装前准备
下载所需要的所有的安装包到/tmp目录下,包括nginx1.10 , mysql 5.6.23 ,php 5. 6.25 。另外还有php的扩展包phpredis2.2.4 , mongo 1.6.14 , memcached 2.2.0 , memcache 2.2.7 。
所需要的包都在这里,需要的同学可以直接来我这下载http://download.csdn.net/detail/tt1ss3/9617899,骗点积分,哈哈哈
安装 vim
yum install - y vim安装nginx
1.创建nginx用户和组,不需要登录权限
groupadd -r nginx
useradd -s /sbin/nologin -g nginx -r nginx
2.安装所需要的编译环境(注:这个我的环境,如果编译过程缺少某些依赖包,自行安装)
yum -y install gcc gcc-c++ autoconf automake zlib zlib-devel openssl openssl-devel pcre-devel libxslt-devel.x86_643.开始编译,安装
tar -zxvf  nginx-1.10.1.tar.gz
cd nginx-1.10.1
./configure --user=nginx --group=nginx --prefix=/usr/local/nginx --with-http_dav_module --with-http_flv_module --with-http_realip_module --with-http_addition_module --with-http_xslt_module --with-http_sub_module --with-http_random_index_module --with-http_degradation_module --with-http_secure_link_module --with-http_gzip_static_module --with-http_ssl_module --with-http_stub_status_module --with-pcre  (这里添加了很多线上环境需要的配置)
make && make install
4.启动服务
/usr/local/nginx/sbin/nginx
此时nginx服务应该已经启动好了,可以用命令查看进程ps -ef | grep nginx
或端口号 netstat -nap | grep nginx 也可通过web查看,浏览器打开http://localhost
安装mysql
1.创建Mysql用户和组
groupadd -r mysql
useradd -s /sbin/nologin -g mysql -r mysql

mkdir -p /data/mysql  创建data目录
2.安装编译环境
yum -y install make gcc-c++ cmake bison-devel ncurses-devel autoconf (这里列出单独安装时所需要的依赖,跟上面有点重复)3.开始编译,安装
tar -zxvf mysql-5.6.23.tar.gz
cd mysql-5.6.23
cmake -DCMAKE_INSTALL_PREFIX=/usr/local/mysql -DMYSQL_UNIX_ADDR=/tmp/mysql.sock -DDEFAULT_CHARSET=utf8 -DDEFAULT_COLLATION=utf8_general_ci -DWITH_INNOBASE_STORAGE_ENGINE=1 -DWITH_ARCHIVE_STORAGE_ENGINE=1 -DWITH_BLACKHOLE_STORAGE_ENGINE=1 -DMYSQL_DATADIR=/data/mysql -DMYSQL_TCP_PORT=3306 -DENABLE_DOWNLOADS=1    //编译

make && make install    //安装
chown -R mysql:mysql /usr/local/mysql   //将mysql所属用户改成mysql
chown -R mysql:mysql /data/mysql        //将mysql的data目录属主改成mysql

cp /usr/local/mysql/support-files/my-default.cnf /etc/my.cnf  //复制配置文件
cp /usr/local/mysql/support-files/mysql.server /etc/init.d/mysqld //复制启动文件到/etc/init.d

/usr/local/mysql/scripts/mysql_install_db --user=mysql --basedir=/usr/local/mysql --datadir=/data/mysql  //初始化数据库
chkconfig mysqld on  //设置开机自启动

vim /etc/profile  //添加环境变量,添加
export PATH=/usr/local/mysql/bin:/usr/local/mysql/lib:$PATH

source /etc/profile  //是环境变量生效
4.启动服务
service mysqld start (或者/usr/local/mysql/bin/mysqld_safe) //启动
ps -ef | grep mysql  //查看mysql服务是否启动
netstat -nap | grep 3306 //查看mysql监听端口是否启动
mysql -uroot  //进入数据库
安装php
1.安装编译环境
yum install libjpeg* libpng.x86_64 libpng-devel.x86_64 freetype-devel.x86_64 libmcrypt-devel.x86_642.编译安装
tar -zxvf php-5.6.25.tar.gz
cd php-5.6.25
./configure --prefix=/usr/local/php --with-fpm-user=nginx --with-config-file-path=/usr/local/php/etc/ --with-fpm-group=nginx --with-mysql=/usr/local/mysql --with-mysqli=/usr/local/mysql/bin/mysql_config --enable-fpm --enable-soap --with-xmlrpc --with-openssl --with-mcrypt --with-pcre-regex --with-sqlite3 --with-zlib --with-iconv --with-bz2 --enable-calendar --with-curl --enable-dba --with-cdb --enable-dom --enable-exif --enable-fileinfo --enable-filter --with-pcre-dir --enable-ftp --with-gd --with-openssl-dir --with-jpeg-dir --with-png-dir --with-freetype-dir --enable-gd-native-ttf --enable-gd-jis-conv --with-gettext --with-gmp --with-mhash --enable-json --enable-mbstring --disable-mbregex-backtrack --with-libmbfl --with-onig --enable-pdo --with-zlib-dir --with-pdo-sqlite --with-pdo-mysql --with-readline --enable-session --enable-shmop --enable-simplexml --enable-sockets --enable-sysvmsg --enable-sysvsem --enable-sysvshm --enable-wddx --with-libxml-dir --with-xsl --enable-zip --enable-mysqlnd-compression-support --with-pear --enable-opcache --enable-inline-optimization --enable-bcmath(这里列出了我所需要的包,可根据自身情况选择,这里几乎包含了所有的包)

make && make install

cp php.ini-production /usr/local/php/etc/php.ini  //复制php.ini配置文件
ln -s /usr/local/php/etc/php.ini /etc/php.ini    //添加配置文件软链接
cp /usr/local/php/etc/php-fpm.conf.default /usr/local/php/etc/php-fpm.conf  //复制php-fpm配置文件
cp sapi/fpm/init.d.php-fpm /etc/rc.d/init.d/php-fpm //复制启动文件到/etc/init.d
chmod +x /etc/rc.d/init.d/php-fpm    //添加可执行权限
chkconfig php-fpm on                 //设置开机启动
3.修改nginx配置文件
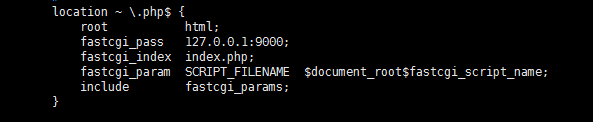
vim /usr/local/nginx/conf/nginx.conf //修改location ~ \.php$ 模块,如下图
4.启动php
service php-fpm start
添加php的扩展
添加扩展的步骤都差不多,这里就以phpredis为例
tar -zxvf 2.2.4.tar.gz
cd phpredis-2.2.4
/usr/local/php/bin/phpize
./configure --with-php-config=/usr/local/php/bin/php-config
make && make install
安装完成之后,出现下面的安装路径
/usr/local/php/lib/php/extensions/no-debug-non-zts-20131226/
vi /usr/local/php/etc/php.ini  //添加
extension="redis.so"
其中安装memcached时需要先安装依赖yum install libmemcached-devel.x86_64
- 注:源码安装太烦了,接下来要研究用脚本安装,一键安装多爽!!!!


 484
484

 被折叠的 条评论
为什么被折叠?
被折叠的 条评论
为什么被折叠?
 到【灌水乐园】发言


