


Apache Flume
一、Flume 概述
Flume是一个分布式、可靠的、高可用的高效的日志数据收集、聚合以及传输系统。它简单灵活的架构是基于数据流的、Flume是具备强大的容错保障机制、有多种容错和恢复保障。Flume使用简单可扩展的数据模型允许开发在线分析处理应用。
二、Flume架构

1、Flume Event
事件对象,被定义为数据流中的一个单元。Event数据流的有效载荷(Body)为采集到的一条记录。Event包括:Event Head、Event Body。数据本身存放在Body中,Head无内容,但是可以添加一些K-V结构的数据。
2、Flume Agent
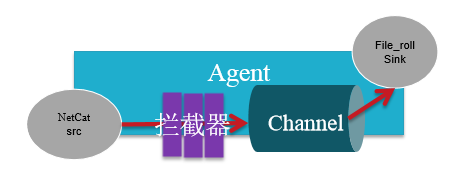
Agent实例是一个JVM进程,包含三个核心组件(Source、Channel、Sink),可以将数据从外部的系统传输到目的地进有效的存储。
3、Agent Source
Source 组件负责数据的收集、接受,并且将数据封装为Event(Head/Body)发送给Channel组件。
4、Agent Channel
类似于一个写缓存,本质上是Event队列(符合队列的先进先出FIFO),将数据传送到Sink组件
5、Agent Sink
负责Channel组件中的Event最终的处理,将采集到的数据保存到指定的外部存储系统中。
三、配置文件简单样例示范
http://flume.apache.org/releases/content/1.9.0/FlumeUserGuide.html
1、配置文件的语法
简单样例 -- Simple.conf
# example.conf: A single-node Flume configuration
# Name the components on this agent

# 指agent有一个source组件名字叫做r1
agent名称.sources = r1
# 指agent有一个sink组件名字叫做k1
agent名称.sinks = k1
# 指agent有一个channel组件名字叫做c1
agent名称.channels = c1

# Describe/configure the source
# 一个source组件的相关配置说明 配置根据不同的需求更换不同的source
agent名称.sources.r1.type = netcat
agent名称.sources.r1.bind = localhost
agent名称.sources.r1.port = 44444

# Describe the sink
# 一个sink组件的相关配置说明  logger指将采集到的数据一日志的形式sink到控制台窗口
# 配置根据不同的需求更换不同的Sink
agent名称.sinks.k1.type = logger

# Use a channel which buffers events in memory
# 配置根据不同的需求更换不同的Channel
agent名称.channels.c1.type = memory
agent名称.channels.c1.capacity = 1000
agent名称.channels.c1.transactionCapacity = 100

# Bind the source and sink to the channel
# 连接
agent名称.sources.r1.channels = c1
agent名称.sinks.k1.channel = c1
2、环境搭建
# 将flume解压到Linux系统中
[root@hadoop ~]# tar -zxf apache-flume-1.7.0-bin.tar.gz -C /usr
[root@hadoop ~]# cd /usr/apache-flume-1.7.0-bin/
3、简单练习操作(Simple Example)
配置文件(Source-netcat、Sink-logger、Channel-memory)
# example.conf: A single-node Flume configuration
# Name the components on this agent
a1.sources = r1
a1.sinks = k1
a1.channels = c1

# Describe/configure the source
a1.sources.r1.type = netcat
a1.sources.r1.bind = localhost
a1.sources.r1.port = 44444

# Describe the sink
a1.sinks.k1.type = logger

# Use a channel which buffers events in memory
a1.channels.c1.type = memory
a1.channels.c1.capacity = 1000
a1.channels.c1.transactionCapacity = 100

# Bind the source and sink to the channel
a1.sources.r1.channels = c1
a1.sinks.k1.channel = c1
启动Flume
# bin/flume-ng agent -n $agent_name -c conf -f conf/flume-conf.properties.template
# a1 Agent名字 在控制台输出日志
bin/flume-ng agent --conf conf --conf-file conf/simple.conf --name a1 -Dflume.root.logger=INFO,console
开启Windows Telnet客户端方法

在Linux操作系统中安装Telnet客户端
[root@hadoop ~]# yum install telnet
通过Linux Telnet客户端向Flume的Source发送数据
# 启动Flume
[root@hadoop ~]# cd /usr/apache-flume-1.7.0-bin/
[root@hadoop apache-flume-1.7.0-bin]#  bin/flume-ng agent --conf conf --conf-file conf/simple.conf --name a1 -Dflume.root.logger=INFO,console
# 启动客户端发送
[root@hadoop ~]# telnet hadoop 44444
Trying 192.168.60.141...
Connected to hadoop.
Escape character is '^]'.
hello wordld
OK
hello Flume
OK
# 接受到的数据
2019-11-11 05:34:30,208 (SinkRunner-PollingRunner-DefaultSinkProcessor) [INFO - org.apache.flume.sink.LoggerSink.process(LoggerSink.java:95)] Event: { headers:{} body: 68 65 6C 6C 6F 20 77 6F 72 64 08 6C 64 0D       hello wordld. }
2019-11-11 05:34:36,826 (SinkRunner-PollingRunner-DefaultSinkProcessor) [INFO - org.apache.flume.sink.LoggerSink.process(LoggerSink.java:95)] Event: { headers:{} body: 68 65 6C 6C 6F 20 46 6C 75 6D 65 0D             hello Flume. }
四、常用的Source类型
1 - Avro Sourcet
type – The component type name, needs to be avro
bind – hostname or IP address to listen on
port – Port # to bind to
Avro实际上是Hadoop生态体系中一个用来进行对象序列化和反序列化的框架。
Avro Source可以启动一个Avro Server接受来自于Avro Client发送的请求数据,类似于Netcat
# 定义source名字 r1 Channel名字 c1
a1.sources = r1
a1.channels = c1
#定义source配置
a1.sources.r1.type = avro
a1.sources.r1.bind = 192.168.60.141
a1.sources.r1.port = 33333
#连接 source和channel组件
a1.sources.r1.channels = c1
测试
# 准备一个文件 splits.txt
[root@hadoop ~]# vi splits.txt
hello
word
thank you
...
# 以 Avro的配置 启动Flume
[root@hadoop apache-flume-1.7.0-bin]#  bin/flume-ng agent --conf conf --conf-file conf/avro.conf --name a1 -Dflume.root.logger=INFO,console
# 在另一台虚拟机上启动 Avro客户端 发送文件数据
[root@hadoop apache-flume-1.7.0-bin]# bin/flume-ng avro-client --host 192.168.60.141 --port 33333 --filename /root/splits.txt
# 接受到的数据
2019-11-11 05:56:35,082 (SinkRunner-PollingRunner-DefaultSinkProcessor) [INFO - org.apache.flume.sink.LoggerSink.process(LoggerSink.java:95)] Event: { headers:{} body: 68 65 6C 6C 6F                                  hello }
2019-11-11 05:56:35,082 (SinkRunner-PollingRunner-DefaultSinkProcessor) [INFO - org.apache.flume.sink.LoggerSink.process(LoggerSink.java:95)] Event: { headers:{} body: 77 6F 72 64                                     word }
2019-11-11 05:56:35,082 (SinkRunner-PollingRunner-DefaultSinkProcessor) [INFO - org.apache.flume.sink.LoggerSink.process(LoggerSink.java:95)] Event: { headers:{} body: 74 68 61 6E 6B 20 79 6F 75                      thank you }
2 - Exec Source
type – The component type name, needs to be exec
command – The command to execute
Exec将Linux的操作指令的执行结果作为数据来源。
a1.sources = r1
a1.sources.r1.type = exec
# 执行的指令
a1.sources.r1.command = tail -f /usr/apache-flume-1.7.0-bin/access.log
测试
# 先创建一个文件
[root@hadoop apache-flume-1.7.0-bin]# vi access.log
# 以 exec.conf 启动
[root@hadoop apache-flume-1.7.0-bin]#  bin/flume-ng agent --conf conf --conf-file conf/exec.conf --name a1 -Dflume.root.logger=INFO,console
# 启动后会先读取 access.log 文件中已经存在的内容 然后实时接受文件改变
2019-11-11 06:09:20,785 (SinkRunner-PollingRunner-DefaultSinkProcessor) [INFO - org.apache.flume.sink.LoggerSink.process(LoggerSink.java:95)] Event: { headers:{} body: 68 65 6C 6C 6F 20 77 6F 72 6C 64                hello world }
2019-11-11 06:09:20,785 (SinkRunner-PollingRunner-DefaultSinkProcessor) [INFO - org.apache.flume.sink.LoggerSink.process(LoggerSink.java:95)] Event: { headers:{} body: 74 68 61 6E 6B 20 79 6F 75                      thank you }
2019-11-11 06:09:20,785 (SinkRunner-PollingRunner-DefaultSinkProcessor) [INFO - org.apache.flume.sink.LoggerSink.process(LoggerSink.java:95)] Event: { headers:{} body: 61 72 65 20 79 6F 75 20 6F 6B                   are you ok }
# 在另一台虚拟机上 对 access.log 进行操作
[root@hadoop apache-flume-1.7.0-bin]# echo 'nihao'>> access.log
[root@hadoop apache-flume-1.7.0-bin]# echo 'nihao'>> access.log
[root@hadoop apache-flume-1.7.0-bin]# echo 'nihao'>> access.log
[root@hadoop apache-flume-1.7.0-bin]# echo 'xxxx'>> access.log
3 - Spooling Directory Source
type – The component type name, needs to be spooldir.
spoolDir – The directory from which to read files from.
spooling driectory 将Linux文件系统中某一个目录中文本文件的内容作为数据来源。数据目录中数据文件的内容一旦采集完成,数据文件会自动重命名为
.COMPLETED
a1.sources = r1
a1.sources.r1.type = spooldir
# 要采集的 文件目录
a1.sources.r1.spoolDir = /root/data
a1.sources.r1.fileHeader = true
测试
# 先准备好要采集的目录的文件
[root@hadoop data]# ls
test1.log  test2.log
# 以 spooling.conf 启动Flume
[root@hadoop apache-flume-1.7.0-bin]# bin/flume-ng agent --conf conf --conf-file conf/spooling.conf --name a1 -Dflume.root.logger=INFO,console
# 采集结果
2019-11-11 06:22:28,250 (SinkRunner-PollingRunner-DefaultSinkProcessor) [INFO - org.apache.flume.sink.LoggerSink.process(LoggerSink.java:95)] Event: { headers:{} body: 61 61                                           aa }
2019-11-11 06:22:28,251 (SinkRunner-PollingRunner-DefaultSinkProcessor) [INFO - org.apache.flume.sink.LoggerSink.process(LoggerSink.java:95)] Event: { headers:{} body: 62 62                                           bb }
.......
4 - Kafka Source [重点]
type – org.apache.flume.source.kafka.KafkaSource
kafka.bootstrap.servers – List of brokers in the Kafka cluster used by the source
kafka.topics – Comma-separated list of topics the kafka consumer will read messages from.
kafka.topics.regex – Regex that defines set of topics the source is subscribed on. This property has higher priority than kafka.topics and overrides kafka.topics if exists.(定义源订阅的主题集的正则表达式。此属性比KAFKA主题具有更高的优先级,并且如果存在,则覆盖KAFKA主题。)
tier1.sources.source1.type = org.apache.flume.source.kafka.KafkaSource
tier1.sources.source1.type = org.apache.flume.source.kafka.KafkaSource
tier1.sources.source1.batchSize = 5000
tier1.sources.source1.batchDurationMillis = 2000
tier1.sources.source1.kafka.bootstrap.servers = localhost:9092
tier1.sources.source1.kafka.topics = test1, test2
tier1.sources.source1.kafka.consumer.group.id = custom.g.id
5 - NetCat Source
type – The component type name, needs to be netcat
bind – Host name or IP address to bind to
port – Port # to bind to
Netcat常使用于测试环境,启动服务,通过TCP/IP协议客户端发送请求数据,进行采集
a1.sources = r1
a1.sources.r1.type = netcat
a1.sources.r1.bind = 0.0.0.0
a1.sources.r1.port = 6666
**测试 – 参看上方的Simple Example **
五、常用Channel类型
1 - Memory Channel (内存)
type – The component type name, needs to be memory
使用内存存储Event事件,使用Memory存放数据可能会造成数据丢失
a1.channels = c1
a1.channels.c1.type = memory
a1.channels = c1
a1.channels.c1.type = memory
# 通道中最多存储的 Event数
a1.channels.c1.capacity = 10000
#  通道从一个源获取的最大事件数
a1.channels.c1.transactionCapacity = 10000
# 定义字节之间的缓冲区百分比和信道中所有事件的估计总大小,以考虑报头中的数据
a1.channels.c1.byteCapacityBufferPercentage = 20
# 允许的最大总字节数作为该通道中所有事件的总和,将此值设置为0将导致此值回落到大约200 GB的硬内部限制
a1.channels.c1.byteCapacity = 800000
2 - JDBC Channel
type – The component type name, needs to be jdbc
将Event存储到一个内嵌的数据库Derby中,不支持其他的数据库产品
a1.channels = c1
a1.channels.c1.type = jdbc
3 - Kafka Channel
type – The component type name, needs to be org.apache.flume.channel.kafka.KafkaChannel
kafka.bootstrap.servers – List of brokers in the Kafka cluster used by the channel This can be a partial list of brokers, but we recommend at least two for HA. The format is comma separated list of hostname:port
事件存储在kafka集群中(必须单独安装)。Kakfa提供高可用性和复制,因此在代理或kafka代理崩溃的情况下,事件立即可用于其他接收器。
Kafka Channel可以用于多种场景:
1 .With Flume source and sink - 它提供了一个可靠的和高可用的事件通道
2.With Flume source and interceptor but no sink - 它允许将flume事件写入kafka主题,供其他应用程序使用
3.With Flume sink, but no source - 将事件从kafka发送到flume sink(如hdfs、hbase或solr)是一种低延迟、容错的方法
a1.channels.channel1.type = org.apache.flume.channel.kafka.KafkaChannel
a1.channels.channel1.kafka.bootstrap.servers = kafka-1:9092,kafka-2:9092,kafka-3:9092
a1.channels.channel1.kafka.topic = topic01
a1.channels.channel1.kafka.consumer.group.id = flume-consumer
4 - File Channel
type – The component type name, needs to be file.
将Event存储到本地文件系统的文件中
a1.channels = c1
a1.channels.c1.type = file
# 存储 checkpoint 文件的目录
a1.channels.c1.checkpointDir = /mnt/flume/checkpoint
# 以逗号分隔的用于存储日志文件的目录列表。在多个磁盘上使用多个目录可以提高文件通道性能
a1.channels.c1.dataDirs = /mnt/flume/data
5 - Spillable Memory Channel
type – The component type name, needs to be SPILLABLEMEMORY
内存溢写的Channel,当内存中存放的Event达到阈值会自动溢写到磁盘进行存储
a1.channels = c1
a1.channels.c1.type = SPILLABLEMEMORY
a1.channels = c1
a1.channels.c1.type = SPILLABLEMEMORY
# 存储队列中存储的最大事件数。若要禁用内存内队列的使用,请将其设为零
a1.channels.c1.memoryCapacity = 10000
# 溢出磁盘(即文件通道)中存储的最大事件数。若要禁用溢出,请将其设置为零
a1.channels.c1.overflowCapacity = 1000000
# 内存中允许的最大字节数,作为内存队列中所有事件的总和。 将此值设置为0将导致此值回落到大约200 GB的硬内部限制
a1.channels.c1.byteCapacity = 800000
a1.channels.c1.checkpointDir = /mnt/flume/checkpoint
a1.channels.c1.dataDirs = /mnt/flume/data
禁用内存队列和函数的使用,如文件通道:
a1.channels = c1
a1.channels.c1.type = SPILLABLEMEMORY
a1.channels.c1.memoryCapacity = 0
a1.channels.c1.overflowCapacity = 1000000
a1.channels.c1.checkpointDir = /mnt/flume/checkpoint
a1.channels.c1.dataDirs = /mnt/flume/data
禁用溢出磁盘的使用和纯粹作为内存通道的功能
a1.channels = c1
a1.channels.c1.type = SPILLABLEMEMORY
a1.channels.c1.memoryCapacity = 100000
a1.channels.c1.overflowCapacity = 0
六、常用Sink类型
1 - HDFS Sink
type – The component type name, needs to be hdfs
hdfs.path – HDFS directory path (eg hdfs://namenode/flume/webdata/)
将数据保存到HDFS中进行持久化存储
a1.sinks.k1.type = hdfs
a1.sinks.k1.hdfs.path = /flume/events/%y-%m-%d/%H%M/%S
a1.sinks = k1
a1.sinks.k1.type = hdfs
a1.sinks.k1.hdfs.path = /flume/events/%y-%m-%d/%H%M/%S
a1.sinks.k1.hdfs.filePrefix = events-
a1.sinks.k1.hdfs.round = true
a1.sinks.k1.hdfs.roundValue = 10
a1.sinks.k1.hdfs.roundUnit = minute
出现异常:Caused by: java.lang.NullPointerException: Expected timestamp in the Flume event headers, but it was null
解决方案:给Event事件对象添加TimeStamp时间戳信息,拦截器(interceptor)
# Describe/configure the source
a1.sources.r1.type = netcat
a1.sources.r1.bind = 192.168.12.129
a1.sources.r1.port = 44444
a1.sources.r1.interceptors = i1
a1.sources.r1.interceptors.i1.type = timestamp
★ HDFS Sink 默认采用SequenceFile的文件格式存放采集到的数据,如果需要保存数据的真实内容,需要将fileType修改为DataStream
2 - Hive Sink
type – The component type name, needs to be hive
hive.metastore – Hive metastore URI (eg thrift://a.b.com:9083 )
hive.database – Hive database name
hive.table – Hive table name
serializer - 序列化程序负责从事件中解析字段并将它们映射到HIVE表中的列。序列化器的选择取决于事件中数据的格式。支持的序列化器:分隔和JSON
serializer.fieldnames - 从输入字段到配置单元表中的列的映射。指定为配置单元表列名称的逗号分隔列表(无空格),按其出现顺序标识输入字段。若要跳过字段,请保留未指定的列名。例如,‘time,ip,message’ 表示HIVE表中输入映射到时间、IP和消息列的第一个、第三个和第四个字段。
# Example Hive table
create table weblogs ( id int , msg string )
    partitioned by (continent string, country string, time string)
    clustered by (id) into 5 buckets
    stored as orc;
a1.channels = c1
a1.channels.c1.type = memory
a1.sinks = k1
a1.sinks.k1.type = hive
a1.sinks.k1.channel = c1
a1.sinks.k1.hive.metastore = thrift://127.0.0.1:9083
a1.sinks.k1.hive.database = logsdb
a1.sinks.k1.hive.table = weblogs
a1.sinks.k1.hive.partition = asia,%{country},%y-%m-%d-%H-%M
a1.sinks.k1.useLocalTimeStamp = false
a1.sinks.k1.round = true
a1.sinks.k1.roundValue = 10
a1.sinks.k1.roundUnit = minute
a1.sinks.k1.serializer = DELIMITED
a1.sinks.k1.serializer.delimiter = "\t"
a1.sinks.k1.serializer.serdeSeparator = '\t'
a1.sinks.k1.serializer.fieldnames =id,,msg
3 - Logger Sink
type – The component type name, needs to be logger
将数据最终输出到控制台窗口 以
INFO级别日志的形式进行展示
a1.sinks = k1
a1.sinks.k1.type = logger
4 - Avro Sink
type – The component type name, needs to be avro.
hostname – The hostname or IP address to bind to.
port – The port # to listen on.>将数据 通过Avro Client发送给指令的Avro Server,支持将多个Flume Agent串联构成一个数据采集服务集群

将数据 通过Avro Client发送给指令的Avro Server,支持将多个Flume Agent串联构成一个数据采集服务集群
a1.sinks.k1.type = avro
a1.sinks.k1.hostname = 10.10.10.10
a1.sinks.k1.port = 4545
5 - File Roll Sink
type – The component type name, needs to be file_roll.
sink.directory – The directory where files will be stored
将数据保存到本地文件系统中
a1.sinks = k1
a1.sinks.k1.type = file_roll
a1.sinks.k1.sink.directory = /var/log/flume
6 - Null Sink
type – The component type name, needs to be null.
输出黑洞 丢弃所有的从Channel中接受的数据
a1.sinks = k1
a1.sinks.k1.type = null
7 - HBaseSink
type – The component type name, needs to be hbase
table – The name of the table in Hbase to write to.
columnFamily – The column family in Hbase to write to.
serializer – 默认org.apache.flume.sink.hbase.SimpleHbaseEventSerializer
将采集到的数据保存到HBase中存储
a1.sinks = k1
a1.sinks.k1.type = hbase
a1.sinks.k1.table = foo_table
a1.sinks.k1.columnFamily = bar_cf
a1.sinks.k1.serializer = org.apache.flume.sink.hbase.RegexHbaseEventSerializer
8 - ElasticSearchSink
type – The component type name, needs to be org.apache.flume.sink.elasticsearch.ElasticSearchSink
hostNames – Comma separated list of hostname:port, if the port is not present the default port ‘9300’ will be used
将采集到的数据保存ElasticSearch集群
a1.sinks = k1
a1.sinks.k1.type = elasticsearch
a1.sinks.k1.hostNames = 127.0.0.1:9200,127.0.0.2:9300
a1.sinks.k1.indexName = foo_index
a1.sinks.k1.indexType = bar_type
a1.sinks.k1.clusterName = foobar_cluster
a1.sinks.k1.batchSize = 500
a1.sinks.k1.ttl = 5d
# 默认值
a1.sinks.k1.serializer = org.apache.flume.sink.elasticsearch.ElasticSearchDynamicSerializer
9 - Kafka Sink
type – Must be set to org.apache.flume.sink.kafka.KafkaSink
kafka.bootstrap.servers – List of brokers Kafka-Sink will connect to, to get the list of topic partitions This can be a partial list of brokers, but we recommend at least two for HA. The format is comma separated list of hostname:port
将采集到的数据保存到Kafka Cluster中进行存储,Kafka对接计算框架Flink、Spark或者数据清洗进行MapReduce计算
a1.sinks.k1.type = org.apache.flume.sink.kafka.KafkaSink
# 有默认值 default-flume-topic
a1.sinks.k1.kafka.topic = mytopic
a1.sinks.k1.kafka.bootstrap.servers = localhost:9092
# 一个批处理要处理多少条消息。较大的批处理可以提高吞吐量,同时增加延迟。默认值 100
a1.sinks.k1.kafka.flumeBatchSize = 20
# 在成功写入消息之前,必须确认消息的副本数。接受的值为0(从不等待确认)、1(仅等待leader)、-1(等待所有副本)将此设置为-1,以避免在某些leader失败的情况下丢失数据。
a1.sinks.k1.kafka.producer.acks = 1
a1.sinks.k1.kafka.producer.linger.ms = 1
# snappy  是一个 C++ 的用来压缩和解压缩的开发包
a1.sinks.k1.kafka.producer.compression.type = snappy
Other Kafka Producer Properties - 这些属性用于配置Kafka生产者。可以使用任何由kafka支持的producer属性。唯一的要求是用前缀
kafka.producer.准备属性名称 example:kafka.producer.linger.ms
七、综合使用案例(拦截器、Channel Seletor、Sink Group)

1、多Sources Agent案例
有多个Sources采集数据,将多个sources对接到一个Channel组件,然后在对接Sink进行输出

新建 manySources.conf 配置文件
mple.conf: A single-node Flume configuration
# Name the components on this agent
a1.sources = r1 r2
a1.sinks = k1
a1.channels = c1
# Describe/configure the source
# 两个sources 都是netcat Source类型  可以用其他的Source类型组合
a1.sources.r1.type = netcat
a1.sources.r1.bind = 192.168.60.141
a1.sources.r1.port = 44444
a1.sources.r2.type = netcat
a1.sources.r2.bind = 192.168.60.141
a1.sources.r2.port = 55555
# Describe the sink
# 在控制台输出 也可以选择其他Sink
a1.sinks.k1.type = logger
# Use a channel which buffers events in memory
# Memory Channel 内存
a1.channels.c1.type = memory
a1.channels.c1.capacity = 1000
a1.channels.c1.transactionCapacity = 100
# Bind the source and sink to the channel
a1.sources.r1.channels = c1
a1.sinks.k1.channel = c1
a1.sources.r2.channels = c1
测试
# 以多Sources文件启动
[root@hadoop apache-flume-1.7.0-bin]# bin/flume-ng agent --conf conf --conf-file conf/manySources.conf --name a1 -Dflume.root.logger=INFO,console
# 在另外的两台虚拟机上 启动两个客户端  并发送数据

# 第一台虚拟机
[root@hadoop conf]# telnet hadoop 44444
Trying 192.168.60.141...
Connected to hadoop.
Escape character is '^]'.
aaaaa
OK

# 第二台虚拟机
[root@hadoop ~]# telnet hadoop 55555
Trying 192.168.60.141...
Connected to hadoop.
Escape character is '^]'.
bbbbb
OK
# 结果展示
2019-11-11 08:32:10,258 (SinkRunner-PollingRunner-DefaultSinkProcessor) [INFO - org.apache.flume.sink.LoggerSink.process(LoggerSink.java:95)] Event: { headers:{} body: 61 61 61 61 61 0D                               aaaaa. }
2019-11-11 08:32:14,259 (SinkRunner-PollingRunner-DefaultSinkProcessor) [INFO - org.apache.flume.sink.LoggerSink.process(LoggerSink.java:95)] Event: { headers:{} body: 62 62 62 62 62 0D                               bbbbb. }
2、拦截器(Flume Interceptors)
作用于Source,按照设定的顺序对event装饰或者过滤
(1)基本拦截器的案例
a1.sources.r1.type = netcat
a1.sources.r1.bind = 192.168.60.141
a1.sources.r1.port = 44444
a1.sources.r1.interceptors = i1 i2 i3
# 添加静态数据 k-v结构
a1.sources.r1.interceptors.i1.type = static
a1.sources.r1.interceptors.i1.key = datacenter
a1.sources.r1.interceptors.i1.value = beijing
# 添加主机iP
a1.sources.r1.interceptors.i2.type = host
# 添加时间戳
a1.sources.r1.interceptors.i3.type = timestamp
测试
# simpleInterceptor.conf 启动
[root@hadoop apache-flume-1.7.0-bin]# bin/flume-ng agent --conf conf --conf-file conf/simpleInterceptor.conf --name a1 -Dflume.root.logger=INFO,console
#  再另外一台虚拟机上启动客户端 并发送数据
[root@hadoop conf]# telnet hadoop 44444
Trying 192.168.60.141...
Connected to hadoop.
Escape character is '^]'.
hello
OK
# 接受到的数据
2019-11-11 08:56:49,861 (SinkRunner-PollingRunner-DefaultSinkProcessor) [INFO - org.apache.flume.sink.LoggerSink.process(LoggerSink.java:95)] Event: {
headers:{host=192.168.60.141, datacenter=beijing, timestamp=1573433809855}
body: 68 65 6C 6C 6F 0D                               hello. }
(2)、基于正则过滤的拦截器(Regex Filtering Interceptor)
type – The component type name has to be regex_filter
regex ”.*”(default) Regular expression for matching against events
# 拦截以Info开头的数据
a1.sources.r1.type = netcat
a1.sources.r1.bind = 192.168.60.141
a1.sources.r1.port = 44444
a1.sources.r1.interceptors = i1
a1.sources.r1.interceptors.i1.type = regex_filter
a1.sources.r1.interceptors.i1.regex = ^INFO.*$
(3)、基于正则抽取的拦截器(Regex Extractor Interceptor)
type – The component type name has to be regex_extractor
regex – Regular expression for matching against events
serializers – 用于将匹配项映射到Head名称并序列化它们的值
Space-separated list of serializers for mapping matches to header names and serializing their values. (See example below) Flume provides built-in support for the following serializers: org.apache.flume.interceptor.RegexExtractorInterceptorPassThroughSerializer org.apache.flume.interceptor.RegexExtractorInterceptorMillisSerializer
a1.sources.r1.type = netcat
a1.sources.r1.bind = 192.168.60.141
a1.sources.r1.port = 44444
# 拦截器的名称
a1.sources.r1.interceptors = i1
a1.sources.r1.interceptors.i1.type=regex_extractor
# 提取 从开头开始 到  第一个空格结束的内容 作为Head中value的值
a1.sources.r1.interceptors.i1.regex = ^(\\w*)\\s.*$
# r1 source名称
a1.sources.r1.interceptors.i1.serializers = r1
# head 中 Key的名字
a1.sources.r1.interceptors.i1.serializers.r1.name = type
(4)、基于时间戳的拦截器(Timestamp Interceptor)
type – The component type name, has to be timestamp or the FQCN
headerName - timestamp(Default) The name of the header in which to place the generated timestamp.
preserveExisting - false(Default) If the timestamp already exists, should it be preserved - true or false
a1.sources.r1.interceptors = i1
a1.sources.r1.interceptors.i1.type = timestamp
(5)、基于主机名的拦截器(Host Interceptor)
type – The component type name, has to be host
preserveExisting false(默认) If the host header already exists, should it be
preserved - true or false
useIP true(默认) Use the IP Address if true, else use hostname.
hostHeader host(默认) The header key to be used.
a1.sources.r1.interceptors = i1
a1.sources.r1.interceptors.i1.type = host
(6)、静态拦截器(Static Interceptor)
type – The component type name, has to be static
key key(默认) Name of header that should be created
value value(默认) Static value that should be created
a1.sources = r1
a1.sources.r1.interceptors = i1
a1.sources.r1.interceptors.i1.type = static
a1.sources.r1.interceptors.i1.key = datacenter
a1.sources.r1.interceptors.i1.value = NEW_YORK
(7)、基于UUID的拦截器(UUID Interceptor)
type – The component type name has to be org.apache.flume.sink.solr.morphline.UUIDInterceptor$Builder
headerName id(默认) The name of the Flume header to modify
preserveExisting true(默认) If the UUID header already exists, should it be preserved - true or false
a1.sources.r1.interceptors = i1
a1.sources.r1.interceptors.i1.type=org.apache.flume.sink.solr.morphline.UUIDInterceptor$Builder
3、通道选择器(Flume Channel Selectors)
允许Source基于预设的从所有的通道中选择一个或者多个
(1)基于复制的通道选择器-Replicating Channel Selector (default)

selector.type replicating(默认) The component type name, needs to be replicating
selector.optional – Set of channels to be marked as optional
a1.sources = r1
a1.channels = c1 c2
a1.sources.r1.selector.type = replicating
# c1 c2 类型
a1.channels.c1.type = memory
a1.channels.c1.capacity = 1000
a1.channels.c1.transactionCapacity = 100
a1.channels.c2.type = memory
a1.channels.c2.capacity = 1000
a1.channels.c2.transactionCapacity = 100
# 连接通道
a1.sources.r1.channels = c1 c2
(2)基于分发的通道选择器-Multiplexing Channel Selector

selector.type replicating(默认) The component type name, needs to be multiplexing
selector.header flume.selector.header
a1.sources.r1.type = netcat
a1.sources.r1.bind = 192.168.12.129
a1.sources.r1.port = 44444
a1.sources.r1.interceptors = i1
#  基于正则表达式截取的拦截器
a1.sources.r1.interceptors.i1.type= regex_extractor
a1.sources.r1.interceptors.i1.regex = ^(\\w*)\\s.*$
a1.sources.r1.interceptors.i1.serializers = s1
a1.sources.r1.interceptors.i1.serializers.s1.name = level

a1.sources.r1.selector.type = multiplexing
a1.sources.r1.selector.header = level
# 开头是ERROR的走c1
a1.sources.r1.selector.mapping.ERROR = c1
# 开头是INFO 的走c2
a1.sources.r1.selector.mapping.INFO = c2
# 其他的走c2通道
a1.sources.r1.selector.default = c2

# Describe the sink
# sink1 以日志形式控制台打出
a1.sinks.k1.type = logger
# Sink2 写入文件
a1.sinks.k2.type = file_roll
a1.sinks.k2.sink.directory = /root/fileRoll

# Use a channel which buffers events in memory
a1.channels.c1.type = memory
a1.channels.c1.capacity = 1000
a1.channels.c1.transactionCapacity = 100

a1.channels.c2.type = memory
a1.channels.c2.capacity = 1000
a1.channels.c2.transactionCapacity = 100

# Bind the source and sink to the channel
a1.sources.r1.channels = c1 c2
# c1 连接Sink1
a1.sinks.k1.channel = c1
# c2 连接Sink2
a1.sinks.k2.channel = c2
4、Sink Group
(1)、基于LoadBalance的Sink Group-Load balancing Sink Processor
processor.sinks – Space-separated list of sinks that are participating in the group
processor.type default The component type name, needs to be load_balance
a1.sinkgroups = g1
a1.sinkgroups.g1.sinks = k1 k2
a1.sinkgroups.g1.processor.type = load_balance
# 如果失败的Sinks按指数级后退。默认false
a1.sinkgroups.g1.processor.backoff = true
# 选择机制。必须是从AbstractSinkSelector继承的自定义类的round_robin, random或fqcn (默认round_robin)
a1.sinkgroups.g1.processor.selector = random
八、日志切割
通常情况,日志切割会按照每天进行处理
1、日志切割的shell脚本
[root@hadoop nginx]# vi nginx.sh
#!/bin/bash
#设置日志文件存放目录
logs_path="/usr/local/nginx/logs"
#设置pid文件
pid_path="/usr/local/nginx/logs/nginx.pid"
#重命名日志文件
mv ${logs_path}/access.log  /usr/local/nginx/history/access_$(date -d "yesterday" +"%Y-%m-%d-%H:%M").log
#向nginx主进程发信号重新打开日志 信号量
kill -USR1 `cat ${pid_path}`
2、修改shell脚本操作权限
[root@hadoop nginx]# chmod u+x nginx.sh
3、添加linux操作系统的调度任务(定时脚本)
# cron表达式: 秒 分 时 日 月 周 年
# linux支持5位cron表达式  从分开始
# 每隔3分钟触发一次  0/3 * * * *
# 每天晚上的凌晨1点0分触发一次  0 1 * * *
[root@hadoop nginx]# crontab -e
0/3 * * * * /usr/local/nginx/nginx.sh


 314
314


 被折叠的 条评论
为什么被折叠?
被折叠的 条评论
为什么被折叠?
 到【灌水乐园】发言


