


关于Java Mail 方面demo网上有不少例子,大部分都是随便凑合着能看,不够详细,当然也有一部分写得很好,根据网上查阅的资料和自己思路的整合,简单封装了下,使其易懂易用,如有不足之处,还请大家反馈,我加以改正。
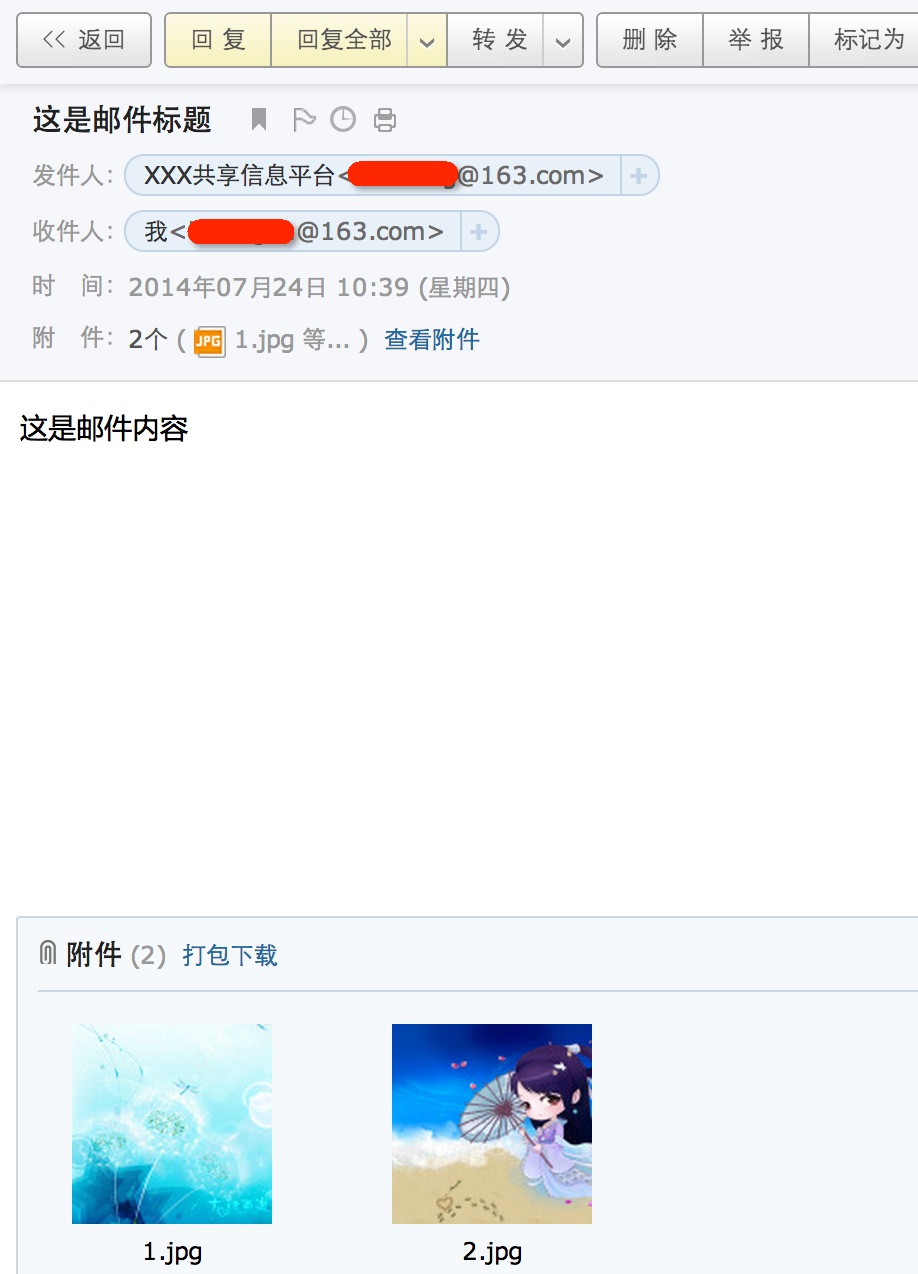
第一部分:功能预览
下面直接上代码:
	/**
	 * 测试发送邮件
	 *
	 * @param args
	 */
	public static void main(String[] args) {
		// 1、设置收件人,必填项(数组,支持过个收件人)
		String[] to = { "aa@163.com","bb@163.com" };
		// 2、设置邮件标题,必填项
		String title = "这是邮件标题";
		// 3、设置邮件内容,必填项(支持HTML格式与普通文本格式)
		String content = "这是邮件内容";

		// 4、实例化邮件发送工具类(有三个构造函数)
		MailUtils m = new MailUtils();
		// 5、发送邮件
		if (m.send(to, title, content)) {
			System.out.println("发送成功~");
		} else {
			System.out.println("发送失败~");
		}
	}
上面代码分为两部分:1、邮件基本信息设置(步骤1、2、3);2、发送邮件(步骤4、5)。经过上面两个部分即可发送邮件。
第二部分:发件设置
当然发件人是我配置好的,自定义配置发件人请看下面代码:
	/**
	 * 构造函数一(使用默认发送设置)
	 */
	public MailUtils() {

	}
	/**
	 * 构造函数二(指定发送设置)
	 * @param host
	 * @param userName
	 * @param password
	 */
	public MailUtils(String host, String userName, String password) {
		this.host = host;
		this.userName = userName;
		this.password = password;
	}
	/**
	 * 构造函数三(指定发送设置)
	 *
	 * @param host
	 * @param userName
	 * @param password
	 * @param nick
	 * @param auth
	 */
	public MailUtils(String host, String userName, String password,
			String nick, boolean auth) {
		this.host = host;
		this.userName = userName;
		this.password = password;
		this.nick = nick;
		this.auth = auth;
	}
上面代码是一个简单封装好的邮件发送类 MailUtils 。
其中“构造函数二”是个简单配置发件人的构造,只需要配置三项:1、邮件服务器地址;2、发件人用户名;3、发件人密码。
如果还需要配置发件人的昵称、身份验证,则使用“构造函数三”即可。
下面看下发件人信息设置代码:
	/**
	 * 邮件发送设置(邮件服务器、发件人)
	 *
	 * @throws AddressException
	 * @throws MessagingException
	 */
	private void setMailInfo() throws AddressException, MessagingException {
		Properties props = new Properties();
		if(this.isProxy){
			props.setProperty("proxySet", "true");
			props.setProperty("socksProxyHost", this.socksProxyHost);
	        props.setProperty("socksProxyPort", this.socksProxyPort);
		}

		// 邮件服务器地址
		props.put("mail.smtp.host", this.host);
		// 发件人账号
		props.put("mail.user", this.userName);
		// 发件人密码
		props.put("mail.password", this.password);
		// 是否需要身份验证
		props.put("mail.smtp.auth", auth ? "true" : "false");

		// 创建Session实例
		Session session = null;
		if (auth) {
			// 构建授权信息,进行SMTP身份验证
			Authenticator authenticator = new Authenticator() {
				@Override
				protected PasswordAuthentication getPasswordAuthentication() {
					return new PasswordAuthentication(userName, password);
				}
			};
			session = Session.getDefaultInstance(props, authenticator);
		} else {
			session = Session.getDefaultInstance(props);
		}

		// 创建邮件消息
		message = new MimeMessage(session);

		// 设置发件人
		if (nick != null && !nick.equals("")) {	// 如果昵称不为空,则设置昵称
			// 设置昵称
			try {
				nick = MimeUtility.encodeText(nick);
				message.setFrom(new InternetAddress(nick + " <" + this.userName + ">"));
			} catch (UnsupportedEncodingException e) {
				e.printStackTrace();
			}
		} else {
			// 设置发件人
			message.setFrom(new InternetAddress(this.userName));
		}

		// 设置发送日期
		message.setSentDate(new Date());
}上面代码包含以下设置信息:
1、设置邮件代理服务器信息(非必填须,后面细说这个)
2、设置邮件服务器地址(必填项)
3、设置发件人用户名(必填项)
4、设置发件人密码(必填项)
5、身份验证(非必填项,据邮件服务器厂商而定)
6、设置发件人与其昵称(非必填项)
7、设置发送日期(非必填项)
推荐使用“构造函数三”,若没太多需求,使用构“造函数二”即可满足需求。
下面看下邮件代理,有些网络环境稍微复杂点儿,比如在一个封闭的内网中,若想发邮件必须通过一个可以连接外面的代理服务器来实现,设置代理服务器信息必须在发送邮件之前,次步骤非必须,依情况而定。下面看代码:
	/**
	 * 设置邮件代理服务器
	 * @param socksProxyHost
	 * @param socksProxyPort
	 */
	public void setProxy(String socksProxyHost, String socksProxyPort){
		this.isProxy = true;
		this.socksProxyHost = socksProxyHost;
		this.socksProxyPort = socksProxyPort;
	}
第三部分:收件人以及邮件内容设置
此mail demo,支持多收件人、多附件,邮件内容可以是HTML,也可以是普通文本。
下面直接上代码:
	/**
	 * 发送邮件(构造方法一)
	 * @param to
	 * @param title
	 * @param content
	 * @return
	 */
	public boolean send(String[] to, String title, String content) {
		return send(to, title, content, null);
	}
	/**
	 * 发送邮件(构造方法二)
	 * @param to
	 * @param title
	 * @param content
	 * @param filePath
	 * @return
	 */
	public boolean send(String[] to, String title, String content, String[] filePath) {
		boolean result = false;

		try {
			// 邮件发送设置(邮件服务器、发件人)
			setMailInfo();

			// 设置邮件标题
			message.setSubject(title);

			// 设置邮件内容体
			message.setContent(getContent(content,filePath));

			// 设置接收者(多个接收者)
			Address[] address = new Address[to.length];
			for (int i = 0; i < to.length; i++) {
				address[i] = new InternetAddress(to[i]);
			}
			/* 正常(Message.RecipientType.TO)
			 * 抄送(Message.RecipientType.CC)
			 * 密送(Message.RecipientType.BCC)
			 */
			message.addRecipients(Message.RecipientType.TO, address);

			// 发送邮件
			Transport.send(message);

			result = true;
		} catch (AddressException e) {
			e.printStackTrace();
		} catch (MessagingException e) {
			e.printStackTrace();
		}

		return result;
	}
若不需要附件,用send的“构造方法一”即可满足。
在send的“构造方法二”中可以看到,我封装了两个其它方法:
方法1、
// 邮件发送设置(邮件服务器、发件人)
setMailInfo();
此方法上面已经讲过,封装邮件发送设置。
// 设置邮件内容体
message.setContent(getContent(content,filePath)); /**
* 构造邮件内容体
* @param content
* @param filePath
* @return
* @throws MessagingException
*/
private MimeMultipart getContent(String content, String[] filePath) throws MessagingException{
// 构造邮件内容体
MimeMultipart mmp = new MimeMultipart();
// 设置邮件的内容体
BodyPart bodyPart = new MimeBodyPart();
bodyPart.setContent("<meta http-equiv=Content-Type content=text/html; charset=UTF-8>" + content, "text/html;charset=UTF-8");
mmp.addBodyPart(bodyPart);
// 添加多个附件
if (filePath != null) {
FileDataSource fileds;
File file;
for (int i = 0; i < filePath.length; i++) {
bodyPart = new MimeBodyPart();
file = new File(filePath[i]);
if(!file.exists()){
continue;
}
fileds = new FileDataSource(file);
// 添加附件
bodyPart.setDataHandler(new DataHandler(fileds));
// 设置附件名称
bodyPart.setFileName(fileds.getName());
// 把附件添加到 MimeMultipart
mmp.addBodyPart(bodyPart);
}
}
return mmp;
}在这里我们用了一个对象来封装邮件内容与、附件
// 构造邮件内容体
MimeMultipart mmp = new MimeMultipart();当然,设置邮件内容有很多构造方法有兴趣的可以多了解下
// 设置邮件内容体
message.setContent();
第四部分,小结:
简单的说,Java Mail 发邮件demo包含两个部分而已如下:
1、发送设置
2、邮件内容设置
下面附上一个完整的测试方法:
		/******************| 发送设置 |*****************/
		// 邮件服务器地址
		String host = "smtp.163.com";
		// 发件人用户名
		String userName = "ab@163.com";
		// 发件人密码
		String password = "123456";
		// 发件人昵称
		String nick = "XXX共享信息平台";
		// 是否需要权限验证
		boolean auth = true;
		// 实例化邮件发送工具类(有三个构造函数)
		MailUtils mu = new MailUtils(host, userName, password, nick, auth);

		/******************| 设置代理 |*****************/
		// 代理服务器地址
		String socksProxyHost = "192.168.168.168";
		// 代理服务器端口
		String socksProxyPort = "1080";
		mu.setProxy(socksProxyHost, socksProxyPort);


		/******************| 邮件内容设置 |*****************/
		// 1、设置收件人,必填项(数组,支持过个收件人)
		String[] to = { "aa@163.com","bb@163.com" };
		// 2、设置邮件标题,必填项
		String title = "这是邮件标题";
		// 3、设置邮件内容,必填项(支持HTML格式与普通文本)
		String content = "这是邮件内容";
		// 4、设置附件,选填项(数组,支持多附件)
		String[] filePath = {"/Users/qmxl/1.jpg","/Users/qmxl/22.jpg"};
		// 5、发送邮件
		if (mu.send(to, title, content,filePath)) {
			System.out.println("发送成功~");
		} else {
			System.out.println("发送失败~");
		}
注:
1、如果附件中包含中文字符(附件路径获取者附件名称,需用UTF-8编码)
	/**
	 * 适配路径
	 * (处理编码过的路径,兼容window,linux,mac)
	 * @param filePath
	 * @return
	 */
	public static String adapterPath(String filePath){
		try {
			File f =new File(filePath);
			if(!f.exists()){
				filePath = URLDecoder.decode(filePath,"UTF-8");
			}
		} catch (UnsupportedEncodingException e) {
			e.printStackTrace();
		}
		return filePath;
	}
2、使用邮件代理的方式本人没有测试过,理论上可行,还个还请用到的童鞋自行尝试~~
附上整个demo下载地址:
CSDN:http://download.csdn.net/detail/u010019941/7671783
百度网盘:http://pan.baidu.com/s/1mgyXwIc
JavaMail1_4_6下载地址:http://pan.baidu.com/s/1hqpChb2
下面看下效果


 713
713

 被折叠的 条评论
为什么被折叠?
被折叠的 条评论
为什么被折叠?
 到【灌水乐园】发言


